To replace the clutch cable on a VAZ-2112, you need to drive the car onto an inspection hole or overpass. If this is not possible, then you can simply raise the left side of the car on a jack. But the latter replacement method will be less convenient. Also, in this case, you will need to put the car on the handbrake, and put a beam under the rear wheels so that the car does not move while the work is being carried out.
Replacing the clutch cable of a VAZ-2110
This procedure is simple and will not take much time.
- It is recommended to remove the windshield wiper and frill, this makes access easier, but you can do without it.
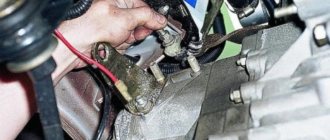
- There is a mounting bracket on the gearbox; you need to pull the cable out of it. To do this, you need 2 “19” keys, which are used to loosen the cable fixing nuts. The tension weakens and the cable can simply be removed from the mount.
- While holding the clutch fork, release the cable from it.
- You need to unhook the cable from the clutch pedal.
- The clutch pedal protective cover can be easily unscrewed with a Phillips screwdriver. This can be done if the frill and windshield wiper are removed. Without removing them, you can get to the support bracket (which is the next step) from the interior in an awkward position, raising the clutch pedal all the way.
- Use a screwdriver to pick up and pull out, together with the cable, the locking bracket that secures the cable head to the pedal.
- Use a 10 key to unscrew the support plate.
- You need to evaluate the integrity of the bushing on which you will put the new cable. If it is severely worn, it requires replacement.
- Installing a new cable is done in the reverse order.
- The cable requires lubrication; the ideal option would be a grease that protects against freezing.
- The final step is adjusting the pedal. The distance between the pedal and the floor should be 125-130 mm. To begin with, the clutch pedal should be at the same level as the others. Loosen the cable fastening nuts on the gearbox bracket. Using the adjusting nuts, the new position is adjusted: the lock nut is unscrewed to the maximum distance, and the second one is unscrewed until the pedal moves freely. The rubber bushing slides up to the fork. The locknut is tightened.
This completes the installation.
Adjustment is an important step when replacing the clutch cable. Replacing the cable is a simple procedure; if all stages are performed correctly, gear shifting will occur smoothly and comfortably for the driver
Purpose of the cable and its place in the device
VAZ 2112 cars have a mechanical drive; it is installed on passenger cars of the VAZ family and not only, which are equipped with low-power power units. This type of drive compares favorably with others due to its very simple design and low cost of production. In addition, the mechanical drive is easy to repair and maintain because it contains a minimum number of necessary elements, see photo below:
Schematic design of a mechanical clutch
- As can be seen from the diagram, the main element of the mechanical drive is represented by a flexible cable enclosed in a shell
- The clutch pedal is located inside the car and is connected to the lever (clutch fork) through a flexible cable.
- At the junction of the fork and the cable there is an adjustment device, which is designed to regulate the free play of the pedal
- The operation of the drive is incredibly simple: the driver presses the pedal
- This sets the VAZ 2112 clutch cable in motion, which pulls the lever device
- This device (fork) moves the release bearing along the guide
- The release bearing presses on the legs (petals) of the basket
- Thus, the clutch is disengaged
Dismantling
Next, you need to remove the old cable, which will allow you to install a new element of the clutch system. The sequence of work will be as follows:
- Remove the windshield wiper from your "ten".
- Loosen the locknut and adjusting nut slightly.
- Remove the rim of the damaged cable from the clutch release fork.
- Slightly move the cover of the lower end of the cable casing using a 17 wrench.
- At the same time, you need to loosen the nut securing the tip to the bracket. The tip must be held with a second key of 17, which will prevent turning.
- Remove the required tip from the bracket.
- The windshield wiper mechanism bracket is held on by 2 nuts that need to be unscrewed. Plus, dismantle the bracket itself directly.
- Do not forget that during reassembly, the bracket must be installed with the inclined part towards the front of the car.
- Now you tighten the screw that secures the protective cover and remove its holder.
- Bend the cover a little, which will allow you to reach the fastening of the cable tip to the pedal responsible for the clutch.
- Using a flathead screwdriver, pry and remove the support bracket from the “finger”, and then remove the cable end from it.
- The next step is to remove the bolt securing the cable holder to the pedal bracket. This way you will finally be able to pull the damaged cable through the interior.
- But that's not all. Remove the bushing from the pedal pin.
- If the bushing is broken or worn out, be sure to replace it with a new one. But keep in mind that the design stipulates that the sleeve is cut. Therefore, this is not a defect that arose during operation, but the manufacturer’s idea.
A few notes
Taking advantage of the fact that you have climbed quite deep into the inside of the car, you can carry out some additional actions so as not to return to this in the near future.
- It is advisable to change the release bearing along with the clutch;
- You also need to check the clutch paddles and the clutch basket itself. If there is significant wear, do not be lazy to replace them, otherwise in the near foreseeable future you will have to climb into the hole again;
- The driven disk must be centered
. It would be good to use a special mandrel for this purpose. If this is not available, you need to at least select a wooden round of the required size. When the basket fasteners are tightened, if the alignment is done correctly, the mandrel (or its substitute) should come out without any effort. But don’t fall out on your own.
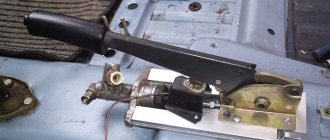
Clutch pedal adjustment
This procedure is essential for proper operation of the vehicle. It only takes a few steps to adjust:
- The car must be placed on a flat surface with the hand brake applied;
- Disconnect the negative terminal from the battery;
- You can evaluate the parameters of the clutch stroke using a school ruler, setting it perpendicular to the floor and pedal; if the value is 160 mm or more, then it needs to be adjusted;
- under the hood from below you need to find the place where the cable with the pedal is attached;
- there are 2 nuts at the end, the first one needs to be unscrewed as much as possible, and the second one needs to be tightened to the level of 120 - 130 mm;
- Now you should depress the clutch pedal 3-4 times and check the indicators; if re-adjustment is not required, then you need to tighten the nuts back.
Done, the new clutch cable of the VAZ 2110 is installed and the pedal is adjusted. The vehicle is ready for use.
Shifting gears without clutch
Not every driver of a VAZ 2110 imagines how to not only start, but also drive a car without using the clutch pedal. Of course, this skill is very specific, but it can be vitally important when the clutch cable breaks at the most inopportune moment.
The easiest way is to start the car in first gear, first pressing the gas pedal halfway. After turning the ignition, the car will immediately move off with a very noticeable jerk, so be extremely careful when trying to start it this way. Similarly, we turn on the reverse gear.
Driving for a long time in first gear can cause the engine to overheat. If there is a considerable distance to be covered, it is better to learn how to shift higher gears without using the clutch, for which:
- release the gas pedal and, at the moment of least resistance, switch off the gear, moving the transmission lever to the neutral position;
- then engage the next gear, continuing acceleration.
The proposed algorithm for downshifting in the event of a non-working clutch requiring replacement is somewhat different:
- Having switched to neutral gear, we revise the throttle, thereby increasing the speed of the input shaft;
- and only then switch to a lower gear.
Causes of wear
The main reason for the breakdown of this element is long-term operation of the VAZ 2110 car in poor conditions. For example, a car is stuck in a snowdrift, the driver has to accelerate frequently, which affects the condition of the part.
Separately, it should be said about the correct operation of the machine. With a sharp start at high speeds or with regular movement, when your foot is on the clutch pedal, which causes slipping, this is also a wear factor. Operational reasons are not the only ones. Cable wear may occur earlier than expected due to the following factors:
- low quality cable installation;
- Carrying out repair work with many mistakes;
- ignoring the first signs indicating a breakdown.
Every factor must be taken into account to avoid unexpected damage and expense.
Contacting the service station
You will have to pay for the service, but this has its advantages:
- As for the cost, most service stations have reasonable pricing;
- all manipulations are carried out by highly qualified craftsmen with long experience;
- the process uses modern equipment and tools;
- Only new spare parts are installed;
- fast service times;
- quality assurance.
All these advantages indicate that you should not save money on car repairs if the driver does not know how to change the clutch cable on a VAZ 2110 car yourself.
Lada 2110 Original Style › Logbook › Replacing the clutch cable of a VAZ 2110
Hello everyone, the other day, while driving into the garage in the evening, my clutch cable broke near the gearbox flag. Fortunately, spare parts for VAZs are available everywhere and always.
This is a tired topic, I think everyone knows how to change it. I will try to focus on a high-quality photo report and problematic issues, maybe it will help beginners.
1) Unscrew the cable on the box:
2) Unscrew the small 10mm bolt on the pedal assembly:
To disconnect the cable itself from the pedal, you can go in two ways: - suffer and try to do it from below, from the passenger compartment (but if you are tall and large, you simply cannot get there); - or throw off the wipers, frill, wiper drive and get to clutch pedal inspection hatch.
I went the second way, which was more normal for me.
3) Remove the wipers, frill:
4) In the distance you can see the clutch pedal inspection hatch cover:
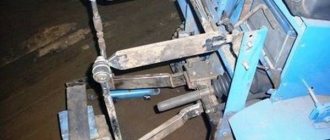
5) But it’s impossible to get to it, so we remove the wiper drive mechanism (trapezoid)
, which is quite not easy, how to do it and how to pull it out, here is the article remont-vaz2110.ru/zamena-…pecii-stekloochistitelya/It is secured with two nuts on top and one hidden bolt on the bottom. Unfasten the rubber fastening of the expansion tank and remove it to the side. And there will be this third point (bolt) for attaching the trapezium of the wipers (link above to the article). The trapezoid itself:
6) The clutch pedal hatch cover itself is secured with two self-tapping screws on the sides (photo from the Internet). Unscrewing is not convenient, be patient:
7) When it is removed, remove the locking plate that holds the cable itself to the pedal:
We check the integrity of the plastic bushing and be sure to lubricate it during further assembly. As far as I understand, there should be a slot, it is not a crack. In all photos it comes with a slot:
9) Pull the cable into the cabin, check the integrity of the seal of the hole in the body:
10) Drop oil into the new hose:
11) Lubricate the eye of the cable that fits onto the pedal through the plastic sleeve with lithol/solidol:
12) We put everything back together exactly the same way we took it apart.
We adjust the tension of the clutch cable on the box flag. To begin with, so that the clutch pedal is level with the brake pedal. And then you adjust the nuts in different directions: the clutch will engage earlier or later.
Issue price: 100 UAH Mileage: 59,000 km
Final Setup Steps
- continue rotating the adjusting nut until we are sure that the brake lever has a full stroke of approximately 3 clicks (this operation is convenient to perform with two people - one person rotates the nut, and the second checks the handbrake);
- after checking the working stroke, you need to tighten the locknut while holding the adjusting nut with a wrench;
- now you need to check whether the handbrake cable is not too tight: the parking brake lever goes down, the rear wheels are jacked up and turned by hand - they should rotate evenly, without delays;
- if the lever travel is still large, then we continue to tighten the adjusting nut (or unscrew it if the cable is too tight) and regularly check the handbrake travel until it reaches 3 clicks and the brake pads do not interfere with the rotation of the wheels.
After adjusting the system, you should check its operation. To do this, the driver needs to place his car on a section of the road with a slope of 23% and raise the parking brake lever. If the car is securely fixed on the road and does not move, this means that the work was carried out correctly.
Stories from our readers
“Fucking basin. "
Hi all! My name is Mikhail, now I’ll tell you a story about how I managed to exchange my two-wheeler for a 2010 Camry. It all started with the fact that I began to be wildly irritated by the breakdowns of the two-wheeler, it seemed like nothing serious was broken, but damn it, there were so many little things that really started to irritate me. This is where the idea arose that it was time to change the car to a foreign car. The choice fell on the melting Camry of the tenth years.
Yes, I had matured morally, but financially I just couldn’t handle it. I’ll say right away that I am against loans and taking a car, especially not a new one, on credit is unreasonable. My salary is 24k a month, so collecting 600-700 thousand is almost impossible for me. I started looking for different ways to make money on the Internet. You can’t imagine how many scams there are, what I haven’t tried: sports betting, network marketing, and even the volcano casino, where I successfully lost about 10 thousand ((The only direction in which it seemed to me that I could make money was currency trading on the stock exchange, they call it Forex. But when I started delving into it, I realized that it was very difficult for me. I continued to dig further and came across binary options. The essence is the same as in Forex, but it’s much easier to understand. I started reading forums, studying trading strategies. I tried it on a demo account, then opened a real account. To be honest, I didn’t manage to start earning money right away, until I understood all the mechanics of options, I lost about 3,000 rubles, but as it turned out, it was a precious experience. Now I earn 5-7 thousand rubles a day. I managed to get the car buy after half a year, but in my opinion this is a good result, and it’s not about the car, my life has changed, I naturally quit my job, I have more free time for myself and my family. You’ll laugh, but I work directly on the phone)) If If you want to change your life like me, then here’s what I advise you to do right now: 1. Register on the site 2. Practice on a Demo account (it’s free). 3. As soon as you get something on the Demo account, top up your REAL ACCOUNT and go to REAL MONEY! I also advise you to download the application to your phone, it’s much more convenient to work from your phone. Download here.
In the store I ask jokingly that I need a clutch cable for a ten, which will never break! They answer me: change the car. I bought a clutch cable for a VAZ 2110 in Balakovo. Of all, he was the most expensive.
You can replace dozens of clutch cables in various ways:
- Remove the frill and the windshield wiper (to make it easier to get to the attachment of the cable end to the clutch pedal)
- Without removing the frill (method for those who are able to take the lotus position)
The standard instructions for replacing the VAZ 2110 clutch cable involve removing the frill and windshield wiper, but I decided to take the shortcut and not disassemble anything.
Also, after replacing the cable, the clutch needs to be adjusted.
Replacing the VAZ 2110 clutch cable without removing the frill
We unscrew the clutch cable fastening using a 19 key. Next, you need to remove the cable tip from the clutch release fork, but since the cable was torn, there was no need to remove anything
In fact, replacing the VAZ 2110 clutch cable with your own hands is quite simple. I did this procedure for the first time. The replacement was carried out in the winter outside in the evening with a flashlight in hand. I spent 2 hours replacing the clutch cable. I spent most of my time in the pedal area when removing and installing the cable.
Adjusting the clutch pedal VAZ 2110
The clutch pedal travel (all the way to the mat) should be 125mm (+-5mm). The maximum permissible pedal stroke is 160 mm. To adjust the clutch, you need to unscrew or tighten nut No. 2, after completing the adjustment, tighten lock nut No. 1. Tighten the rubber washer as much as possible to the fork.
You can adjust the clutch so that the pedal is lower than the brake pedal, then it will grab almost immediately after the pedal leaves the floor. If you make the clutch pedal high (higher than the brake pedal), then when you lower the clutch it will grab almost at the very end. A pedal that is too high can accelerate wear on the basket.
Replace the clutch cable on the “ten” yourself..
Let's start replacing
As you know, there are two ways to replace the clutch cable on a VAZ 2112, with and without removing the frill and wiper. Which one is faster is a moot point; without removing it, it seems to be faster, but then when installing the cable in place, a lot of inconvenience arises, so I recommend leaving the method without removing the frill to yoga. The standard instructions included with the car require their removal, therefore:
- Carry out work on a cooled engine.
- Disconnect (just in case) the battery terminals
- Take off the frill, don't be lazy
- Unscrew the wiper so it doesn't interfere
- We unscrew the nuts that secure the clutch cable in the bracket on the VAZ 2112 using two 19mm wrenches (twist one, hold the other)
- After this, remove the cable from the bracket
- Then you need to disconnect the cable end from the fork
- If the cable breaks, there may be nothing left to remove
- After this, use a screwdriver to unscrew the protective cover covering the clutch pedal.
- And remove the casing
- Unhook the bracket that secures the cable end to the pedal
- To make this easier, you need to raise the pedal as much as possible and use a screwdriver to pry out the clip
- Since we removed the frill, it is now much more convenient to remove the bracket from under the hood
- From the interior, using the “8” key, unscrew the bolt that secures the thrust plate of the upper cable tip
- In the image below, the steering column was removed for clarity; in general, replacing the clutch cable on a VAZ 2112 does not require removing the column
- Then we pull out this support plate
- Pull the cable into the cabin
- Now push the new cable under the hood from inside
- After this, replacing the VAZ 2112 clutch cable in the reverse order of disassembly
- You can coat the inside of the cable with engine or transmission oil
- For lubrication in the winter season or closer to it, grease is better, as is used in CV joints
- Just keep in mind that it is most difficult for her to lubricate the cable from the inside.
- As you can see, replacing the clutch cable on a VAZ 2112 is quick and easy, all that remains is adjustment, which you shouldn’t forget about
Advice from professionals
A vehicle breakdown causes a lot of inconvenience and requires unexpected cash costs. To prevent such situations, it is recommended to take the advice of professionals.
- Carry out technical inspections of your vehicles regularly. This manipulation will allow us to identify future breakdowns and eliminate malfunctions at an early stage of development.
- Respond promptly to emerging signs. Do not operate a vehicle with worn parts.
- When making repairs, use only new and high-quality spare parts.
- Once again, spend a little and entrust the work to qualified mechanics if you don’t know how to remove the clutch cable of a VAZ 2110.
- To extend the life of the clutch cable, systematically lubricate it with a special substance using a syringe provided for this procedure. This feature will prevent chafing of the element.
Carefully monitor the condition of your car. Timely maintenance will extend the life of the vehicle.
Close Window.
Signs of breakdown
Maintenance of the VAZ 2110 clutch cable must be carried out as soon as the first signs of wear are detected. This is necessary so that the malfunction does not take the driver by surprise. If the clutch cable of a VAZ 2110 car breaks, then the following signs will indicate this.
- Stiff pedal. If the driver feels that it has become more difficult to press the pedal, then you should contact a service station. Otherwise, the cable will burst, the pedal will fail and will not return to its original position. As a result, it is impossible to operate transport.
- Slipping. In other words, independent gear shifting. If the cable is faulty, this is quite likely. If the car is in neutral gear, it can move away.
- No switching. If the cable is broken, the clutch will not engage, which means the gears will not shift.
- Other symptoms. For example, there is a leak, then you need to inspect the cable, it is probably torn or disconnected. There may also be jerking, the car jerking forward.
Knowledge of such symptoms of a malfunction will protect the driver from possible emergency situations while driving and will allow you to quickly replace the VAZ 2110 clutch cable with your own hands.
Loading, Please Wait!
This may take a second or two.
Hi all! We continue to mock the car, and this time we will make the clutch pedal softer and quieter.
I think many owners of tens and other front-wheel drive VAZs have noticed that the clutch pedal becomes tighter over time and a squeak appears. There may be several reasons for this, and I want to talk about the fight against one of them. In search of the cause of the tight pedal and creaking, I took the easy way and first tried to lubricate the cable and boss, which naturally did not bring any effect.
Having eliminated the cable, I moved on. The cause of a tight pedal and squeaking is the friction that occurs between the bushings and the axis of the clutch release fork. This happens because over time the lubricant loses its properties.
The main source of the problem is the lower bushing, since it is metal, and as you know, metal slides without lubrication with great reluctance, with the risk of scuffing, etc.
i.e. with excess friction. The upper bushing is plastic and even without lubrication the axle glides well in it.
This is what these bushings look like.
Thus, the main task is to lubricate the lower bushing. Ideally, you would have to remove the box, replace both bushings with new ones and fill them with fresh grease. But since we have enough more important things to do, throwing away the box in vain was not part of my plans. I decided to implement an improvement that I learned about a long time ago, but as always, I never got around to it.
The essence of the modification is to drill a hole in the plastic bushing of the clutch fork axis, and then lubricate both bushings through this hole.
It all sounds very simple, and in reality the same thing happens. Next in order: We remove the air filter box so that it does not interfere. We find this very bushing. And it is located at the checkpoint, strictly under the thermostat.
We drill a hole in it with a diameter of about three millimeters so that the nose of the syringe can fit through. By the way, in order to reach the bushing, you will need a fairly long drill. You can probably try to drill a short one, but the wiring harness and CO pipes will get in the way. You need to drill until the drill rests on the fork axis.
Then we fill the syringe with oil, I used transmission oil, and slowly pour it into the hole. The oil will not go away quickly, because...
The bushing fits tightly to the axle.
To speed up the process, you can slightly lift the bushing (as far as the latches will allow) by prying it around the perimeter with a screwdriver.
You need quite a lot of oil so that it flows along the axis and properly lubricates the lower bushing. I poured about thirty cubes, there is no need to be afraid of overdoing it, the excess will simply flow out. You can plug the hole using a screw.
If you suddenly need to lubricate the bushings again, this can be done by simply unscrewing the screw.
After the procedure has been completed, we get behind the wheel, squeeze the clutch and almost have time to get upset, because nothing has changed. But We don’t give up, we press the clutch five or ten times again, and on the next press the pedal falls down with less effort and without the nasty squeak.
Conclusions:
After lubrication, I finally got rid of the annoying squeaking noise and the clutch pedal became much softer. The feeling can be compared to replacing the clutch with a new one.
PEACE to everyone, like and share the post with friends
, this is another modification for the VAZ from the
MUST HAVE category!
Issue price: 50 ₽ Mileage: 179,800 km.
Important points when replacing the cable
Unscrewing the fastener
- As practice shows, the procedure for replacing a cable on a “ten” begins in the engine compartment. You are required to hold the fork and at the same time pull the cable that is removed from the fork.
- Then the cable fastener is removed from the bracket, which is located on the gearbox. Having completed this procedure, we go into the interior and dismantle the damaged element, that is, the cable.
- The result of the repair is influenced not only by the quality of the new cable, but also by the correctness of the entire replacement procedure.
- If you are dealing with a “ten” from an experimental industrial batch, then the bracket will be presented as a bolt with a Phillips-head screwdriver. To dismantle such a fastening element, you cannot use a regular screwdriver. A special shortened tool will be required.
- If the cable breaks while driving, you can unscrew the bracket with a handy tool, but through the safety block.
- It is strongly recommended to replace the non-standard bolt with a regular one, which can be unscrewed with a simple wrench.
- Be sure to keep a set of tools in your car, since it is extremely rare for a cable to break at the right moment. There is hardly a right moment for any kind of machine breakdown.
Checking status
Normal PT adjustment ensures that the vehicle is held on a slope. This corresponds to 3-8 clicks of the handle on newer nines or 5-7 clicks on a VAZ 2109 produced before 1995.
To carry out the test, follow a few simple steps:
- Find a slope that has about 25 degrees;
- Turn the handbrake to the required position;
- If the car starts to roll, the handbrake does not hold, adjustment is required;
- If there is no such slope nearby, the check is carried out in a garage;
- Place the car on a flat surface, raise the handbrake handle all the way;
- Approach from behind and try to push the car with maximum force;
- If the car begins to move, the RT requires adjustment;
- Check the operation of the handbrake at 2 clicks on newer versions of the VAZ 2109 and not reaching 5 clicks on versions before 1995. If the handbrake is working at full strength, the cable will be tightened. It will also need to be adjusted.
Operating a car with a tightened PT cable is also dangerous, as this leads to overheating and wear of the rear brake pads.
Adjustment
To adjust the PT cable you will need a pit, overpass or lift. Next we proceed according to the following algorithm.
- Raise the handbrake handle 2-3 clicks from the passenger compartment.
- Get under the car and loosen the locking nut of the parking brake cable equalizer. Before doing this, it is better to treat the nut with a wire brush to remove all dirt.
- Then act according to the circumstances. If the cable is overtightened, it must be loosened by appropriate manipulation of the nut. If the cable holds too weakly, the nut must be tightened more tightly.
- If tensioning the cable does not produce any result, then the element is already at the limit of its capabilities. Therefore, the only solution to this situation is replacement.
- When adjusting the degree of tension, be sure to evaluate the adjustment of the cable along the PT lever. As you remember, normally it is 3-8 clicks for more recent versions of the VAZ 2109, or 5-7 clicks for nines that were produced before 1995.
- Check the freedom of rotation of the rear wheels. If you overtighten the cable, the wheels will spin with difficulty and not as freely as they should.
- After making the adjustment, tighten the locking nut back and check the operation of the handbrake again by driving up a slope or pushing the machine with the PT on.
If the adjustment did not give a positive result, the cable turned out to be worn out, overtightened and does not allow adjusting the operation of the RT, you will have to change it, thereby repairing the handbrake.
Replacement
In some cases, heavy movement of the cable in the sheath is due to lack of lubrication. To eliminate this defect, fill the shell with transmission or engine oil. Pour until grease flows out of the opposite end of the cable casing. Remember to move the cable while adding lubricant.
Malfunctions
Any driver experiences an unpleasant feeling when the clutch pedal sinks to the floor. This can happen if the clutch cable breaks; it is also possible that the release fork breaks (this case is discussed in another article). The cable breaks more often on older cars that are used in extreme conditions or all year round.
The cable may become frayed, which affects the smoothness of the pedal and the operation of the clutch. This cable also requires replacement.
If the clutch cable is broken, you can drive your car to the repair site. You need to start the car in first gear and shift while driving. The following situation is possible: the cable broke while the gear was engaged, and the car stalled.
There is a possibility that it will be difficult to engage the neutral position. Then your car won’t even be able to roll off the roadway. The transmission is disengaged by rocking the car forward and backward and disengaging the transmission at the same time. You can jack up one of the wheels and spin it by hand, this will also help.
Even if the cable is not replaced, gear shifting is possible. It is possible to get to the service station, but such driving has a negative impact on the service life of the gearbox.
The cost of the spare part is low, about 300 rubles. The cost of replacing a cable in a car service is 400 rubles.
Malfunctions and reasons for their occurrence
But even this type of driving does not last forever, and problems with it will only be a matter of time.
Over time, the wires in the cable corrode and break, which is why at one point when the clutch pedal is pressed, it remains in the pressed position and does not return to its original position.
For the same reason, it happens that pressing the pedal and returning it back is difficult, and a grinding noise is heard. This is a consequence of the “fluffing” of the cable: rotten wires rest against the braid, significantly complicating movement.
All these malfunctions arise for one simple reason: moisture gets inside the braid, which leads to corrosion.
And although manufacturers are trying to combat this problem by applying a protective layer of polyethylene to the cable, such measures can only extend the service life.
And here, too, everything is simple: while moving, the cable rubs against the braid, and over time the protective layer wears off. Cable lubrication also provides only temporary protection.
Corrosion is not necessarily the cause of failure. Pressing the pedal very hard, for example in a difficult traffic situation when the driver hits it with all his might, can also lead to the cable breaking.
In any case, if you have problems with the drive, you will need to replace the cable as it cannot be repaired.
Please note that the cause of failure of the clutch pedal can be not only the cable, so if such a malfunction occurs, first of all you need to make sure that the drive is moving.
The fact is that there are cases when the clutch release bearing control mechanism breaks, which is a much more serious problem than the destruction of the cable. After all, if such a malfunction occurs, you will have to remove the gearbox from the car to repair the mechanism.
But a broken cable is a malfunction that is very easy to fix if there is a replacement element.
And since such a problem can appear at any time on a VAZ, it is recommended to always carry a new cable with you in the trunk.
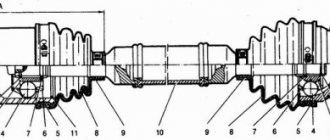
Device
On modern cars, the clutch fork is hydraulically actuated. The clutch master and slave cylinders are engaged. On the VAZ-2110, this fork moves mechanically, using a cable (the same as the accelerator).
- Cable sheath.
- Mounting brackets.
- The lower end of the cable sheath.
- Adjusting nut.
- Cable protective cover.
- Upper tip of the shell.
- Thrust plate.
- Seal.
The entire mechanism is controlled by the clutch pedal. It is suspended on a separate bracket. By pressing it, the driver moves the clutch fork. That, in turn, disconnects the box from the engine flywheel using a basket and a friction disk. After the desired gear is engaged, the pedal moves up under the action of the return spring. The friction disc engages the flywheel. Torque is transmitted to the box and then to the drive wheels. The drive has a fairly simple structure, so owners often do not face the problem of replacing the cable. However, if it is cut off, you will notice it immediately. The gears will not engage normally.
How to adjust the drive?
Replacing the clutch cable on a VAZ is not difficult, but this operation is not enough, since it still needs to be adjusted, and for this you will additionally need a regular ruler.
After replacement, the pedal may be higher or lower in level than the others, which is incorrect, they should be in one line.
The clutch is adjusted as you move the pedal. That is, we put a ruler next to it and mark the level of the position of the pedal pad.
After that, squeeze it all the way and make a mark on the ruler again.
Next, we subtract the distance - for a normally adjusted clutch the stroke is 12-13 cm, but 16 cm is allowed, although this value is considered the limit.
On the VAZ-2110, adjustment is made in two places - on the braid fastening nuts (allows you to change its length) and on the tip itself, which engages with the lever.
To do this, a thread is made on it and two 8 or 10 nuts are installed (they change the length of the cable itself). They are exactly what is needed for adjustment.
To perform adjustment work, it is necessary to unscrew the outer nut, since it is a locking nut, and by unscrewing or screwing the inner nut onto the tip, achieve the required pedal stroke, and then lock it.
On the VAZ-2109 there is only one adjustment - on the mounting bracket on the gearbox and the stroke is adjusted by changing the length of the braid.
You can do without a ruler on a VAZ-2110, it is only important to choose the right cable length. To do this, unscrew the locking nut and unscrew the adjusting
Then, moving the thrust sleeve along the tip, you need to find the moment when the release bearing begins to freely move. It will be easy to feel it, since the force on the lever will increase slightly.
All that remains is to fix the position of the sleeve on the tip with nuts and check. Is the pedal in line with the others.
This adjustment will ensure optimal cable tension, and the clutch will not “drive” or “slip”, since the drive is installed at the beginning of the free play of the release bearing.
Ten car. Either the cable broke or the clutch fork broke. How can I replace and adjust it myself? Thank you
If the clutch fork is out of order, you will have to remove the gearbox and replace it.
As far as I know, on 2110 brand cars, cable breakage is a very rare occurrence, and most often this occurs as a result of violations in the operation of the car or in some extreme situations. To replace the cable you only need a new cable
Is it possible to continue driving a car with a broken cable?
It’s quite possible to get to your house or garage without a clutch; if you’re within the city limits, towing is rarely required. The car must be started with first gear engaged, and movement must begin simultaneously with the engine starting. You need to change gears by accelerating in neutral.
Is it difficult to replace the clutch cable yourself and what is needed for this?
Replacing the cable is not difficult and does not take long. We remove the windshield wiper and the decorative panel under the wipers, you don’t have to remove it, but to make it easier for you to attach the cable to the pedals
In order to remove the old broken cable, you first need to remove it from the mounting bracket, which is located on the gearbox, to do this, unscrew the nuts that secure the cable in the bracket; to unscrew it you will need two 19mm wrenches. By loosening the tension, remove the damaged cable from the mounting, then we bring it to the fork, which engages the clutch, hold the fork with one hand, and remove the cable with the other
Tools
To perform this operation we need a minimum set of tools. Among them, it is necessary to prepare keys “for 8”, “for 17” and “for 19”. We also need a Phillips screwdriver. Replacing the VAZ-2110 clutch cable with your own hands can be done in two ways:
- With removal of the windshield wiper and frill.
- No removal.
Let's look at both options in more detail.
This method takes a little longer. However, dismantling elements such as the windshield wiper and frill (this is a decorative panel located under the “arms” of the wipers) will significantly facilitate the process of replacing the cable. So, where do we start? First, you need to remove the windshield wiper with wrenches, and then the plastic trim underneath it. This way we will release the clutch cable of the 2110 VAZ from the fork. Slide the cover off the cable end and unscrew the nut that secures the end to the bracket on the transmission. Use the second wrench (“19”) to keep the tip from turning. We remove the part from the fasteners. The tip bracket is removed from the studs. Next, unscrew the screw of the protective cover holder. The latter bends slightly to the side. This way we can get to the tip of the clutch cable. Using a screwdriver, remove the locking bracket. Remove the tip. Next we go to the salon. Here we need to unscrew the bolt with which the cable is attached to the pedal. We dismantle the bushing and inspect its technical condition. If necessary, we make a replacement. Don't forget about lubrication. On a VAZ-2110 car, replacing the clutch cable cannot be done without first treating it with Litol. Assembly is carried out in reverse order.
Now let's look at how to replace the clutch cable on a VAZ-2110 car without removing the windshield wiper and decorative trim. First, we take the “19” key in our hands and unscrew the cable fasteners. Remove the tip from the clutch release fork. Next, we move into the interior and unscrew the nut securing the element to the pedal with an “8” wrench. We slightly lift the latter and pry up the clip, after which we disconnect the bracket. Next, you can completely remove the cable from the interior. The new element is also installed from the interior. We push it into the engine compartment and secure it in place. Assembly is carried out in reverse order.
Adjusting the newly installed cable
After the VAZ 2110 clutch cable has been replaced, all that remains is to make its final adjustment, spending about 30 minutes of your personal time. Thus, we ensure comfortable and reliable operation of the VAZ 2110 clutch mechanism.
The degree of tension is adjusted by changing the position of the lower end of the cable fixed in the gearbox bracket. You can navigate by the position of the adjacent pedal. When the adjustment is completed, we check it using a tape measure or ruler.
The pedal travel from its initial position to its stop on the floor should be within 125 mm with an error of 5 mm up or down. If the pedal position does not correspond to the specified recommendations, adjustment should be continued.
When the clutch pedal suddenly falls to the floor, most likely the cable has broken. Replacing the clutch cable of a VAZ 2112 is easy and even done in several ways. You don’t need any special tools or specialist skills; any driver can replace the VAZ 2112 clutch cable on his own.
Replacing the VAZ 2110-2112 clutch cable with your own hands, recommendations
In order to replace the clutch cable, you will need the following set of mechanic tools:
- flat and Phillips screwdrivers;
- a set of open-end wrenches and sockets with a ratchet.
Next, you need to perform a simple algorithm of actions, which involves dismantling the VAZ 2110 windshield wiper and window trim. Of course, it is possible to replace the clutch cable without the above steps, but complete instructions according to standard recommendations will still be more clear.
- 1. First, you need to discard the front facing panel for the wind window frame (jabot), held in place by a set of screws;
- 2. Next, remove the windshield washer tubes, wiper arms (in the case of an old-style frill) and, finally, the casing itself.
Removing windshield washer tubes
- 3. Remove the windshield wiper, having first disconnected the negative terminal of the battery and disconnected the expansion tank, for which:
- the gear motor connector is dismantled;
- unscrew the nuts of the left and right fastening of the trapezoid, as well as the bolt holding the gearmotor to the bracket;
- finally, the wiper base, removed from the studs, can be removed from the air supply box.