If crunching and knocking noises appear in the front part of the car, the CV joint on the VAZ 21099 needs to be replaced. They are especially pronounced when driving over uneven places and on turns. Many car enthusiasts immediately head towards a car service center, but you can replace the CV joint on a VAZ 21099 with your own hands, without resorting to the help of specialists. In this situation, it is better not to leave the solution to the problem for later, so as not to lead to a disastrous result.
If you notice noise in the front of the car, you should immediately start checking the CV joint boots. Perhaps this is precisely the problem - there may be cracks, traces of grease, or even become unusable, namely, torn. To check, turn the steering wheel all the way to the side at your discretion and look at the area under the wheel.
If you find damaged areas on the dust cover, you must immediately replace it with a new one, otherwise it will become clogged with water, stones, dust and others, which will lead to its inapplicability. And when driving around corners, a knocking noise may occur, which indicates faulty joints. To check them, it is worth rocking the drive shaft - this is to check for the presence of play.
What role do CV joints play and how are they designed?
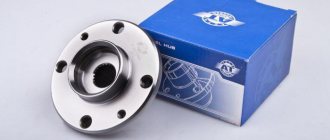
Torque from the gearbox to the front wheel hubs is transmitted by two drive shafts. Constant velocity joints (CV joints), popularly called grenades, are installed at the ends of the shafts, as they look like a grenade with a handle.
The hinges connecting the shaft and gearbox are called internal, those that connect the shaft and hub are called external.
Their purpose is the same as that of the crosspieces in the cardan transmission of rear-wheel drive cars, but they carry a load several times greater, because the force is transmitted without a gearbox.
CV joints must ensure continuous transmission of torque from the power unit.
Smooth operation of the movable joint is impossible when:
- wear of the guide tracks of the body and inner race;
- deformation of balls;
- ingress of dirt;
- lack of lubrication.
When the balls jam for a short time and then “slip” along the track, the hinge produces a characteristic crunch. Over time, the separator holding the balls will collapse from impact loads and torque transmission will become impossible. That is, the car will not move.
The inner CV joint has a lower degree of rotation, but a greater ability to move the inner race relative to the body - it is due to this that the lateral vibrations of the engine and gearbox are compensated.
Both hinges have spline connections to the shaft and are secured to it with retaining rings. On the VAZ 21099, the outer CV joint with the hub, and the inner one with the gearbox, are also connected by splines.
The units are protected by rubber covers to prevent the ingress of water, dust and dirt.
Replacement methods
There are two methods for replacing the external CV joint on an Audi A6 C5 with your own hands - with disconnecting the suspension arms from the steering knuckle and without this operation.
With detachable levers
We will consider replacing hinges with preliminary disconnection of the levers using the example of the left outer CV joint.
The operation is performed like this:
- We park the car on a level surface, engage the handbrake and engage first gear at the gearbox. Additionally, you can put wheel chocks under the rear wheels;
- We remove the cap and using a 27 socket with a wrench, we tear off the bolt securing the drive to the hub, and also loosen the wheel fasteners;
- We tear off 5 disk bolts;
- Use a jack to lift the front of the car on the left side and remove the wheel;
- Completely unscrew the drive mounting bolt;
- Turn the steering wheel to the left all the way;
- We clean the steering knuckle mounting bolt from the upper suspension arms, unscrew it (you will need two 16mm wrenches) and knock it out;
- Carefully remove the tips of the levers from the fist, causing the latter to move to the side;
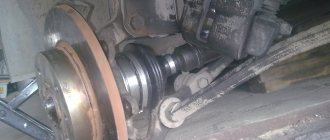
- Having “bent” the hinge all the way, we remove it from the hub. Do not forget to turn the steering wheel to the right (when replacing the left CV joint);
- We remove (cut) the clamps. We pull the boot together or simply cut it off;
- We align the CV joint end cap relative to the shaft (so that they are located on the same axis);
- We pull the joint off the shaft. To do this, install the mounting bolt back and tighten it with a wrench until it stops. Then we turn on the gear to lock the CV joint and further screw in the bolt until the unit “comes off” from the retaining ring located on the shaft;
- Remove the retaining ring, bushing and thrust ring;
- We thoroughly wash the shaft and wipe it with a rag;
- We put a clamp on the drive shaft;
- We do the same with the new boot;
- Next, we put the first washer on the shaft (with its bottom towards the engine);
- Install the second plastic washer;
- We install the retaining ring last;
- We put lubricant in the hinge. There are new CV joints for the Audi A6 C5 already filled with grease, which is very convenient;
- We also put lubricant in the boot;
- We put the new CV joint on the shaft splines, and then seat it all the way, using a hammer and a wooden adapter (we seat it carefully so that dust does not get into the lubricant). Next, take the old bolt, screw it into the hub and use a hammer to push the CV joint onto the shaft. You can check whether the hinge is completely seated by looking at the plastic bushing - it should be almost completely “hidden” inside the unit;
- We put the boot on the outer ring. To do this, you will have to use a screwdriver and remove the car from the gear. We fix the rubber element with clamps, clamping them with pliers;
- Then we do everything in reverse order. We install the drive in the hub and attach the mounting bolt;
- We reconnect the steering knuckle to the suspension arms and secure everything with fasteners;
- We put the wheel in place, lower the car from the jack;
- Tighten the drive and wheel fasteners.
POPULAR WITH READERS: Choosing the type of shock absorbers for a car
At this point, the replacement of the external CV joint on the Audi A6 C5 is considered complete.
In some cases, it is not always possible to unscrew the fastening of the knuckle to the upper arms. If these bolts have not been loosened for a long time, then over time they “stick” and are difficult to unscrew. An alternative option in this situation is to unscrew the lower arms from the knuckle.
In fact, to replace the outer CV joint on an Audi A6 C5, it makes no difference which levers to disconnect the steering knuckle from - upper or lower, in both cases the hub will move to the side, which will allow you to remove the drive limit switch.
Do-it-yourself CV joint removal
In order to replace the internal grenade, you will definitely need to “pull out” the drive from the gearbox. This is achieved either by sharply pressing the “mount” inserted between the gearbox housing and the hinge body, or by striking (through a drift of suitable length) the hinge directed along the drive axis. Before this, it is advisable to drain about a liter of oil from the gearbox, restoring its level after repair.
The outer CV joint can be replaced directly on the car, but it is still more convenient to work by holding the drive shaft assembly with grenades removed from the car in a vice. So, rolling up our sleeves, let's proceed to the following steps:
- We “tear off” the hub nut and wheel bolts.
- We hang the wheel and remove it.
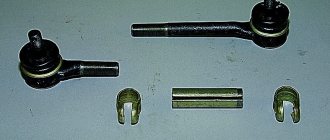
- Disconnect the steering end and ball joint.
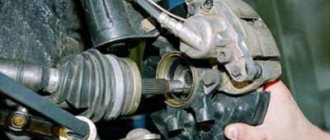
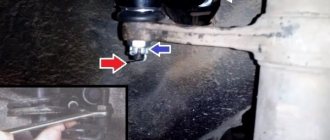
- We move the strut away, pushing the outer CV joint out of the hub.
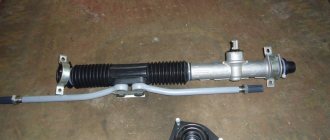
- We pull the drive out of the box and install it in a vice.
- Unfasten the clamps on the rubber boot and move it.
- We place a copper drift on the inner ring (clip) of the joint and with a sharp blow knock it off the shaft.
If you need to replace a torn boot, and the hinge itself is not yet “crunchy,” then before reassembling, thoroughly rinse the grenade with gasoline and blow it with compressed air.
How to remove a grenade from the drive?
The internal grenade is removed from the gearbox by light tapping. But one condition must be observed - if you remove two inner grenades from the box at once, do it one by one. First, take out one, replace it with a plug, then the second. Otherwise, the differential may simply fall apart. And for repairs you will need to completely disassemble the gearbox.
Now let's talk in more detail about how to change the external grenade on a VAZ-2109. This is not a very difficult matter, but it will require skill. The first thing you need to do is cut off the old boot - you won’t need it anymore, so you can remove it in this “barbaric” way. The clamps, of course, also need to be removed.
After this, clamp the shaft tightly in a vice so that the grenade is at the bottom. Position it so that it sits flat on the shaft - you can knock it down faster. Apply several sharp blows through the wooden spacer. The grenade should come off the shaft without any problems. You cannot strike with metal objects, as you can destroy the integrity of the element. When replacing grenades on a VAZ-2114, it is necessary to remove the drives completely, this will significantly simplify the repair.
Possible causes of crunching
An experienced driver can by ear determine the location of a car malfunction. This quality comes with age. However, it is very difficult to confuse the crunch of a grenade with another sound. Let's figure out what a CV joint is. On the outside it is made in the form of a bowl, and on the inside the body has semicircular grooves. There are six of them.
In the internal space there is a spherical fist (clip) with 6 grooves and a splined connection for the axle shaft. Rotation occurs through the force that the cage transmits to the body through the balls located in the separator. The balls, moving along the grooves, change the angle between the axes.
- low-quality or defective products, including counterfeit ones, have been identified;
- low-quality lubricants are used or they are absent;
- boot damage;
- driving on bad roads or aggressive driving style.
There are 2 grenades installed on the drive wheels (internal and external): the first transmits rotation from the gearbox, the second - from the axle shaft to the wheel hub. Therefore, if an extraneous sound occurs, you need to determine which CV joint is making the sound (located on the left or right, inside or outside).
The design of these grenades is the same, they differ only in size (the outer one is smaller). Outer CV joints wear out more intensively because the loads and turning angles are greater. Knowing the design and difference of grenades, which ones wear out, how quickly and why, the car owner will more carefully monitor the condition of the CV joints.
How to remove the drive
In order to remove the drive assembly, you need to perform the following steps:
- Completely unscrew the nut on the outer joint to free the hub.
- Remove the nuts from the bolts that secure the strut to the hub steering knuckle. This will allow you to move the hub to free the joint. But it will be much more efficient not to unscrew the nuts on the strut, but to disconnect the ball joint.
- If you unscrewed the ball joint, you need to remove the tie rod end pin from the hole in the strut knuckle. This is done using a special puller.
- Now you need to pull the outer joint out of the hole in the hub. How to do this depends on the situation. You can use a thin drift, but without fanaticism, so as not to damage the mechanisms. You should also not hit the CV joint axle with a hammer - this will cause the edges to flatten and make it impossible to remove the element.
- After you pull out the outer joint, you can proceed to the inner one - to remove it from the hole in the gearbox, just apply a few light blows with a small chisel. You can also use a mounting spatula.
That's all, now the drive has been completely removed, you also need to learn how to remove the CV joint on a VAZ-2109.
Internal CV joint device
- -outer ring
- -inner race
- -separator
- -balloons
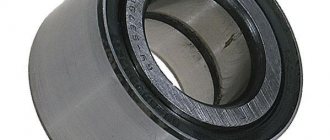
A CV joint is somewhat similar to a bearing, but its parts do not rotate relative to each other, but only have a certain degree of freedom of movement. On most VWs, internal CV joints come in two diameters, 94 and 100 mm. For Golf 2 with a 1.3 engine, the outer part is slightly different, the outer race of small CV joints is symmetrical
large, 100 mm, on the side adjacent to the box flange, have a recess for a cork gasket
The inner race is also not symmetrical, the part that needs to be oriented towards the gearbox flange
The side that should be facing the drive shaft has a pronounced entry for the splined part
Determining the malfunction
First of all, when driving, there may be extraneous noise from the front. First you need to make sure that the CV joint boots are not torn and there are no cracks or oily marks on the surface. To check, just turn the steering wheel all the way and carry out a visual inspection behind the wheel.
Found any damage? Change the boot immediately so that stones, small particles, and water do not subsequently get into the CV joint mechanism. Otherwise, the hinge will quickly become unusable.
It is quite easy to determine the need to replace the hinge itself - during turning maneuvers the driver notices characteristic knocking noises. The presence of play during swinging of the drive shaft will help confirm this fact.
Reasons and signs of replacing the VAZ 2109 CV joint
The CV joint fails due to damage to the boot - sand, water and dirt get into the lubricant. Since this may not be noticed immediately, but after several hundred kilometers, the problem will go so far that the “grenade” will have to be replaced. Therefore, the anthers must be inspected at every maintenance , or even more often, and replaced at the slightest sign of wear.
A crunching sound when turning and accelerating will notify you of the upcoming replacement of the CV joint. You can confirm your suspicion by hanging the wheels and checking whether there is play in the drive shaft by shaking it with your hand.
Tool for work
Replacing the hinge or its boot is relatively easy, and no specialized tools are required. All you need is:
- A set of keys of the most common sizes;
- A set of heads (a 30 head is required);
- Puller of ball joints and steering tips;
- A rubber or wooden hammer (mallet), or a regular one, but with a wooden handle;
- Jack;
- Knife;
- WD-40 product;
- Rags;
You will also need a new CV joint (if you plan to replace it), a new boot and mounting clamps, CV joint-4 lubricant or similar. Having stocked up with everything you need, you can start disassembling.
Removing grenades on a VAZ 21099
The work must be carried out on an inspection pit or overpass. Put the car on the handbrake and secure the rear wheel with wheel chocks. Now the hardest part is to remove the nuts that secure the grenade to the wheel. To do this, you will need a 30mm socket wrench, and to do everything successfully, you need a good lever. The best option is to make an extension from a piece of pipe.
Next, lift the car on a jack, put it on a support and remove the wheel. Now you need to disconnect the steering rod from the steering knuckle of the strut. This is done using a special puller. And the ball joint is simply unscrewed; there is no need to press it out. Just try not to damage the anthers, otherwise you will have to change them.
Now that the strut is free, you need to turn it to the right or left (depending on which side of the car you are working on) and remove the hub from the CV joint. It should fall out, now all that remains is to remove the inner one, which is in the box. This is why an inspection hole is needed, because it is much more convenient to perform this operation in it. The grenade is removed using a crowbar.
Checking the condition of the CV joint
To carry out diagnostics it is necessary to use several methods. After all, you need to determine whether the VAZ-2109 CV joint needs to be replaced. The very first is the appearance of a crunch when cornering. As a rule, this is a sign that the outer hinge is very worn and requires replacement. In addition, a similar crunching noise may occur when reversing. This is not fatal, but it is also not very pleasant, since you have to forget about a comfortable ride.
The main thing when diagnosing is not to confuse the symptoms with those that occur when certain suspension elements break down. For example, when moving in a straight line, only heavily worn joints will crunch. The most common cause of such sounds is the ball joint. A more detailed picture can be obtained if the car is placed on a lift and the entire suspension is suspended. In this position, you can determine what kind of play the hinge has, and whether there is a knock in the ball joint. In addition, this position is most convenient when replacing the outer CV joint of a VAZ-2109.
You can talk endlessly about how to change joints correctly, what lubricant to use, which manufacturer you should trust. In fact, the most suitable components are those whose manufacturers supply them to the AvtoVAZ plant. When replacing the external CV joint of a VAZ-2109, preference should be given to the manufacturer who supplies them to the plant. As practice shows, the service life of these elements turns out to be higher than that of foreign analogues. No matter how much they scold our auto industry, the reliability of domestic units is an order of magnitude higher than the vaunted German or Italian ones.
How to look younger: the best haircuts for those over 30, 40, 50, 60 Girls in their 20s don’t worry about the shape and length of their hair. It seems that youth is created for experiments with appearance and daring curls. However, already last.
Our ancestors slept differently than we do. What are we doing wrong? It’s hard to believe, but scientists and many historians are inclined to believe that modern man sleeps completely differently than his ancient ancestors. Initially.
10 charming celebrity children who look completely different today Time flies, and one day little celebrities become adults who are no longer recognizable. Pretty boys and girls turn into...
11 Weird Signs That You're Good in Bed Do you also want to believe that you please your romantic partner in bed? At least you don't want to blush and apologize.
Never do this in church! If you are not sure whether you are behaving correctly in church or not, then you are probably not acting as you should. Here's a list of terrible ones.
9 Famous Women Who Have Fallen in Love with Women Showing interest in people other than the opposite sex is not unusual. You are unlikely to be able to surprise or shock anyone if you admit it.
Where does the repair begin?
First, you need to drive the car onto a viewing hole or overpass, place safety chocks under the wheels and secure the hand brake. After this, unscrew the drain plug on the gearbox housing and drain the oil (a good reason to replace it) into a suitable container.
Removing the wheel and lower support
Before lifting the front of the car, you should remove the wheel bolts, since this will be quite problematic after lifting. Next, using a jack, raise one side or the entire front of the car.
Attention! Do not forget to place a reliable support under the body.
After this, unscrew the bolts and remove the wheel. Now you can begin dismantling the hub. To do this, carefully remove the protective cap with a screwdriver, unscrew the nut and remove the lock washer. To prevent the hub from turning, it is necessary to push the brake pedal all the way down and secure it with a block or get an assistant to do this.
Removing the support is quite simple: using a 17mm wrench, unscrew the two mounting bolts. It is recommended to use a spanner or socket wrench rather than an open-end wrench. Since the bolts can become very rusty during operation, you should use a “Vedashka”. After 5-10 minutes of treatment, they will turn away quite easily.