Former flagship of the Russian automobile industry VAZ 2110 with a 1.5 16 valve engine, replacement of the timing belt, rollers and pumps. The recommended replacement interval is from 40 to 60 thousand kilometers. The mileage on this strap is 80 thousand and, as the autopsy showed, if they hadn’t changed it today, then tomorrow it would have been more work for our mechanic. In general, we recommend that all customers check the condition of the belt at least once every 5 thousand kilometers, or once a year. But knowing the quality of our spare parts, more often is better.
Attention! On this engine, when the timing belt drive breaks, almost all the valves bend.
Consequence of exceeding the replacement interval. We look, remember and don’t let it get to that point. A little more and the meeting of the valves with the pistons would have been ensured.
The patient became five millimeters narrower and generally looked very bad. We send him to the honor board.
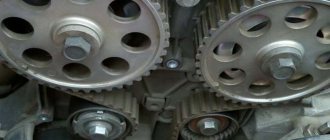
Timing marks - installation of timing marks using the example of a VAZ 2110, 2111 and 2112 engine
Dear friends, today we will tell you the basics of setting timing marks using the example of a VAZ 16 valve engine. It's no secret that correctly set timing marks are the key to proper engine operation. If the marks are set incorrectly, then normal engine operation is impossible. It is also important to tension the belt correctly, this greatly affects its durability. So, when do we have to deal with the procedure for setting timing marks? When, according to the regulations, we need to replace the timing belt at the next maintenance, by the way, the rollers are also necessarily changed along with the belt in this case. Also, if our pump is “covered,” the timing belt will have to be removed, since it is this that drives our “water pump.” Well, what if (the worst case scenario) is that our belt broke. Here, if the engine is “plug-in”, then this is a huge nuisance, the pistons meet the valves, and at a minimum, we are guaranteed to remove the cylinder head and replace the valves. So, what are timing marks and where are they applied? The first is the marks on the camshaft pulleys, both on the intake and exhaust:
They must coincide with the mark on the crankshaft, and there are already several methods for calculating this mark. It’s quite difficult to remove the generator belt pulley (it doesn’t allow you to see the mark) and see if the marks match.
With such a coincidence of the piston marks, they are at TDC (Top Dead Center)
The second method is to calculate the DPKV sprocket by the teeth
And finally, the third option for setting the crankshaft position is the marks on the flywheel, they can be seen if you remove the rubber plug on the gearbox:
These are the options for comparing timing marks that we offer you using the example of 1.5 16V engines installed on the VAZ-2110, VAZ-2112 and VAZ-2111. If you still have questions regarding timing marks on your specific engine, ask them on our forum, in the appropriate section.
Source
Troubleshooting methods
Now we list methods for eliminating these causes. Let's go in the same order.
- Belt tension . First you need to check the tension level and compare it with the one recommended by the car manufacturer (usually indicated in the technical documentation for the car, also can be found on the Internet). If this value is higher than the recommended value, then the tension must be loosened. This is done using a torque wrench. If you don’t have one, then it’s better to contact a car service. As a last resort, you can perform this procedure “by eye,” but use the indicated devices as soon as possible. You can also use a regular dynamometer and a regular wrench for this.
- Poor quality belt . If the two edges of the belt have different stiffness, then a situation will arise where the timing roller eats the belt from the softer side. You can check this by replacing its right and left sides. If after replacement the second side does not wear out, then the belt is to blame. There is only one way out, and it consists in purchasing and installing a new, higher quality part.
- Wear of pump bearings . To diagnose this problem, it is necessary to dismantle the belt and check for play on the toothed pulley. If there is play, it means the part needs to be replaced. Bearings cannot be repaired.
- The pump is installed crookedly . This situation is possible if, during the previous replacement, the adjacent surface was poorly cleaned, and small particles of the old gasket and/or pieces of dirt remained on it, but if this happens, then most likely you will understand this by the leak that appears after filling the antifreeze and starting the engine. When installing a new pump (or even an old one, if it is in good condition), be sure to thoroughly clean both surfaces (including the bolt holes), both on the pump itself and on the motor housing, and install a new gasket. In some cases, instead of a gasket, sealant is placed under the pump.
- Problems with the video . The video needs to be reviewed. It should have minimal play and a flat working surface. To check, you can use a ruler or other similar object of the required width. It also makes sense to check the presence of grease in the bearing. If its quantity is small, it should be added. If the roller is of poor quality, it must be replaced. It is almost impossible to repair the bearing, much less the roller surface.
- Damage to stud threads. To correct this situation, there are two options. The simplest is to use a saw with the appropriate diameter for turning internal threads and/or a die for turning similar threads on a stud. Another option is more labor-intensive and involves completely dismantling the block in order to restore the specified thread. This method is used if for some reason it is impossible to use the sword.
Installing washers under the roller - Roller pin bend . Mechanically fixing a stud is almost impossible. Sometimes (but not in all cases, and it depends on the degree of curvature of the pin and the location of its bending) you can try to unscrew the pin and screw it back in, but with the other side. If the curvature is small, then such a solution may be successful. However, in most cases, shims are used. Let's consider this point separately, since most car enthusiasts consider this method a real panacea if the timing belt is eaten from the engine side or from the opposite side.
Setting timing marks on a 16-valve VAZ-2112 with your own hands
Car : VAZ-2112. Asks : Kostikov Vladimir Igorevich. The essence of the question : I can’t fix the timing marks, how can I set the marks on the timing belt?
I have a problem. When replacing the timing belt, the upper pulleys were not fixed, and now it is not clear how to align them. The marks on the pulleys do not “look” in exactly the same direction. Maybe it would be easier to tighten all the pulleys to the TDC position in cylinder 1? If we are talking about 16 valves, I am familiar with setting the marks on the VAZ-2112: I performed this operation on the timing belt 21124. Well, I have a 1.5 engine. Are there any differences?
Ignition control
Electronic ignition control
How to set the ignition angle? In systems with electronic ignition control, this can be done using computer diagnostics that are connected to the electronic control unit (ECU) or "brains" of the car. And there you can see how the engine operates in real time: what signals the sensors receive, what engine speed, fuel consumption, injection time, ignition time and other input and output data.
Essentially, you don't need to change anything while running unless you change the firmware. That is, if the machine somehow began to work incorrectly, then most likely there could be several reasons:
- An incorrect signal is received from the sensors: in this case, you can replace the supposedly faulty sensor with a replacement one that is known to be good, and see if the result changes.
- The mains voltage is incorrect and as a result the sensors produce an incorrect signal. The input signal to the sensor is 5 V, if this value is different, the ECU will receive incorrect input data and the engine will not be able to operate normally.
- Faulty ECU. Quite often it happens that, having considered everything possible, it turns out that the brain has flown. But it’s not scary, they are cheap at VAZ.
Therefore, the ignition itself is not installed on injection machines; it is already included in the system, but it is worth checking whether the signs are set correctly.
Adjusting the ignition marks on the VAZ-2110 injector
When the engine is running, some phases must work synchronously, the camshaft must coincide with the crankshaft, and the timing of fuel injection and ignition must be associated with them. Let's look at all this using the VAZ-2110 as an example.
How to set the ignition on a VAZ 2110 injector
If the car does not start, shoots, sneezes and everything is in the tube, then there are no signs somewhere and this needs to be solved.
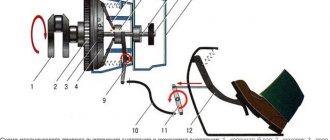
On any car, the timing marks must be set perfectly, only then it will work normally. On the VAZ-2110, the crankshaft mark is located on the flywheel. You need to look through the inspection window on the gearbox housing, through which you can see the flywheel. It's better to use a flashlight because it's not that easy to see.
Set the timing marks correctly - otherwise you will bend the valves!
The VAZ-21124 engine has a special feature: no matter how its pulleys are turned, it does not bend its valves. With the 21120 engine (16 v 1.5 l) such jokes will not work! If the pulley positions are not too far off, try putting on the belt and turning the mechanism to the “TDC 1 and 4” position. From now on, always use the following instructions:
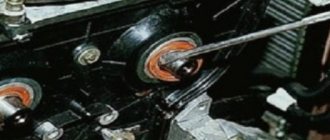
- The crankshaft is set to the required position by checking the mark on the generator drive pulley (photo 1) or on the crankshaft pulley (photo 2);
Alternator drive pulley and crankshaft pulley
Exhaust and intake shaft pulley
In theory, on the VAZ-2112, marking is carried out the same way, no matter what engine we are talking about. Here are photos for engine 21120.
What it looks like in reality and in the instructions
Take the time to find the inspection window on the gearbox housing. There is another mark under the plug.
The last step is optional. And they do it so as not to redo all the work “from scratch.”
- The number of belt teeth between the “upper pulley” marks is exactly 16;
- The mark on the crankshaft pulley sometimes breaks off - use the control method “1” (photo 1) or “3” (lower photo).
Updates for VAZ-21124
On a 1.6 engine, all actions are performed in the same way as described above. There is one exception - the generator drive pulley is aligned according to the mark on the casing (see photo).
Generator drive pulley, motor 21124
However, if this mark is not there, use the proven method: 20 teeth are counted from the DPKV body. Instead of the 21st there should be a “pass”.
The timing pulleys can be rotated as you like - the pistons will not touch the valves in any case. Compare what the pistons of two different engines look like and it will become clear what we are talking about.
For those who don't understand anything
The number of teeth on the crankshaft pulley is 21, on the camshaft pulleys – 42. When the crankshaft rotates 360 degrees, the camshafts rotate 180. In general, a complete engine cycle consists of two crankshaft revolutions (720 degrees).
In theory, you can use an alternative configuration method. Let the camshaft pulley marks point straight down. Then the mark on the crankshaft pulley should face up (TDC 1 and 4).
If there is no fixing device, you can make it yourself. Even a puller for suspension springs will do (see photo).
Checking the ignition coil with a multimeter
Checking the voltage at the wire terminal block
:
- Disconnect the block with wires from the ignition coil (on the H4M engine, to access the coils of cylinders 1 and 2, remove the intake pipe).
- Turn on the ignition and measure the voltage at terminal 3 of the block (the pin numbering is indicated on the ignition coil).
- The output voltage must be at least 12 V. If it is less or less, the battery is discharged, there is a fault in the power circuit, or the engine control unit (ECU) is faulty.
- Turn off the ignition.
We change the timing belt on a VAZ-2112 16 valves with our own hands (+ video)
The timing belt (gas distribution mechanism - approx.) plays a very important role in any vehicle, and the VAZ-2112 was no exception. On a 16-valve engine of the VAZ family, a break in this element in some cases can negatively affect the condition of the entire engine as a whole, as this leads to bending of the valves and expensive repairs and replacements. Therefore, the timing belt should be changed on time, and if cracks or abrasions appear on it, then there is no point in waiting for it to finish. Below we will tell you how to independently replace the timing belt on a 16-valve VAZ-2112 engine with your own hands.
The video describes the process of replacing the timing belt on a VAZ-2112 in detail, see:
Why do you need a timing belt?
In all cars, the timing belt acts as a connecting element between the camshaft and the crankshaft. After all, as you know during operation, the crankshaft rotates due to the work of the piston group, and in order for the camshaft to open the valves at the top point, synchronization of their movement is necessary. The timing belt does this job. In other words, in the absence of such a link, the engine simply will not move. Therefore, it is very important to maintain it in excellent working condition and replace it on time.
How to choose a timing belt?
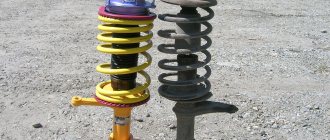
Complete kit from Gates - timing belt and rollers, all that remains is to choose a pump
Which timing belt to choose? Which one has a longer service life? These and many other questions are asked by many VAZ-2112 owners when choosing a new timing belt. Of course, there is a large selection of belts in stores, and the seller will select one for you based on your parameters, focusing only on the manufacturer.
Among Russian manufacturers, VAZ-2112 owners, according to reviews from most forums, have a leading timing belt - OJSC BRT Balakovo . Further, with a large lag, car enthusiasts choose belts from Gates and Bosch . However, the latter is not stable, because its breakdown can occur either at the 5,000th mileage or at the 20th.
In addition, there are enhanced options from the above-mentioned manufacturers.
Originals, analogues, articles and prices
Drive specifications: length 1295 x number of teeth 136 x width 9.5 mm.
| Name/article | Price in rubles |
| Original | |
| VAZ-2112 engine 16 valves, 2112-1006040-83 | From 1600 |
| VAZ 21120-1006040-00 | From 1600 |
| VAZ 2112-1006040 (16 valves) | From 1600 |
| GATES K015644XS | From 2000 |
| GATES K015536XS (16 valves) | From 2000 |
| GATES K055781XS, K015587, K015564 | From 2000 |
| Analogs | |
| BOSCH 2112-1006040 | From 1200 |
| INA 530055410 | From 1200 |
| CONTITECH CT996 | From 1200 |
| GATES 5539 | From 1200 |
| BOSCH 1987948286 (16 valves) | From 1300 |
| BOSCH 1987946329 | From 1300 |
| CONTITECH CT527K2 | From 1800 |
| CONTITECH CT1137K1 | From 1800 |
| LYNXauto 137FL22 (16 valves) | From 1500 |
| Hola TH1372 (16 valves) | From 1500 |
| BOSCH 198798527 (tension rollers) for VAZ 8 and 16 valves | From 450 |
Before purchasing spare parts, check the compatibility of the parts with the model of your technical device. Check the catalog numbers against the data specified in the instruction manual.
When we change the belt, do not forget to put marks on the crankshaft and camshaft. Many car enthusiasts neglect this rule, as a result of which the engine does not start, operates unstably, and the ignition angle is lost.
Which belt is better: domestic or foreign manufacturer. Russian analogues are not inferior in quality to imported ones, so it is not rational to overpay for a brand name. The final decision is made by the owner of the technical equipment, but it is necessary to listen to the opinions of experts.
Causes of drive belt wear
- Duration of vehicle operation without intermediate prevention and diagnostics;
- Installation of non-original parts, poor workmanship;
- Mismatch in length, width, number of teeth;
- Aggressive driving style, speed limits;
- Critically high (low) temperature conditions, climatic features.
Signs of belt wear
- Unstable engine starting: excessive wear or weak tension leads to malfunction of the ignition system;
- Copious amounts of smoke from the exhaust pipe due to melting of the catalytic filler;
- The appearance of third-party sounds when the engine is running;
- Presence of oily streaks around the perimeter of the drive mechanism;
- Cracks, fiber breaks on the belt, broken teeth, other signs of wear;
- The power unit does not start, the starter rotates.
Consequences of untimely replacement of the timing drive
- Wear of pistons, crankshaft liners, camshaft, valve mechanism;
- Increased engine oil consumption;
- Deformation of gears, cylinder head (cylinder head).
Preparatory work
Before you start work, familiarize yourself with the timing system diagram and the location of the marks on the camshaft and crankshaft.
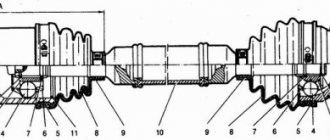
This is what a detailed timing belt diagram looks like.
Scheme: 1 . Crankshaft pulley. 2 . Timing belt. 3 . Water pump pulley. 4 . Tension roller. 5 . Intake camshaft pulley. 6 . Timing belt upper protective cover. 7 . Exhaust camshaft pulley. 8 . Phase sensor synchronization dial. 9 . Support roller.
A – TDC mark on the crankshaft pulley. B – Mark on the oil pump cover. C – Installation mark on the protective cover. D – Mark on the exhaust camshaft pulley. E - Mark on the intake camshaft pulley. F - Installation mark on the protective cover.
Tools for work
To carry out all the work you will need:
- New timing belt for the 16-valve VAZ-2112 engine.
- Socket head for “10” and “17”.
- The key is "17".
- Screwdriver.
- Tensioner pulley key.
Step-by-step replacement procedure
- First of all, after opening the hood, remove the negative terminal from the battery.
- Next, remove the timing belt protective cover by unscrewing 6 bolts using a “10” socket.
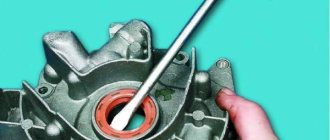
We clean the sensor from dirt and dismantle it.
Everything has been removed, everything needs to be replaced - that’s how it should be!
We set them up as marked with a marker.
If all work is carried out in such a strict order, the entire replacement can be done with your own hands within an hour.
Source
Injector types
The injector controls fuel injection and can also control the ignition. On all new injection machines, the ignition is set by a computer and adjusted by compiling various firmware. But this was not always the case, and on old cars, the same Japanese ones from the 90s, the ECU only regulates fuel injection, and the ignition timing is set using a distributor and set in the same way as on old models. Lada, but depending on the speed, the ignition timing is adjusted using a more complex vacuum system than the Zhiguli carburetor. Sometimes a pipe breaks during operation and the traction is lost; you will have to look for and correct this defect.
Replacing the timing belt VAZ 2112 16V
Replacing the timing belt of a VAZ 2112 16V in a car service center by specialists using a complex scheme...
Greetings, car enthusiast on the autoblog RtiIvaz.ru! Today we will look at the work scheme for replacing the timing belt and tension rollers in a car service center on a 16-valve, 1.5-liter VAZ 2112 car engine by masters of their craft.
Replacing the timing belt is a responsible operation that must be performed in accordance with the regulations prescribed by the manufacturer. It is extremely undesirable to exceed the prescribed mileage before replacement, since when the timing belt breaks, the valves bend as they meet the pistons.
When to change
The manufacturer provides a 100,000 km warranty on a new belt. But the quality of the tension and deflection rollers leaves much to be desired. Therefore, based on life experience, the timing belt along with the support rollers should be changed every 50,000 km. This will help avoid tragic consequences resulting from a timing belt break or failure of one of the rollers.
Also, after 50,000 km, it is necessary to check the coolant pump (pump) for leaks, play and squeaks. If necessary, the pump must be replaced. When a vehicle travels more than 100,000 km, the coolant pump must be replaced.
The first part of replacing the timing belt
Before carrying out any work on the vehicle, for the safety of the work, you must always remove the negative terminal of the battery.
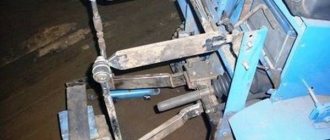
It is convenient to carry out the work of replacing the timing belt using an inspection hole or overpass, where it is easier to drain the coolant from the engine cylinder block. It is necessary to drain the fluid if you intend to change the engine pump. To perform the operation, it is necessary to place wheel chocks under the rear wheels, jack up the car, and remove the front right wheel to gain access to the crankshaft pulley.
After the car is jacked up, it is necessary to place an additional safety stand under the body. You can use an empty 20-liter gasoline canister by placing it on its edge.
Next, you need to remove the decorative plastic engine cover, which is secured with 4 bolts (X10 key). After removing the cover, it is necessary to remove the timing gear protection casing, which is secured with 5 bolts (X10 key). Here it is convenient to use a ratchet wrench with a short head (10).
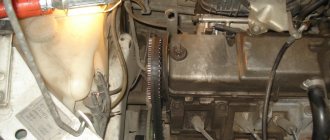
After removing the protective cover, it is necessary to conduct a visual inspection of the timing belt for cracks, delamination, abrasions, etc. Despite the mileage of the car, if there is a suspicion about the quality of the timing belt, then it must be replaced.
A break in the rubber drive can lead to major engine repairs.
The second part of replacing the timing belt
After removing the front right wheel, access becomes available to work on replacing the timing belt. To gain access to the crankshaft pulley, you must remove the decorative plastic trim covering the pulley.
Next, before carrying out the operation to replace the timing belt, it is necessary to set the piston of the first cylinder to top dead center (TDC). The piston of the first cylinder is adjusted by rotating the crankshaft pulley until the marks align. It is necessary to use the X17 head and a crank to rotate the crankshaft.
In this case, it is forbidden to turn the engine by the bolts of the camshaft pulleys, so as not to break the threads of the bolts securing them and not to cause damage to the engine.
Slowly turning the engine crankshaft, it is necessary to align the marks on the camshaft pulleys with the marks on the protective (rear) timing belt cover. After aligning the valve timing marks, it is necessary to maintain the alignment of the marks on the camshafts and the crankshaft pulley.
The crankshaft pulley can be marked with paint or a marker relative to a mark on the cylinder block, or one of the pulley teeth that is exactly vertical. To check that the piston of the first cylinder is at (top dead center), you need to unscrew the spark plug of this cylinder and use the tip of a screwdriver to make sure that the piston is actually in the upper part of the cylinder.
How to replace a pump along with a timing belt
If you plan to change the pump, then you need to remove the engine protection; this work must be done from the inspection hole.
Then you need to remove the generator drive belt, for which you need to loosen the lower bolt of its fastening and the upper bolt of fastening to the adjusting bar. We remember the position of the belt or draw a sketch on a piece of paper, then the generator is moved to the loose side and the belt is removed.
Next, you need to drain some of the coolant from the cylinder block. To do this, you need to remove the plug in the drain block. It is advisable to let the engine cool down a little, as you can get burned from the hot liquid. Before handing over the drain plug, it is advisable to treat it with an anti-rust compound, such as WD40 or a similar liquid. To drain, you must prepare in advance some kind of capacious container and a hose, which must be attached to the vacated drain hole in the block, and the other end of the hose must be lowered into the prepared container.
Some craftsmen insert a funnel or a plastic bottle with a cutout into the end of the hose. For whom it is more convenient to work. After the coolant drain plug is released (there is a vacuum in the system and the liquid does not come out of the block), you need to attach a drain hose and then open the cap of the expansion tank, a vacuum will appear and the liquid will begin to come out of the block. If the liquid begins to come out immediately under pressure from the block, before removing the cap from the expansion tank, then the cap valves do not hold and it needs to be replaced.
Setting the ignition timing
Required for carburetor models only. To work you will need a tool - a strobe light. It is sold in almost all car dealerships and at a reasonable price. It is also advisable to have a wrench to unscrew the nut that secures the distributor.
When choosing the correct ignition timing, mark 1 on the flywheel should be between the central division (notch) 2 and the previous division 3 of the scale. If not, adjust the ignition timing.
To adjust the ignition timing on a VAZ 2110 you need to:
- Do minimal work. The crankshaft should rotate at a maximum speed of 820-900 rpm. The tube coming from the carburetor and connecting to the vacuum valve must be disconnected.
- Take a strobe light and connect the cables to the “-” and “+” terminals of the battery. The tip of the high-voltage wire must be removed from the socket and the wire coming from the strobe inserted.
- Remove the rubber plug from the slot in the crankcase and point the strobe light at the free space. Next you need to start the car. During its operation, it is necessary to apply a mark to the flywheel. As soon as the engine starts, the strobe light starts. Flashing will indicate a sign. The flashing will be fast and the sign will remain stationary. However, if you move the dispenser, the label will move.
- To move the label and dispenser, you must loosen the top nut securing the dispenser, as well as the 2 lower nuts. Subsequently, the distributor can be turned slightly. At this time, the mark will also move with the strobe light.
To understand the process of adjusting the ignition in more detail and clearly, it is recommended to watch the corresponding videos. To resolve the issue of how to set the ignition on the VAZ 2110 8 injector, you can also consult with experienced car owners.