Windows in cars always remain an important part of the external and internal style, as well as functionality. A good overview affects the safety of the car owner and passengers of his vehicle, and allows you to admire the beauty of the area being driven. Cars are equipped with special mechanisms that are installed in all vehicles - window lifters - for convenience and safe driving. These devices make it possible to open or close a window in the event of an emergency or regulate the temperature in the cabin in cars that are not equipped with air conditioning.
More modern car models have electric windows. They allow you to lower or raise the glass at the touch of a button. The windows of VAZ 2108 cars received mechanical windows. The glass is lowered/raised by rotating the handle. During operation, such mechanisms fail and require repair or replacement, and it is not difficult to do this yourself.
Mechanical glass lifting devices
Structurally, VAZ mechanical lifts are made simply, their parts are inexpensive, installation is simple, and they do not require power. The operating principle of such a mechanism eliminates the possibility of involuntary raising or lowering of the glass. The downside is the need to spend time and effort adjusting the glass height and the inability to close all windows at the same time - you will have to turn the handle on each one.
When raising and lowering the windows of a VAZ 2108 becomes a problem - the handle turns with difficulty, the window moves heavily, or even gets stuck in one position - you should check the condition of the window regulators. To do this, they are disassembled.
- The window is lowered all the way down, the upholstery on the doors and the rear view mirror located outside are carefully removed.
- Afterwards, the external and internal glass seals are removed from below and, after removing the holders, the protective door film is removed.
- Remove the seal from above.
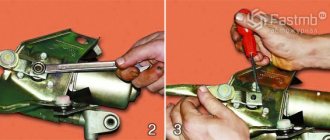
- By turning the handles, the glass is positioned in such a way that you can reach the bolts securing the glass to the lift slide in the VAZ 2108.
- After unscrewing the bolts, lower the window down.
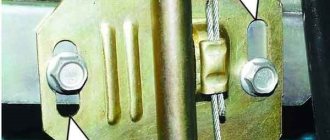
- Unscrew the fasteners of the VAZ 2108 glass lifting device guide.
- After unscrewing the nuts of the upper and lower guides, supporting the glass lift, pull it out of the door.
When purchasing a new mechanical window regulator, you should be sure to pay close attention to the markings: the bracket should be marked “2108”. Different VAZ models have different window lifting mechanisms. In the marking of the part, the sides are encrypted before the dash: 10 - installed on the right, 11 - on the left.
After repair or replacement, the window regulators are installed in place, the cable and mechanism are lubricated with a special penetrating compound. Subsequent door assembly occurs in the reverse order.
Mechanics most often break down due to worn parts or mechanical damage. These include breaking the cables or getting a foreign object into the guides. As practice and reviews from experienced VAZ 2108 car owners show, gears most often become unusable - their teeth wear out or break. Since these parts are inexpensive and sold everywhere, replacing them is quite easy.
Electrical related breakdown
When repairing the electrical equipment of the machine, it is necessary to disconnect the wires from the battery
It is important. Because first you need to check the functionality of the fuse responsible for the operation of the lifts
The marking of this fuse is F5. If it malfunctions, we replace it.
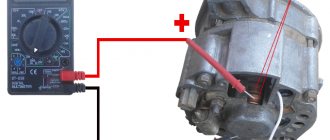
In this case, it is prohibited to use a screwdriver or metal tool. There is a possibility of a short circuit in the electrical circuits. If the fuse is working, then it is worth measuring the voltage of the power window motor (at the terminals) with a multimeter or an ordinary 12-volt light bulb.
If there is no voltage, inspect the electrical wiring of the power windows. If everything is fine there, we study the relay, and then the control unit. It may be necessary to pinout the control unit. We will not dwell in more detail; on the Internet there are a lot of detailed articles with schematic images on this topic.
Sometimes it happens that the glass closes on its own immediately after opening. It also happens that the button does not work until the ignition key is turned. Then it is best to clean the contacts of this button. And if this does not help, then replace it completely.
It happens that the backlight of the power window buttons on the VAZ 21099 does not light up. Most likely the problem is in the light bulb or LED itself. Replacement is required. It is best to first remove the entire control unit and disconnect the wires from it. Then, using a screwdriver or knife, remove the button itself, carefully prying it off, first on one side, then on the other. Then everything is elementary. A lamp or LED is in front of us. We use a soldering iron to replace it. In the case of replacing an LED, you need to use a resistor of a certain value. And be sure not to forget about polarity. You need to solder the anode and cathode correctly.
Replacing mechanics with electrical devices for glass lifting
VAZ 2108 owners often improve their car, fortunately there are many opportunities for this. In particular, mechanical basic windows are being replaced with electric ones. Electric windows are operated by a reversible electric motor. To raise/lower the glass, you need to press the button, which starts the mechanism. Their design is more complex, allowing you to simultaneously close or open all the windows in the car, which can be very convenient. But they require uninterrupted power supply, and certain types of mechanisms can be triggered by accidental pressing.
Built-in electric windows are conventionally divided into two groups:
- the first includes simpler ones, they consist of a motor with transition elements that, through electricity, drive the basic mechanism of an ordinary lift;
- The second category includes autonomous mechanisms that are installed instead of basic ones.
Depending on the types of mechanisms, the scheme of their operation may be different for different models: lever, cable or worm types are distinguished. Also, lifting mechanisms are universal (suitable for any model). Installation of the latter is recommended for inexperienced drivers to gain repair experience.
The first stage is the purchase of an electric lift for the VAZ 2108 either in a car store or at a car market. In addition, you will need brackets, adjustment buttons, plugs, and mounting material. They disassemble the door and pull out the basic mechanism, as described above. Next, the new lift is “folded” a little for convenience and brought into the door. Carefully put the mechanism in place of the previous one and begin to secure it. The bar is raised to the bracket on the glass, then the structure is connected with bolts. To do this, you can connect the lift motor to the battery.
Detailed replacement of window regulators
So:
- From the interior side, you need to remove the handle and remove the “soap dish” located under the door handle itself.
- The fastening bolts are carefully unscrewed and the interior trim is dismantled. Do not damage the plastic latches.
Note! If several latches are broken, they must be replaced with new ones. Otherwise, rattling will be observed in the cabin.
- Now, one by one, remove the plugs, the handle and its lock. You should also unscrew the bolts from the handle and remove the “pipe”.
- As a rule, manual window lifters are secured with 7 nuts and a pair of bolts that secure the device to the glass. In this case, you need to remove all the bolts and remove the device from the door. Since there is a risk of glass breaking during the change process, it is recommended to secure it with a cable.
- The guide bolt of the old window lifter is removed, as well as the bolts of the bracket for raising the glass through the door hole. The same applies to the lower mounting bolt of the SP slide.
- After unscrewing all the necessary fasteners, you can safely remove the mechanical device.
- Now you need to pay attention to preparing the new window lifter, as well as installing the correct brackets.
- Temporary wiring from the battery is currently being installed to the door. It may be required to regulate the ESP in order to prevent sticking and biting of the glass when lifting and when fixing the device to the glass.
Note! You need to be extremely careful not to allow short circuits in the wires.
- To install the window regulator inside the door, you first need to install it in the folded state, as there is a risk that it will not fit.
Note! At the time of purchase, the device is in an unfolded state. In this case, you need to connect it with temporary wires, only after that, changing the polarity, the rail is brought into the middle.
- The ESP is mounted in place of the old lift, the SP studs are inserted into the door holes and secured with several nuts.
Note! The studs are not driven in, but attached, since then you will need to screw the lift to the glass, which requires some adjustment.
- The lift rail is raised, so it becomes possible to align the holes with all the glass mounting holes, only then the joint is screwed into place.
- The glass is lifted and the smoothness of the work is monitored; even the smallest distortions and jams are not allowed. If this cannot be done, most likely you need to loosen the fastening of the joint venture directly to the door. Turn the fasteners left or right, re-tighten the nuts and check the operation of the installed window lifter.
Note! In some situations, such actions make the joint venture work worse, then you will need to turn the mechanism in the opposite direction.
Determining the location of control buttons
For these actions you will need a ruler, pencil, file and hand drill:
- First, drill a hole in the casing. You can’t rush in this matter, it’s better to make the hole smaller, sharpen it and try on the button. If it doesn't fit, you need to sharpen it again.
Note! The wires must not be short-circuited; it is advisable to disconnect the “-” terminal of the battery at the time of work.
- The plastic of the front pillar is dismantled and the interior trim is folded back.
- Several meters of two-core wire are passed through this stand directly into the door. It is also required to conduct a single-core wire according to this principle.
- Since the wires rot and break after a while, you need to install casings between the door and the stand. As a rule, when the ignition is turned off on the “nine”, only the cigarette lighter and side lights work.
- Once the wiring is all the way through, it's time to connect it. To do this, you need to have an appropriate diagram available.
- At the end of the work, you need to check the functionality of the entire mechanism. Place the terminal on the battery, press the button, evaluate the efficiency of the new ESP and the lighting of the backlight on the button.
Note! If the joint venture is working too slowly, you need to try switching the “+” wires.
All resulting connections are wrapped with electrical tape, while the wires themselves are hidden in a niche in the cabin. This must be done in order to prevent them from being pinched by the ESP rail. You can install a button in the door trim of a VAZ 2109, connect the block and mount the trim in place. All removed elements are installed in the opposite order of removal and the functionality of the power windows is re-checked. Of course, ESP is an important part of the machine, but it is not necessary to turn to professionals to install them, since videos and photos on the Internet reveal all the intricacies of installing the mechanism with your own hands. For a better understanding of the replacement process, detailed instructions are provided with a description of each stage. To obtain the desired result, it is important to purchase a high-quality mechanism, the price of which may vary depending on the manufacturer.
FakeHeader
Comments 40
I had the same problem... I installed Katran and forgot... One thing is bad - it’s not cheap
Scissors pull more vigorously in any case, but if you are thinking about getting rid of these, then these are exactly what I need. I want 2 glasses and they have the most compact design.
Loosen the bolts. Slowly lift the glass. Where it is distorted, it comes loose. Fix it. Check. If you don’t walk smoothly on the sled, repeat the procedure.
Thanks for the advice, I'll try it!
They put them on 2108 and then they tear their ass on the Internet that there is nothing better than them in the world. however, my advice to you, as a person who has used both the handle and the forward and the golden eagle. The glass on the 08 is heavier than the glass on any 4-door. Due to the lift’s counter structure, it’s fucking difficult for the motor to lift such windows. The most ideal option is the design of scissors. There are no distortions and everything is attached to the standard holes. Yes, and they were made just for two-door cars. The forward has no adjustment, but there are washers and play in the holes for fastening. That's where you twist them.
ESP is an indispensable element in any car nowadays. The latest domestically produced cars were supplied with ESP straight from the factory, but they work very poorly and raise the window with great difficulty. In winter, the glass freezes to the seal and it is impossible to lower it in any way. It is possible to correct factory problems by installing the necessary elements and in this case these are power windows.
So, we go to disassemble the VAZ 2109, 2108, 21099 or buy an electric window lifter at a car store. It is best to purchase an ESP rack-and-pinion design, because it is much more reliable than a cable design.
In addition to the ESG itself, the kit should contain the following tools: brackets for installing window regulators on a VAZ 2109, control buttons, plugs in place of the standard window regulator handles, all kinds of washers and nuts. When all this is available, you need to start installing electric SPs on the car.
Installation must be carried out according to the following scheme: first, the device must be installed on one door, then on the other, then you need to lay the wiring, check the functionality of the entire structure, and install everything back. The installation will now be discussed in more detail. First, you need to remove the handle from the interior side, pull out the “soap box” under the door handle, unscrew the fastening bolts and carefully remove the door trim, while doing everything extremely carefully so as not to damage the latches.
If some of the latches were broken, then in this case it is better to immediately purchase new ones, because otherwise excess sound may be created in the cabin. Now, one by one, you need to remove the plugs, the handle lock, the handle itself, unscrew the handle bolts and remove the “pipe”. The manual SP is installed on 7 nuts and a few more bolts need to be secured to the window regulator to the glass itself. We unscrew all the bolts from the door and pull it out. To prevent the glass from breaking during operation, it is advisable to secure it with a cable. The window lifter guide block must be carefully unscrewed, several bolts of the glass lifting bracket through the holes in the door, two middle bolts of the SP guides, the lower bolt of the window lifter slide, the upper bolt of the SP slide.
see also
Today, electric windows have become an indispensable element, in principle, like any household electrical appliance. New versions of the VAZ 2109 car, of course, have ESP installed at the factory, but it is difficult to say that they work with the required efficiency. In frosty months, the rubber seal freezes to the door, making it almost impossible to lower the glass. Having a suitable manual for the VAZ 2109 at hand, replacing the window regulator will be easy and simple. Thus, it is possible to get rid of all the errors of a given manufacturer. On a VAZ 2109, replacing the window regulator can be done on your own.
First you need to visit a specialized store that sells high-quality electric windows for vases. It is recommended to immediately purchase a rack-and-pinion design for ESP; compared to a cable design, it is characterized by increased reliability. The purchased kit should also include:
- control buttons;
- special brackets designed for installation of joint ventures;
- plugs for the holes in the handles of a conventional window lifter;
- various washers and nuts.
Installation is performed according to the following scheme:
- the device is first mounted on one door, then on the other;
- wiring is being laid;
- work efficiency is checked;
- assembly is in progress.
Types of electric windows and which ones are better for the VAZ 2109
ESPs come in various types.
- cable-type (weak and very slow, with the advantage of being cheap and being able to replace the motor separately if it suddenly burns out);
- rack and pinion (a bit weak, based on operating experience - require regular lubrication);
- articulated-lever (work quickly, make little noise, are quite powerful: they can easily cope with frozen glass).
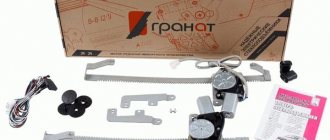
We opt for the latter, called “Pomegranate”. Moreover, the kit of these ESPs includes everything necessary for installation - electrical wiring, buttons, plugs, all the necessary fasteners, rubber cuffs for pulling the wiring from the rack into the door.
There are also “Katran” and “Berkut”, they have a slightly different device and installation is a little more complicated, but according to reviews they are also not bad.
Start installation
You need to start installing window lifts by choosing the mechanism itself. Today we have three versions of this device. Everyone has their pros and cons.
| Types of units | Advantages and disadvantages |
| Cable type. | They are quite cheap compared to other types of devices. But this fact is reflected in their work: they are leisurely and do not have much power. In addition, such devices can often fail and even break. But one of their undeniable advantages is that individual parts can be replaced. |
| In terms of all their characteristics, rack and pinion lifts occupy an average niche. | They are moderately reliable and functional. They work for a long time without any complaints, but depending on the intensity of work, they may require frequent lubrication of the slats. If this is not done, the mechanism may jam. Also, such a device requires gentle handling. |
| Lever-articulated lifts always receive the best reviews for their functionality. | These devices work best: they are fast and silent. A window lifter like this option can even move frozen glass. They are often recommended to be installed when replacing mechanisms on “nines”. |
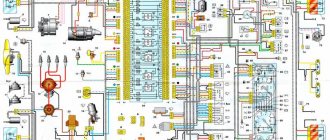
For those who have already installed modifications on cars, it will be no secret that without the correct circuit it is difficult to do this. When installing any electrical device, first of all you need to correctly connect all its contacts and power supply in order to avoid possible disconnection and broken connections in the future.
Installation and connection diagram for VAZ 2109 window regulators: step-by-step instructions with photos
- Before starting work, you must turn off the power supply to the vehicle's on-board network from the battery. Or we separately turn off the power circuits for the cigarette lighter and the backlight of the instrument panel and buttons, because The power supply wiring for the power windows will be connected to these circuits in the future.
- Remove the door trim. It can be removed quite easily, but it is better to stock up on mounting pins.
When the circuit is assembled, it is necessary to connect the battery power and check the correct operation of our system. We turn on the side lights and check the correct operation of the backlight of the ESP activator keys. If the backlight does not work, swap the sockets on the contacts of the keys, indicated in the diagram as 3 and 6. You can install the window lifters in the standard way, here are two diagrams:
You can read more about the types of mounting blocks for front-wheel drive VAZs here.
- We check the functionality of the window regulators. The glass should move smoothly, without jamming or jerking, and should not come out of the guides. To facilitate the movement of glass in the seal, it can be treated with silicone grease.
- All that remains is to reinstall the door trim.
- That's it, the installation of the window lifters is complete, let's enjoy the completed modification!
- Replacing the window regulator
- Additional video materials
How to install and connect electric window lifts “Granat”: video experience
Welcome! Today you will learn how to correctly change the window regulator on VAZ cars of the Samara family.
Summary:
Where is the window regulator located? It is located on the inside of the door, under the trim. In this regard, it can only be clearly seen when the trim is removed from the car door. Below is a photo in which the arrows indicate the location of the window regulator:
When should you replace your window regulator? Usually, when it fails, the window may stop raising and lowering by turning the window lifter handle!
Basic malfunctions of window regulators and their repair
If we generally consider the side window lifting device, then in the mechanically driven cable type there are very few components that can fail. The first of these is the cable itself. Over time, it stretches out, and its threads may break due to corrosion, which will lead to jamming, or it may break completely. Due to excessively applied forces, the gearbox itself may fail.
But in general, such a mechanism is quite reliable, rarely breaks down, and to maintain it, it is enough to lubricate all its elements just once a year.
Video: Replacing the electric window of a VAZ 2110, 2111, 2112 and Priora
But problems with power windows arise more often. At the same time, their actuators themselves are very reliable and break down infrequently. Much more often, malfunctions occur due to damage to the guides.
As for the electrical part, it is this that most often causes non-working lifts.
The most common problems are:
- Blown fuse or main power window control unit;
- Broken or damaged wiring;
- Oxidation of contacts on control keys;
- Electric motor malfunction;
It is in this sequence that the circuit is checked to identify a malfunction. That is, if the power windows do not work at all, then the reason usually lies in the lack of power, so the problem must be looked for in the fuse or control unit.
If a particular lift does not function, then first the circuit up to the control keys is checked, then the keys themselves, then the wiring to the motor and the electric motor itself.
How to replace the window regulator on a VAZ 2108-VAZ 21099?
Removal: 1) First, remove the trim from the car door on which you are going to work. (You can find how to remove the trim in the article: “Replacing the door trim with a new one”)
2) Now remove the side glass from the car door, using the article on “Replacing glass on the side door of a car”.
3) Then, using an extension with a socket head, unscrew the two nuts that secure the middle part of the mechanism guide.
4) Next, unscrew another nut of the lower fastening.
5) And then unscrew the upper fastening nut.
6) Now, using the same extension cord with a union head, completely unscrew the three nuts that secure the window lift mechanism itself.
7) And to complete the operation, remove the window regulator through the hole in the inside of the door.
Installation: 1) First install the new window regulator in its place. And after installation, tighten all the bolts and all the nuts that secure it.
Note! The window regulator mounting bolts and nuts include: 1. Three window regulator mounting nuts. 2. And also the nut for the upper fastening of the guide. 3. Lower fastening nut. 4. And two nuts for the middle fastening of the mechanism guide. 5. And the last bolts that secure the glass to the mechanism.
2) Once the window regulator is installed, proceed to the final installation of the glass and door trim in place.
Additional video materials: More detailed instructions for replacing the window regulator can be found in the video clip located just below:
Note! From the video clip you will learn: How to remove and install trim from a car door, and it will also include detailed removal and installation of glass, and in addition to all this, the window regulator itself will be replaced with a new one!
Important points
- dismantling the standard ones and subsequent installation of new ESPs on the rear doors of the VAZ 2109 is carried out in the same way as indicated above (since the rear doors differ from the front ones only in the location of the standard window lifter handle: on the rear doors it is shifted 3 cm to the left);
- When removing the door trim using a screwdriver, you must be careful: the plastic plugs over the mounting bolts are very fragile. They break easily if you apply too much force by prying them with a screwdriver;
- The simplest ESP connection diagram given above is far from the only one. Car enthusiasts who are well versed in electrical engineering prefer more reliable and complex circuits that use mounting blocks. Here is an example of one such scheme:
Connection diagram for ESP with mounting blocks for cars produced before 1998
ESP connection diagram for VAZ 2109, produced after 1998
So, you can install an ESP on a VAZ 2109 yourself. In order to assemble a simple electrical circuit, no special electrical skills are required. Knowledge from a school physics course is quite enough. But at the stage of choosing window lifters you should be especially careful. It is strongly recommended to abandon both rack and pinion devices, even if their price seems incredibly attractive. Only lever window lifters should be installed, since they are the only guarantee that the glass will not freeze to the door on a frosty winter day.
If a VAZ 21099 car has an electric window lifter, then sooner or later it will need repairs. The electric window lift is a very convenient thing. The driver is less distracted from the road if the window needs to be opened. A broken window regulator does not affect driving safety. With such a breakdown, the car can be used. But the ride will be less comfortable for both the driver and passengers.
The window regulator may stop working completely or begin to jam. Every car owner can repair or replace broken power windows. To do this, you need to have all the necessary tools and spare parts with you.
What is the cause of the problem
Sometimes there is no malfunction as such. For example, window regulators may fail in severe frost, but other electrics also suffer from similar problems. Therefore, experts advise not to save on buying/renting and heating a garage. But mechanical failures are much more common.
If you suspect a breakdown, you first need to check the TsBKE - this is AvtoVAZ’s personal innovation, which operates the electrical package. First you need to make sure the fuse is working. If everything is fine, we disassemble the doors, arm ourselves with a multimeter and measure the voltage at the terminals of the window lift motor. If there is no voltage, then:
- There may be a malfunction of the power window control unit (the button for opening and closing the window located on the door).
- The problem lies in the connection of the wire connectors.
- CBKE refused.
- The window lift motor is stuck or stuck.
- The window lift cable has already outlived its usefulness and needs to be replaced.
- Distortion of the glass itself, while the rest of the system is in full working order.
All of the above breakdowns occur with approximately equal frequency, with the exception of glass distortion, which occurs much less frequently.
Self-detecting a broken power window can be seriously difficult. First, it is difficult to diagnose a CBCE problem. The device is designed in such a way that one of the cables is multifunctional. It could be:
- X1-4.
- X1-6.
The essence of multifunctionality lies in the fact that some conductors are capable of independently changing polarity if the appropriate command is received from the CBKE. These pairs can simultaneously control side mirrors, central locking, provide power, etc.
To diagnose a malfunction of the CBKE, it is necessary to perform the X1-4 or X1-6 test, which is multifunctional on a specific vehicle. In this case, you should also press the window up/down button. If the multimeter detects the presence of electricity when the button is activated, then everything is fine. You also need to check sockets No. 1, No. 5, No. 11 and No. 13. If in all cases the presence of current and correct operation of the system are noted, it means that the reason does not lie in the CBKE.
As for the power window control unit, you most likely will not be able to identify the fault yourself. The fact is that it ensures the operation of all such devices in the car, which means you can call it as much as you like, but it will be very difficult to confirm the fact of its failure and find out where exactly it failed. The only real way out in such a situation is to contact specialists at a service station. With a high probability, it will not be possible to do without diagnostic equipment.
Repair is determined by the specific malfunction and is not always possible at home. If we are talking about skewed glass or poor conductor contact, this is not a problem. You can also replace a worn-out window lift cable yourself; you just need to purchase a new one at the nearest car market. If the problem lies in the power window control unit or in the CBKE, then you cannot do without contacting a service center. In this case, independent electronic repair is impossible.
July 29, 2015 219,652
Owners of Lada Priora have to periodically deal with malfunctions of power windows (ESP). In some cases, the problem lies in some small detail that can be easily fixed with your own hands; in other cases, you will have to contact a service center to repair the ESP. We decided to look into the main reasons why power windows do not work.