Driving on Russian roads significantly reduces the service life of suspension elements. On VAZ 2114 models, the chassis is not a weak point, but over time its various components become unusable. Silent blocks, grenades, boots, steering rods, stabilizer struts - all of this wears out intensely when driving over uneven surfaces. Rear shock absorbers also suffer from bad roads and therefore require periodic replacement. Replacing the rear struts of a VAZ 2114 yourself will save you money and relieve you of extraneous sounds from the chassis.
Useful video:
Step-by-step instructions on how to replace the rear struts of a VAZ 2114
Hi all! Today at VAZ Repair you will learn how to replace the rear struts on the “fourteenth” Lada at home, quickly and correctly. This step-by-step instruction for replacing rear shock absorbers is supported by photographs of the process, which will allow you to replace the rear shock absorbers on a VAZ 2114 without the help of specialists, that is, with your own hands.
Replacement of rear shock absorbers is necessary if they are faulty. The latter manifests itself in the form of knocks, oil leaks on the rod or shock absorber body, as well as a lack of vibration damping. Shock absorber malfunctions occur for various reasons, this could be: critical wear of the components of the shock absorber strut due to service life, failure due to violation of operating rules, etc.
Before you begin, prepare:
- New shock absorbers;
- Jack;
- A set of keys, including special keys for fixing the rod and a socket wrench for unscrewing the rod securing nut.
Useful tips.
General recommendations:
- Before direct installation, we carefully inspect the purchased parts and treat them with kerosene. Broken and unusable elements are not needed for repairs;
- A number of professionals believe that the final tightening of bolts and nuts does not require the participation of a jack;
- The struts can be checked using the wheel alignment method. This method increases the service life and increases the comfort of the trip;
- There are special stands where you can check the result of the replacement. The price of the service is small. At the same time, one’s own skill and skill is tested;
- Don't worry if the support bearing doesn't come out with the strut when you remove it.
Popular question: how often do parts need to be replaced? There is no clear answer. Vehicle operating conditions, quality of spare parts and personal skills are key success factors. If a car owner likes to “pick up” potholes and pits, then the time for repairs will inevitably approach. It is also obvious that if there are “symptoms” of a malfunction (dull knocks, fluid leakage or spring deformation), then there is no need to hesitate.
The process is simple. You just need to know clearly what and when to do. A competent selection of tools and spare parts is half the battle, and step-by-step instructions that allow you to carry out repairs yourself will help you complete what you started. Take care of yourself and your car, because health and life are the most valuable things we have.
How to replace the rear shock absorbers of a VAZ 2114 with your own hands - step-by-step instructions
- First of all, you need to remove all unnecessary things from the trunk, remove the plastic covers and anything that might get in the way.
- Next, remove the cup plug, under which there is a nut securing the strut rod.
- Using a special wrench that needs to be used to keep the rod from turning, and a carbon socket wrench we unscrew, or rather “tear off” the rod securing nut.
- The next step is to remove the wheels; to do this, we “tear off” the wheel nuts, then install a jack and hang the rear of the car. Attention! Working with a jack is dangerous, so install stops or blocks under the car that will securely hold the car and prevent an accident.
- We dismantle the wheels. Before proceeding with further work, I recommend treating all threaded connections that need to be unscrewed with WD-40, this will speed up the process.
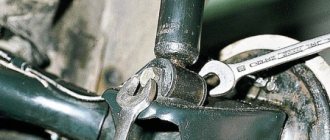
- We begin to “free” the rack. Using a “19” wrench, unscrew the fastening bolt that secures the rack to the beam.
- We completely unscrew the “torn off” nut attaching to the rod at the beginning, after which we can safely remove the strut along with the spring.
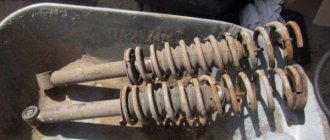
- It should be noted that the stand does not always come out with the support, for example, as in my case. Now let's start disassembling the rack.
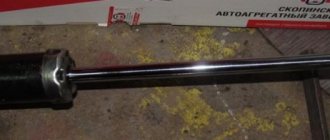
- We remove the spring and check the old shock absorber “for ourselves” to make sure that it is really faulty.
Next, take a new shock absorber and bleed it. Not many people know that pumping shock absorbers is MANDATORY! Some people mistakenly believe that this is not necessary; as a result, the rack “dies” immediately after replacement or simply lasts several times less than the one that was pumped. How to pump up a rack? Everyone has their own answer to this question, some advise turning it over so that the oil spreads, others, on the contrary, prohibit doing this... In general, there are enough manuals and video instructions on the Internet that will tell you in detail and show you how to bleed shock absorbers before installation.- We assemble the strut and do not forget about the bump stop and shock absorber boot.
- Let's start installing the shock absorber. Here you will have to tinker... The fact is that sometimes, as in my case, the stand is not so easy to install in place. If difficulties arise, you can jack up the beam with a jack. After the rod has come out, install a sealing gasket in the interior and secure the rod with a fastening nut.
- Tighten all bolts and nuts. We put the wheels back and lower the car from the jacks. We repeat all the above steps in relation to the other rack. Replacing the rear shock absorber of a VAZ 2114 on the other side follows the same principle.
Order of Operations
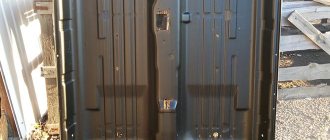
Removing old shock absorbers and installing rear struts of the VAZ 2114 and other models can be done without an inspection hole or overpass - just jack up the car. But before you lift the car, you need to remove the assembly plugs located in the trunk. So:
- You need to remove the trunk shelf, bend back the upholstery and use a screwdriver to pull out the plug. The rod nuts are located under them; they need to be unscrewed and the washer and plate removed.
Now you need to jack up the car. This is necessary so that the lower rack lock is accessible. This bolt is most often tight, so it is better to pre-coat it with a special lubricant. If after this you cannot unscrew the fastener, you need to knock it out with a smaller bolt.
Now you can remove the stand, be sure to support it - it may fall. It's easier to do this if you move the end towards the rear of the car
Note! After dismantling the stand, a rubber gasket remains in the glass. It needs to be removed because the material has lost its elasticity
A new spacer must be installed, which is purchased separately from the assembly.
Now you need to remove the spacer sleeve, shock absorber cushion and bushing, remove the cover from the casing, and remove the bump stop from the rod.
You can begin installing the new unit. The rod element must be fully extended. We install the bushing, cover, its cover, and bump stop on the rack. The spacer and spring are assembled after all other parts. On a note! It is advisable to bleed the shock absorbers before assembly. This will increase their functionality and service life. The procedure is performed by turning the device over. This will allow the oil to spread evenly throughout the entire assembly.
Installation is performed in reverse order.
Then all the above operations are repeated on the other side of the machine. Difficulties may arise during assembly:
- if the unit does not want to be placed in its normal place, you can use the jack beam;
- if the old parts have lost their integrity, they need to be replaced, if they are in order, wipe them with kerosene;
- if the support bearing comes out separately during dismantling, this is normal;
- to install the spacer without any problems, you need to glue it to the spring with masking tape;
- Some experts believe that when final tightening the fasteners, you first need to remove the car from the jack.
The sequential replacement of the rear struts of the VAZ 2114 can be seen in this video:
How to change rear struts on a VAZ 2114 with your own hands
Even for a not very experienced motorist, replacing the rear struts on a VAZ 2114 will not turn into a real challenge. It is more than possible to perform such an operation on your own. The main thing here is to choose new racks correctly, and also follow clear instructions.
What does it consist of?
This is exactly what we have prepared for you. In our material we will look at how to replace the rear struts on a VAZ 2114 car and how to choose the right new unit to replace the old one.
Repair of shock absorber struts
If the struts are broken, you won't be able to fix them, but with proper care, you can maximize the service life of new components. Careful driving, avoiding potholes and potholes, of which, unfortunately, there are many on our roads, can increase the life of the rear struts. Careful driving will not help if the selection of rear struts was made incorrectly, or you purchased a cheap fake.
Please note that some types of shock absorbers can be repaired using repair kits. They include rubber O-rings, valves, nuts, and seals. Be sure to change the oil inside the shock absorber. This can increase the efficiency of the device.
Selection of new
Look at different photos to see what the assembled rear pillar for a VAZ 2114 looks like. This will allow you to understand what you generally need to look for for this car.
The fourteenth model of the domestic automaker AvtoVAZ provides for the use of a telescopic rear pillar.
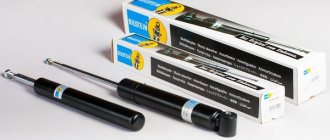
Kayaba kit
We will not rant about which ones to buy, with what characteristics, from what materials, and so on. We will simply offer you objectively the three best options.
| Name | Advantages | Flaws |
| SS20 | A high quality device that will provide excellent performance characteristics to the car. | When replacing, you need to additionally purchase a support from the same company. |
| Plaza | Available in three types - Sport, Comfort and Supersport, they have excellent performance characteristics. | Not frost-resistant, therefore problems may arise when used in winter |
| KYB | Available in several types of execution, depending on the driver’s style, they are distinguished by the best characteristics | High cost and widespread counterfeits due to the popularity of racks. |
Shock absorber: its role in suspension operation
An automobile shock absorber is a mechanism in the suspension of a car that serves to partially dampen the swaying (damping) that occurs during movement or completely absorb it.
Giving the car a smooth ride, shock absorbers act as protection for the car's chassis from overloads when driving on uneven roads and rough terrain. In the suspension, the shock absorber acts as an element to increase its elasticity along with the spring and torsion bar.
Shock absorbers are divided according to their types:
- gas single-pipe;
- gas two-pipe;
- oil two-pipe.
On the VAZ-2115 model, standard oil shock absorbers are installed at the factory. Later, when using the car, owners often replace them with gas ones, depending on their driving style.
There are 3 types of racks with different characteristics. You need to choose them based on the roads on which traffic occurs. Oil (hydraulic) – quite elastic. Designed for drivers who prefer a calm, measured ride or frequent trips on unpaved roads.
Gas shock absorbers are characterized by higher rigidity, and, as a rule, they are preferred by motorists who practice an aggressive, highway driving style. Such shock absorbers (gas) prevent swaying that occurs at high speeds and turns. Gas-oil shock absorbers combine the advantages and disadvantages of both types.
When replacement is required
If your car is still running on factory struts, you can hardly expect that over the course of many years they will not begin to act up and require replacement.
There are several characteristic signs that indicate that the old rear struts have become unusable and the car needs urgent repairs.
- When hitting holes, potholes, bumps inside the cabin, you feel a dull and strong blow in the area of the rear wheels.
- Even when passing small bumps on the road, the car bounces and so do you. This suggests that the current elements are not working properly, and the level of comfort is significantly reduced.
- After bouncing, the car with working rear struts immediately returns to its initial position. If they fail, the machine will oscillate for a long time.
- In the area of the rear pillars there are traces of lubricating fluids, which under normal conditions should not be present with a working unit.
Do I need to change the spring?
A spring is a very durable element, but with prolonged use it can become unusable. Cracks appear, elasticity and length decrease. Diagnosing the condition is very simple:
- Visually inspect the springs for cracks and deformations. If they occur, then the springs must be replaced.
- Apply a load of 325 kg*s (or 3188 N). On export models of the car, the length will be 182 mm. For those produced for the domestic market, the length should be more than 201 mm. If less, then the spring must be replaced.
The springs that were installed on the VAZ-2115 are marked in the form of the letters A and B. The former are capable of working with higher loads. Be sure to install new springs with the same class.
Replacement
Having decided on the choice of new racks, you can begin the procedure for replacing them. We recommend that you study training videos on replacing rear struts on a VAZ 2114, which allow you to carry out repairs competently and effectively even without experience in such a matter.
Don't try to repair old racks and look on the Internet for some advice on this matter. Even if something is found, resuscitation of failed suspension components will not give the desired effect. Moreover, you risk making the problem even worse.
Remember - these elements cannot be repaired. The only correct solution is replacement.
This procedure is performed as follows:
- Place the car on some flat surface. It could just be the floor in your garage;
- Raise the rear axle and be sure to put some kind of stoppers under the wheels so that the car does not suddenly jump off the jack;
- Remove those wheels where you plan to change the struts. The order of replacement does not play a big role, that is, you can start with either the left rear or the right rear wheel;
- The protection is removed from the top mount;
- Armed with a 13 mm wrench, slightly loosen your grip on the rod nut;
- Loosen the other nuts as well. This time the ones that hold the body;
- Take regular pliers and straighten the cotter pins. This will allow you to remove the old stand without any problems;
- There is also a nut on the steering rod, which should be removed without serious effort. Here you will need a 19 mm key;
- Remove the brake hose by unscrewing the nuts securing it;
- When unscrewing the steering knuckle elements, carefully remove your old strut through the arch;
- When installing a new element, simply proceed in the reverse order. There shouldn't be any problems when assembling the unit.
At this point, the procedure for replacing the rear struts can be considered complete. Now check the car in action, make sure that all previous problems are gone and the car behaves as you expected. Obviously, figuring out how to change the rear struts on a VAZ 2114 is not at all difficult. That’s why car owners often resolve such issues in their own garage. This fact does not force you to do everything yourself, since not everyone is given the opportunity to be an experienced auto mechanic. Don't be afraid to contact auto repair shops.
Let's summarize
As you can see, the procedure is not complicated, you just need to know what and how to do. For a beginner, the event will take up to 4 hours, but if you have the skills, you can complete it in 1.4-2 hours. It is advisable to check the results of work performed for the first time using the wheel alignment method or go to a car service center and use a special stand. The price of the service is affordable, but you will be convinced of your competence as a repairman. There is no definite answer to how regularly rear struts require replacement - it all depends on the quality of spare parts, intensity and care of operation, and driving style.
Execution Sequence
2. Using our hands, we rock the upper part of the front wheel of the car in the transverse direction. We check the front suspension on the other side of the car in the same way.
If play is felt (even barely noticeable), then we check the reliability of the steering knuckle to the front suspension strut and the condition of the hub bearing (see “Wheels, tires and hubs”).
Recommendation: It is better to check the performance of shock absorbers after a long trip, until the working fluid in the shock absorbers has cooled down.
3. Vigorously swing the front part of the car body in a vertical direction. If, due to inertia, the body continues to oscillate (more than two movements - up and down) after it has stopped rocking, then one or both shock absorbers are faulty. To identify a faulty shock absorber, we repeat the test, applying force first on one side of the car and then on the other.
Note: This test only identifies faulty shock absorbers. The effectiveness of vibration damping by shock absorbers can only be checked on a special stand.
4. Inspect the suspension struts - fluid leakage from the shock absorbers is not allowed.
Recommendation: Shock absorbers should be replaced as a pair, even if the second shock absorber on the front suspension is working.
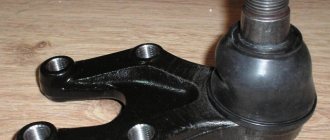
5. Visually check the condition of the cushions (1) and struts (3) of the anti-roll bar, rubber-metal hinges of the arms and longitudinal braces (2), and covers of the ball joints (4).
. cross brace cushions (5).
We replace hinges and cushions with one-sided bulging of rubber, tears and cracks (see the relevant sections below).
6. Check the tightness of the nuts securing the suspension parts and tighten them if necessary.
7. Inspect the suspension parts. Deformation and fatigue cracks in suspension parts are not allowed. We replace damaged parts.
8. Using a caliper, measure the distance between the brake disc and the wishbone. If, when the body rocks, this distance changes by more than 0.8 mm, then replace the ball joint. Similarly, we check the ball joint of the other front suspension strut.
Installation procedure
The rear suspension must have springs of the same class.
Before putting the shock absorber in place, you need to secure the rubber gasket to the spring with electrical tape or tape.- Install the spring on the shock absorber and fully extend the rod. We put a spacer sleeve and a lower cushion on the rod.
We install the shock absorber so that the end of the lower coil of the spring faces the wheel.
3. Insert the shock absorber rod into the hole in the body. At this moment, the assistant puts the upper cushion, support washer on the rod and tightens the rod nut.
Raise the lever to align the holes in the beam bracket and in the shock absorber. Insert the lower fastening bolt and tighten the nut.
5. Put the wheel in place and lower the car onto the wheels. We press the rear of the car several times so that the suspension elements fall into place.
6. Tighten the shock absorber rod mounting nut to a torque of 50–61.7 Nm (5.1–6.3 kgf m).
7. Tighten the nut of the shock absorber lower mounting bolt to a torque of 66.6–82.3 N·m (6.8–8.4 kgf·m).