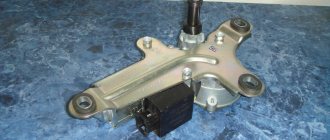
Dear reader, I’ll say right away that the article is long and if you’re not interested, you can just look at the photo) I’ll start with the fact that I began to notice that the wipers in all modes began to work more slowly, and the problem was still there from the moment of purchase - the wipers had to be turned off, when they approached their “lower position”, because stopped anywhere. So I finally decided to take care of the wiper maintenance) The process itself is quite simple, except for getting the trapezoidal mechanism out) First, I unscrewed the wiper arms and unscrewed the 22 nuts under them -> open the hood, remove the storm drain and the plastic protection of the switch -> unscrew one bolt on 10 which holds the entire mechanism -> I took out the trapezoid with the motor through the driver’s side, I did it without any problems (just before that I unscrewed the switch with its stand)
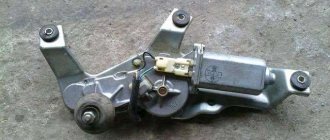
Next, before removing all these rods, you need to remember their position, otherwise you will have to suffer later.
Unscrew the nut and 3 10mm bolts to free the motor from the trapezoid itself. To see what was inside, I removed the gearbox cover (held on by 5 latches) and this is what I saw...
VAZ 2110 windshield wiper motor - advice from car owners on repair and replacement
How to disassemble and repair the windshield wiper motor of a VAZ 2110
Repairing VAZ 2110 wipers mainly consists of straightening warped or deformed levers or rods, and if this is not possible, then replacing them with new parts. If the VAZ 2110 windshield wiper motor is in faulty condition, then it will have to be replaced with a new one. Regarding repair work, we can say that the VAZ 2110 windshield wiper motor only allows for the replacement of gears, as well as cleaning the contacts of the ring switch and cleaning the commutator.
So, in order to repair the windshield wiper on a VAZ 2110, you must first remove the windshield wiper . To do this, first of all, the nut securing the wire is unscrewed, the wiring is removed from the gearmotor shaft, the three bolts securing the gearbox are unscrewed, then the wiper motor of the VAZ 2110 car is removed from the bracket, and the protective film is removed from it. The next step is to unscrew the two fastening screws and remove the plastic cover. Then the two fastening screws are unscrewed again, after which the panel is removed along with the switch contacts and the gasket is removed. Next you need to pull out the gear, plastic washer and gear motor shaft, then pull out the intermediate gears. To avoid any difficulties in further assembly, the gears should be marked relative to their axes, because they have opposite inclination of the teeth.
VAZ 2110 wiper malfunction Solution
A simple solution to the problem at no cost.
At the next stage, you will have to remove the gearbox from the electric motor, remove the armature and clean all parts of old grease and dirt. Be sure to check how easily the VAZ 2110 wiper blades move in the brush holder. They must move there without any jamming and freely. If the brushes are already chipped or worn out, they should be replaced immediately, or the gearmotor assembly should be replaced. By the way, when changing the wiper blades of a VAZ 2110 car, you must solder their leads to the brush holder. In addition, you should also inspect the brush springs; if they have lost their elasticity or broken, be sure to replace them.
Read
Repairing windshield wipers on a VAZ 2110 also includes cleaning the collector with fine sandpaper , especially if it has scratches, scratches or is dirty. If the collector is burnt or badly worn, you will have to replace the armature or gear motor assembly. If traces of jamming are found on the anchor journals, they will have to be cleaned with fine sandpaper .
Those gear wheels that have broken or heavily worn teeth should be replaced. And damaged threads of the rollers of the brush levers and damaged splines require replacement of the rod assemblies.
Oxidized or burnt switch contacts should be cleaned with fine sandpaper . And those rubber cushions that have lost elasticity or are torn must be replaced. In order to remove the pillow, you will first have to remove the metal spacer sleeve from it.
At the last stage of repair the windshield wiper is assembled in the reverse order, only one point is taken into account: the inclination of the teeth of the intermediate gears must be opposite, and before installation they must be lubricated with grease along with the armature shaft worm.
In order not to break the brushes, when installing the anchor, their guides should be recessed. Then the armature is installed in the gearbox housing, and the VAZ 2110 windshield wiper motor housing is placed on it. After assembly, in order to center the bearings, you need to knock on the gearmotor housing with a wooden hammer.
Good technical characteristics of the gearmotor
Rotation speed of the gear motor shaft at a supply voltage of 14 V, load torque of 1.47 N•m (0.15 kgf•m) and ambient temperature (25±10) °C, min –1
- first (small): 30–40
- second (large): 55–70
The current consumption at the above load should be no more than:
- at first speed - 3.5 A
- at second speed – 5 A
The device has found its application not only in passenger cars, but also in all other types of vehicles. Even large submarines, helicopters and airplanes are equipped with windshield wipers, which perform an irreplaceable role and at the same time have a very simple operating principle. When the wipers operate, excess water, dirt and other foreign objects on the windshield begin to be removed.
Car models have several operating modes: with a given period of time; constant; single. The auxiliary mechanism supplies water to remove large amounts of dust or dirt from the windshield.
Step by step procedure for windshield wiper repair:
2. The nut that holds the leash must be unscrewed.
3. Now remove the leash.
4. In order to remove the gearmotor from the bracket, you need to unscrew the 3 bolts that hold it in place.
5. The gearmotor is wrapped in a thin leather film; it must be removed.
6. Then you should unscrew the 2 screws that secure the black plastic cover.
7. Remove the cover and remove the next two screws.
9. Next, remove the brown gasket.
10. Remove the largest gear with the gearmotor shaft and then the plastic washer under it.
11. Next you need to remove two small gears, but before removing them, they should be marked. This is done so as not to confuse their location later. They have different tooth angles.
12. To disconnect the gearbox from the electric motor, you need to unscrew two opposite screws.
13. Remove the armature from the metal housing of the electric motor.
14. Clean all parts of the gearmotor as much as possible from accumulated dirt and old grease.
15. Use your fingers to press the three brushes into the brush holders; they should move freely without any difficulty. If some brushes are difficult to move in the brush holder, have cracks or other defects, then they must be replaced with new assemblies. If you replace the parts with new ones, then do not forget to solder the leads to the brush holder.
16. Next, we check the three springs; they should not be stretched or, even worse, broken.
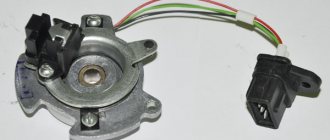
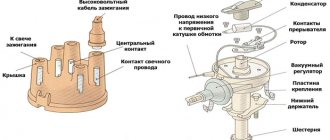
Features of the electric motor design
The windshield wiper base consists of several individual elements. Among them are the following:
- lever axis;
- electric motor (device that drives the windshield wiper);
- brush lever;
- brushes;
- brush holder;
- mounting block;
- frame;
- gearmotor.
Regardless of the model and manufacturer, such parts are irreplaceable. Variations are explained only by model characteristics. For example, the latest innovations in the automotive industry include upgraded versions with a wide variety of functions.
Some of them have a heating function, some work automatically, reacting to any contact with water or dirt on the windshield. In general, these are all the existing parts of the device, so the next step in learning how it works is to review the basic concepts.
It's no secret that all glass cleaners are very fragile and vulnerable devices that require a lot of care and can break . Such a structural element is forced to cope with all the work of cleaning the windshield, therefore, with prolonged use, a problem such as rapid wear is noticed.
The trouble is associated with constant contact of the rubber brush with the surface of the glass and heavy loads. As a result, a good model should have impressive flexibility and rigidity.
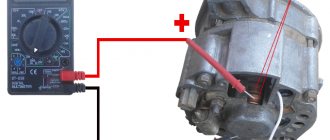
How to check the windshield wiper motor? When checking the wiper motor for serviceability, it is enough to pay attention to a number of key subtleties and predetermining factors. One of them is weather conditions. It is no secret that prolonged exposure to low temperatures, heat and rain do not have the best effect on the condition and operation of parts.
Checking the windshield wiper motor is not difficult at all. If there are any defects, scratches or streaks . It is also possible that incorrect noise may occur from the operation of the brushes. In addition, the brushes can move very slowly, out of step, or very quickly. In this case, you should pay attention to the motor.
When inspecting, consider the condition of the relay or lever. If one of the important elements fails, this will be accompanied by movement of the brushes in different directions . If the windshield wiper blades begin to fly off during active operation, you will have to use a new wiper blade holder.
Principle of operation
Modern cars and many other vehicles may be equipped with two windshield wipers. A similar solution has a double design for the front glass.
It does not include rubber bands placed on the blade, which provide more efficient and productive work , as well as for the rear window (here we are talking about a single version).
Most existing models are capable of operating in three different modes:
- Slow mode.
- Intermittent operation.
- Fast work.
At the heart of each glass cleaner is a corresponding motor , which is equipped with a gearbox, brushes, a lever system and an automated mechanism that allows you to return the wipers to their original position.
In addition, together with the device there is a device for supplying water to the entire area of the windshield. If it fails, the motorist should seriously think about upcoming repairs.
Dismantling the device
In rare cases, the front or rear windshield wiper motor stops working due to some manufacturing defect. The problem is extremely rare, however, if you become a victim of it, there is nothing left to do but start special repairs.
To complete the procedure successfully, perform a complete dismantling . It is no secret that such a process is quite troublesome and time-consuming. Especially if you have to repair a part from old cars, such as Tavria, KAMAZ, Priora, and so on. In this case, you will have to use several separate steps, including unscrewing the nuts that act as fasteners for the levers.
In the future, you can begin to remove the levers themselves from the tapered splines of the drive. If you have any difficulties at this stage, the splines can be treated with penetrating lubricant . Next, the lever drives are dismantled by unscrewing the nuts, as well as removing the rubber gaskets and plastic bushings.
In the harness, the wiring block is disconnected and pulled out using the raised edge of the seal, through a special slot in the partition of the engine compartment. The next step is to remove the windshield wiper .
Now you will have to unscrew the washer from the removed device and remove the spring retainer . And also you can’t do without disconnecting the rod. As a result, all you have to do is dismantle three bolts and remove the engine. After a full visual inspection, begin replacing any faulty parts.
If this does not give any results, the only way out of the situation is to buy a new motor . If the problem is resolved, the glass cleaning system must be reassembled in the reverse order.
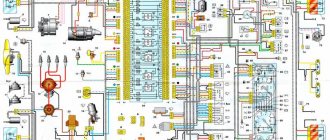
Replacement features and diagram
If, after a thorough diagnosis, you were able to determine that the motor is faulty, think about replacing the failed unit. At this stage there are no special difficulties, so even an inexperienced beginner can easily solve the problem.
True, you must understand that the features of the procedure vary depending on the model of a particular vehicle.
Therefore, before performing a series of any actions, pay attention to the technical features of the system , read the service manual for the car.
- First of all, you must unscrew the nuts securing the brush arm. The help of a wrench will come in handy here. Then remove them from their installation location. If difficulties arise, use a penetrating lubricant.
- Then you need to remove the lever drives by unscrewing the nuts that secure them.
- The next step is to disconnect the connector with the wires in the harness and lift one part of the seal through the hole formed.
- As a result, all that remains is to dismantle the wiper itself. Then remove the washer and spring mount. After successfully achieving such goals, all that remains is to disconnect the pull rod, unscrew the three screws and remove the motor. Unit repair is characterized by particular simplicity and speed of execution.