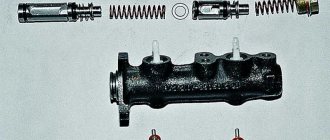
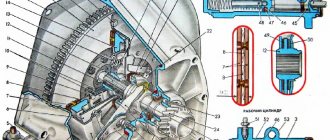
Master cylinder with reservoir:
Rice. 8.5. Master cylinder with reservoir:
A – gap; 1 – main cylinder body; 2 – low pressure sealing ring; 3 – drive piston of the left front-right rear brake circuit; 4 – spacer ring; 5 – high pressure sealing ring; 6 – pressure spring of the sealing ring; 7 – spring plate; 8 – piston return spring; 9 – washer; 10 – locking screw; 11 – drive piston of the right front–left rear brake circuit; 12 – connecting sleeve; 13 – tank; 14 – emergency brake fluid level sensor
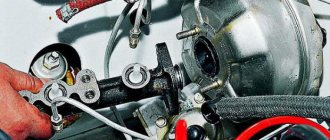
1. Remove the master brake cylinder from the vehicle (see “Removing and installing the master brake cylinder”).
2. Using a wooden spatula as a lever, remove tank 13 (see Fig. 8.5) from the cylinder.
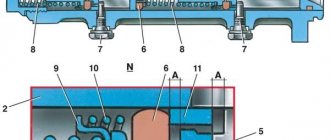
8.11. Master Cylinder Parts:
1 – cylinder body; 2 – low pressure sealing ring; 3 – drive piston of the left front-right rear brake circuit; 4 – spacer ring; 5 – high pressure sealing ring; 6 – pressure spring of the sealing ring; 7 – spring plate; 8 – piston return spring; 9 – washer; 10 – locking screw; 11 – drive piston of the right front–left rear brake circuit; 12 – sealing gasket
3. Remove connecting sleeves 12 from the main cylinder body.
4. Remove two locking screws 10 (Fig. 8.11).
5. By hand, remove the pistons of the first and second chambers with cuffs, washers and springs from the body. Piston 11 of the second chamber may not come out freely. To remove it with the remaining parts, hit the end of the body from the side of the first chamber on a clean board and push it through the first chamber. To remove the piston, you can also use compressed air, which must be supplied to the outlet of the second chamber, closing the hole under the tank.
6. Carefully inspect and make sure that the cylinder bore and the working surface of the pistons are completely clean, and that there is no rust, marks or other irregularities. Otherwise, replace the parts with new ones.
7. Replace cuffs that are torn, swollen, or have lost elasticity. It is recommended to replace the seals with new ones each time the master cylinder is disassembled, regardless of their condition.
8. Check the elasticity of the piston springs, the length of which should be 41 mm under a load of 38.26–46.1 N (3.9–4.7 kgf), 21 mm under a load of 81.81–99.47 N (8.34 –10.14 kgf), 59.7 mm in a free state. Replace springs that have lost their elasticity.
9. It is recommended to replace gaskets 12 under the locking screws with new ones.
10. Before assembly, wash all parts with clean brake fluid. Do not allow parts to come into contact with mineral oils, gasoline, kerosene or diesel fuel, as even residual traces of these liquids can lead to destruction of the rubber seals.
Algorithm for replacing the main brake cylinder on a VAZ 2115
Losing brakes is a very unpleasant moment for any driver, especially if it happened while driving. This phenomenon is rare on the road, but it does occur. In most cases, in such a situation, the main brake cylinder on the VAZ 2115 turns out to be the culprit; it should be noted that its failure is almost never sudden. It all starts with minor “little things” and ends with failure. You should also know that the VAZ 2115 has a similar master brake cylinder.
Master brake cylinder
What reasons will indicate a malfunction?
DmitryCorsten Blog Error codes for on-board computers of the Samara-2 family VAZ 2113, VAZ 2114, VAZ 2115
The following signs will help you understand that the clutch master cylinder is malfunctioning:
- a sharp decrease in the level of working fluid in the tank;
- traces of leaks in the area where the working and main cylinders are located;
- a kind of “failure” when pressing the clutch pedal;
- inability to fully press the clutch pedal.
Among the main types of malfunctions noted by experts, it is worth highlighting the following:
- malfunction of the cylinder itself;
- worn cuffs or piston;
- filling the system with low-quality brake fluid, which may contain both numerous dust particles and an excess of moisture.
To eliminate the causes of the malfunction of the main element, it is time to use two methods - replace the one that has become unusable with a new one or eliminate a minor breakdown by repairing it yourself. However, it is worth understanding that only rubber cuffs and the body can be repaired, and besides, repairing components will not always give the expected result. It should also be noted that as for the boot, it also needs to be inspected for the presence of large contaminations. According to experts, it is best to completely replace the cylinder, especially since its cost does not exceed 550 rubles.
Some signs of its malfunction
The driver should be alert to the following comments in the operation of the brake system:
- Liquid leakage from the tank;
- The brake pedal sinks when pressed;
- The appearance of air in the car brake system;
The manifestation of at least one of these signs should cause an immediate response from the driver to eliminate it.
Restoring the performance of the GTZ is impossible without removing it, so it will have to be removed from the car.
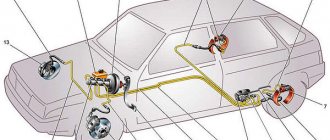
Air removal procedure
Bleeding the ABS brake system begins by treating all fittings on the working cylinders with WD-40 lubricant. During operation, they manage to rust and often break when trying to loosen them with a wrench. Then proceed according to the instructions:
- Open the expansion tank and add brake fluid to the MAX mark. During operation, monitor the level and constantly replenish the container so as not to fill the lines with new air.
- With the ignition off, disconnect the wires from the expansion tank cap.
- Place the transparent tube onto the front wheel cylinder fitting and unscrew it 1 turn.
- Press the brake pedal to the floor and do not release, which will cause fluid to leak out with air bubbles.
- When clean brake fluid comes out, tighten the fitting and release the pedal. Refill the reservoir and repeat the operation on the second front wheel.
As you might have guessed, the contours of the front wheels are de-aired due to the gravitational flow of liquid. So, if desired, the operation can be performed without outside help. But it is much more difficult for one person to pump up the rear circuits. The gravity method will not work here - the tubes are too long and are not always inclined towards the working cylinder. Pumping starts from the right rear part and is carried out according to the following algorithm:
- Place the hose back on the fitting and turn it 1 turn with the wrench.
- Press the brake pedal all the way down. Keep it pressed and turn on the ignition.
- The automation will start the return pump, which will begin to squeeze out the liquid through the open fitting.
- As soon as you notice that there are no bubbles in the tube, tighten the fitting and release the brake.
The rear left cylinder is pumped differently.
The pedal is not depressed at first, the ignition remains on, and the fitting with the hose on is immediately unscrewed. The pump will start again and force fluid through the hole. When the air stops escaping, depress the brake halfway and close the fitting. When the pump raises the pressure in the system and stops, add fluid to the tank one last time, tighten the cap and connect the connector. There is an opinion that bleeding the brakes on an automatic is much more difficult than on a car with a conventional manual transmission. Such statements are groundless, since the brake circuits are in no way connected with the gear shift mechanism in the car. The air removal technology in both cases is absolutely the same.
At the end of the work, make sure that the working cylinders do not leak and the level in the expansion tank does not decrease. Install the fuse in the socket, and then test the car while driving, trying to brake with different effectiveness.
Thanks to the presence of an electric pump in the ABS system, you can try to bleed the brakes yourself if you don’t have anyone to call for help. In this case, you should not press the pedal, but only unscrew the fittings and turn on the ignition. The success of the operation will be indicated to you by an extinguished light on the instrument panel.
During the repair process, air often gets into the brake system (this happens when the structure loses its tightness, brake fluid is replaced, etc.). You can tell that there is excess air by the soft and increased pedal travel. Bleeding the brakes will help get rid of it.
Many cars are equipped with an ABS system: bleeding such a system will have certain features.
What is needed to remove the GTZ from a car?
To perform such an operation, it is advisable to have an assistant and the necessary tools nearby:
- Wrenches for “10”, “13”, and “17”;
- Special wrench for unscrewing brake pipe fittings;
- Pliers;
- Rags;
- Metal brush;
- Liquid for topping up.
It is also necessary to ensure that there is a place where, if necessary, you will have to lay out the parts of this disassembled product. Let's look at the question of how to replace the brake master cylinder with your own hands. The matter is not very complicated and can be dealt with in about 30 minutes, unless unforeseen circumstances suddenly arise.
How to replace the brake master cylinder
When removing, you must perform the following steps:
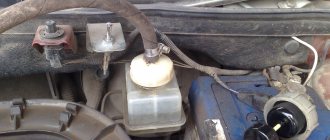
- The first step is to disconnect the wiring from the brake fluid level sensor, which is located in the reservoir cap on the GTZ;
- The next step is to remove the cap from the tank and pump out the liquid from it. A large-volume medical syringe is well suited for this purpose;
- Now you need to use a special wrench and unscrew the fittings of the tubes that are connected to the GTZ;
- Move these tubes to the side so that the replacement of the VAZ gas turbine engine occurs without interference;
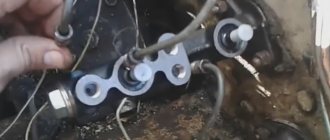
- After this, you can use a “17” wrench to unscrew the two nuts that secure the GTZ to the vacuum booster housing;
Separating the GTZ from the vacuum
- The final step is to remove it from the vacuum booster.
Before changing the main brake cylinder, it is necessary to disassemble, inspect and troubleshoot the old cylinder. You may be able to get it working again. It is possible to repair the master brake cylinder of a VAZ 2114 if only the rubber sealing collars are worn out, but wear has not been detected on the cylinder mirror. If it is present, repairs will be a futile undertaking.
The inspection confirmed the fact that the master brake cylinder of the VAZ 2115 needs to be replaced. In this case, you will have to purchase a new GTZ at a car store or car market. The cost of a master brake cylinder can range from 800 to 1500 rubles, the price depends on the manufacturer of such products.
Disassembly and assembly of the cylinder
To begin, you can remove the reservoir from the master cylinder. Then you need to unscrew the locking screws (numbered 10 in the figure), after which we remove all the parts one by one.
Before assembling all the parts, wash them with isopropyl alcohol, dry them or wipe them with a clean dry cloth, but do not allow them to come into contact with kerosene, diesel fuel or mineral oils, which will harm the seals.
Important! It is necessary to wash the O-rings in isopropyl alcohol, but no more than 20 seconds, after which you need to blow them with air.
We put the working surface of the pistons and the cylinder mirror in order. They must be clean, free of rust and other effects. It is better to replace the O-rings with new ones every time, even if they are in good condition.
Before assembly, check the elasticity of the piston spring. Its length under a load from 34.3 to 41N should be 36 mm, under a load from 62.3 to 72N - 21mm, and in a free state - 57.5 mm.
The process of assembling the brake master cylinder is the reverse of disassembly. Don't forget to lubricate all parts with brake fluid. In this case, it is better to replace the gaskets under the locking screws with new ones.
Sequence of work
To carry out the work correctly, you need to provide a level platform for the car and a place to place spare parts and tools. If unexpected situations do not arise, this operation, like replacing the rear brake cylinder of a VAZ 2114, can be completed in half an hour.
- Remove the negative terminal from the battery contact.
- Now you need to disconnect the block from the sensor located on the cover of the GTZ barrel.
- First you need to clean the sensor contacts with a brush or solvent, removing deposits and accumulated oxides from them.
- Now the tank is accessible.
Open the lid and pump out the liquid. Now you can install the GRC. Its installation begins with the tank - it needs to be washed. - The cylinder is secured in its original place on the amplifier with two nuts.
- Place a wide container or rags under the body. The barrel is filled with liquid to the maximum level.
Now you need to check the ability of the GTZ to operate. An assistant will be needed for this. He must press the brake pedal, but very lightly. At this time, the master, having blocked 4 holes with his fingers, must wait for liquid to appear in them: first in the front ones, then in the back ones. The person driving at this moment must hold the pedal, and the master must first connect the front tubes, then the rear ones. Record them.You can also watch the replacement of the GTZ in the video:
Tools that a master will need in his work
To dismantle the GTZ, as well as remove the rear brake cylinder of the VAZ 2115, it is advisable to have an assistant and the following tools:
- pliers;
- standard set of wrenches for cars;
- special key for fittings;
- metal brush;
- screwdriver;
- large syringe;
- wide container or rags;
- TJ.
Replacing the gas turbine unit can also be entrusted to car service technicians; as of October 15, 2022, the average cost of work for service stations is 850 rubles
. But by performing the operation yourself, you can save not only time and money, but also assess the condition of the brake system as a whole and the components adjacent to it. Below in the text is the order of work.