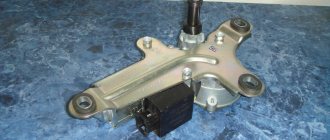
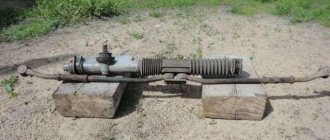
The wiper trapezoid is a mechanism for transmitting force from the windshield wiper motor to the wiper arms. In this case, the mechanism during operation:
- gradually wears out;
- trapezoid hinges become clogged with dirt;
- The grease is gradually washed out of the joints.
As a result, high loads on the wiper motor disable the motor, the driver is faced with poor quality of windshield cleaning, extraneous noise appears during wiper operation, etc. The solution in such a situation is to repair the trapezoid or replace the wiper trapezoid. Read more in our article.
Why does the windshield wiper trapezoid fail?
The main cause of all problems associated with the trapezoid is the location of the mechanism. The wiper motor and trapezoid are located directly under the glass.
Dirt, small abrasive particles, water and washer fluid constantly accumulate in this area.
This leads to wear at the moving joints and loss of lubricant. Active wear of the plastic bushings of the hinges is observed, backlashes appear, resistance noticeably increases during operation and the load on the motor increases. In such conditions, the trapezoid for the wipers and the motor quickly fail.
As a rule, the VAZ 2110 trapezoid requires revision every 2 years. Such an inspection should mean cleaning the trapezoid from dirt and additional lubrication. If this is not done, after 5-6 years the trapezoid will need to be replaced or repaired (a trapezoid repair kit is used).
When will you need a new trapeze?
At the slightest breakage of the trapezoid, the correct operation of the wipers is disrupted. Most often, a new part is installed. However, in some cases, you can limit yourself to purchasing a repair kit for a windshield wiper trapezoid and replacing its individual elements. So, what should you pay close attention to?
The very first sign of a breakdown is a weakening of pressure in the system, that is, the wiper cannot cope with the flow of water and snow. There may also be noise during operation, the reverse motion of the windshield wiper is difficult - you can see the tension with which the brush moves across the glass. In addition, the backlash increases. As a result, the glass is not clean enough, stains appear, and all this negatively affects visibility, and therefore our safety.
The cause of breakdown is often wear and tear of parts, because they are mostly made of plastic, sometimes of insufficient quality. A trapezoid can also fail as a result of mechanical damage, for example, during an accident.
It is very important to choose the right trapezoid. Externally, they may be the same, but they differ in the method of fastening. For example, VAZ cars have two versions of the trapezoid - old and new. In one case it is fixed with 2 studs, in the second - 4. In addition, the sizes of the windshield wiper arms, as well as the connectors for connecting to the electric motor, are different.
If you have certain knowledge, you can solve all these problems right during the repair, cut off excess fasteners, replace leads, but why this additional work? And there is no guarantee that after such transformations the wipers will work as they should. There is a fairly high probability of play appearing, or the brushes will have difficulty returning to their original position. Therefore, you should not chase minor savings; buy a “original” high-quality part that will last a long time.
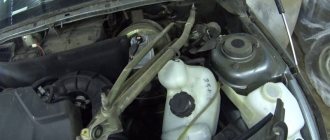
How to remove the windshield wiper mechanism
To carry out repair or replacement work, you need to know how to remove the trapezium of the VAZ 2110 wipers. To remove the trapezoid, you need to prepare a “10” key, a flat thin screwdriver and a Phillips screwdriver.
The entire removal process looks like this:
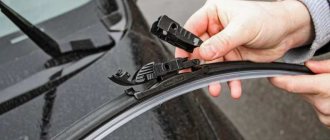
- First, the windshield wiper blades (windshield wipers) are removed;
- then remove the plastic covers and unscrew the nuts securing the wipers to the trapezoid studs;
- now you need to unscrew the screws and side fastenings of the frill (protective cladding-casing under the windshield);
- if the fasteners are difficult to unscrew, before unscrewing they must be treated with a penetrating lubricant such as WD-40;
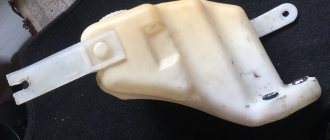
After unscrewing all the fasteners, you need to lift the frill, disconnect the washer fluid supply tubes from the tee and remove the casing. - then the expansion tank fixing belt is removed, the tank is moved to the side;
- now you need to pull out the soundproofing partition behind the tank, pulling out the washer fluid supply tubes;
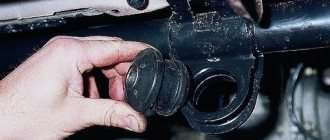
- at this stage you can disconnect the electrical connectors of the electric motor;
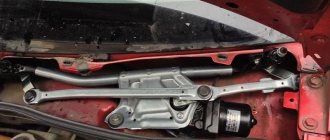
- Next, you need to unscrew the bolts securing the trapezoid and the electric motor;
- to remove the trapezoid, you need to place a flat screwdriver under the far end of the lower link of the trapezoid (in relation to the motor), after which the entire mechanism can be removed quite easily;
- another option is to turn the left edge of the trapezoid clockwise, pull it out, and then remove the motor;
Signs of trouble
In order to fix the breakdown in time, you need to know the first signs of problems associated with the windshield wiper mechanism, namely the trapezoid. It's not that difficult to spot them. First of all, problems with the trapezoid may be indicated by poor performance of the wipers. For example, they may move out of sync or too slowly. Also, intermittent movements on the glass or a characteristic creaking sound can be a signal of problems with the trapezoid.
However, these signs may indicate problems with the wipers or other mechanisms. In order to find out the true cause of the breakdown, you must fully diagnose the system.
Often, problems with wipers lead to wear on the trapezoid bushings. A clear sign of this problem may be the formation of backlash. The main reason for this is the formation of oxide, which subsequently causes the electric motor to malfunction.
In any case, these signs indicate the need to repair the trapezoid mechanism. Depending on the stage of the device failure, you can either repair the problematic elements or completely replace the device.
Repair and replacement of trapezium wipers 2110
As a rule, if you need a new windshield wiper trapezoid, the price for the mechanism is not the highest. The replacement itself is also not particularly difficult. However, the mechanism does not always need to be changed. As a rule, it is often possible to limit ourselves to only repairing the trapezoid.
Moreover, regular inspections and replacement of only worn-out elements can extend the service life of the entire mechanism, as well as reduce the load on the heater motor and increase the overall efficiency of the wipers as a whole.
How to repair a trapezoid
First of all, after removal, all elements of the trapezoid must be cleaned, and then the condition of the studs must be examined. If the ribs are severely worn, the trapezoid must be replaced. If there is no such wear, it is enough to replace the plastic caps, which are sold in a repair kit.
- First, the trapezoid is disassembled and the old caps are cut off. The main task is to remove the caps from the trapezoid rods. You can also immerse the ends of the trapezoid in boiling water for a few minutes. Then the caps can simply be pushed out.
- Next, you need to take into account that the VAZ 2110 model was equipped with different types of trapezoids with minor differences.
In this case, it is often necessary to adjust the trapezoid rods to the caps or the caps from the repair kit to fit the rods. At the initial stage, the caps should be inspected. If they have a locking protrusion, there should be a recess on the rod for such a protrusion on the rod. If there is no such recess, the protrusion on the cap must be cut off or a recess for it must be cut on the rod itself. If there is no protrusion, no modifications will be required. - When installing, the seat is cleaned, the new cap is immersed in boiling water for a few seconds. Next, the cap, soft from heat, is easily put into place. Do not attempt to install a cold cap as there is a risk of damaging it!
- After installing the cap, you should wait 15 minutes until it cools completely, after which the rod can be assembled. The bushings should first be lubricated with grease (graphite will do).
Replacing the trapezoid
Regardless of whether a new mechanism is installed or a repaired one is installed, replacing a trapezoid is not a complicated procedure. Installing a trapezoid will require:
- inserting a new or restored mechanism;
- fastening the mechanism with bolts;
In general, assembly is carried out in the opposite order to removing the trapezoid from the car (discussed above). However, there are some nuances that you should pay attention to.
We also recommend reading the article on how to polish car windows. In this article, you will learn when and why you need to polish your windshield and side windows, as well as what you need to consider before polishing your car's glass.
- When changing the trapezoid for the wipers, you should not immediately tighten the bolt securing the electric motor.
The fact is that for the mechanism to work properly, you may need to slightly turn the motor. Only after confirming that the trapezoid is operating normally can the motor mounting bolt be tightened. - Then you can put the sound insulation in place and fasten it, connect all the washer pipes, and fix the expansion tank. The final stage is the installation of plastic plugs, installation of leads and wiper blades.
After installing all the elements, you should once again check the quality of the wipers. In this case, it is important to use the windshield wiper in all modes, check the operation of the washer, etc.
Repairing a trapezoid with your own hands if the wipers are faulty
A considerable number of owners of not very new cars have encountered a situation where the windshield wiper blades suddenly begin to function much more slowly, after which they may stop altogether..
Often this can happen halfway through the stroke, in the middle part of the glass. The fault for this lies not with the cheap fuse, but with the trapezoid.
Simple explanation. The trapezoid of the wipers is precisely the mechanism due to which the rotational movement of the motor is converted into the translational movement of the brushes. At first it may seem that there is nothing complicated in it: a certain number of rods, swivel-type connections and bushings. In this light, it is even more incomprehensible that it is precisely there that a breakdown can occur. The reason for this is clogging with dirt and signs of corrosion, as a result of which the speed of their movement decreases, and then they stop altogether.
The second scenario could be a failure, namely a motor burnout. But it is better not to wait for such developments, but to do repair work. When contacting the service, they may ask for various amounts of money for such work, ranging from 500 to 1000 rubles. Not too many, but quite a few people will want to figure out the causes of the problem on their own. There is an important positive point in the work itself - it does not require complex technical devices; a screwdriver, a set of wrenches, graphite grease and WD-40 will be enough. The structure of almost all trapezoids is the same, and they have problems in the same place.
Finger attachments and flexibility. The first thing you need to do is disconnect the wiper arms. There is nothing complicated about this, just remove the protective caps, unscrew the nuts and pull them off their own axle. The next step will be dismantling the plastic frill. Most often it consists of two parts - upper and lower. The upper half is secured using ordinary latches, which can be easily moved with a screwdriver. The most important thing is to hold them firmly with your fingers so that at the last moment they do not fly away somewhere, for example, into the engine compartment. Successfully removed latches must be folded together with the wiper arms, nuts and washers from them, then pull out the rubber seal and remove the lower part of the frill. All this is also not difficult. Here the trapezoid is already clearly visible, so many people prefer to stop at this stage and remove it. For greater convenience, you can unscrew two more bolts to remove the lower part of the frill, after which access will be much more comfortable.
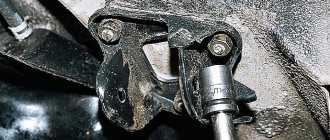
The trapezoid itself is attached to three bolts, after unscrewing them, you can carefully remove the trapezoid itself. Caution is required, as there are wires connected to it, which it is advisable to keep intact. The best option would be to remove the terminal, which will be accessible by slightly pulling out the trapezoid. But the hardest part is yet to be done.
Strength and a little skill. Most types of hinge joints are made of polyformaldehyde, which is a fairly strong material with a high coefficient of friction. In automobiles, it is used in the production of connections with minimal frictional force and the need for high wear resistance. Its second advantage is its resistance to corrosion. Disassembling the hinges does not have much practical benefit, and doing it for fun is pointless. If, after all, disassembly was completed, it would not be superfluous to clean out the existing dirt. Souring of the trapezoid mainly occurs in the bushings with the axles of the leads. A hammer and WD-40 will help here. If everything works out, the axle needs to be well lubricated.
Bottom line. When disassembling this part, it is worth measuring the force used, since the platform for installing the motor itself is made of a highly brittle alloy that may not withstand strong blows with a hammer. The solution will be to purchase a new trapezoid, the choice of which depends on the capabilities of the car owner.
Recommendations
Often the wipers on the VAZ 2110 begin to work poorly as a result of problems with the electric motor, and not the trapezoid. For this reason, when servicing or replacing the trapezoid, it is important to check the serviceability of the electric wiper motor.
- To check the wiper motor, you need to disconnect it from the trapezoid by unscrewing the mounting nut.
The motor is then connected directly to the battery or via a standard power connector. A low buzzing sound during operation is considered normal. At the same time, noise, grinding and crackling when power is supplied are unacceptable. We also recommend reading the article on how to replace windshield wiper blades. From this article you will learn about the features of replacing wiper rubber bands, as well as what you need to consider when performing this procedure. - Experts also recommend turning on different operating modes so that the engine as a whole runs for about 10 minutes. Next, you should feel the motor. Strong heating will indicate that the wiper motor will soon fail and needs to be replaced. It is also possible to repair the motor, but it is easier and faster to purchase a new device, since its cost is not high.
Finally, we note that the VAZ 2110 windshield wiper requires regular trapezoidal maintenance. At a minimum, cleaning from dirt and lubrication is necessary. This allows you to significantly increase the service life of the mechanism and reduce the load on the electric motor, increasing its service life and productivity.
What is needed to carry out the work and the article numbers of parts required for replacement
To carry out work on removing and replacing the trapezoid and wiper motor on a Priora, you will need a minimum set of tools. These include:
- 13" head and ratchet;
- Phillips head screwdriver;
- head at "10".
In addition, if the trapezoid or engine is being replaced, then these parts must also be purchased. It is recommended to choose original devices, so their article numbers are presented below:
- trapezoid - article 2170-5205015;
- wiper gear motor - 842-3730-50 or 2123-523612.040.
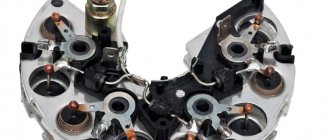
The wiper motor is correctly called a gearmotor, since it consists not only of an electric motor, but also a set of gears through which rotational movements are transmitted.
In addition, when removing products you will need to use gear lubricant. It is needed to lubricate the gear unit and rods. When the tools and materials are ready, you can start working.
Diagram of the Priora windshield wiper system
This is interesting! Priora is equipped with geared motors from the factory, which differ in rod diameter. They come in 10 mm and 12 mm. This is important to consider when choosing a new product.
Wiper design
Main components of the windshield wiper:
- Control system.
- Brush and leash.
- Trapezoid.
- Levers.
- Worm mechanism.
- Electric motor.
- Gearbox.
In order for the windshield wiper blades to move smoothly across the glass, sufficient force must be transmitted to the driver. This is achieved through the operation of an electric motor connected to a gearbox, which has a worm gear. Since the system has a gearbox, it is possible to reduce the shaft speed and increase the amount of force transmitted to the trapezoid. The trapezoid synchronizes the movements of both brushes.
The procedure for repairing a windshield wiper is removing and installing a gearbox with a motor.
Rubber bands for wiper blades
The procedure for repairing a windshield wiper is removal and installation.
Repair of VAZ 2101 windshield wiper, disassembly and assembly
The procedure for repairing the VAZ 2101 windshield wiper
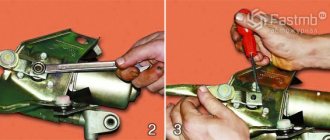
- unscrew the wiper blades with holders;
- disconnect the wires from the windshield wiper motor and the terminals from the battery;
- remove the equalizers by first unscrewing the nuts securing the lever fittings;
- dismantle the windshield wiper assembly, first unscrewing the nuts of the motor bracket;
- Perhaps a workbench will help you to remove the gearmotor from the mounting bracket, and then disassemble the lever drive;
- Installation of the windshield wiper after repair is carried out in the reverse order.
After you have repaired the windshield wiper, you need to connect it so that it makes several working cycles. The wiper blades must be installed (in the lower position) – 50 mm from the glass seal. After complete assembly, we check what we have achieved and, if necessary, make adjustments.
Below we will look at how to disassemble and then assemble an electric windshield wiper motor and its gearbox.