string(10) “error stat”
If, as a result of operating a vehicle, the radiator of the car’s cooling system fails, then there are two ways to eliminate the malfunction, or, equally, replace it.
1 way. Seek help from specialists. In this case, you will need two things: time and money. The service station specialists who carry out repairs are responsible for the quality and work. They (in most cases) provide a guarantee for their work and use original components and components.
Method 2. Do the work yourself. You will need to solve a number of organizational issues and make purchases, including:
- Spend your personal time searching and purchasing a new radiator;
- time to remove the radiator and install it;
- money;
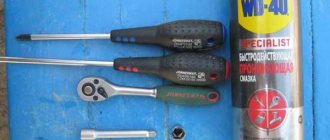
- set of tools: keys, heads No. 8,10, 13, 17, screwdrivers with a sharp and Phillips-shaped blade, pliers, extensions, ratchet handle and or wrench, sealant;
- decide on the location for technical treatment of your car.
Knowing the structure of the machine and the sequence of work will not hurt.
It's up to you to decide which path to take. We must remember that saving is not always in the first place, especially if we are talking about a means of transportation - a car!
Removing and replacing the VAZ 2110, 2111, 2112 cooling radiator with your own hands
Sometimes, even after changing the pipes, antifreeze leaks out and accumulates under the radiator.
Also, in such cases, stains and smudges from the coolant are visible on the radiator. To make sure of this, you need to remove and replace the radiator of the VAZ 2110, 2111, 2112. The work is done with your own hands and is not difficult to perform. You will need: a new cooling radiator, a 10″ wrench, a screwdriver, new antifreeze.
Open the hood, disconnect the battery terminal, remove the drain plug on the left side of the radiator and drain all the antifreeze.
We drain the antifreeze from the cylinder block. To speed up draining, unscrew the cap on the expansion tank.
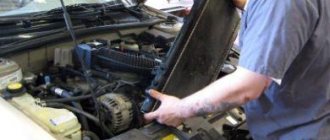
Turn off the radiator fan. For convenience, you can remove the air filter.
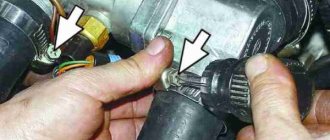
Unscrew the bolts on the left side of the radiator.
And also one at the bottom of the radiator
Next, carefully remove the radiator fan.
Unscrew the clamps and disconnect the radiator pipes.
Actually we take out the radiator itself. We replace it with a new one and install it in the reverse order. Fill in new antifreeze.
Video on replacing the cooling radiator VAZ 2110, 2111, 2112
Source
Tools
Be sure to acquire the following materials:
- Torque wrenches;
- Bypass;
- Bulgarian:
- Adjustable wrench;
- Gas key;
- Roulette;
- Drill;
- Pencil;
- Soldering iron;
- Level;
- Lever pipe wrench.
In addition, it would not hurt to have a Mayevsky tap, without which no plumbing work can be done. It is imperative to have plugs that are suitable in size for the junction of batteries and radiators, as well as for installing additional taps. In addition to the plugs, it is recommended to immediately stock up on gaskets.
If, in addition to dismantling, you plan to replace batteries and pipes, then you need to stock up on new sections of pipes; it won’t hurt to buy Rifar bimetallic heating batteries, or some other analogues. In this case, you will need American cranes or simpler options. A polypropylene tap is very useful; with its help it will be easy to ensure that the heating is working when the radiator is removed. The PPR limit switch will be necessary for carrying out work in the neighbors’ area. If communication with them is unsuccessful, you will also need a clerk.
Among other things, the cost of cast iron batteries is much lower than their analogues, while the heat dissipation can be envied by these same analogues. Cast iron batteries also have low hydraulic pressure. Such batteries are very reliable and do not require any specific skills to operate.
The only drawback of these units is their extremely unpresentable appearance. However, manufacturers today know a lot about the style of radiators and try to give their cast-iron counterparts the most attractive appearance, especially since modern technologies make it possible to do this.
Replacing a cast iron battery cannot be done without a lever pipe wrench, which is used to remove locknuts and flanges. If this work is not possible, you have to use a pipe cutter. In this case, cutting must be done in front of the same nut. The following dismantling steps include:
- Disconnecting the heater from the system;
- Removing the heater from the fasteners;
- Heater disassembly and cleaning.
Very often, removal is carried out not only for replacement, but also for cleaning the radiator. Thus, cast iron radiators are very difficult to disassemble, but it is simply necessary to clean them of rust so that they work as if they were newly purchased. Before you start disassembling the battery, you need to prepare the tools:
- Blowtorch;
- Tow;
- Pipe wrench;
- Brush;
- Gaskets;
- Chisel;
- Bulgarian;
- Nipples;
- Hammer;
- Battery key.
You need to start disassembling the battery by heating the plugs with a blowtorch, after which they can be easily removed. After this, the nipple is cut between the sections using a grinder, so it becomes possible to disconnect the sections. Next, these nipples are removed with a hammer, and the battery is cleaned.
The reverse process is much more difficult - it’s no longer the same as unscrewing the heating battery with a wrench. First, you need to assemble the sections and group them, then the sections are connected using a set of gaskets, silicone and nipples, the latter being selected relative to the direction of the thread - this must be taken into account. Don’t forget about flushing the newly assembled radiator.
When the assembly process is completed, it is necessary to secure the removed radiator. This procedure involves either fastening to previously installed brackets or to new ones, especially when they were previously poorly installed. In this case, the first holes must be covered and puttied. New holes are drilled according to the measurements taken. Again, the holes are filled with nipples and brackets.
The best sealing can be achieved by securing all joints with tow. Moreover, cast iron batteries are connected to the pipes by means of bends. Be sure to ensure that the plugs are turned out. This is the algorithm for dismantling a cast iron battery. For convenience, it is recommended to purchase 300 mm heating radiators.
How to replace the radiator of a VAZ-2112 heater with 16 valves of different types
Signs that your car's heating system radiator requires replacement:
- high consumption of coolant (antifreeze or antifreeze) in the vehicle cooling system (antifreeze or antifreeze);
- The heating of the car interior does not work;
- traces of a coolant leak on the asphalt under the heater radiator or leaks in the hoses supplying fluid to the heater;
- the smell of antifreeze in the cabin;
- greasy deposits on car windows, their fogging.
In these cases, first of all, check the tightness of the system hose clamps. Perhaps they are the cause of the leaks.
And now about how to replace the VAZ-2112 heater radiator with 16 valves of different types
Materials used
If the joints of the pipes and radiators do not match, you can use a corrugated hose.
Galvanized steel pipes are used to change the system or extend the connections to heating accumulators. They are joined with threaded connections; welding is not used. The melting point of steel is +1400°C, and zinc is +900°C. The zinc completely evaporates in the weld area.
Required components:
- blind and straight radiator bushings;
- two shut-off valves;
- paired locknuts when installed on squeegees, their size corresponds to the diameter of the connections;
- brackets for fixing the convector on the wall.
Sometimes stainless steel corrugated pipes are used. Durable products are bent; compression fittings are used for connection, installed with adjustable wrenches.
New cooling system
The sequence of your actions in this case is as follows:
- First of all, for safety reasons, disconnect the negative terminal of the battery. We drain the cooled antifreeze or antifreeze, first opening the expander cap. To drain the liquid you will need a container with a volume of 4-5 liters.
- Now, after unscrewing the two nuts, remove the wipers from the car.
- Then we dismantle the released protective plastic cover under the windshield, which is secured with 2 nuts and 4 self-tapping screws.
- To access the stove, remove the frill of the car by unscrewing 5 self-tapping screws, 1 screw and 2 nuts located at the bottom, in the middle of the frill, in the area of the steering rack.
- In order to remove the stove, remove the yellow cross brace, if any, as well as the curved bellows of the air filter.
- We pull the chokes off the radiator pipes.
- Then disconnect all electrical wires from the stove terminals.
- At the steering rack, unscrew 2 nuts that secure the heater, 1 nut securing the heater to the body.
- We unscrew the 3 screws connecting the two halves of the stove.
- We take it out by swinging the right side of the stove, first moving it to the right.
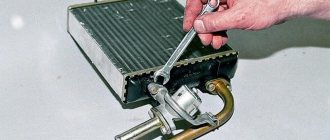
- The radiator in the removed half of the stove is secured with 3 screws. We take it out and replace it with a new one, not forgetting to put on the foam seal. We check the operation of the fan and, if necessary, repair it or replace it with a new one.
- Before installing the assembly, it is advisable to rinse the coolant supply hoses with running water.
- Assembly is carried out in reverse order.
Brake replacement procedure
Man has always strived to minimize his own labor, to solve a problem with a minimum number of movements. The impetus for the development of technology is a very interesting factor - our laziness.
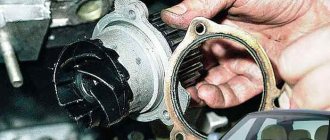
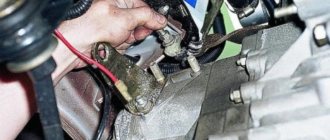
Removed the brake cylinder
It was laziness that largely led to the emergence of an original method of replacing the heater radiator on a VAZ 2110. In this case, the heater does not have to be removed. The entire job will take more or less experienced car owners an hour, but a beginner may need a little more.
The work is carried out as follows.
- Drain the coolant using the remote control heating pipe.
- Disconnect all pipes and remove the expansion tank.
- Disassemble the frill.
- Remove the brake pedal, grabbing the VUT at the same time, to gain access to the radiator.
- We take out the old radiator from there and install a new one in its place.
- Assembly is performed in reverse order.
- Return the coolant.
- With such a procedure, it would not be amiss to replace the cabin filter at the same time.
As you can see, the process is quite simple and original, not requiring excessive effort or professional skills. Any car owner can cope with such a task.
Regardless of which radiator you choose, try to carry out each stage of its replacement as competently and carefully as possible. To be fair, let’s add that the copper unit is better than DAAZ. And the money spent on it is largely worth it. Of course, if you are not going to sell the car right away, but plan to use your own VAZ 2110 for several years to come.
Old style cooling system
Such heaters were installed on early 21120 models. You can determine the modification of the system by its appearance, after first removing the frill of the car.
To replace the radiator you need:
- Carry out steps 1, 4-7 for removing the new type cooling system.
- We dismantle the expansion tank of the cooling system.
- We remove the vacuum booster by unscrewing the 2 nuts (17 mm) and carefully (without damaging the brake system pipes) move the brake master cylinder to the side. Remove the vacuum booster pipe.
- Inside the car, unscrew the 4 nuts from the brake pedal studs and, together with the pedal, remove the car's amplifier.
- Thus, we gained access to the heater core, which is secured with three screws. We replace it and reassemble the entire system in the reverse order.
Can you see everyone?
Why are we talking about different ways to dismantle radiators?
How do they differ in connection methods?
- Fittings used. Traditionally, for the installation of Soviet-style cast iron radiators, a combination of a conduit (a pipe with a long thread) and a lock nut were used; now the batteries are more often connected with American ones - quick-dismount fittings with union nuts;
The photo shows the connection of an aluminum sectional radiator by an American woman.
Connection on the lines.
The location of the connections relative to the radiator. The connection can be one-way or two-way
This is important when installing on squeegees: one of the radiator plugs through passage will have a left-hand thread.
A special case
- In many houses built in the 80s and 90s, convectors are used as heating devices. The convector is a coil made of a steel pipe of the same diameter as the riser, with fins that increase heat transfer. The typical method of connecting a convector and a steel line is a butt weld.
The heating device is connected to the riser by welded seams.
Replacing the cooling radiator - instructions with photos
Dear readers, in this article we will figure out how to change the cooling radiator on VAZ 2110-2112 cars. So, the radiator must be replaced if a coolant leak is detected from it. In general, the engine cooling radiator can be repaired in a special workshop, the whole point is just how much it will cost. Let's get straight to work. This will take approximately 3 hours. We will need:
Perform all work only on a cold engine!
- The first thing to do is drain the coolant;
- Then remove the air filter;
- After this, loosen the clamp of the lower supply hose;
- Disconnect the hose from the lower radiator pipe;
Now loosen the clamp on the upper outlet hose;
Changing the VAZ 2110 cooling radiator with your own hands
Even for people who are quite far from technology, the purpose of a cooling radiator is clear - it removes excess heat from the engine, thereby preventing it from overheating and failing.
However, some time passes, the most important part of the cooling system may fail, or simply leak. Then there is a need to replace the cooling radiator of the VAZ 2110, which can be done not only at a service station, but also with your own hands.
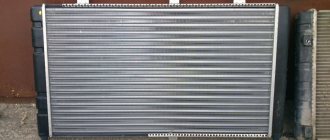
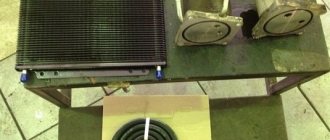
New engine cooling radiator
Device
Any radiator on a car, regardless of its brand, consists of:
The body, which can often be made of aluminum, less often copper, consists of two tanks (one on top, the other on the bottom) and adjacent pipes through which the coolant circulates.
The core is rows of brass tubes soldered to cooling fins. They are located inside the case.
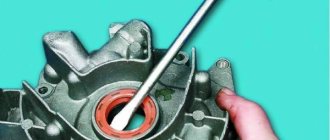
Cooling liquid enters the radiator through the filler plug and is drained through the drain valve, if necessary.
In addition, the power unit for maintaining thermal conditions includes an electric fan and a thermostat.
Turning off the coolant supply
Let's move on to practice.
Before removing the radiator, you need to turn off the heating and drain the water. How to do it?
I will analyze the heating shutdown in an apartment in an apartment building. It is difficult to give any general recommendations for autonomous heating systems due to their individuality.
The simplest scenario is to turn off the water using valves, ball valves or chokes installed on the supply lines. It is enough to close the shut-off valves on both connections - and you can disassemble the connections on the radiator plugs, after first placing a basin or other container under them to drain the water.
A jumper must be installed between the connections with shut-off valves. Without it, a closed throttle or tap will stop circulation throughout the entire riser. Very soon your neighbors will come to you and begin to loudly question your high moral qualities.
Correct connection: shut-off ball valves on the connections and a jumper between them.
If the connections do not have shut-off valves, you will have to look for and reset the riser. It’s worth making a short lyrical digression here.
In apartment buildings with standing wiring, two bottling layouts are used:
Top filling means supply to the attic. Risers connect it to the return bottling located in the basement or subfloor. Each riser operates independently of the others and is switched off at two points - below and above;
A pair of heating schemes with top filling.
In a house with bottom filling, the supply and return wiring is done in the technical basement. The risers are alternately connected to both bottlings and connected in pairs by jumpers on the top floor of the house. Accordingly, two risers will have to be turned off - supply and return.
To determine the type of wiring, look into the basement. If there are two horizontal pipes in thermal insulation along the perimeter of the house, you have a bottom fill, and one has an top fill.
Bottom filling: both return and supply lines are laid around the perimeter of the house.
First, find your boner. In the basement it is easiest to navigate along the flights of stairs between the entrance and the first floor landing, in the attic - by the windows of the apartments. Further actions depend on the type of bottling.
Top filling
In the case of top filling, the shutdown procedure will be as follows:
- Turn off the attic valve. Do not unscrew the plug;
The outlet of the riser from the supply bottling in the attic looks something like this.
- Turn off the valve in the basement;
Riser and return flow in the basement.
- Unscrew the plug one or two turns and wait until the pressure of the stream of water hitting the thread drops. This will ensure that the shut-off valves are in full working order;
- Unscrew the plug completely. The water hanging in the riser will flow out after you open the line to the radiator.
Bottom filling
Here are instructions on how to turn off the heating riser in a house with bottom filling with your own hands:
- Shut off your riser and the two adjacent to it;
- Unscrew the plug one or two turns;
If instead of a plug there is a sump on the riser, the task will be greatly simplified.
- Open the valves on adjacent risers one by one. This way you will identify the boner associated with yours;
- Fully open the valve you don't need. Close the riser connected to yours;
- Unscrew the plugs on your riser and the risers connected to it.
Causes of engine overheating
The reasons for overheating of the VAZ 2110 engine include, first of all, the insufficiently efficient operation of the cooling system. The reasons may be:
- The radiator pipes are clogged. A thing that is rarely seen today, and only when using coolant of extremely low quality. In this case, replacing them will help;
- Low coolant level due to leakage at the attachment points of the pipes or cracks in the pipes themselves. Need to replace fasteners or pipes;
- Housing contamination. Here you should take into account a small detail: the whole car, the radiator in particular, requires care. It should not be allowed to “overgrow” with dirt, fallen leaves, or other debris. Because of this, the efficiency of its work is significantly reduced;
- The radiator is leaking. It is necessary to remove it in order to decide based on the location, size of the leak, and general wear and tear of the unit whether it needs repair or replacement.
Model selection
For the VAZ 2110 you can choose either aluminum or copper radiators. To a large extent, the choice depends on what result you need: saving money or durability and reliability.
Their disadvantages and advantages:
- Aluminum. Lightweight, relatively cheap, the price depends on the manufacturer: - Luzar (2110-8101060) - about 1000 rubles; - Pramo (2110-1301012) - retail approximately 1600 rubles. But its thermal conductivity interferes, and it cools the engine worse. In addition, it is subject to fairly rapid corrosion; it takes less time for it to flow; Aluminum radiator cooling
- Copper. It is heavier, significantly more efficient in its cooling characteristics, and lasts longer, since the copper body is less susceptible to corrosion. For it to flow, mechanical action (impact, etc.) is most often required. The disadvantage is that its price is higher, about 5,000 rubles, for a two-row one, with an increased efficiency of 40%. Copper cooling radiator with 40% increased efficiency
Which radiator should I choose, aluminum or copper?
The VAZ 2110 after 2008 was equipped with aluminum radiators, which have a number of pros and cons. However, some car owners complain about cold interiors and foggy windows. Advantages of an aluminum radiator:
- They have a higher density compared to copper
- The width of the radiator channels is larger, which means more heat transfer
Minuses :
- If a leak occurs, it is not repairable
- Heats up quite quickly, but also cools down quickly
Initially, domestic cars were equipped with copper radiators. However, later, as we wrote above, they were replaced with aluminum ones.
Now it is quite difficult to find a high-quality copper radiator, since some manufacturers use impurities instead of pure copper.
Advantages of copper radiators VAZ 2110:
- Among the obvious advantages is its heat dissipation of 389.6 W/(m. deg), it is significantly higher than that of aluminum
- A copper radiator takes a long time to heat up, but also takes a long time to cool down.
- If it leaks, it can be repaired.
- The copper radiator can be soldered.
Minuses:
This type of radiator has fewer fins and thin channels that can become clogged.
Dismantling and installation
To remove the cooling radiator from a VAZ 2110 with your own hands, you must:
- Drain the coolant through the bottom plug;
- Remove the battery as it is in the way;
- On the injection VAZ 2110, it is also necessary to remove the air filter;
- The upper mount to the frame must be disassembled, simultaneously releasing the fan;
- Remove the electric fan;
- Remove two hoses - for steam supply/discharge;
- Tilt the radiator towards the engine and remove.
That is, removal is quite simple. Now, if the radiator leaks slightly, but is not severely damaged by corrosion, you can repair it. Otherwise, replace it. When choosing a new radiator for a VAZ 2110, be sure to take into account the model of the previously installed one so that the new one fits perfectly.
When installing, make sure that the rubber pads on which the body rests with the lower part fit firmly into the holes on the cross member.
Next, you need to fill in the coolant (you can use the old one by filtering it), and then start the engine.
Source
Radiator connection diagrams, operating efficiency
Depending on the design of the heating system, there are different schemes for connecting heating devices to it. If you look at the cross-section, each radiator has upper and lower full-flow channels through which coolant flows in and out.
Each section has its own channel connected to two common ones, the task of which is to pass hot water through itself and receive part of the thermal energy. The overall efficiency of the device depends on the amount of hot liquid that has managed to pass through the channels of the sections and the heat capacity of the material from which the heating elements are made.
The amount of coolant passing through the channels of individual sections directly depends on the connection diagram of the heating device.
Side connection
With this scheme for installing heating radiators in an apartment, the coolant can be supplied from above or below. When the supply is from above, the water passes through the upper common channel, descends through the vertical channels of individual sections to the lower one, and leaves in the same direction from where it came.
Theoretically, the coolant should pass through the vertical channels of the sections, heating the radiator completely. In practice, the liquid moves along the path of least hydraulic resistance.
The further the section is from the entrance, the less coolant will pass through it. With a large number of sections, the latter will heat up much worse, or even remain cold at low pressure.
With the side installation method for heating radiators in the apartment and supply from below, history repeats itself. The efficiency of the heater here will be even worse - hot water must rise up through the channels, and gravitational load is added to the hydraulic resistance.
The lateral connection diagram is most often used for riser wiring in apartment buildings.
Bottom connection
With this scheme, the coolant is supplied from below, passes through the sections, and exits through the same lower channel. The principle of convection is used here - hot water always rises, cold water always falls.
This is theoretically intended. In practice, most of the hot water passes from the supply inlet to the outlet, the lower part of the battery heats up well, and the coolant flows poorly to the top. The efficiency of a heater with a bottom connection of both flows is 15 - 20% lower than with a side-piping scheme.
The connection from below is good because when the battery is aired, the rest of the battery heats properly.
Diagonal connection
The classic method of tying batteries is diagonal. With proper installation of heating radiators in an apartment in a diagonal manner, the sections are heated evenly, increasing the efficiency of thermal energy use.
With the diagonal piping method, hot liquid enters through the upper common passage opening, descends through the channels of each section and exits the lower passage channel on the other side. Here the liquid descends from top to bottom, hydraulic losses are minimal.
This method also has disadvantages. The battery is becoming airy, you need to monitor this and bleed the air through the Mayevsky tap. Second, dead zones with cold water at low pressure may form below.