The entire design of the rear shock absorber struts is completely identical to that of the younger model VAZ-2109, which is why the work to replace it is absolutely the same. Let’s say right away that replacing the rear struts is much easier to carry out than replacing the front struts. You can easily carry out such work with your own hands and in a short period of time. How to easily carry out this work is described below in our article.
The video shows the process of replacing rear shock absorber struts on VAZ cars of the 2110-2112 family.
Do-it-yourself replacement of rear shock absorber struts on a VAZ-2112
The entire design of the rear shock absorber struts is completely identical to that of the younger model VAZ-2109, which is why the work to replace it is absolutely the same. Let’s say right away that replacing the rear struts is much easier to carry out than replacing the front struts. You can easily carry out such work with your own hands and in a short period of time. How to easily carry out this work is described below in our article.
The video shows the process of replacing rear shock absorber struts on VAZ cars of the 2110-2112 family.
Required tool for replacement
When the tool is ready, you can start working.
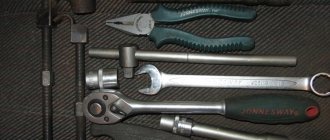
Before you begin work, you need to prepare the following tools:
- A driver or ratchet wrench.
- Head at “17” and “19”.
- Lubricant like WD-40.
- Spring ties.
- Jack.
- Special key for the rack rod.
Preparatory work
Carry out the following preparatory work:
- When the car is secured on a level surface, remove all the nuts on the rear wheels. Then we lift the car on a jack and finally remove the wheel.
- It is also necessary to loosen (but not completely unscrew - approx.) the nut securing the strut rod. This is done either from the trunk or the rear seat.
- Treat all unscrewing surfaces with lubricant for best unscrewing.
New elements are ready for installation.
Step-by-step work order
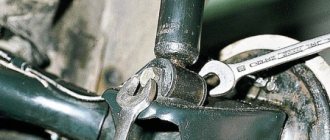
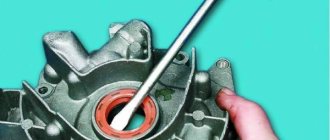
- First of all, we remove the plug and unscrew the nut on the rear pillar rod, and in order to prevent it from turning, you can use a regular “6” key or a special one - which is intended for this.
The plug will come off easily by prying it off with a screwdriver.
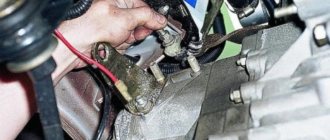
With some force, the nut will unscrew
The lower mount for the rear pillar sometimes sticks.
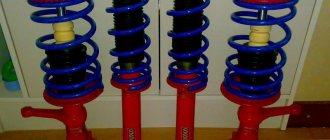
It is necessary to tighten the springs until they release the upper cup. The photo shows an example with a front shock absorber on a VAZ-2112.
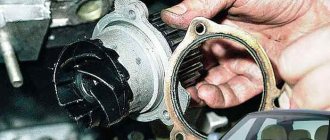
Removing the rack components
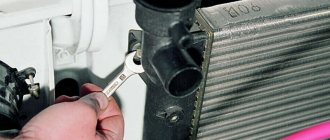
- With the rack removed, we inspect the condition of the boot and bumper, and when installing new racks, we replace them, or if they are in good condition, we leave them.
As you can see, the bumpers are in worn condition.
Disassembly and assembly of the unit
Replacement of the rear pillars of the VAZ 2110 is carried out on any flat area on the street or in the garage; an inspection hole is not needed here. To disassemble the unit, you need to prepare the following tools and devices:
- jack;
- wooden stand of the required height;
- curved spanner wrench size 19 mm for unscrewing the rod;
- a set of open-end wrenches of standard sizes;
- standard plumbing tools (pliers, hammers, screwdrivers);
- wheel key;
- aerosol lubricant WD-40;
- gloves, rags.
It is better to carry out assembly and disassembly work with gloves to avoid minor injuries when loosening or tightening threaded connections. Replacing the rear struts 2110 begins with disassembling the luggage compartment side of the car. It is necessary to remove the rear seat fasteners and unscrew the seat belts, as well as dismantle all interfering decorative panels. Stuck threaded connections are sprayed with universal lubricant WD-40. The further sequence of work looks like this:
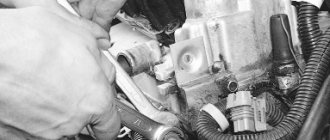
- The upper support of the rear pillar is unscrewed. To do this, unscrew the nut using a 19 mm curved spanner wrench, and hold the rod with a special or open-end wrench. In VAZ 2112 cars it is possible to unscrew the nut with a 19 mm open-end wrench.
- The wheel bolts are loosened, the car is jacked up and the wheel is removed. Don’t forget to secure the car with available anti-roll bars.
- A wooden support is placed under the bottom of the VAZ, and the jack is released and installed under the rear wheel hub.
- Using 17 and 19 mm wrenches, the lower support of the rear pillar is unscrewed, the bolt is removed and it is removed together with the spring.
To replace the shock absorber, the unit will have to be completely disassembled. You will need to remove the spring, the upper support washer, the boot with the upper cover and the compression stroke buffer. Then all these parts are rearranged onto the new rack. The rubber spacer also changes regardless of whether it knocks while driving or not.
Reassembly does not cause any difficulties. Only at the beginning you need to show dexterity to bring the rod back into the upper hole. Then the lower rack mount is aligned along the holes by pressing the hub from below with a jack. The bolt is put in place and tightened, after which the rest of the assembly is done.
Sometimes old racks can be restored and can serve as a backup option in case the new ones break down. Repair of the shock absorber is possible if it has not received mechanical damage to the body, the rod is not bent, and very little oil has leaked from it. The movement of the rod must remain free, without jamming, otherwise the shock absorber must be discarded. Remember that restoration rarely gives a good effect; about half of the repaired racks fail quite quickly.
Rear shock absorber assembly
We assemble all elements of the rear pillar strictly in the reverse order, paying special attention to all connections and places where the pillars come into contact with the body.
The stand is installed and ready to use.
Which racks to choose (poll)?
Prices for racks for VAZ-2112
In all stores that offer spare parts for cars of the VAZ family, you will find rear struts for the VAZ-2112 to suit your wallet and all the most necessary characteristics.
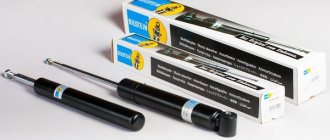
HOLA rear struts have proven themselves well
- for racks of good characteristics will vary within 5000 rubles per pair,
- for springs 3000 rubles,
- for buffers 500 rubles,
- and for anthers 300 rubles.
Independent rear suspension device
To improve vehicle handling and increase comfort, an independent rear wheel on struts with longitudinal and transverse arms is often used.
Its device is shown in the figure. Independent suspension This design has the following advantages:
Relative simplicity of design; Low weight and cost; Improved wheel camber and toe characteristics during operation.
Along with the advantages, this scheme has disadvantages:
Limited limits for initial wheel camber setting; Increased noise when handling road irregularities due to the location of the strut supports directly in the body.
Replacing rear struts and springs on a VAZ 2110-2112
The design of the rear shock absorber struts on VAZ 2110-2112 cars is completely similar to previous front-wheel drive cars, such as the VAZ 2109, so all work on replacing rear suspension parts will be completely identical. We can immediately say that it is much easier to change the rear struts with springs than the front ones, and all this can be done with your own hands and in a short period of time. Of course, all the necessary tools for this should be at hand, such as:
- mounting blade
- crank and ratchet
- head for 17 and 19 as well as similar open-end and ring wrenches
- penetrating lubricant
- a special wrench to keep the strut rod from turning while unscrewing the nut
A rear strut is nothing without a good shock absorber
After replacing the racks on a VAZ 2110, the following situation may occur. The wheels began to hold the road normally over bumps and uneven surfaces, but before, before the replacement, the rear of the car would bounce even on small bumps. But, although road stability became normal, driving comfort suddenly disappeared. In other words, now the bumps hit the driver’s back through the seat, and the car really shakes on the road. What's the matter? Maybe it's all a matter of grinding in the new struts or is this how it should be? It turns out that the whole problem may actually lie in the shock absorbers or in the bearings, but then the knocking should not disappear. Therefore, correct replacement of racks implies knowledge of its design, so to speak, an integrated approach must be applied.
- Shock absorbers in this case can play a very important role. As you know, today there are a lot of different shock absorbers of gas and oil type. Some of them are specially made rigid and when driving on uneven roads, you will definitely feel all the bumps. But driving in this case will be simply superb. Typically, such shock absorbers include products from expensive manufacturers intended for sports driving on highways and even surfaces.
- As for off-road driving, most experts agree that oil shock absorbers are no better in this case. In particular, they are cheaper and do not have too high rigidity. That is why, if after replacing the rear struts you feel stiffness and discomfort in the ride, the problem may lie in the shock absorbers. They will have to be replaced.
- Today, in addition to oil-type shock absorbers, there are also those equipped with special stiffness adjustment. But they are very expensive and not every VAZ 2110 owner can afford to buy them.
Changing the shock absorber
Replacing the shock absorber is carried out as follows:
- the car is raised on a jack, and stops are placed under the front wheels;
- again, the rear seat is dismantled;
- from inside the cabin, unscrew the bolts securing the upper parts of the shock absorbers;
- Now you will need to unscrew the lower shock absorber mount;
- By removing the lower end from the bracket, the shock absorber will automatically be removed along with the spring.
Here, in this video, you can see how shock absorbers are replaced.
- after the shock absorber and spring come out, you will need to remove the spring insulating gasket, which is located in the wheel well;
- remove the support washer, again from the interior (as in the photo);
- the cushion and bushing are also removed;
- then the casing is removed from the shock absorber, and from there the compression stroke buffer;
- install a new shock absorber.
The instructions recommend carrying out the above operations strictly according to the rules. And even a beginner who only knows how to hold a wrench in his hand can cope with replacing the rear struts of a VAZ 2110 car. You can also learn on our resource how to replace the front struts. By carrying out the replacement operation yourself, you can even save a lot of money, because the price for services of this kind in car services is quite high.
The rear pillars on VAZ 2110-2112 cars sometimes last more than 100,000 km, if we consider the factory parts. But if you notice that when you get into holes on the road, one or both struts begin to “punch”, knock, or even oil leaks become visible, then this indicates the need to replace them.
Consider the list of tools that will be needed for repairs:
- 19 mm head
- 19 mm wrench
- Special key for holding the strut rod from turning
- Ratchet and crank
- Hammer
Garage or service station
All car enthusiasts can be divided into two categories:
- Those who do most of the repairs independently in their garage, and only in critical cases turn to a car service;
- Those who prefer not to touch anything with their own hands, but 100% trust repairs and services to service station technicians.
Any of their rights in their own way. Therefore, we have no right to reproach those who do not want to do repairs without the help of others. After all, garage and professional repair of silent blocks, like other components, has its advantages.
100 has the following advantages:
- A high-quality, responsible car service provides a guarantee for the repairs performed;
- In case of repeated breakdown, which is covered by the warranty, repairs will be carried out free of charge;
- Masters are masters, they have vast experience and knowledge, which allows them to do their job well.
But first you need to find such a car service, which, alas, is not an easy matter. Many give a guarantee, but when they call again, they do everything possible to justify the failure of the failure to comply with the terms of the guarantee. An obvious ploy.
Repairing your garage will provide the following benefits:
- Significant money savings, since you only have to spend money on consumables;
- The quality of work performed by a craftsman is always in doubt if you do not understand this person personally. So self-repair may be much better than 100;
- You purchase the silent block, and the master only installs it. Why pay money for work that you can do yourself?!;
- Guarantee that a new one will be installed instead of the old silent block. Incomprehensible 100 can, without any problems, install an old, more or less usable silent block instead of the one you gave them. You yourself realize what the result is.
"Nine" and Samara
For the indicated repairs on the “nine” we will prepare the following tools and accessories:
- set of wrenches;
- screwdrivers;
- pliers;
- wheel chocks.
Also read about replacing the belt tensioner roller of the Granta generator and why hydraulic compensators knock when cold.
Let's get started.
- We remove the back of the rear sofa, pry it up with a screwdriver and remove the protective cap, after which we unscrew the upper fastening of the defective unit, holding the rod from turning with pliers.
- Next, placing jack stands under the front wheels, jack up the rear of the car, not forgetting to loosen the wheel nuts first. We remove the wheel.
- Unscrew the nut of the lower silent block using two keys, then remove the bolt. We now pull the broken assembly unit down.
- Through the coils of the spring we take out the cushion, bushing, and washer.
- Having sunk the rod, we take out the spring, cover, compression buffer and cover, and separate them from the shock absorber.
- We examine all parts and replace defective ones.
- We assemble the unit in the reverse order, after which we install it in the car, securing it first at the top and then at the bottom. In this case, you will have to tie the upper spacer ring to the spring before installing it, and then you will have to compress the spring itself by resting the jack under the spring against the beam.
Everybody is here. Just as an addition - stubborn nuts, of course, must be treated with the so-called “Vedashka”.
Changing the rear pillars of the restyled "nine" - VAZ 2115 - occurs in a similar way. You will need the same tools, but to compress the spring it is more convenient to use universal ties - fairly inexpensive devices available on the shelves of large auto stores.
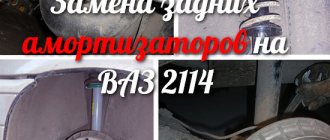
By the way, we mean that changing struts on VAZ 2114 cars is done according to the instructions for the fifteenth model.
Below we present these instructions briefly, since they completely repeat the procedure already described for the “nine”. The only difference: we add the operation of compressing the spring with ties, which is not necessary at all.
- We unscrew the top nut in the cabin by simply tilting the back of the rear seat.
- We remove the desired wheel, not forgetting to support the car with stands against rollback, and also turn on the speed.
- We install two couplers, and then compress the spring.
- We unscrew the bottom bolt and pull out the defective unit.
- If the spring is intact, we immediately replace it with a new assembly unit.
- We also reinstall the rubber compression buffer and other parts.
- Installation of a new rack into the car is done in reverse.
If there are any unclear points, we suggest watching the video of replacing the rear pillar of a VAZ 2115.
Ten, Kalina plus Priora
If you ask yourself what nuances there are when replacing any of the rear struts in other front-wheel drive VAZs, we hasten to assure you that there are practically no differences from the instructions given above. For example, replacing struts on VAZ 2110 cars can be done according to the instructions for Samara, only it is not necessary to use spring ties, these parts can be easily dismantled.
When changing VAZ 2112 cars, the operation of unscrewing the top nut of the rod from the passenger compartment is somewhat easier. To unscrew the same fastener when replacing the rear struts in the Lada Kalina, you will first have to pry out the rubber plug with a screwdriver. But it’s generally difficult to add anything new about the operation of changing the struts on the Priora.
In all cases, after unscrewing the lower fastening, you will most likely have to knock out the bolt with a hammer and stand.
If we talk about the brand of new shock-absorbing spare parts for these VAZs, then this is a voluminous issue that requires a separate article. Let us only note that the components installed during the production of a Russian car directly after 20 - 30 thousand kilometers during normal operation. These spare parts under the KYB brand of all sizes are extremely popular among car enthusiasts.
A few words about the foreign car and price
In order to get a complete picture of the problems of reinstalling rear shock absorber units, let’s consider another procedure being studied on one of the popular foreign cars.
Namely, we provide instructions for replacing the rear strut on such a popular car as the Honda Stepwagon.
- spanners;
- socket heads with a knob.
We begin the procedure from the salon.
- Having unscrewed the carpet, unscrew the two support nuts, as well as the rod nut of the defective unit. The support nuts are hexagon-shaped; if they do not give in, they can be carefully cut off.
- Loosen the wheel nuts, lift the part of the car to be repaired, and remove the wheel.
- At the lower fastening of the unit being replaced, one bolt must be unscrewed. We dismantle it using a head with a knob.
- We remove the broken part.
- In this machine, the spring is located next to the rack, as it works separately. If it is cracked, it can be removed from the car after removing the shock absorber.
- Assembly is carried out in reverse order.
As for markings, many Honda Stepwagon owners advise purchasing New sr special brand shock absorbers.
In general, these parts for any car are usually sold at fairly high prices. However, the work of reinstalling them is also expensive. For clarity, we have compiled a table in which we have collected average data on the cost of the described repairs relative to several large cities in Russia. Here she is.
| City | Price |
| Moscow | 1100 rub. |
| St. Petersburg | 900 rub. |
| Samara | 600 rub. |
| Ekaterinburg | 900 rub. |
| Krasnodar | 800 rub. |
It is clear that under certain conditions it is better to do all the described manipulations on your own. This will save a significant amount for the family budget.
It is for such situations that we tried to highlight as many important points as possible related to the reinstallation of such a critical rear suspension unit, and not only on AvtoVAZs. Many of the recommendations given should serve motorists well.
Selecting new parts
It is not difficult to purchase a rear shock absorber for a VAZ 2112; there is a fairly large selection at any auto store. The question is what type of rack to choose. There are 2 types of them:
Parts of the first type are cheaper and handle road unevenness much more smoothly. When the car is operated without special loads and with a quiet driving style, oil shock-absorbing elements can last quite a long time, provided that you do not come across a fake. Gas-oil shock absorbers are more expensive and behave more rigidly, which improves car handling and is a definite plus for an aggressive driving style. In addition, they last longer when used under increased loads.
To avoid purchasing low-quality products from unknown manufacturers, you should choose products from brands that have proven themselves on the roads of Russia:
At the same time, it is necessary to take into account that products of these brands are most often counterfeited in underground workshops. Therefore, it is better to buy parts from official sales representatives of these manufacturers. The same applies to VAZ 2110 springs, which sometimes change due to shrinkage from loads.
If there is an obvious malfunction of one of the shock absorbers, it is recommended to replace both elements.
There is no point in changing them one by one; you will only waste money and time on replacement. Using an old rack together with a new one will cause rapid wear of the latter. A “bad” part will handle irregularities much worse than a new one, which will put a double load on it. An exception is a situation where, for various reasons, a new shock absorber installed recently has failed. Then it makes sense to replace only it.
Why do the rear beam silent blocks fail?
During operation, the rubber part peels off from the metal bushing.
The rubber of the parts itself, which is cast with metal bushings, must withstand enormous loads, but time destroys the rubber.
In addition, if the parts are installed skewed, or the quality of the ohms turns out to be low, which often happens, then the silent blocks can quickly fail. In addition, the following factors affect the durability of parts:
- The main factor that affects the service life of obviously high-quality silent blocks is driving style . If you do not pay attention to holes and other irregularities, then they will be the first to suffer in the suspension.
- Wheel alignment also affects the life of the hinges . If this is not done periodically, the wheel alignment angles will change, which will lead to incorrect operation of the suspension.
- Rubber is not very durable, especially if oil and other technical liquids get on its surface . In these cases, the surface of the silent compounds becomes covered with cracks, which can lead to ruptures.
In order to avoid problems and expensive suspension repairs, it is recommended to inspect the condition of the silent blocks at least once every six months. This will help to identify and eliminate problems in a timely manner.
What to consider when replacing
The silent blocks of the VAZ-2108 and VAZ-2110 visually seem exactly the same, but in fact their mounting dimensions are different.
When should you change the rear struts of a VAZ-2110?
Most often, seals, rods and silent blocks wear out on racks.
Any experienced driver can independently determine when his car needs to replace the rear shock absorbers. This is determined by the following features of the car’s behavior while driving:
- Management efficiency has decreased.
- When driving, the car may “steer” to the side.
- The braking distance increases, although the pads are fine.
- There is a beating sensation in the cabin.
- The rear began to sag a lot.
The combination of all these reasons clearly hints that it is time to replace the rear struts of the VAZ-2110.
How long does it take to replace it yourself?
Since the design of domestic VAZ cars is not particularly complex, most car owners prefer to repair their cars themselves.
As experience shows, if you have knowledge in the field of self-repair, replacing the rear struts will take about 2-3 hours.
If the rear shock absorbers are not replaced in time, this may lead to an accident. The combination of problems that will arise during the development of the rear suspension will lead to disaster at a critical moment.
Rack installation methods
Very often, a loaded VAZ-2112 catches on the reverse wheels when moving and rocking on a bad road. Mechanics have found an original solution and attach so-called “spacers” to the rear struts, placing them between the beam and the car’s shock absorber. After the manipulations have been performed, the characteristics of the machine change as follows:
- The angle of the headlights changes.
- The castor position (wheel angle) changes.
- In contour brakes (rear), the direction of the pressure regulator changes.
If the car's headlights can be adjusted independently, the direction of the front wheels and the angle can only be corrected at a service station.
What problem does the rear pillar solve?
A car's pillars, including the front ones, are car components that are designed to absorb body energy transmitted from driving on the road surface. If the road is uneven, then a double load sits on the racks. In fact, not only the comfort of movement, but in many cases also safety depends on the operation of the racks. So:
- In particular, the rear struts are responsible for the wear and tear of the car's chassis, help, together with shock absorbers, to resolve issues with body bouncing, and much more. As is known, at the moment of bouncing, the wheels of the car lose contact with the road surface and temporarily become suspended from transmitting the brake, driving and exerting lateral forces. As a result, all this affects driving safety.
- As for driving comfort, it is lost without high-quality shock absorption, especially if the direction of movement changes when moving over bumps. In addition, when braking or sharply accelerating, every pebble on the road, or rather its energy, is transferred to the cabin, so to speak, without filtering.
Note. The rear pillars, like the front ones, effectively solve the above problems, absorbing all the shocks and shocks from the road surface. They are designed to take care of the comfort and safety of the driver and passengers inside the car.
In addition, poorly performing shock absorbers increase braking distances and allow the vehicle to bounce on the road, causing severe body vibration. It swings from side to side, which contributes to rapid wear of tires and other parts of the car's chassis.
Correct and competent replacement of the rear pillars of a VAZ 2110 with your own hands, in this case, becomes a decisive operation, which, despite its apparent simplicity, is a serious process where you can make a lot of mistakes.
How to determine the malfunction?
The shock-absorbing unit of the rear beam of the VAZ 2112, although it is distinguished by its simplicity of design, has some “cunning” in terms of detecting malfunctions. Since it does not experience the same loads as the front suspension, the rear shock absorber lasts longer - up to 50 thousand km. The “cunning” of the rear pillar of the VAZ 2110-12 is that there are only 2 clear signs indicating the need to replace the part:
- traces of oil flowing down the element body;
- a dull knock when driving over bumps or small potholes.
The second sign does not always indicate a breakdown of the VAZ 2110 shock absorbers themselves; the rubber bushing of its lower mount knocks much more often; the issue is resolved by replacing these rubber bands. And only when the struts are too loose, a change in the car’s behavior on the track is felt, which is expressed in vibrations or skidding of the rear end during sharp turns of the steering wheel.
Motorists who constantly operate their cars with a full load or with a trailer are recommended to check the condition of the rear springs and struts after each long trip. An immediate inspection of the unit is also carried out after a strong blow to the shock absorber from a wheel that has fallen into a large hole. If an oil leak appears on the body or the behavior of the car changes dramatically, then most likely the rear shock absorber has become unusable. Too strong a blow often leads to bending of the rod, causing the car to start to pull to the side when driving.
Since the rear of the car does not initially bear much load, you can try to check the struts by rocking. By sharply pressing the corner of the trunk from behind, you should make sure that the shock absorber immediately extinguishes the vibration. If the body swings a second time after pressing, then the element does not cope with its task.
Do-it-yourself replacement of rear struts on a Priora
So, first of all, when the car is still on wheels, we remove the plastic plugs from the pillar cups from the interior side. It is under them that the shock absorber mounts are located.
If you have a special wrench, then use it to unscrew the nut securing the strut from above, holding the rod from turning. If there is no device, then we hold the rod with improvised means.
Once the nut is free to rotate, you can move to the lower shock absorber mount. To do this, remove the rear wheel and apply penetrating lubricant to the threaded connections. We wait a few minutes and unscrew the nut securing the rack from below.
We knock out the bolt if it is soured using a hammer and a punch. When you have dealt with this, you need to completely unscrew the upper fastening nut.
Now you need to pry up the shock absorber and remove it from its seat in the rear beam using a pry bar.
Now you can remove the entire shock absorber assembly, as well as the spring of the Priora rear suspension.
If necessary, we replace the struts with new ones, as well as springs if they are already worn out. The spring can be removed without any problems, after which we remove the boot and reassemble everything in the reverse order with new parts.
How to remove rear lights on VAZ 2114, 2113, 21099, 2109, 2108
Before proceeding with the replacement, you must disconnect the minus terminal from the battery. If you are confident in your electrical wiring, then you don’t have to disconnect the terminal, but making sure that power is not supplied to the lights is strictly necessary.
Then we open the trunk lid and move aside the so-called windows in the trunk trim, which are secured with Velcro. It is through these viewing windows that the nuts securing the lights are visible:
Using a ratchet, unscrew the two nuts securing the flashlight on one side, as shown in the photo below.
Now disconnect the power plug from the board by pressing the latch.
Now there are two more nuts left on the other side, which are also accessible after opening a special “window” in the carpet.
After this, we carefully take the flashlight body from the outside and try to move it back, thereby removing it from its seat.
The second light on VAZ 2114 and 2113 is changed in the same way. Don't forget to connect the power plugs after installing new lights.
Required tool for replacement
When the tool is ready, you can start working.
Before you begin work, you need to prepare the following tools:
- A driver or ratchet wrench.
- Head at “17” and “19”.
- Lubricant like WD-40.
- Spring ties.
- Jack.
- Special key for the rack rod.
Preparatory work
Carry out the following preparatory work:
- When the car is secured on a level surface, remove all the nuts on the rear wheels. Then we lift the car on a jack and finally remove the wheel.
- It is also necessary to loosen (but not completely unscrew - approx.) the nut securing the strut rod. This is done either from the trunk or the rear seat.
- Treat all unscrewing surfaces with lubricant for best unscrewing.
New elements are ready for installation.
Step-by-step work order
- First of all, we remove the plug and unscrew the nut on the rear pillar rod, and in order to prevent it from turning, you can use a regular “6” key or a special one - which is intended for this.
The plug will come off easily by prying it off with a screwdriver.
With some force, the nut will unscrew
The lower mount for the rear pillar sometimes sticks.
It is necessary to tighten the springs until they release the upper cup. The photo shows an example with a front shock absorber on a VAZ-2112.
Removing the rack components
- With the rack removed, we inspect the condition of the boot and bumper, and when installing new racks, we replace them, or if they are in good condition, we leave them.
As you can see, the bumpers are in worn condition.
Additional recommendations
Before you begin assembling all the components of the VAZ-2112, you should perform several additional manipulations:
- treat all insert elements with kerosene;
- Before direct installation, carefully inspect each element, even a new one, to ensure its integrity and quality;
- The final fixation of the mounting bolts should be carried out after the jack has been removed;
- After assembling all components, it is recommended to carry out a special wheel alignment check.
If for some reason a car enthusiast has difficulty replacing the rear struts in a VAZ-2112, then you can get additional information from the video tutorial at any time. On the site, recommendations are given by professionals in their field; all work is presented step by step with photos.
Source