02 April 2020 Lada.Online 44 974 0
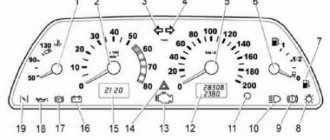
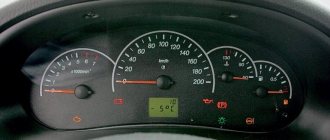
The Chevrolet Niva instrument cluster is designed to display driving characteristics, the current state of vehicle systems that ensure traffic safety, as well as the correct operation of the entire vehicle as a whole. If you are a novice driver, then this description of the dashboard will help you understand the readings of instruments and indicators.
Designation of signs and icons
Their work together indicates that the emergency lights are on.
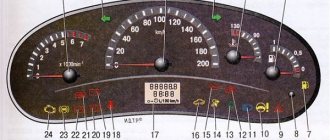
- 5 — Speedometer
- 6 — Fuel level indicator
- 7 - Minimum fuel level indicator
- 8 — Indicator for turning on external lighting (side light)
- 9 — Indicator of problems in the brake system (lights up when the brake fluid level decreases)
- 10 - High beam headlight indicator
- 11 — Button for resetting daily mileage, time settings, etc.
- 12 — Odometer display
- 13 — Indicator for turning on the center differential lock
- 14 - "Check Engine"
- 15 - Clock and outside temperature display
- 16 — Indicator of lack of charge from the generator
- 17 — Parking brake indicator
- 18 - Insufficient oil pressure indicator
- 19 — Lamp for checking the operation of the immobilizer
Price of standard tidy: from 5 to 7 thousand rubles . Used - from 2 thousand rubles.
In addition to the instrument cluster, important information may also be contained in the LCL. As the year of manufacture changed, on Nivas some of the information went to the warning lamp unit. On modern models, almost all the icons below are located only there.
- 1 — Differential lock indicator
- 2- Immobilizer indicator
- 3 — Lamp for monitoring the power steering condition
- 4 — ABS diagnostic lamp
- 5 - Airbag warning indicator
- 6 - “Insufficient brake fluid level”
- 7 — “Unfastened seat belt”
The warning lamp unit is usually replaced by an on-board computer, and all icons are transferred to the BC.
In addition to the standard dashboard, tuned ones can also be used. But the combination on them will be different.
Source
Light bulb designations
3. Indicator lamp for turning on the direction indicators on the left side
. Lights up with a green blinking light when the left turn signal is turned on.
4. Indicator lamp for turning on the direction indicators on the starboard side
. Lights up with a green blinking light when the right turn signal is turned on.
7. Fuel reserve warning lamp
. If the fuel reserve indicator light comes on, refuel the vehicle as soon as possible. The arrow points to the right side of the car, on which the gas filler flap is located.
8. Indicator lamp for turning on the side light
. Lights up green when the exterior lighting is turned on.
9. Warning lamp for emergency condition of the service brake system
. Lights up red when the fluid level in the hydraulic brake reservoir drops below the “MIN” mark, as well as when the starter is turned on to monitor the serviceability of the lamp itself. Attention. It is prohibited to operate the vehicle with the warning lamp for the emergency condition of the service brake system constantly on.
10. Indicator lamp for turning on the high beam headlights
. Lights up blue when the high beam headlights are turned on.
13. Differential lock indicator lamp
. Lights up yellow when the differential lock is engaged.
14. Check Engine warning light
. When the lamp lights up when the ignition is turned on, it indicates a self-test of the system. If there is no malfunction, the lamp goes out after the engine starts. Attention. If any defect is detected in the system, the lamp lights constantly. To determine the cause, read the error using diagnostic equipment.
16. Battery charge indicator lamp
. Lights up red when the ignition is turned on and goes out after the engine starts. The lamp burning or glowing at full intensity while the engine is running indicates a lack of charging current caused by a malfunction of the generator or voltage regulator, as well as weak tension (or breakage) of the generator drive belt.
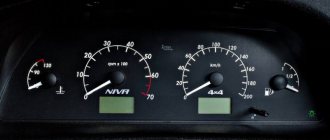
Symbol designations on the Chevrolet Niva instrument panel
The stock 2004 version has a number of mechanical gauges and analogue icons. In the photo above the panel elements are numbered. The symbols are described below.
| Number | Meaning |
| 3/4 | Standard turn signals also illuminate when the hazard lights are activated. |
| 7 | Indicator of the minimum amount of fuel in the tank. Refuel. |
| 8 | This indicator indicates that the side lights are on. |
| 9 | The brake system is in disrepair. The system needs to be diagnosed. |
| 10 | The high beam of the head optics is on. |
| 12 | Digital mileage indicator, general on top – daily on bottom. |
| 13 | This indication indicates that there is a problem with the engine. In this case, you need to immediately go to the service station. |
| 14 | Emergency light indicator. |
| 15 | Digital display – daily time indicator. Also, during self-diagnosis, an error code is displayed here. |
| 16 | The battery is low. Check the generator and its drive belt. |
| 17 | Handbrake activation lamp. |
| 18 | The oil pressure in the crankcase is too low. |
| 19 | Reserve indicator. |
Errors on the Shnivy panel
When performing self-diagnosis of the BC, the following faults may appear on the display.
| Number | Decoding |
| There are no problems in the system. | |
| 1 | The ECU controller is faulty. |
| 2 | Fuel level indicator is broken. |
| 4/8 | High or low voltage inside the on-board network. Check that the generator set is operating correctly. |
| 12 | The warning lamp diagnostic circuit is faulty. |
| 13 | Open circuit DK1 |
| 14/15 | High/low signal level from DTOZH. |
| 16/17 | High/low voltage inside the on-board network. Here the distributor and battery are checked. |
| 19 | The DPKV is transmitting the wrong signal. |
| 21/22 | Likewise for TPS. |
| 23 | The intake air temperature sensor is reporting incorrect data. |
| 24 | Open circuit of the vehicle speed meter. |
| 25 | DD produces erroneous information. |
| 27/28 | Potentiometer CO – increased/lowered value. |
| 33/34 | The absolute pressure sensor is faulty. |
| 35 | The XX regulator is faulty or does not work correctly. |
| 41 | Phase sensor - incorrect signal. |
| 42 | The ignition control circuit is damaged. |
| 43 | DD – errors in the operation of the highway. |
| 44 | The fuel mixture is too lean. |
| 45 | Opposite meaning. |
| 49 | Loss of vacuum in the fuel line. Check the line for leaks. |
| 51 | The PROM is faulty. |
| 52 | RAM failure or circuit malfunction. |
| 53 | Increased voltage in the circuit. |
| 54 | The octane corrector is torn or out of order. |
| 55 | ECU circuit error. |
| 61 | Oxygen sensor degradation. |
Most errors can be caused by the overlap of several problems. For example, 8+2=10.
Shnivy tidy does not work: reasons
Usually this is damage to the module's power circuit, moisture/condensation on the board, or mechanical damage caused by improper repair.
The problem is simple when studied in detail, and can be easily eliminated without the help of specialists.
The shield does not light up
If it just goes out (the backlight has failed), check the corresponding fuse inside the mounting block. Next you need to follow the wires towards the tidy. Here the condition of the contact groups and the presence of oxidation on the terminals are checked. If there are such problems, the problems should be eliminated.
If only some of the light bulbs stop lighting, dismantle the device and check the lighting elements directly for damage.
Shnivy's shield is blinking
A typical problem in cars that are driven on rough terrain or broken roads. A symptom of trouble is that the device periodically goes out while driving or blinks quickly.
Possible faults
If you understand the designations of the light bulbs in the Niva Chevrolet instrument panel, let's look at the next point - possible malfunctions of the device:
- The instrument cluster does not work, but the engine starts normally. Most likely, the problem is caused by either a failure of the shield itself or a lack of power.
- The lights on the instrument cluster do not light up. If all the indicators stop working at once, this may indicate a break or fraying of the wire responsible for the lighting. If only some of the lamps do not work, then most likely they are simply burnt out.
- Devices not working - speedometer or tachometer. Most likely this is an electrical type problem; you need to disassemble the panel and look for the fault.
- Sensors do not work - fuel level, antifreeze temperature. As practice shows, this usually indicates poor contact in the electrical circuit. Usually this problem is solved by disconnecting and cleaning the plug contacts (the author of the video is the Ig K channel).
How to remove the tidy
Follow the simple procedure.
- Disconnect the car. Usually users remove the battery terminal, but you can remove the power fuse.
- Next you need to remove the steering casing. This is done by unscrewing the five mounting screws.
- Next, the steering wheel and its switches are removed.
- Now you need to unscrew all the fastening bolts that hold the tidy in place.
- After this, you need to carefully lift the panel from its seat and disconnect all contacts of the shield wires.
- Now you can completely remove the part from the machine.
Reassembling the unit is performed in reverse order.
The standard Shnivy panel is a well-thought-out module with informative and easy-to-read information. The simple design ensures the reliability of the unit and the absence of serious breakdowns during operation.
Specialization : Graduated from the State Automobile University, worked for 20 years at GAZ-56, now I drive a Zhiguli.
Source
General appearance and varieties
At the moment, there are several options for the instrument panel on the Niva Chevrolet and Niva Treval.
| Picture number | Years of manufacture | Applicability | Catalog number |
| 1 | 2006-2007 | Chevrolet Niva | 21230-3801010-00 |
| 2 | 2006-2009 | Chevrolet Niva | 21150-3801010-00 |
| 3 | 2009-2018 | Chevrolet Niva | 21230-3801010-10 |
| 4 | 2018-2019 | Chevrolet Niva | 21230-3801010-15 |
| 5 | 2019-2020 | Chevrolet Niva | 21230-3801010-17 |
| 6 | 2020… | Lada Niva Travel | 21230-3801010-17 |
Despite the external differences, these shields differ only in appearance, lighting, software and functions of the built-in BC. Otherwise, the icons and designations of these panels are absolutely the same.
Specifications
Automotive manufacturers have specially improved the Niva's power plants in order to outshine their competitors. At first they wanted to install a monocoque body, MacPherson strut suspension, automatic transmission, and a 135 horsepower engine.
In fact, they installed a new four-cylinder unit with 122 horsepower. The front suspension was made of two wishbones. The Niva also has all-wheel drive and a 5-speed manual transmission. This element has become permanent. A version with a single drive will appear soon. If a transmission of this type is used, then you need to forget about saving. The independent front suspension has a stabilizer.
You can pick up speed up to 100 km on the new Niva in 10 seconds. At the same time, the car, having driven 100 km, consumes 8-14 liters of fuel. The luggage compartment holds few things. With its volume of 320 liters, it is capable of storing 420 kg of weight. But if you move the seats back on the second row, the trunk space will increase.
The second generation of the car has the following parameters: 4048/1770/1652 mm. Wheelbase width 2450 mm. The new weight of the model is now 1 ton 410 kg.
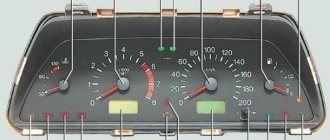
Description of devices and indicators
The Niva Travel and Niva Chevrolet panel has the following icons and indicators:
Designations:
- Coolant temperature gauge. Informs the driver of the current coolant temperature and warns of overheating.
- Tachometer. Shows crankshaft speed. The numbers on the panel must be multiplied by 100 to get an accurate result.
- Left turn signal indicator.
- Right turn signal indicator.
- Speedometer. Displays vehicle speed in km/h.
- Fuel level indicator. Shows the remaining gasoline in the tank.
- Low fuel level warning indicator. Lights up when there are 5-6 liters left in the tank.
- Indicator for turning on the side light.
- Malfunction indicator in the service brake system. Lights up when the brake fluid level drops. For the test, the light comes on while the starter is cranking.
- Headlight high beam indicator.
- Daily mileage reset button.
- Odometer with the ability to display other parameters. Shows total and daily mileage.
- Differential lock activation indicator.
- Check Engine. Lights up when there is an engine malfunction.
- Clock and thermometer. Later instrument panels display the voltage of the on-board network.
- Generator lack of charge indicator. It turns on when the ignition is turned on and if the generator is working, the lamp should go out immediately after the engine starts.
- Parking brake engaged indicator.
- Low oil pressure indicator. It should go out after the engine starts. It can turn on when the oil level is low and there is insufficient pressure in the lubrication system.
- Lamp for monitoring the performance of the immobilizer and standard security system.
Possibilities of the daily mileage reset button
The mileage reset button on the Niva Chevrolet and Niva Travel has a lot of useful functions:
- Setting the time.
- View the outside temperature and on-board voltage.
- Mileage reset.
- Starting the self-diagnosis system
Each possibility should be considered separately.
Setting the time
Turn the barrel switch fully clockwise to set the clock. Shifts will take place one hour at a time. To adjust the minutes, you need to turn the button counterclockwise. The time will be saved independently and will be reset only after the battery is disconnected or after the instrument panel on the Niva is rebooted.
View outside temperature
To display the outside temperature on the left display, you need to briefly press the button and release. Pressing the button again will display the on-board network voltage on the display, if provided for by the version of the panel.
Mileage reset
To reset the mileage on your Niva Travel, press the button and hold until “0.0” appears on the bottom line.
Self-diagnosis system
The instrument panel on the Niva Chevrolet is being diagnosed. To do this do the following:
- With the ignition off, press and hold the mileage reset button.
- Turn on the ignition.
- You can release the button, and the arrows on the dashboard will begin to move and all the lights will light up. This way the panel checks the functionality of all elements.
- Pressing the button again will display the software version.
- Another press will show engine error codes.
Despite the possibility of engine diagnostics, its readings are not always correct and therefore do not inspire confidence. For diagnostics, you should use appropriate software and devices.
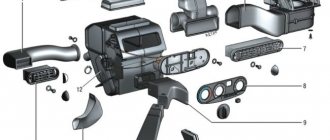
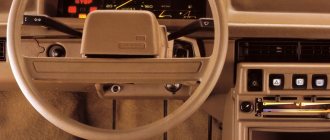
What is a torpedo
All cars have a dashboard (board), which is located in front of the passenger compartment. In a Niva Chevrolet car, it is a plastic covering on which almost all vehicle control elements are located. Although the panel is not a necessary part for driving a car, without it driving turns into complete dissatisfaction. Under the socket there are parts that can fail from time to time. And sometimes, to get to them, it is necessary, as they say, to disassemble half the car. Let's take a closer look at the stages of removing a torpedo from a Niva Chevrolet car.
Steps for removing the instrument panel
The reason for removing the panel may be not only the breakdown of parts located under the panel, but also the following points:
- Car interior modernization;
- Insulation and noise reduction of the interior;
- Cleaning the car heater;
- Replacement with a new, improved one.
Removing the Niva Chevrolet dashboard is carried out in stages. You need to arm yourself with a simple set of tools and get started.
- Stage 1. The car is disconnected from the battery. This is necessary, because there is a huge amount of wiring on the instrument panel, which can accidentally be shorted during removal. To do this, simply disconnect the negative terminal from the battery.
- Stage 2. First of all, the part of the casing located under the steering wheel is removed. The five fastening screws are unscrewed with a screwdriver, and this casing, consisting of two parts, is removed.
- Stage 3. The steering wheel and the switches located on the side are removed. The steering wheel is removed by unscrewing the nut located inside the steering wheel. Remove the steering column shaft. How to remove the steering wheel and its parts can be found in the relevant sections.
- Stage 4. The car radio and its installation location are removed from the passenger compartment. Let's start removing the floor covering. To remove the A-pillar trim, you need to unscrew four screws. The ignition switch is also removed.
- Stage 5. We proceed to disconnecting the wires. The blocks with wires located at the bottom near the gas and brake pedals are disconnected and marked with a marker. The wires supplying the car's anti-theft system are disconnected. The power supply of the instrument board consists of three blocks, which are also detachable.
- Stage 6. The ground wire of the car is unscrewed from the stud. Under the hood, you need to remove the filter, which is designed to filter the air entering the cabin.
- Stage 7. Most of the liquid is drained from the expander, and the clamps suitable for the heater radiator are disconnected.
- Stage 8. Work is carried out with a wrench inside the car. The bolts securing the panel to the stand and the stand to the bracket are unscrewed. The cross member strut is removed. A cross member of the instrument panel is attached to the steering shaft bracket, which can be removed by unscrewing four bolts.
- Stage 9. All visible and invisible bolts securing the instrument panel are unscrewed. These fasteners are located on top near the glass and on the side. The front air duct, which is designed to supply cold and warm air into the cabin, is removed.
- Step 10. You can remove the dashboard. It is best to do this together, so that one person observes the removal processes from inside the panel. Otherwise, any power wire or part may be damaged or broken.
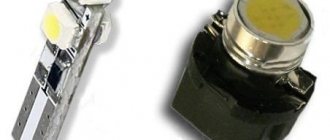
How to change a light bulb in a panel on a Niva?
To replace the lamp in the dashboard on a Chevrolet Niva, you need to remove the panel from the car. To do this, dismantle the cladding and then remove the shield.
Unfold the shield and find the required cartridge. Remove the cartridge by turning it counterclockwise. You need to remove the baseless lamp from the socket and install a new one in its place:
After this, you need to install the shield in its original place and reassemble it in the reverse order.
Source
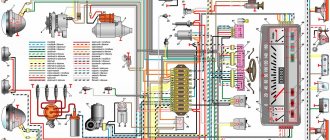
Chevrolet Niva operating manual
The Niva Chevrolet manual describes the operation of the main vehicle systems: engine, brakes, amplifiers, electronics, and also provides guidance on setting up the equipment.
For easy reading of the Niva Chevrolet manual, select “Presentation mode” in the upper right corner of the pdf. You can also download the manual.