Lada K alina 2 . REMOVAL AND INSTALLATION OF GENERATOR - PART 2
For removing the generator of cars with VAZ-21126 and VAZ-21127 engines
do the following. On cars with and without air conditioning, generators are secured in different ways, since to install the air conditioning compressor, a bracket common with the generator is used, of a new design, significantly different from the bracket of the previous design. The operation is shown using the example of a car without air conditioning. Techniques for removing a generator on a car with air conditioning are specifically discussed. You will need: keys “10” and “13”.
1. Disconnect the wire from the negative terminal of the battery.
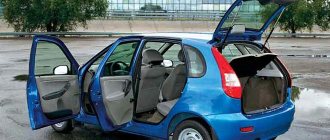
4. Place the car on a lift or jack and remove the right front wheel (see “Replacing a wheel”, p. 50).
5. Remove the right front wheel arch liner
This is where contact bolt A and terminal block B of terminal D+ of the generator of a car with air conditioning are located.
This is how the adjusting bolt is located on a car with air conditioning. Do not forget to tighten the locknut of the adjusting bolt after completing the adjustment!
20. Tighten the nut securing the generator to the tension bar to a torque of 21 Nm.
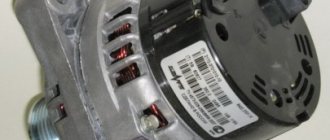
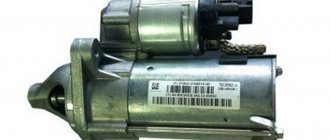
Lada Kalina cars are equipped with generators of two brands - 5132.3771 or 9402.3701-06. The standard Kalina generator is a three-phase alternating current device, which has a built-in rectifier unit and an electronic voltage regulator.
There are very different reviews regarding the quality and reliability of the devices with which these cars are equipped during factory assembly. If the unit fails, you can replace or repair it yourself.
About the Kalina generator tensioner
In April 2011, a pilot batch of 1000 elastic belts 1118-1041020-07 manufactured (Germany) was installed. These Kalinas do not have an alternator belt tensioner, all problems caused by its absence are solved, like the Lada Granta. On other Lada Kalina cars, the alternator belt tensioner is present.
Replacing a generator on Kalina
Required tools: socket wrench “8”, wrench “19”, head “13”, head “17”. Disconnect the negative terminal of the battery. Then:
- We hold the belt tensioner pin with a 19mm wrench, put a 8mm wrench on the hexagon of the adjusting pin, and turn it clockwise. The tension will weaken.
- Remove the Kalina generator belt from under the tension roller, and then from the generator pulleys and crankshaft.
- Press the lock of the generator pre-excitation wire block. Disconnect the connector from the voltage regulator connector.
- Unscrew the nut securing the wire lugs to terminal “B+” using a “13” socket. Remove them from output.
- Unscrew the lower mounting bolt of the generator using a 17mm socket and remove it. Remove the nut from the generator bracket.
- Unscrew the nut of the bolt of the upper mounting of the generator, using a 13mm head.
- Remove Kalina generator
Operating principle
The basic principle of operation of the generator is as follows: a three-phase alternating current is induced in the stator winding, which is converted into direct current using a rectifier unit attached to the cover of the device. On the cover there is a unit consisting of an electronic voltage regulator and a brush holder. The rotor rotates from the crankshaft of the car engine via a serpentine belt.
The Lada Kalina generator has the following characteristics:
- maximum output current - 85-90 A;
- voltage - 14.4-15.1 V;
- engine-generator gear ratio - 1:2.4;
- direction of rotation is right.
4 bolts secure the stator and covers of the device. The covers contain bearings in which the rotor shaft rotates. The rear bearing is located on the rotor shaft; it is mounted in the rear cover with a small gap. The front bearing, which slides along the rotor shaft, is installed in the front cover with a slight interference fit and covered with a pressure plate. The device is covered at the back by a plastic casing.
The generator connection diagram is quite simple. When the car's ignition is turned on, voltage is supplied to the voltage regulator through the low battery warning light. When the engine is started, the field winding receives power from 3 diodes that are installed on the rectifier block.
Typically, checking the alternator is easily done using the battery charging warning light. If the device is working properly, this lamp should light up when the ignition is turned on, and when the engine starts, it should go out. If the lamp burns brightly or at full intensity, then the generator needs to be replaced or repaired because it is faulty.
Checking and adjusting the tension of the Kalina generator belt
We press the lower branch of the belt upward with our hand; with a pressing force of 100 N (10 kgf), the belt deflection should be about 10 mm. In the absence of a special tool, household scales can be used.
- Excessive belt tension causes increased loads on the belt, generator bearings and tension roller, which leads to premature failure.
- Insufficient belt tension will cause it to slip on the pulleys, causing wear and preventing the battery from charging.
If the belt tension is not correct, then:
- To tension the belt, rotate the adjusting pin counterclockwise.
- To loosen the tension, rotate the adjusting pin clockwise.
Source
When is it time to change?
On Lada Kalina cars, the manufacturer does not regulate the replacement of this part. However, its failure is a common problem. In particular, we are talking about Lada Kalina cars. This applies to both 16-cl and 8-cl engines.
This is what a deformed element of a Kalina generator with an 8-cyl internal combustion engine looks like
Therefore, let’s look at the signs that indicate that the belt may fail in the near future:
- Whistle when moving. As a rule, this whistle appears when the electrical appliances of the vehicle begin to load. For example, if you start the car, and when you press the gas, a loud whistle is heard from the engine compartment, this indicates that the belt is loose. In this case, it must be tightened using a tensioner or replaced.
- Cracks on the strap. If you open the hood, look at the belt and see cracks on it, then you know that it’s time to change the element. Neither tensioning nor adjusting the rollers will help here. The component can be tightened, but this will not be enough for a long time. The only option left is replacement.
- Deformation. As in the previous case, neither tightening the tensioner nor adjusting the rollers will give much effect. You just need to change the element.
- Noise when the engine is running. If the element has already served its service life, this can be understood by the noise that appears when the motor is running. For example, some Lad Kalin car owners report loud knocking and even impacts when the engine is running.
The assembly is disassembled: this is what the strap looks like on the shafts
If the vehicle is equipped with a generator sensor that determines its performance, then it will be easier to identify the malfunction. For example, if you heard a whistle from under the hood, and at this time the indicator on the sensor came on, then you need to pay attention to the strap. This indicates that the belt needs to be tightened, since it may be in a weak state or that its service life has been exhausted.
New Lada: Topic: Turn signal fuse blows. Where is the source of the problems?
One way or another, if the slipping and whistling of the strap cannot be eliminated by adjusting the belt or rollers, it needs to be changed.
DIY generator replacement
Usually, even factory generators on Kalina serve for quite a long time and do not require replacement, of course, unless you come across a car with a factory defect of this device. If this electrical equipment unit fails, it will have to be replaced. Although this is not difficult to do, it will take at least an hour, especially if this is your first time doing this procedure. So, we will need the following tools:
- Open-end or ring wrenches for 8, 13 and 19
- Small and large ratchets and heads for 8, 13 and 19 for more convenient and faster work
- Wrench with extension
Why did it happen so?
Perhaps the automatic requests do not belong to you, but to another user accessing the network from the same IP address as you.
You need to enter the characters into the form once, after which we will remember you and be able to distinguish you from other users exiting from this IP. In this case, the page with the captcha will not bother you for quite a long time. You may have add-ons installed in your browser that can make automatic search requests. In this case, we recommend that you disable them.
It is also possible that your computer is infected with a virus program that is using it to collect information. Maybe you should check your system for viruses.
If you have any problems or would like our support team, please use the feedback form.
Replacing the alternator belt
Domestic cars have been and remain popular among car enthusiasts. Therefore, current issues relating to spare parts and their replacement in case of wear and breakdown require detailed consideration and study. One of these spare parts is the Kalina generator belt. Usually it is changed every 30-60 thousand km of the car.
A car generator is a device that recharges the battery and maintains the voltage necessary for the system to function. After starting the engine, the battery partially consumes its charge, but due to engine operation, energy is returned through transmission through the generator.
It is noted that the professionalism of the driver directly affects the power of the generator. Also, in the process of converting the mechanical energy received from the engine into electrical energy by the generator, the operation of all electronic devices of the car is ensured.
Kalina has a lot of devices and systems that require electrical energy. It is required to turn on the ignition system, operate both low and high beam headlights, to be able to use air conditioning, which is indispensable in the warm season, and, of course, to maintain the battery charge at the required level.
About the Kalina generator tensioner
In April 2011, a pilot batch of 1000 elastic belts 1118-1041020-07 manufactured (Germany) was installed. These Kalinas do not have an alternator belt tensioner, all problems caused by its absence are solved, like the Lada Granta. On other Lada Kalina cars, the alternator belt tensioner is present.
Replacing a generator on Kalina
Required tools: socket wrench “8”, wrench “19”, head “13”, head “17”. Disconnect the negative terminal of the battery. Then:
- We hold the belt tensioner pin with a 19mm wrench, put a 8mm wrench on the hexagon of the adjusting pin, and turn it clockwise. The tension will weaken.
- Remove the Kalina generator belt from under the tension roller, and then from the generator pulleys and crankshaft.
- Press the lock of the generator pre-excitation wire block. Disconnect the connector from the voltage regulator connector.
- Unscrew the nut securing the wire lugs to terminal “B+” using a “13” socket. Remove them from output.
- Unscrew the lower mounting bolt of the generator using a 17mm socket and remove it. Remove the nut from the generator bracket.
- Unscrew the nut of the bolt of the upper mounting of the generator, using a 13mm head.
- Remove Kalina generator
Stages of work
To adjust the degree of belt tension on Kalina engines, a mechanical tensioner is used, in contrast to the timing drive, which uses a hydraulic tensioner. When changing an element, it is recommended to carry out preventive maintenance of the roller by adding fresh lubricant.
To complete the work you need to do the following:
- Loosen the roller bolt. The thread on it is reversed.
- Use a screwdriver to pry up the plastic plug on the roller and carefully remove it.
- Unscrew the fixing nut on the tensioner rod a few turns.
- Loosen the belt tension by rotating the rod nut clockwise. The nut must be unscrewed until the rod begins to move freely in the seat.
- Unscrew the side bolt securing the rod end, located next to the tension roller.
- Remove the tensioner and set it aside.
- Proceed to dismantle the strap. The procedure must begin with the generator pulley, while overcoming the slight resistance of the belt.
- Remove the element from the crankshaft pulley and remove it completely.
- Unscrew the roller bolt and remove it.
- Using a needle, carefully pry up and remove the protective caps on the bearing. Wash the bearing with white spirit or gasoline.
- Refill with fresh grease and install protective rubber caps.
- Assemble all the parts and mount the roller in place. When assembling, you must remember that the bushing is in the bearing on the side of the bracket.
- Change the belt by installing it in the reverse order - from the crankshaft pulley to the generator pulley.
- Install the tensioner and begin tightening the belt by turning the nut counterclockwise. The nut must be tightened until the resistance increases. A well-tensioned strap should be slightly pressed when pressed by hand.
- Tighten the nut securing the tensioner rod.
- Check the operation of the mechanism; if a whistle occurs, tighten the strap.
Loosening the 17mm left nut
Removing the cover on the roller
Disassembled tension roller
Bearing with caps removed
Washed roller
Reassembling the unit
Belt tension
Tightening the control nut
Checking and adjusting the tension of the Kalina generator belt
We press the lower branch of the belt upward with our hand; with a pressing force of 100 N (10 kgf), the belt deflection should be about 10 mm. In the absence of a special tool, household scales can be used.
- Excessive belt tension causes increased loads on the belt, generator bearings and tension roller, which leads to premature failure.
- Insufficient belt tension will cause it to slip on the pulleys, causing wear and preventing the battery from charging.
Disassembling the device
To disassemble the generator, you need to perform several simple manipulations:
- Remove the drive pulley. Try not to lose the key.
- Unscrew the nuts from the back cover that secure all parts of the structure.
- Remove the voltage regulator. At the same time, evaluate the condition of the brush assembly.
- Disconnect all parts of the generator.
After this, you can begin to carry out repairs.
Bearings often fail, especially the one located in the front cover. The reason for this is excessive belt tension. To make a replacement, you need to unscrew four screws and press the bearing out of its seat. Instead, install a new bearing. To increase reliability, change both rollers at once.
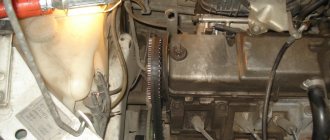
Removing a generator on a Lada car without air conditioning
Before starting work, disconnect the negative terminal from the battery and the engine protection. Prepare the keys “10, 12, 13”.
On 16 valve engines (VAZ-21126, VAZ-21127) an alternator belt tensioner is used:
- Unscrew the tensioner nut (No. 2) 3-4 turns.
- Loosen the generator belt by rotating the tension roller screw (No. 3).
- remove the alternator belt
- remove the protective cap (No. 1), unscrew the nut and remove the wiring harness terminal.
- disconnect the block with wires (No. 7) from the generator.
- Unscrew the nut (No. 3) and remove the bolt from the upper mounting of the generator.
- Unscrew the nut (No. 5) and remove the lower fastening bolt.
- remove the belt from the pulley, and then the generator itself.
ps To remove the back cover of the generator, lift three latches at the same time. This is difficult to do, so it is suggested that before dismantling the cover, fix all the clamps in the upper position by placing nails under them. Now the generator cover can be removed without difficulty.
Replacing a generator on a Lada with air conditioning
The air conditioning compressor and alternator are driven by one belt. The air conditioning compressor, its tubes and hoses make it difficult to remove the generator.
It is necessary to additionally disconnect the compressor (No. 2) from its mounting bracket (No. 3) by unscrewing the four bolts (No. 1). There is no need to disconnect the air conditioning system pipes; we simply move the compressor down and towards the right side member of the body. Otherwise, the process of removing the generator is similar (see above).
Installation of the generator is carried out in reverse order. When pressed with a force of 100 N (10 kgf), the belt deflection should be 8-12 mm. (you can use scales). Let us remind you that other recommendations and tips for operating Lada cars can be found in this category. See also the report on replacing the alternator belt without a tensioner and how to assemble the belt tensioner yourself.
Installation and repair features
Installation occurs in reverse order. If necessary, the generator is replaced or repaired. In some cases, repair will be impractical, since there are many unusable components, including stator and rotor windings. Restoration will be expensive; it will be much easier to completely replace the generator on Kalina. The cost of a new generator in stores is 4-5 thousand rubles. At "showdown" you can buy it 2-3 times cheaper.