One of the most mysterious, but no less important parts of the car is the brake force regulator (sorcerer VAZ 2114).
The importance of this part is that it regulates the behavior of the car under different braking conditions. When the regulator operates correctly, the braking distance is reduced and skidding and skidding are prevented.
What is the sorcerer on the VAZ 2114 and where is it located?
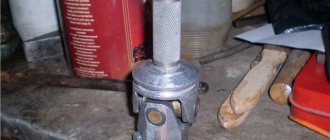
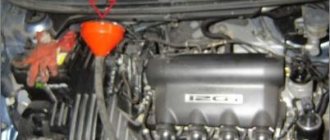
This strange name “sorcerer” was given to car owners by the brake force regulator. This device first appeared in 1970. This is probably not accidental, because the behavior of a vehicle on the road depends on this mechanism: the length of the braking distance, whether the car will skid when turning and by how much. During braking, the load on the front and rear axles is distributed unevenly, therefore, in order to equalize the force between the axles for effective braking, dynamic correction of the braking process is required. This correction is performed by the brake force regulator. This small detail prevents the rear wheels from locking before the front wheels, and thereby prevents the car from skidding during braking. If the sorcerer is faulty or incorrectly adjusted, the machine may even overturn. The figure below shows the design of the brake regulator.
And below is its schematic image:
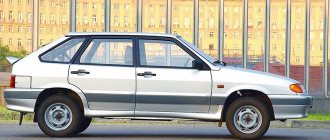
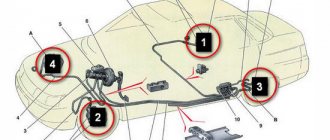
The brake torque regulator on the VAZ 2114 is located under the body at the rear, on the side of the left rear wheel, near the rear suspension beam. The VAZ-2107 and other “classic” models also have this mechanism, but it is located on the right side. New vehicles equipped with anti-lock braking devices and EBD electronic brake force distribution do not use the sorcerer. Understanding how the sorcerer works will help the car owner configure it correctly and operate it in the future. The sorcerer distributes the braking forces as follows: during sharp braking, the front is pressed to the bottom, and the rear is raised. In this case, the rod moves and thereby closes the flow of brake fluid to the rear brake cylinders. The spring holds the valve, preventing it from closing completely, so the rear wheel locking is activated, but a little later than the front ones. Ideally, the rear wheels should brake half a second after the front wheels.
Examination
Symptoms of a sorcerer malfunction on a VAZ 2110 appear when braking:
- Pulling the car to the side;
- Skidding;
- Insufficient brake performance.
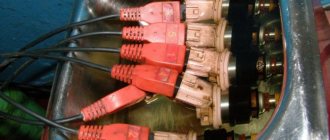
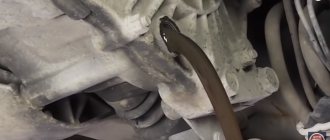
The VAZ 2110 has a sorcerer on a bracket under the bottom, slightly to the left, in the area of the rear wheels. It is better to work with it on a lift, overpass or inspection hole. The main defects are easily detected during external inspection. Brake fluid leaks indicate wear or damage to the seals.
Sorcerer (RDT) installed on the bottom
If the sorcerer's piston has turned sour and does not move, then this is also determined visually when the assistant smoothly presses the brake pedal several times. In both cases, repair is impractical and replacement is necessary.
Everything is in order if the regulator is clean, the gap between the drive lever and the plate is 2 mm, the rod moves when the pedal is pressed.
Replacing the sorcerer on a VAZ 2114
There are 3 signs that the brake torque regulator on the VAZ 2114 has become unusable and needs to be replaced:
- The cuffs are worn out and as a result, brake fluid leaks.
- When braking hard, the car skids heavily.
- The piston is soured.
Let me remind you that the manufacturer does not recommend changing the design of the brake force regulator or performing any manipulations with it. It is also not recommended to remove it from the car's brake system. By doing this, every car owner puts his life in danger. It is also recommended to replace a failed regulator and its subsequent adjustment at a car service center, entrusting this work to professionals. However, knowledge of how to replace the rear brake pressure regulator with a new one will not be superfluous for the car owner. So, you purchased a new regulator and went to the pit. First, remove the rubber plugs from the new regulator. Using a special 10mm wrench, disconnect the 4 brake pipes and immediately insert plugs into these pipes so that the brake fluid does not leak out. Unscrew the 2 mounting bolts on the bracket. In the figure above, these bolts are marked with the number 7. The bolts are unscrewed with the thirteenth key. We remove the old regulator and install a new one. First we connect the brake pipes, but do not tighten them yet. We adjust the gap to 2 mm. How to configure the VAZ 2114 sorcerer is also described above. Then tighten the brake pipes and pressure regulator mounting bolts. After the assembly is bolted, be sure to bleed the brakes and make sure there is no brake fluid leaking. If necessary, brake fluid should be added to the system.
Pedal adjustment
After the inspection, it is necessary to adjust the brake system:
- Raise the hood.
- Disconnect the negative terminal from the battery.
- Move the front driver's seat from the instrument panel all the way to the rear passenger seats. This must be done for easy access under the steering column.
- Hang the prepared lantern in the car to provide sufficient lighting in the area where the adjustment is being made.
Note. Carry out work carefully and consistently.
- Press the brake pedal with the palm of your hand. Press without sharp jolts.
- With your other free hand, try to install the plate in the space from the pedal bracket to the switch button.
If the plate does not enter or if a larger gap of more than 2 mm is detected, the following actions must be taken:
- Hold the pedal with your hand without releasing it.
- With your other hand, using a wrench, slightly unscrew the two nuts along the threads. To loosen the brake warning light switch.
Move it carefully to achieve the required space between it and the brake pedal:
Note: The distance should be no more than 5mm.
- First tighten one nut, then tighten the second.
- Remove your hand from the pedal.
- Check the operations performed.
- The switch buffer rests against the brake pedal bracket, the adjustment is considered complete.
Replacing the sorcerer with a tee
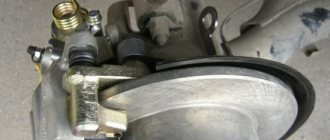
It is no secret that the reliability of the brake force regulator leaves much to be desired, causes many complaints from car owners, and many dream of getting rid of it. The most risky and confident drivers install a tee. You see him in the picture. This device is simpler than the sorcerer, less likely to leak. However, the distribution of braking forces does not occur, and the braking of the rear and front wheels occurs simultaneously.
Pros and cons of installing a tee
| Pros of installing a tee | Disadvantages of installing a tee |
| The brakes become more rigid and at the same time obedient | In winter conditions, the risk of skidding increases if the rear wheels are locked with brake pads before the front ones. |
| Service life increases | Braking becomes dangerous, especially in winter |
| The cost of a tee is less, the prices of a sorcerer | If the front hose ruptures, which happens quite often when a tee is installed, the brakes completely fail. Even the parking brake is a poor help in this case. |
You, of course, can use this scheme and “upgrade” the brake system in your car, but it will be much safer to monitor the condition of this system and, in particular, the sorcerer, and carry out preventive cleaning of this device more often. Then it will last longer.
There is an opinion that the tee is installed not instead of the sorcerer, but after it, and then this device will protect the force regulator.
Adjustment
The work of the sorcerer on VAZ cars depends on the position of the body. Therefore, adjustment must be performed not only during each maintenance, but also when replacing shock absorbers and springs, after repairing the rear beam and, of course, replacing the sorcerer itself.
The car is placed on an overpass or inspection hole, to set the suspension to a balanced position, the trunk is rocked a couple of times by hand. Use a 13mm wrench to loosen the fastening bolts to the bracket; the front bolt is not visible from below, you need to find it by touch.
By moving the regulator, a gap of 2 mm is achieved between the elastic plate (the rod rests against it) and the lever. The spring resistance is high, you need to use a “mounter” or a special device. The bolts are tightened and the gap is checked with a feeler gauge. If you don’t have a probe, you can use a drill with a diameter of 2 mm and even a two-ruble coin.
Further verification is carried out on the fly. When braking from a speed of 40 km/h, on your own or with the help of a partner outside the car, evaluate the moment when the rear mechanisms begin to operate in comparison with the front ones.
If it needs to be done later, then the gap must be increased, and if it is smaller, then, accordingly, reduced.
Possible malfunctions of the sorcerer
The most common problem with the sorcerer is leakage of brake fluid from under the cuff, or at the junction with the brake pipes. It is impossible to eliminate leaks; you can only replace the entire assembly. The sorcerer is generally a reliable part and there are few malfunctions in it. Piston souring and valve jamming are two interrelated problems. They occur because the piston becomes clogged with dirt, which can be mixed with oils and other technical fluids. All this leads to undesirable consequences. In order for the sorcerer to last longer, it is necessary to periodically, at least once a season, drive the car into a pit and carry out general cleaning under the body, including cleaning the brake pressure regulator from dirt.
Signs of air in the brake system
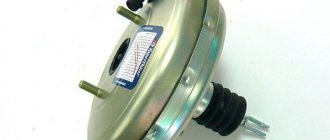
Airing the car's braking system is fraught with serious consequences, because... the next time you try to stop the car, the brake pedal may fail and not work. Diagnostics at every maintenance is a sure way to preserve the entire design. Most civilian vehicles are equipped with a hydraulic braking system from the factory. When the driver presses the pedal, force is transferred to the vacuum booster, which drives the calipers with pads. Due to this, braking occurs.
The situation when air enters this circuit manifests itself as follows:
- Increasing pedal free play;
- Too high “softness” and “cottonness” when pressed;
- Complete pedal failure.
Air ingress is caused by untimely maintenance of the machine. Infrequent replacement of pads leads to the fact that the calipers have to work for a complete fit, because The pads themselves are worn out. A lack of fluid in the circuit leads to early wear of the cylinders in the caliper and gradual leakage of air.
The lack of air in the circuit depends on how to properly bleed the brakes on a VAZ 2114. The procedure is not complicated, but it requires attention and double-checking, because The performance of all components must be normal.
Procedure for bleeding the brakes
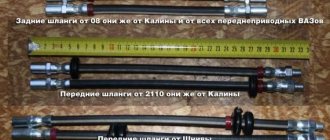
Before starting the procedure, you should check all connections and hoses for leaks. If there are leaks and signs of friction, replace the hoses with new ones. Also keep in mind that the brake fluid you will fill must match what is already in the circuits. Starting from the rear wheel, the procedure is carried out diagonally. Only by following the procedure for bleeding the VAZ 2114 brakes will you get a good result.
For convenience, we present the sequence of pumping the brakes of a VAZ 2114:
- Rear left wheel.
- Front right wheel.
- Rear right.
- Front left.
FakeHeader
Comments 28
And what tubes should be connected to each other? Can I have a diagram?
Honestly, I can’t answer you exactly, since I already bought one, and just when I changed the hoses for iron, I connected them as they were, who knows how it is, because they have circuits arranged on the GTZ, where is the back where is the front, I got it right now, not cross to cross, as in stock, but the front, rear, and GTZ will be changed in the same way as it was, I’ll connect everything, I want from the new Niva, VUT and GTZ) in general it will be superb, I’m waiting for my system to run out)
This means that the tubes on the GTZ have been swapped as well.
maybe x.z. I can’t say anything, but I think it certainly won’t get worse)
The sorcerer threw it out. When pressed smoothly, the butt grips faster. I read on the drive that it is also necessary to swap the circuits on the GTZ.
I didn’t notice anything like that, I didn’t even know that I didn’t have a sorcerer))) until I decided to check just because I don’t care about making rear brake pipes)) when I press it smoothly, it slows down as usual, when I press it hard, the car, according to passengers, gets stuck, but I still want something better, here and the GT from the new modernized Niva, in my plans, I really want it, but I live in Tatarstan, in a small town, where the evil, despicable garbage ((( will get along with the car
I haven't seen a car yet. And your front discs are perforated and notched. If so, what kind of pads do you use?
Yes, these are the wheels, Alnas, ATE pads, starting from the rear)
And what tubes should be connected to each other? Can I have a diagram?
Nobody suggested a diagram? otherwise I want to throw out the sorcerer, but I can’t find which tube to connect to which anywhere
Nope. But I think so.
Nobody suggested a diagram? otherwise I want to throw out the sorcerer, but I can’t find which tube to connect to which anywhere
Connect the tubes to each other. UAZ would be harmful
Necessary tool
The pumping process should be carried out with a partner, because... It will be difficult to do the work yourself. To get results when working independently, you will need the following tools:
- A hose suitable for the fitting on the wheels of the car;
- Set of keys and sockets;
- Brake fluid;
- A rag for cleaning dirt from the caps;
- Container for liquid accumulation;
- Spare fittings in case the old ones break off.
It is also worth knowing the procedure for bleeding the brakes on a VAZ 2114, because... When performing the procedure, you should start with the rear wheels.
Where does the air in the brakes come from?
Untimely maintenance and inattention to the technical condition of the machine are not all the reasons why air problems occur. Let's consider several main reasons for the violation of the tightness of all circuits:
- Replacing technical fluid throughout the entire circuit involves draining the old DOT4. At the moment of refilling, air also enters the circuit;
- There are hoses going to the brake cylinder, damage to which is a very common situation on VAZ. Over time, they begin to “sweat” and become airy;
- Cylinder leaks (both rear and front);
- Leak from the GTZ.
Timely maintenance involves replacing all fluids in the car, incl. and brake. Ignoring this fact plays a cruel joke on drivers. With long runs, moisture somehow gets into the system, which reduces the resistance of DOT4 to low temperatures. In cold weather, the pipes can crack and render the machine stopping unit unusable. Also, do not allow DOT4 to come into contact with paint surfaces. It contains quite aggressive elements that can damage the paint. If you carry out manipulations yourself, using a compressor to pump up pressure, follow the safety rules. Excessive pressure will cause the pipes to rupture and spill their contents onto you. After completing the work, do not rush to accelerate and check the effectiveness of the brakes at high speed. It is enough to press the pedal several times and feel how much it sinks. In a situation where following the instructions does not produce results, contact the service specialists. It is better to pay for brake system repairs with money than with your safety.
Source