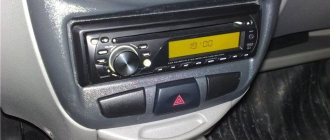
VAZ offers Kalina-2 cars with two interior trim options. The first is used in luxury trim levels (where a media center is installed), the second is an integral part of the “Norma” and “Standard” trim levels. We will talk about what methods exist for dismantling the climate control module panel and the radio panel. Moreover, one of the considered options is suitable for the “Lux” configuration, the other – for more affordable versions (Norma, Standard). The dismantling methods in the two indicated cases are noticeably different. Let's start looking.
Alternative radio menu (mms) Lada Granta
What is the difference:
- The previously used NK has been fixed - unnecessary lines from the registry have been removed, due to which bluetooth and radio did not work correctly in the standard shell.
- Added a convenient on-screen keyboard and call it from some programs.
- Ability to configure a 3G modem. You can create a connection directly from the menu, bypassing the desktop and Explorer.
- Added the ability to surf the Internet using the Opera browser.
- Added the ability to configure the GPS receiver.
- Other functions depend on the version of the alternative menu.
What is the difference:
- The previously used NK has been fixed - unnecessary lines from the registry have been removed, due to which bluetooth and radio did not work correctly in the standard shell.
- Added a convenient on-screen keyboard and call it from some programs.
- Added the ability to configure a 3G modem and create a connection directly from the menu, bypassing the desktop and Explorer.
- Added Opera browser with automatic connection to the Internet.
- Added the ability to configure the GPS receiver.
You will need an SD card up to 4GB formatted in FAT. In the future, it will be possible to use a card in exFAT format.
Attention!
| The author is not responsible for all your actions. In addition, flashing the MMC leads to loss of warranty. |
Procedure: 1. Copy the firmware to an SD card (up to 4GB in FAT).2. Copy files from the “FirmWare” folder to the root of the memory card.3. Remove the flash drive from the USB port.4. Insert the SD card into the radio.5. Reboot the GU by long (about 15 seconds) pressing the power button (for Lada Kalina 2) or the volume button (for Lada Granta).6. A flashing will occur (4 status bars will run through) and the radio will reboot itself into the desktop.
7. Without rebooting the radio, press the “Recalibrate” button and calibrate the screen. At the end, during the countdown, click on the screen.8. Reboot the radio with the memory card inserted. The new menu will load.
If, after flashing the radio, the download freezes at the “Lada” logo, then most likely there is a problem with the SD card. Try formatting the memory card to other file systems (FAT32/exFAT/FAT) and flashing it again. You can also try using other SD cards, 4GB or 2GB in size.
How to return to the standard menu of the Kalina 2/Grant radio:
- Click on the “Media” icon in the alternative menu.
- Reboot the radio, first remove the SD card.
Nothing changes in the standard shell, everything remains the same.
Removing the rear seats of a viburnum
- Lift the rear seat cushion by the strap, unscrew one nut securing each hinge to the floor with a 10mm socket.
- Remove Kalina's sofa cushion.
- Unscrew the 2 nuts securing the backrest brackets to the floor on the left and right sides using a 13mm socket.
- Fold the backrest, unscrew the 2 bolts securing the backrest brackets on the left and right sides.
- Remove the back of the sofa.
Installation of the left side of the backrest and seat cushion of the Kalina is carried out in the reverse order.
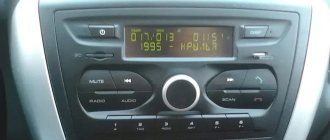
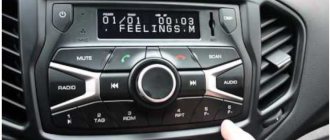
Radio capabilities
On the right side of the radio there is a USB connector, which is designed to connect:
- USB Flash card (USB 2.0 and 3.0 up to 64 GB);
- USB Flash player with a memory capacity of at least 1024 MB;
- USB HDD with FAT32 file system;
- Mobile phone (only in charging mode).
On the left side of the radio there is a slot for SD cards. SD Memory Card Slot: Supports SD, SDHC cards of size 32 X 24 X 2.1 mm. SDHC up to 32 GB, SD up to 32 GB.
The file allocation table (FAT) of the connected device must be FAT16 (< 2 GB) or FAT32 (> 2 GB). The maximum number of primary partitions should be no more than 4. It is advisable that the directory tree of the connected device have no more than eight levels. There should be no more than 1000 files in one directory.
While playing files, the display shows all the necessary information about the track. The playback source is selected using the AUDIO button on the left side of the radio. The radio has equalizer presets (JAZZ, POP, CLASSICAL, VOCAL and USER). The range of timbre adjustments for bass, treble, balance, front/rear balance is from “-7” to “7” units.
The radio has Bluetooth and Handsfree functions. You can connect your phone by long pressing the handset button. When pairing on the phone, the inscription “MMC12” should appear in the list of found devices, the default password is “0000”. After successful connection, the BT icon will appear on the display of the radio.
There is no phone book on the Kalina 2 and Grant radio, but it is possible to save up to 6 numbers in the radio’s memory. The audio system also remembers the last outgoing and incoming calls. The manufacturer does not guarantee operation of a phone in Handsfree mode that uses two or more SIM cards.
The radio allows you to listen to audio files from your mobile phone. To do this, you need to connect your phone to the radio via Bluetooth and launch the player on your phone. The manufacturer states that certain cell phone models may not work correctly with this radio, but this is not a sign of a malfunction.
The Kalina 2 and Granta radio has its own battery, which allows you to save user settings after disconnecting the battery for 10 days.
Appearance of the instrument panel on Lada Kalina
Dashboard for Lada Kalina
- Tachometer. Using it, the driver can find out what the crankshaft rotation speed is. The dial is divided into sectors. If the arrow is on red, this means that the engine is operating in a dangerous mode.
- Indicator of a malfunction of the system that controls the motor. This light turns orange when the ignition is turned on and goes out when the engine starts running. If it lights up while the engine is running, this means that the engine must be stopped and the cause of the malfunction eliminated. Operating the engine with the indicator on is prohibited.
- A diode that signals the activation of the left turn signal.
- Indicates low oil pressure in the system. After the motor starts running, the indicator goes out. If the light stays on for more than 5 seconds after starting the engine, this will indicate that the oil pressure in the unit is insufficient.
- ABS. Lights up when the ignition is turned on and goes out two seconds after starting the engine. If it continues to burn, this will indicate that the brake system is faulty. It is not recommended to use the car in this case. We need to find the problem and fix it.
- Immobilizer. Lights up orange. The driver can use it to determine the operation of the car’s security system.
- Coolant. The indicator displays the temperature of the coolant in the system. After starting the engine it goes out. Also, during operation of the car, the indicator may light up when the fluid temperature is above 115 degrees. When the temperature drops to 110 degrees, the light bulb will go out. It is not recommended to operate the vehicle if this indicator is constantly on. This may lead to motor failure.
- Parking brake. After starting the engine it goes out. If the indicator lights up while driving and a beep is heard, this will indicate that there is not enough fluid in the brake system. If the indicator lights up, it is prohibited to operate the vehicle.
- The light indicates that the right turn signal is on.
- Battery. Lights up red. Goes off after starting the engine. If the light comes on at full intensity while driving, this means that the battery charge is low. In this case, the alternator (or alternator belt) or voltage regulator may be faulty. It is prohibited to operate the machine with the indicator on.
- Speedometer. Shows the speed at which the car is moving.
- ESC. Lights up yellow. Goes off after starting the engine. If “ESC OFF” lights up while driving, this indicates that the system is not working. If the lamp flashes while driving, this will allow the driver to understand that the system is working. In all other cases, the lamp will indicate that the exchange rate stability system is not working.
- Shift to higher gear. Not applicable on this car.
- High beam. It indicates that the high beams are on in the car.
- Fog lights. It says the rear fog lights are on.
- Low beam. The car has low beams on. If the headlight does not light, check the fuse, then replace the low beam lamp.
- Front fog lights. Indicates that the front fog lights are on.
- Reset daily mileage. When you press the button, the counter is reset to zero.
- On-board computer display.
- Unclosed doors. Indicates that one of the doors in the car is not closed.
- Fuel. Indicates the amount of fuel in the tank. It is not recommended to allow the gasoline in the tank to run out completely. This may cause the fuel pump to fail.
- Tire pressure. Indicates insufficient tire pressure.
- Power steering indicator. Lights up orange. After starting the engine it goes out. If the lamp lights up while the engine is running, this indicates a malfunction of the amplifier. The problem needs to be fixed.
- Unfastened seat belts.
- Motor malfunction. Not used on cars.
- Airbag condition. Goes off after starting the engine. If the lamp continues to light, this indicates a malfunction. The problem needs to be fixed, because if necessary, the pillow will not open.
( 1 rating, average 4 out of 5 )
Dismantling the console containing the stove control unit
As you know, some trim levels of the Kalina-2 car do not have climate control. Here the driver can only control the operation of the stove. The stove control panel is held in place by 4 clips. In general, the mount used here is the same as in versions with climate control, but you won’t be able to remove the control unit panel unless you first remove the three control knobs.
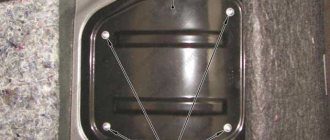
Let's say we managed to dismantle the stove control unit panel. Then, all that remains is to remove the top flap, which is adjacent to the air ducts. This part itself needs to be pulled towards you from below, but first you need to unscrew two screws (they are circled in the figure).
Any device of standard size 1 DIN can be installed in the compartment intended for the radio. You don't need to dismantle anything to do this. It is difficult to imagine a situation in which it is really necessary to remove the center console panels, if we consider the “Normal” or “Standard” equipment.
on MMC 2190 with Grants-Lux. As was already written on the drive, the most difficult thing was to remove the climate panel... it didn’t want to come off the latches. But still, I managed to first snap it off with a plastic card from below, and then it all gave up)) The main thing here Don't rush, or you'll scratch the panel!
Well, then it’s a matter of technique. We unscrew a couple of screws on the air duct trim, carefully remove the panel itself, then the four screws of the radio and.
.Stop! I almost forgot about the antenna! We are looking for the antenna plug; I found it right under the glove compartment.
Then loosen the wire and carefully pull the radio towards you,
then we snap off a couple of connectors and voila!
Now we take our MMC from Granta, stretch the antenna to our plug under the glove compartment, immediately pull the USB connector into place, only in the reverse order. We insert it into its original place in the glove compartment
and pull to MMS. We snap the speaker and power connectors into place. We connect the MMC to the CAN bus. Since I’m going to install a rear view camera a little later, I immediately connected the adapter with a tulip to the rear view camera. It’s worth getting a little distracted here... Since I didn’t have connectors for connecting a camera and a CAN bus, and ordering it would take a long time, it’s expensive and I’m too lazy... I did it , as advised here on the drive, (many thanks to whoever came up with this!) took the connectors from the computer’s power supply, cut off the wires with the necessary contacts, after first removing the contacts themselves from the connectors.
I put heat shrink on the contacts for insulation and carefully inserted it into the MMC connector on the required contacts. I soldered a tulip for the video camera to the opposite end (I pulled it under the glove compartment so as not to remove the MMC again later). I did not connect the camera control, the Crosses already have a signal on the connector power supply when reverse gear is engaged. Next, we put our MMC in place.
New Lada: