The VAZ 2107 clutch is designed to connect the engine crankshaft and the gearbox input shaft with the possibility of briefly stopping the transmission of torque. The reasons for its failure can be very diverse. However, all of them can be easily diagnosed and eliminated on their own.
- Reasons for replacing and adjusting the VAZ 2107 clutch
Replacing the clutch - Clutch adjustment
- Clutch slipping
- Tools and materials
Video: do-it-yourself adjustment of the VAZ 2107 hydraulic clutch
How to adjust the clutch on a VAZ 2107
A correctly adjusted VAZ 2107 clutch ensures normal operation of the vehicle and long-term operation of the machine’s components and parts.
It is recommended to check the correctness of the adjustment at every vehicle maintenance. During operation, incorrect adjustment can result in two types of malfunctions:
- The clutch slips - when the pedal is fully released, the disc slips and does not transmit the full amount of engine power to the transmission;
- The clutch drives - when the pedal is fully depressed, the disc does not move away from the flywheel, which does not allow normal gear changes and makes the car move when it is not needed.
In addition, the clutch may engage too early or late, making it difficult to control the vehicle.
The adjustment process itself consists of two parts. The first is carried out in the cabin, the second - under the bottom of the VAZ 2107, from the inspection hole. Tools you will need:
- Key for 8 or 10, depending on the model of the clutch slave cylinder;
- Open-end wrench 13;
- Open-end wrench 17.
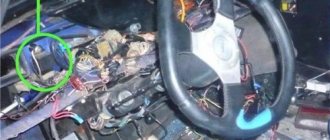
The first adjustment involves setting the clutch pedal travel. It is performed from the interior, under the steering column. To limit the full stroke, use a special adjusting screw secured with a lock nut. By tightening or unscrewing it, we achieve normal pedal travel, which should be approximately 140 mm. Usually there is no need to adjust the full stroke; it is set from the factory and is changed very rarely.
The second part of the adjustment is to set the pedal free play. In normal mode it should be 30-35 mm. However, some car enthusiasts adjust the freewheel to suit their individual habits and preferences. This approach is quite acceptable provided that it does not affect the performance and durability of the parts of the VAZ 2107 car.
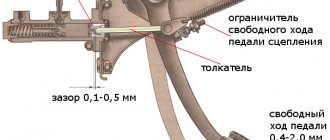
So, to check and adjust, we go down into the inspection hole. The clearance is checked by pulling the fork away from the pusher.
The free play distance should be 4-5 mm. If the gap differs significantly from the standard, it must be adjusted. For this:
- Remove the spring that pulls the clutch fork to its original position;
- Loosen the locknut on the pusher;
- Holding the pusher with a 8 (10) wrench, screw or twist the thrust nut until the required clearance is achieved;
- Fix the thrust nut with a locknut;
- Checking the gap;
- We install the spring in place.
At this point the adjustment procedure can be considered complete. However, in order to ensure that the result obtained is correct, it is necessary to check the clutch in action. To do this, start the car, engage the gear and gradually begin to release the pedal. When adjusted correctly, the car should move off at approximately half the pedal stroke. Adjustment is allowed, including the clutch lower or higher, but engagement at the very top or bottom is unacceptable, as there is a risk of the above malfunctions occurring.
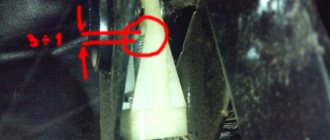
How to center a clutch disc without an input shaft
A little about clutch disc alignment. And a popular myth:
If you do not center the disc, the clutch will “beat”. Is it true.
If you do not center the disk, you will not be able to install the gearbox in place, because the centers of the holes in the basket, disk, seat on the flywheel must coincide, otherwise the shaft will not go all the way.
In general, there are 2 official methods for centering a disk.
1) Centering the disk on the seat of the input shaft.
This method is routinely used in service centers for opulent cars, incl. and Lanos. A mandrel according to the dimensions of the input shaft is used. For Lanos like this
2) Centering the disc on the basket.
This type of tool is used
There are many unofficial methods - using a shovel handle, a finger, other parts of the body and any other crap that comes to hand.
But I will describe 2, which are very simple, do not require investment, and can be made from scrap materials in 5 minutes
1 Method. Bolt and blue electrical tape.
In general, blue electrical tape is a unique thing. She can repair anything. And not only to repair.
We will need an M10 bolt or a 10 or 11 mm drill. — a roll of blue electrical tape First, wrap a certain amount of electrical tape around the end (of the bolt) and try it on so that it (the end of the bolt) fits into the seat of the input shaft on the flywheel with a slight interference. Then, we measure the distance at which the clutch disc will be located and wrap the required amount of electrical tape so that the disc can fit with a slight interference fit. Those. we get an analogue of the device from the official 1st method.
2 Method. Using 2-sided tape.
We will need - double-sided tape - scissors. The idea is simple, we must fix the clutch disc to the basket by aligning it in the center. To do this, cut 3-4 small pieces of 2-sided tape, 5x5 mm in size. No more. Paste on the basket as in the photo
The name is so long because it is difficult to find information on this particular model. Thanks to everyone who answered the questions, special thanks to Dima trilian for the tips. I’m writing but I haven’t finished it yet - I haven’t pumped the clutch. I hope for some advice. The symptoms for replacement were as follows. In 4.5 gears, if you give the gas sharply, the revolutions first increase, then the car accelerates. The mileage is about 250. The clutch was most likely original Valeo. I only changed the disk without the basket. Only stellox 0700094sx could find the disc separately. I don’t trust this company, but I couldn’t find any other analogues. If you know, write. Okay, at least this one fits. Now the price according to the autodoc is 1370 rubles, and in winter I took 1000 rubles from the party committee. Assembled Valeo costs 6-7 thousand and the release one costs about 5. This is if you do it wisely. And don't forget the gearbox oil.
How to adjust the clutch of a VAZ-2107
During vehicle operation, an incorrectly adjusted clutch is expressed as follows:
- The clutch drives. When the clutch pedal is fully depressed, the disc does not move away from the flywheel, making it impossible to change gears normally. Thus, the car can start moving even when it is not necessary.
- The clutch is slipping. When the clutch pedal is fully released, the disc begins to slip. As a result, it does not transfer all the engine power to the transmission in full.
In addition, problems with the clutch sometimes result in it setting too early or, conversely, too late. As a result, driving may become significantly more difficult.
Most common breakdowns
Every car owner of domestic brands is familiar with the concept of slipping and dragging, this applies to the clutch.
- in the first case: when the pedal is fully lowered to the bottom position, the clutch disc itself slips a little, thereby not providing the transmission with the required amount of power;
- in the second: the clutch pedal, which is completely flooded down, cannot move the basket away from the flywheel, because of this the car moves even when the rocker is in the neutral position. This situation is extremely negatively reflected in the control process itself, since the speeds will turn on either too early or too late.
Clutch adjustment
The entire clutch adjustment process consists of two parts.
One of them takes place directly inside the car, while the second is performed from below the car while it is either on the inspection pit or on a lift. To adjust the clutch you will need the following tools:
- open-end wrenches for 13 and 17;
- a key for 10 or 8 (it all depends on which model of the clutch slave cylinder).
The first adjustment also involves setting the clutch pedal travel. This stage of work is performed directly from inside the car, under the steering column. There is an adjusting screw that serves to limit the full stroke. It is secured with a locknut. By turning the screw first to one position, then to another, you can achieve normal pedal travel, which, according to the instructions, should be 14 cm.
But, as a rule, there is no need for this, since the pedal travel is set at the factory and can spontaneously change only in very rare cases.
The second stage of adjustment is to set the pedal free play, which in normal mode should vary in the range from 30 to 35 mm. Nevertheless, quite often car enthusiasts prefer to adjust the pedal free play to their personal preferences.
Changing cylinders
There is a reason to change the main cylindrical system if the functionality of the system does not improve after replacing the o-rings. Replacement with new clutch cylinders is installed when the brake fluid runs away even after replacing new cuffs.
Perform the process of removing the working cylinder and installing it according to the following diagram:
- We get rid of the spring near the pedal.
- We unscrew the two nuts that secure the cylinder to the gearbox;
- The process of unscrewing the rubber hose attached to the working cylinder is carried out by weight;
- We screw a new type cylinder to the hose to avoid leakage of the brake compound;
- We pump everything out of the cylinder, unscrew the fitting, close the hole;
- We unscrew the nuts that secure the master cylinder to the car body;
- To release the hinge connected to the pedal, you need to pull it towards you. Pull out the pin, this will release the cylinder from the pedal.
- Install the two cylinders in the same way as you disassembled them.
After replacing the cylinders, bleed the main clutch. When the air stops escaping, the cylinder is installed correctly.
When to adjust the clutch drive
- Gear shift violation - positions are engaged with knocking, crackling or extraneous sounds.
- The clutch switch response threshold has been violated. A dip of 25 to 35 mm is considered optimal.
- Increased fuel consumption. If the mechanism is faulty, excess gasoline consumption can be up to 20% of the reference value.
- Knocking out positions. During acceleration of the vehicle, the gears “fly out”.
- Dissonance when revving the engine. When you press the gas pedal, the internal combustion engine spins up, and the car lags behind.
- Clutch lever failures, this also includes an increase or absence of operating play in the system.
- Early or late operation of the mechanism when the pedal is pressed.
Where is the clutch cable located?
The location of the cable is the protective casing. Its ends are attached to the pedal and fork, which engages the clutch. If the discs wear out, the pedal travel increases. When the cable wears out, on the contrary, there is a decrease in the amplitude with which the pedal moves. This can lead to incomplete engagement or disengagement of the clutch.
Do-it-yourself clutch adjustment on a VAZ 2107
This procedure is performed similarly for all classic models VAZ 2101-07 and 21214. The essence of the procedure is to adjust the clutch or play of the clutch working cylinder rod if it takes at the very end or with minimal pressure.
- standard open-end wrenches;
- screwdriver or pliers;
- ruler;
- ticks.
Basically, the calibration process looks like this.
- The car is driven onto a viewing hole or lift.
- The battery terminals are disconnected, and the car is blocked from accidentally rolling away (relevant for a pit or overpass).
- The clutch pedal stop is located under the steering column. This element is responsible for setting the working gap between the rod pusher and the pedal. A backlash of 1-2 millimeters is considered normal; if the condition is met, no calibration is needed.
- Next, you need to check the backlash of the working cylinder. To do this, unscrew the pusher rod from the clutch fork and check the existing gap.
Setting up the clutch of an injection VAZ 2107
Fundamentally, the repair procedure differs from the carburetor by the presence of an additional dirt-proof sheet. The structure is dismantled in this way.
- Using a socket head, 12 shield mounting bolts (A, B, C) are removed.
Next, you need to unscrew the rear screws using a Phillips screwdriver or wrench No. 8.
- Reverse installation is carried out in mirror order.
- Otherwise, the sequence of actions does not differ from the standard procedure.
Adjusting the clutch of a carburetor VAZ 2107
Step-by-step instructions for adjusting a carburetor model look like this.
- The car is jacked up or driven into an inspection hole.
- The nominal free play position of the clutch pedal is set.
- Adjusting the release bearing play.
- Reverse fixation of the structure.
- Checking completed work.
Adjusting the clutch pedal free play
To set the required clutch pedal travel, the following procedure is performed.
- Inside the car, you need to find the clutch piston pusher (located under the corresponding pedal).
Pedal travel
This is where the whole process begins. The factory manual states that normal travel is about 13 centimeters.
Nut and locknut
But over time, the parameter increases as the driven disc lining wears out. This leads to the fact that the pedal rises slightly. Measuring the indicator is not difficult.
- Open the door leading to the driver's seat in the cabin.
- Squat down so you are close to the pedals.
- Place a regular ruler on the mat under the pedal, positioning it perpendicular to the clutch pedal.
- Measure the distance from the mat to the extreme point of the pedal, that is, the maximum distance.
- If the indicator is 16 centimeters or more, this indicates an urgent need for adjustment.
How to finally adjust the clutch on a VAZ 2107
After all manipulations, it is necessary to check the functionality of the system. To do this, you need to start the engine and let it warm up. Then, with the engine running, you need to depress the clutch and, without accelerating, engage the rear rocker position. In this case, the presence of extraneous sounds and rattles is not allowed. The position is turned on easily - without additional effort.
Next, you can start moving at first speed and then increase the position to maximum (5). When driving, the presence of extraneous sounds or grinding noises is strictly unacceptable; the pedal is pressed evenly, without dips or jerks.
The last stage is acceleration at each gearbox speed, while the set of engine speeds fully corresponds to the acceleration of the car. If there is dissonance, the clutch disc slips and recalibration is required.
Important Tips and Recommendations
Experienced drivers and mechanics recommend following simple rules to extend the life of the device.
- Do not overpress the pedal. This causes the disc to heat up and can cause it to wear out quickly.
- Use only high-quality brake fluid.
- Check the functionality of the device in a timely manner.
- If extraneous sounds or plugging occur, it is necessary to diagnose the mechanism.
Clutch adjustment on a VAZ-2107 - detailed instructions for a beginner
The main purpose of the clutch mechanism is to combine the crankshaft with the gearbox and transmit torque from the engine to the wheels of the car. This device is used on the car when switching to a lower or higher gear, as well as when turning on neutral. In order for gear shifting to be carried out easily and smoothly, you will need to properly adjust the VAZ 2107 clutch, which every owner of the 7 should be able to do.
Tools and materials
In order to cope with the operations of adjusting the transmission on a VAZ 2107 with dignity and quality, the driver will need the following tools:
- set of wrenches;
- bottle with hydraulic fluid;
- flat-head screwdriver;
- container for draining waste liquid;
- a small amount of rags;
- ruler or tape measure.
A similar set is probably present in every person who, to one degree or another, has encountered procedures for repairing various vehicles.
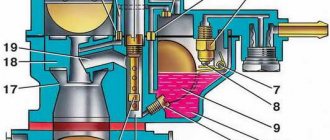
The design of the clutch mechanism on the VAZ 2107
Although the clutch performs a simple task, it consists of many component parts. All parts have a corresponding lifespan, so sooner or later the clutch needs repair and adjustment. Before setting up the clutch on the VAZ 2107, you need to understand its structural elements.
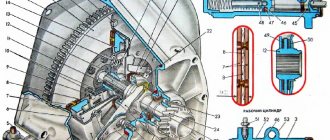
Classic cars of the VAZ family are equipped with a dry closed-type clutch mechanism. The device consists of the following elements:
- The driving part is a driven disk that has splines for transmitting the moment of movement to the gearbox shaft. This rotation is transmitted by friction that occurs between friction linings with the flywheel and the pressure plate.
- Non-separable mechanism - this unit is called a basket, which is fixed to the flywheel.
The clutch mechanism on the VAZ 2107 is activated by the leftmost pedal in the car's interior. The device is driven by a hydraulic drive. The basis of the hydraulic drive consists of the following components:
All classic VAZ models, as well as carburetor and injection VAZ 2107, are equipped with a similar clutch design. The only difference is the presence of an auxiliary shield on injection models, the purpose of which is to protect against dirt. To give you an idea of what we're talking about, below is a diagram of the device in question.
How to adjust the clutch on a classic
The clutch adjustment on the seven should be done after the work on installing the mechanism is completed. If the setup procedure is correctly completed, you can continue to operate the machine without worrying about premature failure of the unit. Before the adjustment process, you will need to check the hydraulic drive for the presence of air in it. The air must be removed by bleeding the system, and if necessary, replace all the fluid.
This is interesting! If, after replacing the clutch parts, the adjustment of the mechanism was carried out incorrectly, then continuing to further operate the machine with an unadjusted device is not only inconvenient and dangerous, but may risk repeated repairs.
If there is a need to adjust the mechanism in question on the VAZ 2107, then detailed instructions are presented below.
Replacing the clutch slave cylinder
First, we disconnect the cotter pin element, which drives the hydraulic drive mechanism itself, using pliers. We use them to remove the spring. We do not scroll the fitting hose completely.
Do-it-yourself engine repair - major restoration and maintenance of an internal combustion engine
DIY bumper: how to make a unique polymer bumper for a car at home (125 photos)
Do-it-yourself car painting - preparation for coating and the main stages of high-quality car painting (100 photos)
Using the 13th key, remove the 2 bolts from the crankcase. And only now we take out the pusher. Access to the cylinders is open. How to further replace the working clutch is shown in more detail in the video.