When turning at high speed, centrifugal forces act on the car body, as a result the body rolls in the direction opposite to the turn. While the roll is insignificant, it does not affect the car’s handling, but there comes a moment when the body has deviated so much that the wheels on the “inner” side begin to lose traction. To avoid this, anti-roll bars are installed.
There are two types of stabilizers used on modern passenger cars:
- lever;
- torsion bars
Lever stabilizers (aka reaction rods) are made in the form of a hollow pipe, at the ends of which fasteners with silent blocks (rubber-metal hinges) are installed. They are installed between the fist mount on one side and the seat on the body on the other. Thanks to the rigid fixation of springs and shock absorbers, the installation of a stabilizer creates a triangle, the sides of which are the spring (shock absorber), beam (bridge) and stabilizer. When the body is subjected to centrifugal force, the rigidly connected sides of the triangle do not allow the body to deviate to a dangerous value. For greater effect, install X-shaped stabilizers that form two identical triangles, one for each side. The disadvantage of such stabilizers is excessive rigidity, so they are most often used on the rear suspension.
Torsion stabilizers are made in the form of a steel rod of complex shape, 10–25 mm thick. The middle parts of the stabilizer are attached to the body, and the edges are attached to the suspension arms. When the distance between the bottom of the body and the lower part of the suspension changes on one side of the car, the location of the stabilizer mounts shifts, resulting in the torsion bar bending. The greater the height difference, the stronger the torsion bar resists. Thanks to this, the stabilizing effect is smoother than that of a lever. Therefore, on most cars it is installed on the front suspension.
Purpose, design and principles of operation of the VAZ 2107 stabilizer
It has already been written above that the SPU is one of the important parts of the car. But why? The answer is simple - thanks to it, driving improves significantly, becoming more comfortable. This device makes it possible to keep the chassis tilt under control without increasing the pressure on the camber of the rear wheels.
The increased control over the vehicle on sharp turns is especially noticeable.
Thanks to the stabilizer, it will be possible to enter such turns at higher speeds without the risk of capsizing.
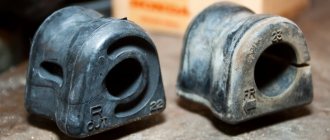
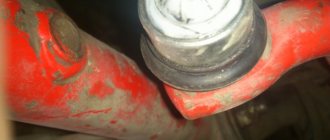
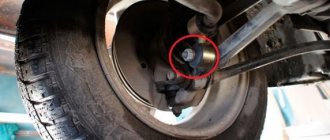
The roll bar SPU looks like a C-shaped hose that is installed next to the axle. The stabilizer is mounted on brackets with rubber bushings inside.
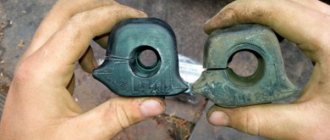
It is worth noting that the VAZ 2107 stabilizer bushing is the weakest point in the design and breaks most often.
The stabilizer works on the principle of distributing the load between two suspensions.
It works relatively simply - when making a sharp turn, the car can roll. Stabilizer, since one wheel lowers and the other, accordingly, rises. The stabilizer prevents this from happening by twisting the rod and raising the lowered wheel and lowering the raised one. Thanks to this, the car is leveled.
Replacement and installation of parts
The procedure is as follows:
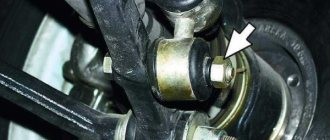
It is necessary to tighten the nuts of the strut with a force of 43-53 N•m, of the bracket - 13-16 N•m.
To eliminate excessive wear on the struts, it is necessary to compare the original and non-original parts. The differences will be immediately visible. Therefore, after comparison, it is necessary to take a heavy hammer and with a few precise blows change the arc-shaped contour of the non-original rod. After that, you can put it in place and enjoy the ride without breakdowns, like on the Priora.
Sources
- https://www.avtika.ru/qa/137-Zamena-stabilizatora-poperechnoj-ustojchivosti-i-ego-podushek-u-VAZ-2113
- https://tuningvaz.in/zamena-stojjki-stabilizatora-vaz/
- https://expertvaz.ru/2114/stoyki-stabilizatora-zamena.html
Diagnostics
A breakdown can occur for a variety of reasons, so it is impossible to determine the exact time of full operation without breakdowns. Basically it all depends on the operating conditions. For example, if you often drive off-road, the stabilizer will break down often.
Basically, the SPU is checked during annual maintenance, but no one bothers you to do it yourself at any time.
First you need to remove the wheel. After this, use the steering wheel to make a maximum turn in any direction and shake the “bare” stand from side to side with your hand, grasping the middle third. If there are faults, looseness will be noticeable.
Signs of a broken rear stabilizer
The most common signs of failure are:
- Vehicle roll during sharp maneuvers, instability;
- The car begins to sway, as soon as you turn the steering wheel a little to the side;
- If you drive on an uneven road, you will hear a sound from the suspension;
- The car begins to “yaw” when braking;
- If you lower the steering wheel, the car will start to swerve.
How should the stabilizer be positioned?
A correctly installed SPU should twist when the wheels turn.
Therefore, on passenger cars it is strictly forbidden to weld to the frame, since there must always be an intermediate link between it and the wheel. For example, in the VAZ 2107 bushings act as such a link. It is not recommended to use a stabilizer without them.
Causes of creaking stabilizer bushings
Drivers most often complain about bushings creaking either in cold or dry weather. But these are not the main factors and each driver may have his own reasons for this problem. They are individual for everyone. Main reasons:
- The material from which the bushings were made is of poor quality;
- When it freezes, the rubber from which the bushings are made becomes harder and loses its elasticity, which is why squeaks are heard;
- The bushing has simply worn out and can no longer fulfill its direct duties;
- Due to the design features of the car.
Before replacing the anti-roll bar, you need to figure out what the problem is. Most often you just need to replace the rubber bands.
Why does the stabilizer bushing squeeze out?
In fact, the bushing is quite gentle to use. It can wear out pretty quickly. This mainly happens in winter. In cold weather, the bushing freezes, which can cause cracks to appear on it. Various reagents that are used to sprinkle roads during icy conditions can also play a role in this.
If the driver did not notice the problem in time, the cracks continue to grow. Because of this, the bushing begins to lose its elasticity. And so, at the next turn, it can simply be squeezed out of the eyelet. It is no longer possible to return it back - it is too worn out and will not be able to perform its direct functions.
After this, when entering a turn, the motorist may hear a creaking and grinding sound. The vehicle's handling will also decrease.
About double stabilizers
As the name suggests, there are two rods in this stabilizer. But such a device is installed only on the front wheels. Basically there are no fundamental differences.
Thanks to this SPU device, the stiffness of the suspension will increase significantly, which on the one hand is good, but on the other hand, some problems may arise. The fact is that on the classic VAZ 2107 the two front wheels operate independently of each other - that is, if the left front wheel lifts, the right one does not. But due to the installation of a double stabilizer, everything will change - the suspension will become semi-independent and the steering will become much stiffer, and the traction will become worse.
Therefore, before purchasing and installing a double SPU, you need to think carefully - either comfortable driving and good cross-country ability, or no roll.
Which stabilizer struts are best to choose?
Taking into account the fact that the stabilizer rod does not last long, many car enthusiasts seek to increase the service life of the part by searching for the best and most reliable options. In practice, it is important to understand that the service life of the rack is influenced by a large number of factors: the quality of the part, the model and make of the car, operating features and the condition of roads in the region, the general condition of the chassis, etc.
For example, the original on European roads may well last 50-60 thousand km, while in the CIS on bad roads the same part will last no more than 25-30 thousand km. At the same time, it is not always the case that an expensive “original” will necessarily last longer than high-quality analogues.
For this reason, stabilizer struts from Lemforder, CTR, SASIC or GMB can be distinguished. Moreover, for many models the mentioned companies supply parts to the assembly line. This means that buying analogues under your own brand allows you not to lose quality, but also not to overpay for the original.
The basic rule is that the parts must be branded (there are many fakes on the market), and also exactly suitable for a specific car model. Even the slightest change in length by 1-2 centimeters is not allowed when trying to install racks that at first glance may seem completely suitable. The fact is that such replacements will inevitably affect the operation of the entire suspension and the behavior of the car, and negatively.
Benefits of timely replacement
Replacing bushings is a simple process that any driver can handle. As they say - “if there is a desire.” If it is not there, it is better to contact a car service center, where you will be provided with professional assistance.
Thanks to the timely replacement of worn bushings, the anti-roll bar of the VAZ 2107 can last longer.
Thanks to the new bushings, driving on roads, regardless of whether they are of high quality or not, will become much more comfortable and safer.
The process of removing the starter and installing a new element
Starter removal process:
- Place the car on the inspection pit. If this is not possible, use an overpass or just a good jack.
- Lift one side, remove the wheel, remove the boot or crankcase guard (if equipped).
- The next step is to unscrew the top nut that secures the starter. This can be done both from the engine compartment and from under the car - whatever is convenient. Additionally, unscrew the nut that secures the terminal to the solenoid relay. Remove it so it doesn't interfere.
- Disconnect the nearby wire going to the starter.
- The final step is to unscrew the nut, which secures the part from below.
- Now you can pull the element out of the clutch housing.
Checking starter malfunction:
- Take a flathead screwdriver and try to move the coupling forward/backward along the shaft. It should spin easily and not hit anything.
- Use a screwdriver to turn the gear. If everything is spinning in the same direction, everything is fine. If the scrolling goes in the opposite direction, the part will need repair.
- Checking the retractor relay is carried out using two wires with “crocodiles” for convenience. Place the red one on the positive terminal of the battery, and place the other end on the control terminal of the relay. Use the negative conductor to connect the negative battery and the starter housing. After such actions, a click will appear and the clutch will come forward. After disconnecting the wires, the coupling will return.
- The final stage of the test is to disconnect the wire from the control terminal of the traction relay. Connect the crocodile clips in exactly the same way. When voltage is applied, the starter armature should spin at a frequency of more than 5 thousand revolutions per minute. If everything is so, the element is working.
Installing a new starter is carried out in the reverse order of removal. If you do not want to completely change the part in question, but want to repair it, then we recommend that you familiarize yourself with the relevant information. We do not recommend that you do everything yourself without knowledge of the entire process. In this case, it is better to contact a service station.
To summarize, we note that the starter on the VAZ-2110, as on other cars, is a very important unit, the failure of which is a rather unpleasant situation. In the article we examined the main points for dismantling the old part and installing a new element. Carrying out the work should not cause any difficulties. It is enough to use the recommendations from the article to successfully repair your car.
Solution
Many beginners may experience problems or difficulties when replacing bushings. This section of the article will help you solve them.
When to replace transverse stabilizer bushings
SPU bushings are replaced immediately after wear is detected. If this is not done and you continue to drive with worn bushings, then irreparable problems may soon appear and then you will have to replace the stabilizer completely.
Installation materials and tools
In order to successfully change rubber bands you will need:
- A set of new bushings for the rear stabilizer;
- Set of open-end wrenches;
- Flathead screwdriver and hammer;
- Composition WD40;
- Mounting blade.
Sequence of operations for replacing rear stabilizer bushings on a VAZ 2107
Having prepared everything you need, you can begin the repair:
- After the car is placed in the pit, you need to inspect the fastenings. Usually, due to long-term use, a layer of dirt and rust could appear on them. To eliminate these unpleasant consequences, you need to treat the compounds with WD 40. After that, all you have to do is wait about fifteen minutes. During this time, dirt and rust should dissolve and work can continue.
- The nuts must be unscrewed with a 17mm open-end wrench.
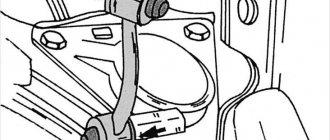
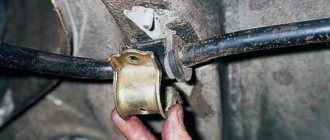
- In order to loosen the stabilizer bar with the clamp, you will have to use a mounting blade. Having inserted it into a narrow hole, you need to use the lever principle and bend the clamp.
- After this you need to get rid of the old gum. This can be done with a knife.
- The place where the new bushing will be installed must be cleaned of dirt and rust. After this, you can install a new rubber band, having first lubricated its inside with grease (it should be sold with the kit). Now you need to put it on the rod and move it along it to the installation site.
- After the fifth step is completed, you need to tighten the nut on the clamp.
- Then all that remains is to replace all the other bushings according to the instructions above. Afterwards, you need to evaluate the quality of the work performed - if the stabilizer is not warped and no play is detected, then the replacement was carried out correctly. You can drive.
Chassis features
The rear axle of Renault Logan does not provide for the presence of struts, since the design is based on a continuous beam. Initially, this node is able to do without the presence of the elements in question. Vibrations in the vertical plane are very insignificant, and the body is protected from lateral rolls by a horizontal rod fixed on the axis.
If you touch the front chassis, its design includes a transverse stabilizer bar. The manufacturer states that the absence of this element cannot have a negative impact on reducing the level of safety while driving. But practice shows: the presence of this part will not interfere with the confident behavior of the Renault Logan car.
Video of replacing stabilizer bushings on a VAZ 2107. Useful video:
Let's summarize - the stabilizer for the classic VAZ 2107 is an extremely controversial tuning element. On the one hand, it increases the stability of the car, but on the other hand, it reduces cross-country ability and driving comfort. However, it has one undoubted advantage - ease of maintenance. Even a novice car enthusiast can cope with this. After all, the only part of the SPU that is subject to rapid wear is the bushings, replacing which will not be a problem for a person who has at least once held a wrench with a mounting blade in his hands.
Starter problems and their elimination
If the starter does not turn the engine crankshaft and the car does not start, but the traction relay clicks, then the culprit of the problem is a discharged battery. Due to insufficient battery charge, the on-board mains voltage when the starter is connected drops below the permissible level. This causes the relay to turn off and then turn on. Therefore, a characteristic cyclic clicking sound occurs. To fix the problem, it is usually enough to simply recharge the battery. If the battery does not hold a charge, the battery should be replaced with a new one.
Another reason for the voltage drop in the starter circuit and the occurrence of relay clicks is oxidation of the contacts. Damaged terminals do not provide sufficient electrical conductivity. To solve the problem, remove the oxides with sandpaper. If grinding does not remove defects, the damaged element must be replaced.
Mechanically, the weak link is the bendix. To diagnose it, a visual inspection and checking for the presence of play is required. In case of excessive wear and most breakdowns, the problem can be solved only by replacing the bendix with a new one.
If problems arise with the armature, you will need to disassemble the starter
After this, it is important to inspect the collector for signs of wear, melting or loss of plates
Pay attention to the windings. They should not have obvious breaks. Using an ohmmeter or multimeter, you need to test the armature for the absence of interturn short circuits and breakdown to the housing
Using an ohmmeter or multimeter, you need to test the armature for the absence of interturn short circuits and breakdown to the housing.
When assessing the condition of the stator, attention should be paid to the housing and magnets. There should be no mechanical or other damage
Sequence of actions when carrying out diagnostics
Diagnostics is essential before starting work on replacing parts. A visual inspection will help identify the source of the breakdown, assess the general condition of the vehicle, and correctly calculate spare parts and consumables.
- We drive the car into the inspection hole, ensure priority safety measures, squeeze the handbrake, install wheel chocks;
- Jack up the side, unscrew the bolts, remove the wheel;
- We use a metal pry bar to facilitate the diagnostic process. We press at the junctions of metal structures. If the rod is in good condition, there should be no squeaks or knocking. Otherwise, this will indicate defects and wear of elements.
We summarize the data obtained based on the diagnostic results and make a decision on the need to replace spare parts.
At the same time, we check the technical condition of silent blocks and the brake system. If there are signs of wear or deformation, we replace the elements with new ones.
general information
As mentioned above, the starter provides current support due to permanent magnets. Producing a power of 1.55 kW, this element provides the starting frequency that is so necessary for the cylinders of the car’s power unit. Different motor types have different frequencies, but there is an average starting frequency. It is equal to 40-50 revolutions per minute, if we mean the operation of a gasoline engine, which is the VAZ 2112 engine.
Note. As a comparative example, diesel engines will require the starter to rev at 100-200 RPM.
Consists of the following components:
- Permanent magnets in the amount of 4 pieces. They are mounted inside the starter and perform one of the important missions.
- An anchor that rotates the flywheel, and with it the crankshaft of the car engine.
- Brush unit with 4 brushes. Two of the brushes are called positive, two are called negative. The brush assembly is designed to provide electrical connection.
Note. This assembly has been proven to be one of the least reliable parts of the starter. It is the brushes that are the first to be questioned when the stator is performing poorly and are subject to testing, followed by replacement.
- The planetary gearbox is the next component. It is also the most important element, as it is responsible for transmitting torque to the drive shaft. The gearbox itself consists of several gears that reliably perform their functions.
- A drive that is designed to insert the stator gear into connection with the engine flywheel. The mechanism of this drive is located on the armature shaft.
- Covers, front and back, which are cast mainly from aluminum, or rather from its alloy. The front cover is needed to mount the relay, which is connected to the drive through a plastic lever and ring. Brush holders are located on the back cover.
- Solenoid relay, also called traction relay. Thanks to this component, the drive gear meshes with the ring gear. As soon as the driver turns the key, voltage will not flow anywhere, but to the windings (holding/retracting) of this relay. As soon as the contact relay closes, the pull-in winding is switched off.
Note. It will be useful to know that 8V is the normal voltage of the traction relay, of course, if the ambient temperature is average. It is by this parameter that electricians determine the malfunction of this relay.
- Light weight and small dimensions, making it compact, are among the obvious advantages of this element.
- On the other hand, this is the most loaded part in the entire car system, because being small in size, it must spin the heavy flywheel of a strong car engine. In addition, the starter is also responsible for rotating the crankshaft along with connecting rods and pistons. Because of this drawback, the starter cannot serve for a long time and after a certain time (usually 5-6 years) fails.
Briefly, you can imagine the work of the starter. Through the ignition switch, power is supplied to the relay windings. The windings create an E.M.F. that is transmitted to the relay core. This, in turn, closes the power contacts, transferring power to the stator motor. At the same time, the relay influences the drive, which, with its gear, engages with the engine flywheel.
Note. To prevent reverse transmission of torque, the overrunning clutch disengages the rollers as soon as the machine's engine starts.