VAZ 2110: replacing the rocker seal the easy way
VAZ 2110 backstage and oil seal replacement
It is noteworthy that on the VAZ 2110 the rocker seal must be replaced when there is an oil leak from the gearbox. Replacing the VAZ 2110 rocker seal can be done in two ways, which will be discussed in this article. One of the ways to replace the cuff cuff involves dismantling the gearbox. The second method is not so cumbersome and is carried out directly on the car without removing the box. Needless to say, this method requires knowledge of certain secrets and skills.
Conclusions (video)
If you are not confident in your abilities, you can watch a video that shows the entire replacement process in detail. Self-repair will guarantee that everything will be done efficiently, since the owner of the VAZ-2110 will control the process.
–> Masters VAZ / Gearbox / Backstage
VAZ 2110 backstage and oil seal replacement
Diagnostics
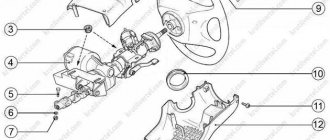
Replacing the rocker seal on a VAZ 2110
What symptoms indicate that it is time to change the cuff or gearbox rod? Most often, oil stains and marks remaining on asphalt or other surfaces after the car has been stopped for a long time are the very signs. An experienced driver is obliged to notice them in time and draw the appropriate conclusions. But such spots do not always indicate a problem with the cuff of the drawstring. Often the reason for oil loss is the oil filter, which needs to be checked to avoid errors. Often this same filter is poorly screwed in, resulting in leakage.
Note. Needless to say, noticing an oil leak from the gearbox in a timely manner is an opportunity to save an important vehicle mechanism. Otherwise, the danger associated with the complete loss of oil from the gearbox and the replacement of the gearbox, as a consequence, cannot be avoided.
Replacing the oil seal on the wing of a VAZ 2110
Regular checking will help avoid problems with oil leakage from the gearbox. The gearbox oil level should be easily visible, and a faulty oil seal makes itself felt by a characteristic crunch that occurs when changing gears.
conclusions
Replacing the gear selector oil seal on a VAZ-2114 is not as difficult as it seems at first glance. Probably, every motorist, even a novice, can handle it on his own, but if not, then it is recommended to contact a car service center. Particular attention should be paid to the choice of parts, or more precisely to the quality of the product. The better the quality of the spare part, the longer it will last.
An oil leak from a VAZ-2110 car is a serious cause for concern. It is especially dangerous when oil begins to leak from the gearbox. As a rule, this problem is associated with wear of the rocker seal. If this problem is discovered, repair work must be carried out immediately.
Replacing the drawstring cuff
Replacing the backstage seals of a VAZ 2110
First you need to arm yourself with the necessary set of tools, which includes:
- Set of keys (10, 13);
- An ordinary awl or other sharp metal object;
- Screwdriver;
- Hook;
- Plastic stopper.
The oil seal must be replaced in a viewing pit or overpass. If this is not possible, then an option with a lift will do. In addition, there is another option, which involves placing two spare tires flat under the car, like stops. Two strong boards are placed on them, and the car drives onto a makeshift overpass. Simple and brilliant.
Advice. If a motorist drives into a hole or other device, he must take care of the safety rules. In particular, it is necessary to secure the vehicle using the parking brake and wheel chocks.
Replacing the gearbox seal of a VAZ 2110
Let's start the replacement process:
- The slide on a vase is almost always covered with a special rubber boot. If the cuff is faulty, then this same boot will be covered in oil, which will once again indicate the need for replacement;
- We take the wide part of the anther and bend it;
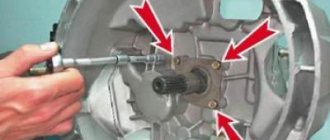
- We see the cardan located at the bottom;
- We disconnect this same cardan from the rod and lever, thus gaining access to the cuff (we use a 13 key in our work);
- The nut is turned out completely, which allows you to loosen the connection between the cardan and the lever;
- The lever is removed from the cardan;
- First or third gear is engaged;
- The cardan is completely disconnected from the rocker;
- The cardan is removed;
- Now you should remove the rubber boot.
Replacing the rocker seal on a VAZ 2110 gearbox
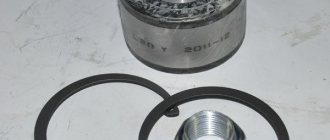
We see the cuff itself, which is located in a certain recess. This is where the rocker seal fits into the gearbox and needs to be removed from this recess.
Note. It is almost impossible to remove the cuff from the rod without using a special tool. An awl and a special hook will help in the work.
- We insert the awl and the hook inside and thus remove the cuff (you can also use a self-tapping screw, which we screw inward, thereby uncorking the seal, like a corkscrew);
Two ways to replace the gearbox seal on a VAZ-2110
It is easier to change the oil seal with the gearbox removed.
Replacing an element that has become unusable can be done in two ways.
- The first of them is very labor-intensive , since it will be necessary to remove the gearbox. But replacing the oil seal will be much easier.
- The second method seems less time-consuming and labor-intensive , but in practice it is very difficult to carry out this procedure. Only experienced motorists who have repeatedly had to repair their cars can replace the oil seal directly on the car without removing the gearbox.
Troubleshooting
Experienced car owners know the visual reasons why they can determine the failure of the rocker seal. Naturally, for such reasons it is impossible to accurately determine the cause of the leak, but this gives a signal to carry out diagnostics, in which the cause of the oil leak can be accurately identified.
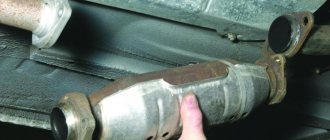
The most important sign is oil stains under the car, especially in the gearbox area.
An oily rubber boot indicates a malfunction of the rocker seal.
But these spots do not always indicate oil seal failure. It happens that this is due to the oil filter, which sometimes does not tighten properly. In any case, the driver is obliged to monitor for any oil leaks in the checkpoint area . To do this, you need to monitor the oil level. This is the only way to save the box from damage, which will certainly happen if it operates with a minimum amount of oil.
Another way that indicates the oil seal is worn out is a characteristic crunch that is heard when changing gears . But only an experienced VAZ-2110 owner can diagnose this crunch. In any case, if you hear unusual sounds when shifting into gear, it is better to diagnose the gearbox.
Set of tools required for replacement
A minimum set of tools for replacing the oil seal without removing the gearbox.
In order for the replacement of a part to take place without problems, you need to prepare the place and the necessary set of tools in advance. You will need:
- A set of keys and sockets, and for 13 you need two keys and there must be a key for 10. There must also be a socket head for 22.
- A chisel or screwdriver will be needed to knock out the oil seal.
- The hammer is small so you can get under it.
- Silicone sealant.
- Awl and hook.
Additional accessories
A regular self-tapping screw will allow you to do without a special puller.
For those who decide to replace the gearbox seal without removing it from the car, you will need additional equipment:
- Several long screws.
- A piece of pipe for pressing in a new oil seal.
It should be noted that the replacement process without removing the gearbox is much more complicated. In addition, there is a possibility of damaging the part being replaced during pressing.
How to repair a car
Replacing the drive seal of VAZ 2109, VAZ 2110, VAZ 2112, VAZ 2114, VAZ 2115
You can replace the drive seal of a VAZ 2109, VAZ 2110, VAZ 2112, VAZ 2114, VAZ 2115 car with your own hands, in a garage. Now we will look at how to replace the drive seal of a VAZ 2109, VAZ 2110, VAZ 2112, VAZ 2114, VAZ 2115 car yourself. When should you change the seal?
We are all fans of driving cars; we often forget about such an event as replacing the drive seal, or rather the internal grenade seal. Let's remember what signs indicate the need to replace the drive seal?
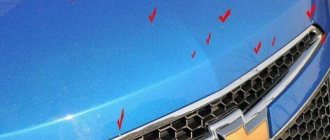
— oil leakage from the gearbox (formation of an oily film on the gearbox); If you notice an oil film, be aware that over time, more oil will ooze out, even to the point of forming oil droplets on the asphalt under the car.
Do not forget! Oil seals are left and right, and they should not be confused. The left and right drive seals are different in color. The left oil seal of a VAZ is usually brown and is installed on the driver’s side, while the right oil seal is black and is installed on the passenger’s side.
Tool for replacing the drive seal of a VAZ 2109, VAZ 2110, VAZ 2112, VAZ 2114, VAZ 2115:
- Wrench 17;
- 30mm socket wrench;
- Mount ;
- Screwdriver;
- Hammer ;
- Mandrel for pressing the oil seal;
- Container for draining oil.
- Pipe of suitable diameter.
How to buy a VAZ drive oil seal?
Before you run out to buy a drive seal, decide which drive seal you need (left or right). You can buy a drive oil seal at any VAZ auto store or at the car market.
What is the difference between the left and right drive oil seal?
The left-hand drive oil seal differs from the right-hand drive oil seal of the car in that it has oil drainage grooves in different directions.
The main differences between the left and right drive oil seal.
- Different directions of arrows on the inside of the seals;
- The numbering of the right oil seal has an even number at the end, and the left one has an uneven number.
- The color of the left oil seal is brown, and the color of the right one is black.
How to replace the drive seal of a VAZ 2109, VAZ 2110, VAZ 2112, VAZ 2114, VAZ 2115 car yourself?
- Drain the oil from the vehicle's gearbox.
- Loosen the wheel bolts and unscrew the VAZ front wheel bearing nut.
- Using a jack, raise the car and remove the ball joint from the steering knuckle by unscrewing the bolts.
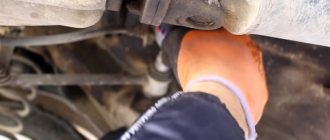
- Using a pry bar, push the lower arm down and pull one end of the drive out of the hub.
- Then we push the drive out of the gearbox (for this we drained the oil from the gearbox))) so that it doesn’t drip into the eyes.
- Using a screwdriver, remove the drive seal from the gearbox.
- Press in a new oil seal. The oil seal should fit freely.
Process in detail (algorithm)
It is recommended to carry out replacement work in a pit. In this case, you must take care of safety. The car must be secured using a handbrake and wheel chocks, which must be installed on both sides of the rear wheels.
Having prepared a workplace and a set of tools, you can begin to work. To replace the gearbox seal, you need to do the following:
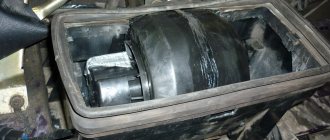
- Most often, the VAZ-2110 wing is closed with a rubber boot. If this part is covered in oil, this immediately indicates that the oil seal is really worn out. The boot needs to be bent. To do this, you just need to pull it by the wide part.
Oil leaking from under the “glass” - the rocker seal definitely needs to be changed.
Before loosening the clamp, you need to put a mark so that you don’t have to adjust the link later.
The oil seal is located deep in the bushing.
Only after this you need to press the new part into the rod. This procedure is quite complicated, since there should be no distortions. Many drivers use various homemade devices when pressing. When working, it is very important not to damage the new part, otherwise everything will have to be redone.
After the spare part is in its place, assembly is carried out in strictly the reverse order.
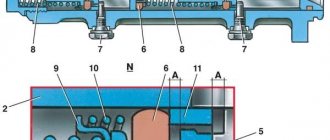
DEVICE OF BRAKE MECHANISMS
Many people wonder what is the difference between the brake mechanisms of the front wheels and the rear ones. The fact is that when braking, they are subject to different loads, and they do not operate synchronously. But this is not the main reason for the differences.
The front mechanisms consist of:
- Brake disc of classic design;
- Direction pads;
- Calipers;
- Directly the pads themselves;
- Cylinder;
- Piston;
- Seal rings;
- Protection casing;
- Direction finger;
- And its cover, which performs a protective function.
The design of the front brakes is a little simpler than the rear, however, this does not mean that they play a lesser role in braking. After all, these are the mechanisms that work first.
- Nuts that secure the hub;
- Actually, the hub itself;
- Tension springs (lower and upper);
- Brake pads;
- Directional springs;
- Wheel cylinder;
- Expansion bar;
- Handbrake lever finger;
- Handbrake lever;
- Mechanism casing.
As we can see, this difference in design is caused by the presence of parking brake elements in the rear mechanism. Therefore, the part itself looks much more massive. The operating principle of the hydraulic part is the same as in the front. The only difference between the rear brakes is this.
A simple diagram of the VAZ 2114 brake system allows you to easily carry out any repairs yourself. Spare parts for domestic cars are inexpensive and quite common, which greatly simplifies operation and repair work. This is why VAZ cars are in such demand and provide good competition to foreign cars.
Diagnostics of the breakdown of the scenes on the VAZ 2110
While driving, the driver notices extraneous noise on the right side of the seat, observes excessive play in the lever, and difficulty in changing gears correctly. The gearbox (gearbox) is suspicious. Upon closer examination, the control drive turns out to be to blame for the unstable operation of the car. The first thing you need to do is calm down, study the operating instructions, carry out an external inspection, make a list of work, parts, tools necessary for repairs and adjustments.
Typical faults
- When reverse gear is engaged, the lever is not held in the set position and spontaneously jumps to the right. Other switching occurs as normal. Possible reason: the plastic retainer (gear shift lever cover) has worn out or burst. If, after examining the drive, the condition of the remaining components is satisfactory, you should purchase a repair kit and replace the part.
- Problems with engaging (disengaging) first, fifth gears, and reverse. The second, third, fourth speeds are turned on. The link needs to be adjusted and replaced.
- The engine is running. Strong vibration of the switching unit, the handle dangles in all directions. The drive requires replacement. Possible breakdowns:
- The service life of the spherical washer of the ball joint (plastic insert) has expired,
- excessive degrees of freedom of the gearbox hinge (cardan),
- the gearbox ball lever support bracket (cushion) is cracked,
- rods are bent.
- Oil stains under the car, on the protective boot of the cardan. The gear selector rod seal has failed.
Adjusting the scenes of the VAZ 2110
It is preferable to carry out the adjustment together. The master with the tools is under the car, the assistant is in the cabin and performs the necessary actions behind the wheel.
- Try to install and hold the lever in first gear.
- Loosen the clamp on the control drive rod (stage).
- Move the lever to the far left position. Avoid switching to front and rear positions.
- Tighten the clamp.
- Assess the condition of the hinge switch cover. If damage is found, replace it.
- Carefully pull the boot towards the box. Inspect the cardan. Deviations from the norm are noticed - schedule a shift. Pull the protection back.
Installing a repair kit for the wings on a VAZ 2110
Contents of the repair kit (catalogue names).
- Cover plate for VAZ-2110 gear shift lever.
- Clip retaining ring.
- Lever spring.
VAZ-2110 gear lever axle assembly:
- remote bushing,
- low hex nut,
- spring washer,
- two bushings,
- spherical washer.
Replacement procedure
- Remove the axle retaining ring.
- Pull out the axle.
- Unscrew the six bolts, lift the pressure plate, and remove the cushion retaining ring.
- Remove the lever from the holder and remove the old hemisphere. Options for the design of a hemispherical part are possible.
- From one part. Warm up, slightly soften the new part with an industrial hair dryer (hold in boiling water), insert, gently pressing, the switch ball.
- Composite - a hemisphere, a sleeve cut along the axis. No heating required.
- Before assembly, plastic products are thoroughly lubricated.
- Unscrew the three bolts and replace the reverse trim.
- Reassemble in reverse order.
Procedure
On Renault Logan cars, the weak point is the left inner boot. It often leaks and quickly loses its protective qualities. Replacing the left CV joint boot on a Logan is carried out in the following order:
- Unclench and remove the retaining ring from the rear end of the drive shaft;
- with the help of light progressive blows we knock down the tripoid;
- we bite off the clamp, remove the used cover;
- install a new dirt cover and tighten the clamp.
Replacing the right boot of Logan is carried out by analogy with the left one. The difference is that the three-stud cage is removed first.
Procedure:
- We cut the large clamp with a hacksaw and remove it; we will install a new one in its place;
- pull the part off the holder;
- remove the stopper, knock down the tripod and install a new dirt cover.
Assembly is carried out in reverse order. After washing all the parts, apply lubricant.
Important! The stopper has to be knocked down with a hammer. It is better to do this through a wooden block, which must be installed on the inside of the body, so as not to damage the grenade balls. Make sure the retaining ring is not damaged when knocked out
Otherwise, you will have to change both the stopper itself and the CV joint. The problem occurs quite rarely, but there is a risk
Make sure the retaining ring is not damaged when knocked out. Otherwise, you will have to change both the stopper itself and the CV joint. The problem occurs quite rarely, but there is a risk.
Replacing the backstage cushion of a VAZ 2110
The work is performed under the car (partially inside the car).
- Using a socket wrench, unscrew the nuts of the metal buffer. The bar is put on the studs and presses the clip from below to the body.
- Two bolts secure the cage to the jet rod. Disassemble, holding the nut with a spanner from above. Take it aside.
- Pull the cushion out of the boot down along with the lever. Remove the retaining ring using a pointed tool. When working together, an assistant can pry the stopper from the interior side.
- Assemble, lubricate, install back, tighten fastening hardware.
Replacing the backstage oil seal of a VAZ 2110
- Loosen the drive rod clamp.
- Pull the cover off the hinge. If you plan to replace the boot, cut it lengthwise to save time.
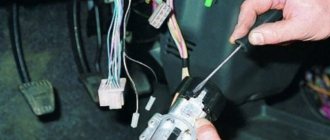
- Unscrew the locking screw.
- The assistant, while driving, presses the clutch pedal and changes gears. In this case, the drive supplies thrust towards the box and back. The master, pressing the cardan to the gearbox, disconnects the drive assembly.
- Remove the hinge.
- Remove the cover.
- Remove the oil seal, carefully, without crimping the cuffs, insert a new seal.
- Pull the boot.
- Install and secure the hinge. Important point. Rotate the adapter within a few degrees around the axis and insert the locking screw into the hole on the shaft.
- Refill the cover.
- Connect the rod to the cardan.
- Adjust gear shifting.