Hi all! Many car owners value high-quality sound in their car. But it is not always possible to get it from a standard audio system. Therefore, you have to resort to some tricks, assemble a homemade complex and achieve the desired results. As you understand, today I will try to tell you about how to make and assemble a subwoofer into a car with your own hands.
In fact, if you have a good understanding of electrical circuits and also know how to hold tools in your hands, there is nothing difficult in assembly and manufacturing. Prepare special drawings, think over the design, looking for good ideas in the photo, and also calculate all the necessary parameters.
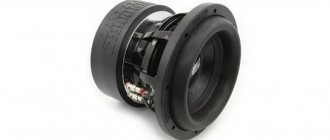
Even if your car audio system does not have an amplifier, a good passive or active sub will correct the situation and significantly improve the sound quality of your favorite compositions. Moreover, you can make a sub from old speakers or from an ordinary speaker.
Let's talk about everything in the appropriate order. Let's try to figure out together how to make an excellent subwoofer for your car.
How to properly install and connect a subwoofer in a car
Installing a homemade device in a car, as well as connecting it, will require a certain tool. So, in addition to the fact that you need a subwoofer and an amplifier for it, you will have to worry about the following devices in advance:
- fuse;
- wires (three wires in one winding - for power, for “+” to the battery and a wire to the radio);
- capacitor;
- wire cutters;
- insulating tape;
- plastic clamps;
- set of wrenches.
Once a location has been chosen to install the subwoofer, you need to make sure that it will withstand the resonant waves coming from the device. Installing subwoofers on fragile and light vehicle surfaces is prohibited.
The wires are connected according to the following diagram:
- Initially, the subwoofer wire is routed to the amplifier.
- From the amplifying device, the wire is connected to the car radio.
- The “+” power cable must be protected from damage - for example, wrapped in corrugation.
- The fuse is placed on the same “+” wire at a minimum distance from the battery.
You can connect the subwoofer yourself, based on the parameters of this circuit
Before starting work, make sure that the vehicle battery is disconnected. This is a safety measure that will not only avoid damage to the speaker system, but can also preserve the health and performance of parts of the human body.
Which material is better
What is the best way to make a subwoofer box?
In principle, there are many materials from which a housing for such a speaker can be made. It can be plywood, MDF, chipboard and so on. Each of these materials has not only advantages, but also disadvantages.
Note. The best material for making a subwoofer enclosure, according to many experts, is shipboard laminated plywood.
Finding ship plywood is not as difficult as it seems at first glance. Construction sites and other manufacturing enterprises have such material. Formwork is often made from this plywood. This material is always moisture resistant, very durable and tough. In a word, for a subwoofer body this is what you need.
Note. It will be useful to know that in the West, where the manufacture of homemade enclosures for subwoofers is highly encouraged, they prefer MDF. They don’t have any marine plywood at all, and many experts see this as the reason for their love for MDF.
Chipboard is also a good material, but it doesn’t like moisture at all. In addition, when processed, chipboard tends to crumble. On the other hand, if you take thicker material, the problem can be solved.
What to make a subwoofer box from
Some experts also recommend other materials, but they are, as a rule, not so popular - for example, glued laminated boards.
What is the best material to make a subwoofer box from?
Subwoofer design
The next step will be to create a project for the future subwoofer. Before assembling the case, it is recommended to perform some calculations. You can see something in the video, study the experience of making subs by other car enthusiasts.
But it’s still right to make a project specifically tailored to your speaker and car parameters. There is even a special almost professional program for such purposes. It's called Win ISD. Some parameters are entered into it, as a result of which you get a project for the optimal subwoofer.
You should know about:
Speaker selection
Although in theory a sub can be made from a regular home speaker, which is used in music centers or on computers, to achieve a good result I advise you to choose the speaker responsibly.
Using one compact element or trying to assemble a system of two speakers, this directly affects the size of the box, as well as the frequency spectrum that the device can reproduce.
There are several main speaker options:
Subwoofer housing: how to make it yourself
Taking into account the fact that the bandpass is the most difficult to manufacture, this enclosure is difficult to design and calculate the subwoofer box without special skills, knowledge and experience.
On the one hand, you can use the WinlSD program to calculate the subwoofer. This software allows you to select the size, calculate the volume of the subwoofer, and even create a three-dimensional model.
However, on the other hand, such a task is usually beyond the capabilities of an ordinary car owner without special knowledge (you need to know the characteristics of the speaker, take into account a number of additional features, etc.).
In fact, to make a sub with your own hands, it is better to choose a closed box or bass reflex. In this case, it is recommended to pay attention to the second option as a homemade subwoofer.
This solution (subject to proper design) will be more than enough. The bass reflex makes it possible to play back the lowest frequencies with high quality, provides increased efficiency, etc.
So, first we select the material for making the subwoofer. Typically, multilayer plywood is used for these purposes. You can also take chipboard. These materials are affordable, easy to work with, and provide good sound insulation.
- As an example, consider a subwoofer made of multilayer plywood (3 cm thick). In order to make a box for a subwoofer, you need to prepare, on average, about 100 wood screws 50-55 mm.
You also need to purchase sound insulation, have a drill, a screwdriver or screwdriver, a jigsaw, liquid nails, sealant and PVA glue, about 3 meters of carpet and a terminal block. The next step is the drawings of the subwoofer box.
The calculation of the subwoofer box is individual; the parameters depend on the size of the speaker, etc. Using an example, consider a sub with one 12-inch speaker. The volume of a box for a subwoofer with one such speaker, according to the recommendations of experts, is 45-50 liters.
To calculate the box for the subwoofer, below is an introductory diagram with the dimensions of the panels. If you do not have the skills to do this kind of work, it is recommended that you separately study the materials on how to make a drawing for a subwoofer yourself.
During design, you need to separately ensure that the minimum distance from the walls of the case to the speaker, as well as the volume of the box itself, is calculated exclusively on the inner surface, and not on the outer one.
Let's move on. After preparing all the elements, you can proceed to assembling the subwoofer box. First of all, use a jigsaw to cut out a hole for the speaker. For example, a speaker is 30 cm. Please note that the shortest distance from the center of the diffuser to the wall of the subwoofer is, conditionally, 200 mm. You can measure 230 mm, since 3 cm is the width of the plywood itself.
Then a hole is cut for the bass reflex slot. You can also use a tube instead of a slit. Then you can assemble the bass reflex slot, and then attach it to the front panel of the subwoofer. The joints are glued with liquid nails, then screws are tightened. The screws must be tightened as tightly as possible to avoid resonant vibrations.
Now you can assemble the side walls of the case, coating them in the same way with liquid nails and tightening them with self-tapping screws. You also need to cut a hole for the terminal block on the back cover of the case for the subwoofer. Next, all parts of the subwoofer need to be connected, checking the correct dimensions of the structural elements themselves and the quality of fastening.
At this stage, you can insert the speaker without screwing it in, check its fit and then move on to finishing the box. At the initial stage, it is necessary to glue the joints, cracks and gaps with epoxy glue. You can also use sealants. Then, using PVA glue, the entire upper surface is glued with sound insulation.
The outer surface is covered with carpet (including the bass reflex slot). The carpet is attached with epoxy glue and/or a furniture stapler. The speaker can now be reinserted and screwed in place. The final stage is drawing the wires from the speaker to the terminal block. After the entire structure has “settled” and dried, the sub can be connected to the amplifier. To do this, you need to know how to connect a subwoofer in a car correctly.
Purchased or made yourself
Making boxes for a subwoofer
Making a subwoofer box is a responsible process, but at the same time very interesting. Of course, you can always go to the store and buy a ready-made sub in a housing. But this is a matter for beginners. A professional always buys a subwoofer head separately and then makes the box with his own hands.
Note. The latter option is suitable not only for professionals, but also for people who are passionate about car audio and want to get the most out of the speaker. A subwoofer head placed in a homemade box will produce incredibly strong low-frequency sound.
Before we move on to the manufacturing process, let’s again dwell a little on the topic of purchased subwoofers complete with a housing. As has already become clear, there is no hope for quality here, but the price can attract a buyer. For some models of ready-made cases, the price is only 1 thousand rubles. Needless to say, the material of such a box cannot be expensive. The plywood is always thin, and the box itself cannot even boast of rigidity.
Note. A purchased subwoofer will not give you the right sound. And the same head, if you move it to another box you made yourself, you can connect it so that it sounds much stronger and of better quality.
Types of acoustic design structures
Infinity screen (freeair) - the speaker head is installed in the reinforced rear parcel shelf of the car. Despite the ease of installation, it is rarely used due to the low sound pressure, as well as the change in sound depending on how full the trunk is. Can only be sold in sedan vehicles.
The closed box is the most common subwoofer enclosure. A closed box of sufficient rigidity completely isolates sound vibrations emitted by the back of the head. To better attenuate sound waves inside the case, the inside of the box is covered with sound-absorbing material: felt, cotton wool or foam rubber with a thickness of at least 2 cm. One of the advantages is the simplicity of calculations and manufacturing. Also, speakers in such a housing can easily withstand peak loads. The closed box is suitable for listening to music with a rich tonal color. There is one minus, but a significant one. This is a low subwoofer efficiency because half of the sound waves "remain" in the box.
Bass reflex. It is a closed box with a port exit through which the sound wave from the back of the head comes out of the box to the outside. The tunnel has a round or rectangular shape. It is this port that is called the bass reflex. It has a certain size and installation location, due to which it changes the phase of the sound wave passing through it. The sound from the back of the speaker is superimposed on the sound from the front, increasing the efficiency. This allows you to obtain a sound pressure twice as high as with a closed housing. However, such a housing is more complex in calculations and requires a larger box size compared to installing the same speaker in a closed box. Also, at high sound levels, noise may occur due to air turbulence at the edge of the bass reflex port.
Bandpass. It is a box with a partition in the middle, which forms two chambers. A low-frequency speaker is installed in the partition inside the housing. Depending on the combination of cameras (mute or bass reflex), there are three types of bandpass enclosures. This is a bandpass of the 4th category, 6th category type A and 6th category type B (see figure). Subwoofers of this design allow you to get high-quality bass and a high level of efficiency. Such a case is very complex to design and configure, and is also large in size compared to other designs.