Often, traveling in a car unprepared for winter can result in unpleasant consequences for the driver and passengers, which may require the help of a tow. A snow-covered road or ice significantly reduces the vehicle's maneuverability, so before driving in the snow, it is advisable to equip yourself with snow chains. They will increase the cross-country ability of the car several times. Such equipment can be purchased at a specialized store or you can make wheel chains with your own hands. But how to make snow chains for a car with a minimum of funds? This will be discussed in more detail in this article.
Several ways to increase vehicle cross-country ability
- Installation of all-terrain tires with large and high tread elements on the wheels.
- Putting chains on wheels.
Tires with high lugs have high rolling resistance, which significantly increases fuel consumption. They also make a lot of noise, making them uncomfortable to ride. Riding on chains is even more costly and uncomfortable. To put chains on the wheels, you need to jack up the car. Which is not always possible due to the jack falling into the mud or snow. Therefore, it is quite difficult to put chains on the wheels before going off-road.
Design and advantages of anti-skid bracelets
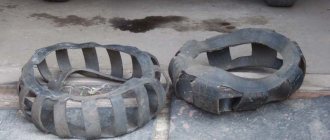
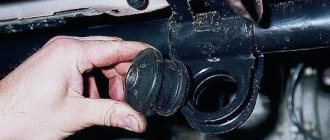
The anti-skid bracelet consists of two pieces of chain with ends connected in pairs and two belts, one with a buckle and the other free. It is put on the wheel so that the chain, forming lugs, lies on the tread in two rows with a small gap between them. The free end of the belt is threaded through the hole in the wheel rim, and after tightening, it is fastened with a buckle on the other side of the bracelet. One bracelet placed on the drive wheel is, of course, not enough to significantly increase cross-country ability. A set of bracelets usually consists of 6 pieces. For a car with one drive axle, this is enough. For an all-wheel drive vehicle, it is better to buy or make two such kits. You need to put on 3 bracelets on each drive wheel at equal intervals. You can buy such kits or make your own. The main advantage of bracelets over chains is that they can be put on wheels without jacking up the car. That is, putting them on before a problem section of the road will not be difficult, and you can move along a good road without them. You can even put them on a stuck car.
The effectiveness of using bracelets is also high as that of chains, since the lugs are formed in the same way.
But do not overestimate the increase in cross-country ability with their help. If the car lands on its bottom in mud or snow, they will not be able to help. The advantages of this device, of course, include low cost and safe operation. If the fastening belt breaks, the bracelet will simply fly off the wheel without causing damage to the body. Some sources note increased rubber wear when using this device. I think that if you don’t ride on bracelets all the time, then wear and tear will not increase.
Oddly enough, in our country anti-skid bracelets are not as widely used as in Europe, which is snowless by our standards. This is apparently explained by the complete ban on studded tires in some countries, and the long-standing habit of drivers to carry such a device with them just in case (such devices have been used there since the 20s of the last century). And the fact that there are roads there that, under certain conditions, are prohibited without such an accessory. Apparently it also plays a role. They even have special road signs that open or close depending on weather conditions.
How to properly put chains on wheels
Spread the chains out on a flat surface in front of each wheel. Moving at minimum speed, drive onto the prepared devices so that the wheels are fully seated on them . Fasten all the carabiners and put on the tension adjusters.
If there is not enough space, it is possible to “dress” the wheels one by one with anti-slip equipment using a jack .
Be sure to check the chains for damage and twisting.
Installation method without jacking the car
Before you begin installing a homemade chain on car wheels , you should carefully lay it down, preventing the links from twisting. Next we proceed point by point:
- Drive the drive wheel onto the product.
- Put the car on the handbrake.
- Place the chain so that the tensioning device with hook and carabiner is on the outside.
- From the inside, connect the hook and the last link of the longitudinal element.
- From the outside, place the carabiner coupling onto the tensioning mechanism and secure it.
- Distribute the transverse parts and tighten them.
Installing a chain on car wheels with your own hands using a jack is similar to the technology described above, its only advantage is that it makes the task easier. For a better installation, you must first reduce the tire pressure, but after the operation do not forget to restore normal parameters. This procedure will allow the product to fit as tightly as possible to the tire.
For those who want to make bracelets themselves
In order to make anti-slip bracelets with your own hands, you need to stock up on some materials. For one bracelet you will need:
- Two pieces of chain, five centimeters long, are greater than the width of the wheel tread. The chain should be such that an M8 screw fits into the outermost link of the segment. The joints of its links must be welded or soldered with copper, otherwise they may be torn during operation. The larger the chain links, the better lugs it will make. But before choosing a chain, measure the narrowest point between the tire and the wheel arch. The chain placed on the tire tread should pass this place without reaching the arch with a good margin. Since if it is missing, if dirt gets under it, it will start to touch the body.
Cargo tie-down straps
The tools you will need are: two open-end wrenches the size of the nuts and bolt heads, an awl and a needle. To find out the tread width, it is not necessary to measure it. This size is indicated on the sidewall of the tire. This designation looks like this: XXX/70 R 14 The first three numbers are the tread width in millimeters.
The chain can be purchased at a professional fastener store or in a regular hardware department. Look for a lanyard with buckles at a climbing equipment store. Once the materials and tools are collected, production can begin.
Take one of the bolts, put a washer on it, and after it the outermost link of one piece of chain. Now put on another washer and tube. If there is no tube, screw in 4 regular nuts and pull the structure through. Put on another washer and the outer link of another piece of chain. Cover the link with a washer, screw on the self-locking nut and tighten it. Similarly, fasten the other two edges of these sections of chain together. After the edges of the segments are connected. Loop the free end of a belt or sling with a buckle around one of the bolts, pull it towards the buckle and stitch it frequently with nylon thread using an awl and a needle. The length of the end with the buckle should be about 10 cm. In the same way, attach a belt or sling without a buckle to the other bolt. For ease of fastening, leave the length of this end longer; if necessary, you can shorten it later.
Selection of ready-made bracelets
Choosing ready-made bracelets is easy. Available for sale, they are divided into three size categories: small (for cars), medium (for minibuses and SUVs) and large (for trucks). In order not to be mistaken in size, remember the width of the tire tread of your car, measure and compare the length of the bracelet chains with it. The length of the chains should be approximately 5 cm greater than the tread width. Assess the reliability of fastening the belts to the chains. The fastening of the belts must necessarily overlap, and threads made from natural raw materials should not be used for stitching, since in such conditions they will quickly rot. The stitching should be frequent, in several rows (necessarily with nylon threads). The joints of the chain links must certainly be welded or soldered with copper. Electroplating on these chains is not necessary, as it will still wear off after using the bracelet a few times. Along with steel chain bracelets, there are devices in the form of plastic clamps and rubber tubes, but they are not popular among our car enthusiasts. Since our drivers must have everything iron-clad.
Almost every driver dreams of his car having excellent cross-country ability. In order for a road of any quality to be passable in snow and muddy conditions, the car must have anti-slip bracelets on the wheels all year round. But how to make anti-slip bracelets with your own hands?
System and types of anti-skid means
These devices are based on a conventional system consisting of iron links or reinforced wire. A successful application is to distribute the parts evenly over the entire radius of the tire. Failure to comply with this condition threatens the product rupture and loss of anti-slip parameters. The traditional design, tested by more than one generation of motorists, consists of inner and outer components that run along the entire circumference of the tire. They are connected to each other by transverse parts, so-called “grousers”. Developing the production of a chain for wheels with your own hands is accessible even to beginners. Depending on the layout of the structural parts, there are three types of devices :
- in the shape of a ladder;
- in the form of a honeycomb;
- in the shape of rhombuses.
Any type has its pros and cons. In terms of labor costs, the first option is more accessible - “ladder”.
What is better chains or anti-skid bracelets?
Bracelets appeared on car wheels relatively recently.
The effectiveness of the bracelets has been confirmed on the most difficult off-road conditions. They help you confidently overcome deep snow and impassable mud. Drivers quickly appreciated the advantages of this anti-skid product, and it quickly became widespread. In some properties, the bracelet surpassed the traditional chain. It consists of two pieces of chain, secured at the ends of two metal pins. Each is fitted with a very durable woven polypropylene anti-slip strap that is threaded through the wheel rim holes. A special lock is attached to the end of one of these belts, which, after being attached to the tire, secures the entire device. The bracelet can be installed on a car with front-wheel drive, rear-wheel drive or all-wheel drive. Thanks to the adjustable dimensions, it can be placed on any wheel and can be combined with cars of most brands.
Several of these products mounted on a wheel provide off-road performance close to the chain. Moreover, their number is directly proportional to the smoothness of the car. Each driver, depending on the road situation, determines the required number of bracelets and wheels for their installation.
The advantages of this tool include:
- the ability to install it on a stuck wheel yourself;
- improving the vehicle's maneuverability on slippery and snowy roads;
- simplicity of design and short fastening time;
- compactness, allowing you to conveniently place several bracelets in the car;
- reasonable price;
- use on cars of different classes;
- versatility, allowing use on wheels of different radii;
- higher level of security than chains.
It is important that the design of this product allows you to make anti-slip bracelets with your own hands. Many motorists take advantage of this, making quite high-quality and reliable devices.
Purpose of snow chains
The cost of high-quality snow chains starts from 5 thousand rubles. Moreover, this does not require special knowledge and experience, since if you have the instructions specified in the material, you can make the products yourself.
Snow chains (lugs) are products that are put on the drive wheels, increasing the maneuverability of the vehicle. By installing such products on wheels, the driver receives the following benefits:
- High cross-country ability on snowy roads.
- Overcoming ascents and descents on sections of highways in icy conditions with a low probability of loss of control.
- Improving the quality of driving on snowy and icy road surfaces.
- Improving the vehicle's propulsion properties when driving through muddy sections of the road.
It is important! Snow chains are installed on wheels only when it is necessary to overcome a difficult section of the road. It is not recommended to use them constantly, as this negatively affects the vehicle.
The negative impact is due to the following factors:
- Increased load on the steering mechanism, as well as transmission elements.
- Inability to move quickly.
- Increased tire wear.
- Lack of comfort.
- The occurrence of extraneous noise.
- Negative impact on suspension elements.
In addition to this, it is prohibited to operate a car with hooks on asphalt, as this will contribute to the destruction of the coating. The products in question should always be in the trunk of the car in order to be able to use them if necessary. This applies not only to crossovers and SUVs, but also to passenger cars with one-wheel drive.
What types of bracelets are there?
A wheel equipped with a bracelet essentially receives a removable tread reinforcement that:
- Helps improve the vehicle's driving capabilities.
- The safety of the car on the road increases.
- Braking becomes more effective.
- Side drifts are minimized.
- Slippage is reduced.
The components of the bracelet can be made of different materials, of different thicknesses depending on the class of the car. So, for buses and trucks, the thickness of the metal from which the chain is made is 8 mm, and the width of the durable fabric tape is about 50 mm. For SUV bracelet chains, there is a 6mm chain and a thick strap to secure it. A passenger car weighing up to one and a half tons has a chain with a bar cross-section of 5 mm and a tape 25 mm wide. Typically, a car set consists of six bracelets. Three for each wheel. This allows you to overcome dirt, sand, snow, clay, and muddy ground. The factory-made kit also includes gloves, instructions for installation and safe work, a rubberized durable drawstring bag or plastic case.
Alternative options
Automotive stores sell traction control bracelets - a worthy alternative to chain equipment. They are distinguished by the possibility of quick installation and low price. But even here the engineering thought of our motorists does not stand still; they have skillfully learned to copy factory copies.
Bracelets are the same homemade snow chains , but without longitudinal elements, their advantages are as follows:
- Ease of manufacture.
- Quick installation.
- High efficiency and reliability.
To make it you will need a modest kit:
- VAZ muffler mounting element made of rubber;
- bolts 40-60 mm long, washers and nuts;
- a tube with a diameter equal to the diameter of the bolt;
- steel chain with a diameter of at least 5-6 mm.
To equip wheels with standard sizes 195 and 205 mm, 4-5 meters of hardware products will be required. Stores also sell ready-made kits for self-assembly of bracelets, with the exception of Chinese kits, they are of fairly decent quality and inexpensive. It consists of:
- blanks;
- fastening accessories;
- sling;
- clamp lock.
The kit is easy to use, transported in a special case and does not take up much extra space. An important advantage of metal bracelets is the possibility of installation on wheels with disc brakes. And if you take into account the reviews, then owners of expensive foreign cars do not hesitate to use such devices, which also says a lot.
How to make anti-skid bracelets with your own hands
Before you start making such bracelets, you should pay attention to the design of similar products sold.
After this it will be easier to make bracelets. Before starting work, clarify what materials and tools are needed. Determine the total length of the chain, the securing strap, and the length and diameter of the high-strength steel rod for cutting studs. You will need metal tubes that will fit over the stud to reduce belt abrasion. You will also need nuts, washers, locking locks, and buckles. The chain should be selected welded with an anti-corrosion coating, the belt should be made of durable braided synthetic material. Equipment for the job will require tools and materials for cutting chains, cutting threads, cutting and stitching belts.
The purchased material must be marked, checked for correctness of calculations and cut to the appropriate sizes. Cut threads on the studs and prepare metal tubes for them. The shorter pieces of the belt are used to fasten the lock, the longer ones are used to tighten the bracelet. Melt the ends of the belt. At one end of each belt, make a loop with stitching into which the tube should fit tightly.
After this, directly make anti-skid bracelets with your own hands. First you need to prepare the studs. Place the tubes onto their greased surface. Then secure the end links of the chains on both sides of both studs using nuts and washers. A lock is placed on the short part of the belt. The long part is passed through the hole in the disk and connected to the lock from the outside.
The first product is mounted on the car, where its functionality and absence of contact with the parts of the brake mechanism are checked. Usually this is 2-3 pieces per drive wheel. If you do this in your free time from work, then in 3-4 days the machine can be equipped with a complete set.
When no rubber moves (DIY chains)
I decided to buy chains for my own belly bike, because the Turanza “doesn’t fit”))) I looked at the cheapest 1500 rubles on the website. , but ordinary ones are impossible, let me think I’ll torture myself. I bought everything I needed, and now I have a free moment.
“Estimating steps” on the wheel:
Determine the length of the “perimeter” and “steps”:
We cut, bend the links and washers (I couldn’t find a ring):
Then we assemble everything one by one (it didn’t fit, photos will be later after modifications), bend the links in a vice to their original position, weld the break points, process the seam, fix carabiners at the ends, make one end of the chain longer - for tightening. Place it in front of the wheel.
We run over the wheel, throw on a chain, fix it with a carabiner on the inside, and pull the long end through the ring on the outside, pull it tight, and fix the carabiner. We drive back and forth a little and pull up again. Ready!
The money came out to 900 rubles per steam, without welding (our own). In terms of time, relax with 4 hands for an hour of steam (without welding). We made a slight mistake in the calculations - later I will add another “step” by removing one link in each workpiece from the “perimeter” side.
The best option for sausage makers or for those who need M/T tires 1-2 times a year.
As soon as I finish it, I’ll immediately test it)))
how to tighten the chains on the wheel so that they dangle?
I copied it as it was on the website, like a standard for Niva. I’ll add one more step - I miscalculated. Will need to test it later. On a frequent basis, I’ll get to the belly faster, it seems to me. I drove on a hard surface - they bite like crazy, you'll have to be more careful with the gas in the mud. And this way you can create “honeycombs”. Nothing complicated either, just more connections. Screw-shaped carabiners cause more concern - after dirt, the threads can become clogged and difficult to unscrew, although they are more reliable than others. We will try))
Last time it was ruled by Extreme Right Hand Driver; 04/29/2011 at 19:34.
Make the honeycomb better, the ladder is killing the box.
Are you thinking critically? So maybe I’ll wear it 1-2 times a season. We’ll also try “honeycombs” - put on two more cars))
The ladder hammers directly, the honeycomb rows even softer.
Yes, I'll probably redo it. On honeycombs, the chain is constantly in contact with the road, which makes it move more smoothly. Also, it holds better on lateral shift.
I saw springs for tightening in stores, but I see that I didn’t bother with it?
Not yet, they’re sitting tight, we’ll test it, and then we’ll see. From here everything was stifled)) https://jeeptoys.ru/cepi/cepi-niva.html It’s true that the castle there is different - the piece of iron is crooked, they didn’t find the shape, they came up with their own version.
I decided to buy chains for my own belly bike, because the Turanza “doesn’t fit”))) I looked at the cheapest 1500 rubles on the website. , but ordinary ones are impossible, let me think I’ll torture myself. I bought everything I needed, and now I have a free moment.
“Estimating steps” on the wheel:
Determine the length of the “perimeter” and “steps”:
We cut, bend the links and washers (I couldn’t find a ring):
Then we assemble everything one by one (it didn’t fit, photos will be later after modifications), bend the links in a vice to their original position, weld the break points, process the seam, fix carabiners at the ends, make one end of the chain longer - for tightening. Place it in front of the wheel.
We run over the wheel, throw on a chain, fix it with a carabiner on the inside, and pull the long end through the ring on the outside, pull it tight, and fix the carabiner. We drive back and forth a little and pull up again. Ready!
The money came out to 900 rubles per steam, without welding (our own). In terms of time, relax with 4 hands for an hour of steam (without welding). We made a slight mistake in the calculations - later I will add another “step” by removing one link in each workpiece from the “perimeter” side.
The best option for sausage makers or for those who need M/T tires 1-2 times a year.
As soon as I finish it, I’ll immediately test it)))
I’ve never met better Japanese ones...I spent 5 winters on the 1st set. It looks like you have raw meat... not more than 200 km.
So, a little criticism)))))) I recycled a small bunch of chains. 1st. Your chain itself is not welded. The links will begin to break very soon. You need to either take a welded one, or boil each link. I boiled it. Further, it is not tensioned on the wheel. You will lose all the time and you will lose all your wings. Take a Zhiguli camera, cut rings 5 cm wide, on both sides along a hook made of 3-4 mm wire. Stage 1 - I put on the clothes, pulled the ends of the chain on the outside with rubber (the inside is connected), drove 300 meters, braked, firmly connected the ends of the chain on the outside, threw the rubber bands crosswise.
Source: forums.drom.ru
How to mount bracelets
To skillfully handle anti-skid devices, it is better to install and remove bracelets in the car in advance in a calm environment. You should always remember that the bracelet is a chain, and any damage or breakage can damage the car and cause other troubles.
Using a homemade device requires taking into account the following circumstances:
- Before starting and during movement, make sure that the bracelets are securely fastened;
- they cannot be used on asphalt and concrete roads;
- you can move on them only after proper installation;
- use gloves when installing and removing;
- When starting to move, keep a safe distance;
- do not allow the wheel with the bracelet to slip.
Anti-slip bracelets can be installed on both stamped and regular wheels. Self-made anti-slip bracelets require special attention. They should be used in small off-road areas. At the same time, we must remember that they are of no use on loose sand. If the car is all-wheel drive, with a free center differential, each wheel must have the same number of bracelets. If the interaxle locking is enabled, they can be installed on the same drive axle. When traveling frequently on difficult roads, every few kilometers you should check the condition of the fastening and tighten the belt.
Features of installation on a car
Making chains is only half the battle. Now you need to install them correctly on the car. There are several ways to do this. The first of them involves jacking up the car. To do this, the driver should perform the following manipulations:
- Before an obstacle, you need to stop on a hard surface, then set the car in first gear and squeeze the handbrake;
- Using a jack, you need to hang up the part of the car on which you plan to install the chain;
- As soon as the wheel is hung, you should begin installing the lug;
- This process usually takes about 10-15 minutes for one wheel. In this case, you need to make sure that the chain is securely fastened.
The product is installed in a similar way on the second side and, if necessary, for all four wheels. The second option involves installing a chain without lifting the wheels:
- You need to stop, and then place chains on both sides in front of the wheels.
- Drive the chains to the middle of their size.
- Secure the product from the inside with a hook or carabiner.
- Straighten each link, then connect the tension adjuster.
If there is no jack, it is possible to run over chains lying on the ground
This option seems simple, but in reality it is not. After installing the chain on the wheel, you need to drive a few meters and then adjust the tension. Then you can storm the obstacles.
How do they travel with them?
Even the best anti-skid devices, which are made by yourself, are not a panacea for off-road conditions.
A car equipped with bracelets requires special attention. A lot depends on what kind of surface the road has. On a slippery, steep climb, in mud and clay, or in dense snow, the bracelets perform well. Attempts to use them in sand or loose snow may not yield results. If in the summer the car gets stuck in a high rut or the body sits on the ground, then there is a high probability that the bracelet will be useless. Moreover, the wheel dressed in it will sink more and more into the ground. Here you will need a shovel, a winch, a tow rope and a tractor. Similar problems arise in winter, when the snow is loose and the temperature is close to zero. The bracelets turn out to be useless, digging a hole under the car.
It is also important to strictly observe the speed limit when driving with an anti-skid device. It is unacceptable to drive with bracelets on snow or ground at a speed of more than 40 km/h. If you have rocky or icy ground under your wheels, you must drive especially carefully at a speed of no more than tens of kilometers per hour.
What are the dangers of using snow chains?
With the constant use of snow chains, the following negative consequences :
- The load on the steering device increases.
- The suspension wears out quickly.
- The chains make a lot of noise when driving.
- Tire wear increases.
- Unable to maintain high speed.
- It's not comfortable to move around.
Do not use these rigid devices when driving on asphalt roads - this will damage the road surface. Observe the speed limit : for hard ones - no higher than 80 km/h, for soft ones - no more than 50 km/h. Use such equipment only in emergency situations to increase cross-country ability. Homemade hooks (mordovkas, anti-skid belts, anti-slip tapes) are suitable for any car - Gazelle, truck, tractor, UAZ, VAZ, Niva and others. Rate the author
Service
Sometimes making such products yourself is easier than caring for them regularly. A car with bracelets in the trunk regularly overcomes off-road conditions with their help. After this, the bracelets are thrown back into the trunk. Once again it turns out that the chain on them is rusty, the belt is torn, and the lock does not hold it. In addition, the tire where it was placed shows signs of wear.
Therefore, you should adhere to several basic rules for caring for the work of your hands:
- keep bracelets in a dry and clean place;
- after use, remove dirt and wash;
- check belts, chains and locks;
- lubricate and tighten the nuts;
- replace worn belts;
- Avoid contact with moisture, fuel, acids.
Important to remember
Any traction control equipment adversely affects the safety of tires, as well as the condition of the chassis. You need to be especially careful when choosing locks for homemade chains on car wheels , since the trouble-free operation of the car depends on them.
Moving on hard surfaces is unacceptable. When driving on loose snow or mud, you should maintain a driving speed of 20-30 km/h; it is not recommended to allow wheels to slip. Experienced drivers advise periodically checking the tension of the equipment along the entire inner and outer perimeter of the tire while driving.
Anti-skid bracelet and its types
Simply, a bracelet or chain is just an additional protector that can be removed at any time, just as it was installed. As quickly and simply as possible. Despite the simplicity of the device, there are quite a few design solutions for these bracelets and chains. You can choose it for both light snowy conditions and deadly mud and deep snow. Considering, of course, the capabilities of the machine. Due to the large lug, the bracelet helps to overcome even rocky, icy slopes or bare ice and increases the vehicle's maneuverability many times over.
Anti-slip devices are divided into two types:
There can be one chain that wraps around the entire wheel, and the bracelet can consist of separate plastic or reinforced strips. There can be from one to five or six such stripes on each wheel.
Details: which locks on homemade snow chains are better and why?
When making traction control devices in garage conditions, drivers most often use the following types of locking mechanisms to secure them to the tire:
- S-shaped;
- hook-shaped;
- with ratchet mechanism.
Some homemade wheel chains are equipped with an S-shaped lock structure, which is locked with a four- or hex key. However, many complain about unreliable fixation and lack of adjustments for this option. In addition, installing such equipment is a complete inconvenience.
The second option for fixing the chain device is more common and holds quite well. If the chain is correctly laid, fastening can be done with a screwdriver without any problems. For a complete guarantee, car enthusiasts advise tying the contact point with 1-3 mm soft wire. Disassembly of the equipment also occurs quickly without much effort.
The ratchet lock model was previously used on trucks. It is characterized by high reliability and ease of operation. The sample provides fixation without the use of additional materials.
Materials and features of bracelets
Devices can be made of different materials, but the most common ones are:
- devices made of durable alloy steel;
- reinforced rubber fibers;
- polyurethane;
- bracelets made of high-strength plastic.
The more severe the road conditions, the more rigid the design of the device should be and the stronger the material should be. So, for shallow snow on hard compacted soil or asphalt, softer lugs are used and speed limits may not apply to them.
The use of traction control devices also depends on the diameter of the vehicle's wheels. Depending on the nature of the coating, choose a lug pattern: for deep snow it is more advisable to use a ladder; honeycombs and diamonds with a smaller pattern are intended more for icy roads.
Varieties and how they differ
Many drivers, having become familiar with the disadvantages of lugs, make a negative decision about purchasing or manufacturing them. However, sooner or later a situation comes when the presence of chains will not hurt. Grunts are divided into several types. The main distinguishing parameters are: the material of manufacture and the geometric pattern of the chain product on the tire.
This is interesting! The above parameters have a corresponding impact on the car and its off-road performance when moving.
Depending on the material of manufacture, lugs are divided into the following types:
- Tough.
- Soft.
Rigid lugs
Rigid types include products made from the following types of metals: titanium, steel, aluminum. The strength of the product depends not only on the material, but also on the thickness of the links. The larger the dimensions of the links, the higher the vehicle’s cross-country ability. However, the indicators of negative impact on the car are also higher.
On the one hand, thick chains increase the vehicle’s maneuverability, on the other hand, they negatively affect the suspension and steering rack
The disadvantage of rigid products is the high noise level, as well as accelerated tire wear. On chains of this type you cannot reach speeds higher than 40 km/h. In addition, the massiveness and heaviness of the chains negatively affect the vehicle. Not all types of passenger cars can use rigid chains due to the small space between the wheel arches.
Soft lugs
Soft lugs are made from non-metallic materials, such as rubber, polyurethane and even plastic. To increase the strength of products, a method such as reinforcement is used. Soft versions of lugs for cars are more gentle, as they contribute less to rubber wear, and they are also almost silent. A car on such lugs can reach speeds of up to 80 km/h, while providing high-quality traction with the road surface.
Soft chains can hardly be called “chains” in the literal sense of the word, but when driving around the city they do just as good a job
Like hard chains, soft lugs have disadvantages that are clearly manifested when moving on ice. Soft chains perform well when moving around the city, without having a negative impact on the road surface. However, they are not able to ensure effective passage through snowy areas and mud, so in such situations only rigid chains should be used.
Benefits of anti-skid bracelets
A snow chain is good in those places and conditions where you don’t have to remove it for a long time. This is due to the fact that the chain is usually thicker and more massive than bracelets, and its installation takes a long time. It all depends on the design, but massive chains are not profitable to take off and put on several times a day. The bracelet can be left on even on the asphalt, so you can put it on in comfortable conditions and drive along a good road to the off-road destination fully armed.
Also, bracelets are more financially profitable than chains, since the chain itself will cost several times less to make a bracelet, fewer parts are needed to fasten the elements, and such a device is much easier to install than chains, which is why we decided to make an anti-skid bracelet with our own hands.
Varieties of lugs according to geometric pattern
Depending on the geometry of the pattern, there are three types of snow chains:
- "Ladder".
- "Rhombus".
- "Honeycombs".
Each option has its own advantages and disadvantages, so we will consider them in detail.
"Ladder"
The “ladder” is a base in the form of longitudinally arranged branches. These branches are evenly distributed around the entire circumference of the wheel. To secure the chain on the wheel, the appropriate type of locks are used. Externally, this type of lug resembles a ladder, which is where the name comes from.
This lug option is one of the most popular, effective and in demand. Among the disadvantages of this type of chain it is worth noting:
- parallel arrangement of chains on the wheel, so the car will dig in when overcoming snowy or soil areas;
- low lateral stability, which is also due to the parallel arrangement of the chain branches;
- heavy load on the transmission.
Despite the high raking properties, ladder-type chains are practically useless on snowy ground
It is recommended to use chains of this type only when it is necessary to overcome a risky section of the route. This option is one of the cheapest, so when the need arises, most drivers prefer this option without delving into its features.
"Rhombus"
The diamond lug design is a modernized "Ladder" design. For this purpose, there are longitudinal branches that form a diamond-shaped pattern, eliminating all the negative factors that are characteristic of the “Ladder”.
The geometric shape in the form of a diamond is intended for the use of lugs when it is necessary to overcome a snowy or swampy area. The diamond shape is shown in the photo below.
Diamond-shaped chains have increased strength and high traction characteristics
The diamond-shaped shape of snow chains is popular among SUVs and crossovers, since this type of pattern on the lug increases the vehicle's cross-country ability several times. This is especially true for snow-covered and icy road sections.
"Honeycomb"
An analogue of a rhombus are “honeycombs”, which have transverse branches similar to a rhombus, but are additionally connected by straight connectors. Diamond and honeycomb are improved types of lugs, in which the products are in constant contact with the road surface. This is a big plus for both rubber and transmission, so when making lugs it is recommended to pay attention to the last two models.
“Honeycombs” ensure constant contact with the road, therefore giving the car a high level of lateral stability
It is also worth noting that when purchasing snow chains, you need to consider their size. The lugs produced in production are divided not only by size for wheels, but also depending on the type of car.
Making an anti-skid bracelet
In order to assemble a set of bracelets, it will be necessary to choose a good chain. it must have welded rather than soldered link connections. This can greatly affect the strength of the structure in harsh conditions. The thickness of the lug is selected arbitrarily and the size of the chain link will depend on the size of the fasteners - bolts, nuts and washers.
The whole design consists of three bracelets for each wheel. Bracelets are fixed separately from each other, their number can also be regulated by traffic conditions. Each of the bracelets tightens the rubber and disc, the metal, chain part is closed with the help of straps on self-tightening buckles.
There are a lot of such rigging belts in construction stores; you can choose any one, both in width and thickness, not to mention the material. The belt itself will not be in contact with the road; its task is simply to tie and secure the chain bracelet.
Types of anti-slip chains according to the picture
Depending on the interweaving pattern of the chain links, there are several types of devices. Their characteristics vary , so be careful when choosing.
Ladder
These are two circles of chains connected to each other by transverse segments . They got this name because from the outside these devices are very similar to a ladder.
This is the cheapest and easiest to manufacture version of snow chains. They also have some disadvantages :
- least effective when driving on snowdrifts and dirt ;
- the car moves in jerks , and this overloads the box;
- the car is thrown to the sides across the movement.
In such devices, circles from chains are connected by segments not in a straight line, but diagonally crosswise. This results in a corresponding diamond-shaped sketch.
Such anti-slip chains are perfectly suitable for driving through wetlands or deep snow cover . They are very strong and provide good grip on the surface.
Perfectly suited for SUVs and off-road vehicles . They increase the cross-country ability many times over .
They are deprived of virtually all the shortcomings of the “ladder” brothers.
Such a sketch results from connecting hexagons from chains together at the corners. Hexagons are placed in the center, and pentagons are placed on the sides. Such devices have all the advantages of diamond-shaped ones , plus they add enormous lateral stability .
Photo of chains according to the drawing
Manufacturing technology
First, the chain is divided into equal parts in accordance with the number of bracelets that are planned for installation. To do this you just need to take into account the thickness of the wheel. For example, for 215 tires, two pieces of chain of 15-17 links each will be enough. everything is calculated empirically, the main thing is that the chain segments are the same.
When the chain is divided into segments, the bracelets are connected in two pieces of chain using a bolt with a diameter corresponding to the size of the link and a length of 50 mm. To ensure that the ends of the chain are fixed and do not move while moving along the bolt, either a bushing of the appropriate length is put on it, or nuts are screwed on so that the end of the second section of the chain is firmly attached.
It is better to use a self-locking nut or flare the thread to prevent spontaneous unscrewing. When the bracelets are ready, their ends go around the wheel and are connected with rigging straps.
After installing the device on the car, it is recommended to drive a couple of hundred meters and check the strength and reliability of the structure. Naturally, with bracelets, the maximum speed will be limited at the discretion of the driver, but it is not recommended to exceed the barrier of 50-60 km/h on a flat road, and to stick to 20 km/h on off-road roads.
So a simple device can make any road passable and any point accessible all year round. Do not exceed the speed limit with bracelets, and have an easy road for everyone!
What you need to keep in mind
The use of anti-slip chains is unacceptable when driving on roads with hard surfaces (concrete, asphalt). In conditions of loose snow or soil, it is recommended to maintain a speed of 10-20 km/h. It is prohibited to allow wheels to slip.
After installing the anti-slip device, having driven the first 100 meters, you should brake and check the reliability of its fixation, as well as the tension around the entire perimeter. A poorly tensioned chain can cause damage to suspension parts and the control mechanism.
Source: autoclub.su