The VAZ 2107, like other cars, needs periodic adjustment of the headlights. Official documentation does not establish a strict interval at which adjustment of the VAZ 2107 headlights is required, but practice shows that when driving quietly on good roads, it should be done every 20-30 thousand km , and on bad roads - every 10-15 thousand.
The adjustment can go wrong not only when the hydraulic corrector, which is short-lived (often lasts only one season), or the adjustment mechanism for a conventional headlight fails, but also when the suspension is faulty. Also, regardless of mileage, you need to adjust your headlights if the light of your headlights begins to blind oncoming traffic, which you will certainly be told by blinking. This happens as a result of replacing optics or light bulbs. This instruction will tell you how to independently adjust the headlights on a VAZ 2107 and what you need for this.
Features of headlight adjustment on the VAZ-2107
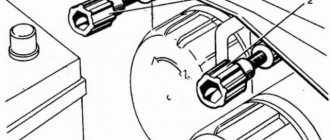
Headlight adjustment is usually done from the engine compartment using special screws located on the rear wall of the lighting unit.
One screw is designed to regulate the light beam in the horizontal direction, and the second is designed to regulate it in the vertical direction. To carry out a similar procedure, these screws need to be rotated, and they, in turn, will rotate the headlight in both planes - vertical and horizontal. Such adjustment screws are provided for each individual vehicle lighting fixture. Experts recommend using mobile optical devices to adjust car lighting fixtures. But even if the car owner does not have them, they can be replaced with a screen. For such a screen, you need to find a flat vertical surface, for example, a garage wall.
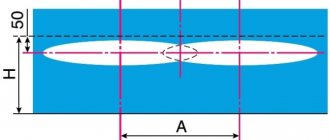
The screen must be marked with special markings according to the following scheme:
Let's consider all the necessary schematic markings:
- A, B, E – centers of low beam headlight lamps;
- C – line of location of low beam headlight lamps;
- D – height of rise of light beams (horizontal boundary);
- O – axis line;
- J – distance between low beam headlight lamps;
- h is the distance from the low beam headlight lamps to the surface of the area where the car is parked.
The peculiarities of adjusting VAZ-2107 lighting devices also include preparatory measures for the main procedure:
- The car must be fully fueled.
- You should put a set of usual equipment in the trunk - a spare tire, a jack, tools.
- Ensure normal tire pressure.
- An assistant with the same weight as the driver of the vehicle must be seated in the driver's seat, or a load with the appropriate weight must be placed on him.
- Be sure to check all fastening connections of each light fixture.
- Make sure that the adjusting screws move easily (there is no rust on them)
- Clean optical devices from dirt - the surface of the lenses should be transparent.
If you do not adhere to the listed conditions, then it will be problematic to obtain adequate results from adjusting the headlights.
Types of lighting devices
Depending on the year of manufacture, the VAZ 2110 can be equipped with either Kirzhach or Bosch headlights. Both of them are a block that includes high and low beam headlights, side lights, and direction indicators.
No matter how much difference there is, there are some nuances:
- In Kirzhach, the glass is sealed, so both removing it and replacing it with a new one is more difficult. In addition, the low beam glass has a lens that makes the light output more focused, although limited;
- Bosch glass is secured with latches. They are sealed with rubber gaskets. Their low beam boundary is more blurred, since there is no lens in the glass.
It’s difficult to say unequivocally which headlight unit is better. But disassembling Boshevskys is definitely easier. In any case, it doesn't hurt to know how to do it in both cases.
We adjust headlights on a VAZ-2107
Experts have developed an action algorithm for setting up automotive lighting devices:
- The machine is installed on a horizontal platform (necessarily level):
- the distance to the screen should be 5 meters;
- position – perpendicular to the screen.
- Special markings are applied to the prepared screen, which must correspond to the above diagram.
- The headlight hydraulic adjustment handle is set to the extreme right position.
- The low beam is switched on.
- The screw, specially designed to regulate the horizontal light beam, rotates until both boundaries of the light beam - upper and lower - are aligned (on the screen this will be line E-E).
- The second screw, intended for vertical adjustment, rotates - the vertical line (E-E) should be aligned with the break point of the upper boundary of the light beam.
Experts advise paying attention to the following nuance: each headlight must be adjusted individually. To do this, the second one is simply covered (for example, with a suitable piece of cardboard or fabric). And the adjustment procedure itself is similar to that described in the algorithm.
Removing the headlight without removing the bumper
Not every driver has enough knowledge and experience to remove the bumper on their own the first time. Also, this stage takes a lot of time, so there is another way to remove the headlights from Kalina. The approach under consideration requires the following actions.
- Get rid of the coolant unit and air filter housing for a while.
- Use a screwdriver to remove the PTF plug.
- Find the lower fastener for the lighting element and unscrew the bolt in this area. After the manipulation, insert your hand into the PTF hole.
- Find the bolts on the top of the light block structure and remove them using a size 8 wrench. You can find them not far from the radiator.
- The element is secured to the wing of the car by a screw, which should also be unscrewed using a Phillips screwdriver of the appropriate size.
- Try to carefully move the part that is located closer to the radiator closer to the engine by rotating the block light. Remove the lower fasteners from the seats.
- Use a short socket to remove the bolts and lower headlight mountings.
- A slight pull towards you will allow you to remove the flashlight. Make sure that the paintwork is intact, as the light will now be very close to the fender and bumper.
Expert advice
Experienced car enthusiasts give some advice to those who want to independently adjust the headlights on a VAZ-2107 in a garage.
- The entire procedure must be performed in the dark.
- All equipment must be in good condition, special attention must be paid to the voltage regulator and generator.
- If the headlight bulb is cloudy, then the reason for this may be a broken seal of the optical assembly connection, and this affects the level of light flux. To restore its tightness, you will have to glue all damaged fragments with sealant.
- After completing the adjustment procedure for both headlights, it is necessary to carry out a check: drive out onto the road at night and check the car lighting devices in operation.
- Self-adjustment of headlights can only be done for yourself, because such adjustment is not suitable for technical inspection. For proper adjustment, the car owner must contact a car service center with qualified specialists.
Accessories for car tuning
The production of spare parts and accessories for the VAZ 2107 has long ceased to be the exclusive domain of a limited number of supplier enterprises. On store shelves there is a large selection of additional equipment for car tuning. Rear headlights for the specified car model are present in the most extensive range.
Component manufacturers offer the following types of flashlights:
- Sports version with four separate round and two rectangular signals. They are arranged in the form of separate modules, and the plastic body can be painted to match the color of the car body.
- Skylain lights have an unusual appearance with three round indicators, and in the upper part there are rectangular turn and reverse signals. The visible part of the body is made of high quality transparent plastic and has a chrome finish.
- Rear headlights of the Ciliac type for the VAZ 2107 differ from other designs by the presence of LED direction indicators, which prevent the signals from being illuminated even in bright sunlight. The device is very popular among car owners due to its unusual shape.
- Tinted lamps are designed specifically for lovers of unusual color schemes. They feature round signals with powerful lamps that are clearly visible in any lighting conditions.
- LED rear lights of a classic design, made in carbon color. The indicators in the device are located closest to the color scheme of the original device. The diodes have high brightness and short response time.
The rear lights of a VAZ 2107 car must first of all inform traffic participants about the driver’s intentions and actions. High information content of signals will help to avoid misunderstandings on the roads, and in some cases, emergency situations.
How to independently adjust the headlights on a VAZ 2107
Driving at night in a car with unadjusted headlights is just as dangerous as driving a car without lights. When driving at night, the driver must have a clear view of the road, since not only his life, but also the safety of other road users depends on this. To increase the safety of movement at night, you need to adjust the headlights on the VAZ 2107, and every owner of this vehicle can do this.
Nuances of domestic cars
Owners of modern foreign cars are in many ways happy people. Of course, their cars are “stuffed” with electronics and automation, so a huge part of the settings is performed by the car automatically or using a computer.
Adjustment screws
Domestic cars, including the VAZ 2110, are deprived of these advantages. Light adjustments have to be done manually. If this is not done, problems will be difficult to avoid.
Frankly speaking, it is still better to perform the settings at specialized service stations. But if you don’t have the money for this, or car service services are too expensive for your budget? In this situation, you can resort to the help of your own hands, as well as a pair of hands of a friend. You won't be able to do it without an assistant.
Common headlight problems
Not only on the 7, but also on other car models, various malfunctions related to optics occur. If breakdowns occur, you should try to fix them as quickly as possible. One of the simplest breakdowns is the burnout of lamps, as a result of which visibility of the road decreases or disappears altogether. Continuing to drive with faulty headlights is strictly contraindicated, so let’s look at what other types of faults occur with headlights:
- Glass damage is most often caused by a pebble that flies out from under the wheels of oncoming or overtaking vehicles. The glass must be replaced, as water can get inside through the crack, which will cause the light bulb to burn out.
- Failure of the lamp, or rather the burnout of the filament on it. If a light bulb burns out, it should be replaced. The seven is equipped with lamps with two filaments, which are responsible for the operation of high and low beam. As a rule, lamps burn out one at a time, so it is always possible to get home with one working headlight.
- Malfunction of windshield wipers - on some sevens, a mechanism for cleaning the headlight glasses (wipers) may be installed. These cleaners allow you to always keep your windows clear, which has a positive effect on the light of your headlights.
If both headlights on a VAZ 2107 do not light up, then you should not rush to disassemble them. First you need to check the serviceability of the fuses, as well as relays and wiring.
Features of the optics unit
The front optics on the VAZ 2107 are presented in the form of a plastic case, inside which there is a reflector and glass. Glass not only serves as a protective option, but also ensures proper light reflection on the road surface. The front side has a rectangular shape, and on top of the glass, some owners of sevens install plastic covers.
Dashboard
The dashboard of the VAZ Five, as in any other car, is an integral part, since it contains devices for monitoring the technical condition of the car while driving. The device is installed on the left side of the dashboard opposite the steering wheel, which makes it easy to read information. The device is equipped with the following elements:
- 4 pointers;
- 6 indicator lights;
- 1 digital indicator (odometer).
The instrument panel uses the following devices:
- speedometer;
- signal light block;
- car odometer;
- voltmeter;
- coolant temperature sensor;
- fuel level sensor in the tank.
What kind of dashboard can be installed
The “five” dashboard can be improved in several ways:
- perform tuning using new lighting elements, scales and instrument needles;
- introduce an instrument cluster from another car;
- do the tidy yourself by installing the necessary indicators.
It is possible to modify the shield by replacement, but only with careful selection and adjustment of the device to the standard torpedo, as well as after preliminary development of the connection diagram.
From another VAZ model
Some owners install a panel from Kalina on the fifth model of Zhiguli. The product looks modern, and the information from the instruments is much better readable. The essence of the modification comes down to installing a new shield into the standard case, for which it needs to be filed, trimmed, and assembled with the new mechanism. After completing the mechanical work, it is necessary to connect the new instrument panel with the wiring, checking the functionality of all gauges and indicators.
On the VAZ 2105 you can install an instrument cluster from Kalina
From "Gazelle"
If you like the instrument cluster from the Gazelle, then you can install it. At the same time, you need to understand that you will have to redo the wiring by making adapters due to mismatched connectors, and then install the product in a standard case with the accompanying stages of adjustment and modification.
To implement the instrument cluster from the Gazelle, you need to redo the wiring, connectors, and fit the shield to the standard housing
From a foreign car
Many owners of classic Zhiguli cars, in the process of tuning their car, install a dashboard from foreign cars. Basically, products from cars manufactured in the late 1980s - early 1990s are suitable for these purposes. One of these is the BMW E30, Audi 80.
For a VAZ 2105 you need to select a dashboard that will fit in size and will not require major changes in the wiring
Hydrocorrector of headlights: how it works and how to use it
The headlight leveler is an inconspicuous and rarely used device. But sometimes without its work it is impossible to move at night on busy roads.
A typical situation that requires the use of this device: a combination of a heavily loaded trunk and a trip in the dark.
When the trunk is overloaded, the rear part of the car lowers, and the front part “lifts up”. In this case, the “low beam” from a certain distance from the car automatically becomes “high beam”.
At first, the driver is perplexed why all oncoming drivers begin to “blink” and demand to switch the lights. If the driver guesses what happened, then he has to reload bags of potatoes into the cabin and onto the front seat in the dark. If the seats are occupied by passengers, then you have to either turn off the low beams and drive on the lights, or create an emergency situation on the road.
But there is a third way out: use a corrector and adjust the tilt of the light beam, lowering it down.
The opposite situation may also occur: if the hydraulic corrector is adjusted to the maximum load, and the machine is empty, then, on the contrary, it is necessary to raise the beam of light upward. In this case, the driver no longer blinds others, but illuminates the road “in front of his nose,” which is also fraught. Figure 1 illustrates these situations. The normal position of the light beam is shown in yellow.
When and why do you need to adjust your car headlights?
Ideally, you should check how accurately your car headlights are adjusted at least once a year. Of course, if you haven't changed anything in the car's design, it's unlikely that anything will change in a year. Nevertheless, an additional check is never superfluous, especially when it comes to the safety of people’s lives and health.
However, headlights tend to get dirty, including from the inside. To clean the lens and reflector, it is often necessary to dismantle the lighting equipment. After all the manipulations with water and cleaning agents, the headlights need to be installed in their place. It is recommended to check the direction of the glow. If it goes wrong, it will need adjustment.
Headlight adjustment must be carried out without fail if you are installing new lighting equipment. It doesn’t matter whether this concerns the entire headlights or just the light source, or perhaps some other element of the system. If you make a replacement at a service center, make sure that the technician carries out the adjustment. But when re-equipping yourself, you will have to try yourself.
There are other reasons for mandatory headlight adjustments. For example, it is necessary if you have repaired or replaced the front end of your car. Some tuning enthusiasts significantly raise or lower the car body. In this case, configuration is also required.
In addition, experts recommend checking the headlights when replacing wheels or tires, as well as when installing a trunk or replacing the suspension. It would seem, how can all these details affect the direction of the light flow? But rules are rules: it is better to spend a few hours and make sure that the equipment works as it should, than to risk your health.
The same applies to traveling long distances. On intercity routes, the quality of the lighting devices is especially noticeable. And given the speed of cars, an accident caused by such violations can end tragically.
Incorrectly adjusted headlights will dazzle the owners of oncoming cars and provoke accidents.
By the way, in our country there is a penalty for incorrectly adjusted headlights: you can be fined 500 rubles. And if a violation of the regulation caused an accident, the punishment increases significantly. If harm to the health of a victim in an accident is classified as minor, then you will face a fine of 2.5 to 5 thousand rubles or deprivation of rights for up to one and a half years. If more severe damage is caused to your health, the amount of the fine may increase to 25 thousand, and you will be deprived of your rights for 2 years. Punishments for driving a car in violation of operating conditions are prescribed in the Code of Administrative Violations. All the information you need is in articles 12.20–12.24.
How to use the corrector?
The corrector has knob A on the dashboard of the VAZ 2107 to the right of the steering wheel, next to knob B for adjusting the brightness of the dashboard lighting. If you rotate knob B counterclockwise, the brightness of the light decreases.
As they say, the control knob of the device has an “intuitive interface.” To change the direction of the light flow, with the trunk loaded and the headlights on low beam, you need to align the mark shown on the regulator with one of the marks marked on the unit body so that the beam of light does not blind oncoming drivers.
The VAZ 2107 hydraulic corrector has four switching options (in order from large point to small point):
I - minimum load, the front of the car is slightly lowered: one driver, or there is a passenger in front;
II - driver and four passengers, the body sags evenly downwards;
III - the same as II, with an additional load of up to 75 kg in the trunk:
IV - driver and maximum trunk load: the “nose up” the most.
In order to see how the angle of inclination of the light beam changes during operation of the corrector, it is better to place the car perpendicular to the wall. Let us recall the standard requirements for the location of the low beam.
The need for a correction system
When driving a car at night, it is important that the headlights illuminate the path well. However, correct adjustment does not in all cases contribute to safe movement at dusk.
This is explained by the fact that in cases where the car’s suspension changes due to the loading of the trunk or the presence of passengers, the light flux changes its trajectory. As a result, this leads to a decrease in headlight illumination and dazzling oncoming drivers.
Therefore, there is a need to constantly adjust the luminous flux relative to the vertical plane using special devices (it wouldn’t hurt to find out how the headlight auto-corrector works). There are almost similar devices - sensors for automatically turning on headlights. But there is a significant difference between them, so they should not be confused.
How does the headlight hydrocorrector work?
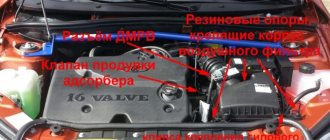
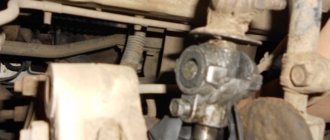
Below is shown the headlight hydraulic corrector without a control knob on a VAZ 2107.
The corrector structurally includes:
- adjustment knob and master cylinder (on the dashboard);
- two pipelines and clamps (to each block - headlight);
- two actuator cylinders, installed on the VAZ 2107 headlight block;
- frost-resistant working fluid (brake) in a closed circuit.
For VAZ 2107 models, a hydraulic corrector model “2105-3718010” is used.
How does headlight range control work?
The cylinder system is manufactured hermetically, with:
- The highest (basic) fluid pressure corresponds to switch position I;
- when switching sequentially to positions II, III and IV, a vacuum is created in the system;
- pistons are retracted in the actuating cylinders and the optics are turned down;
- when returning to position I, the pressure in the system increases to the base one, the pistons protrude and turn the optics upward.
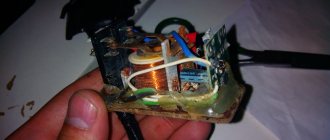
Since the system is under pressure almost all the time, except when the trunk is heavily loaded, seals often leak. The reason may be the fragility of domestic rubber on the VAZ 2107 during winter temperature changes. Due to a leak of working fluid, the piston in the working cylinder becomes stuck in one position.
A working hydraulic corrector must ensure free play of the piston and must be at least 7 mm.
Due to the manufacturing features (tightness), the hydraulic headlight angle correction on the “classic” in general, and on the VAZ 2107 in particular, is non-removable and cannot be repaired. Its cost is low, so it is advisable to replace the entire set if it fails.
Let us remind you that before removing the old cylinders from the headlight housings, the main thing is not to forget to tighten the clamps on the working cylinders and turn them counterclockwise
In conclusion, let us remind you that there are no trifles on the road, and the topic of the corrector is a vivid example of this. Drivers who do not monitor the condition of this small but important device sometimes argue that they do not drive with a full trunk, especially at night. But according to traffic rules, outside populated areas you need to drive with your low beams on, even during daylight hours. And then an incorrectly adjusted corrector can blind road users even during the day and cause an accident.
Checking the corrector's operation
It is necessary to check as often as possible whether the headlight range control is working properly. After all, this is one of the guarantees of safe driving in the dark. Each type has its own limited service life: automatic - up to 15 years, manual - less. The fact that the correction system is not working correctly or has completely failed can be understood if, when igniting or turning on the low beam, the headlight drive does not produce a monotonous, slightly buzzing sound. If there is a serious suspicion that the manual mechanism has failed, you should do the following:
- Disconnect the position sensor lever mount.
- In the dark, park the car with a loaded trunk in front of a light, plain wall and turn on the low beam.
- Change the position of the lever and observe whether there is a change in the luminous flux.
- If the direction remains the same, then the corrector has failed.
Checking the direction of light against the wall.
The most common cause of breakdown is wiring. It is best, of course, to carry out regular computer diagnostics of the performance of the light position regulator in a car service center.
Why do you adjust headlights?
The ability to drive cars at night is ensured by optical elements that are equipped on the front of the car - headlights.
The main task of these headlights is to illuminate the path ahead and partly to the side of the car.
Many modern models also include additional lighting devices - turn signals, daytime running lights. Although initially all headlights included only the main light and side lights.
The main light provided illumination of the road, and it comes in two types: high beam and low beam.
In high beam lighting, the beam of light travels horizontally, providing the best possible illumination of the road ahead.
However, this light can harm oncoming drivers, as it can blind them.
To eliminate the possibility of dazzling, low beam headlights are used.
The light beam with such lighting goes at an angle to the axis of the car, that is, it shines downwards.
At the same time, the illumination range is reduced, but oncoming drivers are not blinded.
The procedure for moving from high beam to low beam and back is prescribed in the traffic rules.
And it seems that everything is simple - the high beam provides illumination of the road as far forward as possible, and the low beam shines “under your feet,” but in this matter there is also such a factor as weather conditions.
The wrong direction of the light beam, which from the outside seems correct, in both modes of operation of the headlights can lead to the fact that in conditions of fog or precipitation, the effect of shielding the light beam will occur, and it will not only blind oncoming drivers, but also the car owner himself.
Therefore, the headlights must be adjusted accordingly, for which there is the possibility of adjusting the light.
Instructions
Initially, you will need to remove the seals before tinting. All car windows to which tinting will be applied must be thoroughly washed with a specialized detergent. You should also rinse all corners very thoroughly. Next, tinting car windows with your own hands (VAZ 2109, 2110, 2107, etc.) is carried out as follows:
- A soap solution is prepared, which is a standard detergent or shampoo mixed with warm water, after which it is poured into the prepared spray bottle.
- The outer side of the glass that has been washed is thoroughly sprayed with a soap solution, after which a tint film is immediately applied, which is cut according to the required dimensions. It is worth noting the fact that the dark layer should be directed inward, while the transparent layer should be directed outward. Here you should be extremely careful, because the parties must never be confused. If you cannot decide which side is dark, then you should split your film very slightly from one corner. After the film is applied to the glass, careful alignment and cutting is carried out. It is best to leave a margin of one centimeter on each edge.
- Now the inner surface of the glass is covered with soap solution. After this, you should act extremely quickly, because the glass should not have time to dry. Carefully separate the dark layer of the film, and at the same time moisten it with the solution with which the spray bottle is filled. In this case, the work of an assistant is very important, because you will be able to perform all procedures much more carefully. In this case, one person will have to hold the clear layer of film, while the other will pull it and spray the dark layer.
- A dark layer is applied to the inside of the car glass. As mentioned above, while tinting car windows with your own hands (VAZ 2106, 2107, 2110 and all others), the glass must remain wet. It is also mandatory to carry out treatment with a spray gun, after which a transparent layer is applied, since the film must have effective protection from any damage. After carrying out all these procedures, you should immediately smooth the film using a rubber spatula, moving from the center to the edges. In this case, you should be especially careful, because any sudden movements are extremely undesirable. You should also completely get rid of any air bubbles.
The film should be smoothed until the transparent part falls off on its own, after which the dried transparent film can be completely removed
Now you can trim the protruding edges by running a knife along the edge of the car glass, but in this case it is extremely important to act without any haste
If you have a hair dryer, then you can thoroughly dry the car glass along its perimeter, but if you don’t have a hair dryer, then just close the door and start working on the next glass. It is advisable that over the next two days you do not insert any seals into the doors or open tinted windows.
When do you need to do this kind of work?
All cars leave the factory with the headlights already adjusted. And if the car is operated in normal mode, then no intervention in the position of the headlights is required.
However, it should be borne in mind that the factory adjustment is made with an average vehicle load.
If the car is often used with maximum load, which usually falls on the rear axle, then the front of the car naturally lifts up, changing the direction of the light - it begins to shine upward.
Replacing a burnt-out main light bulb can also affect the position of the light beam.
This applies even more to the headlight itself - replacing the glass or the light fixture itself if the standard ones were damaged.
In general, not only damage to the headlight, but even overloading the car leads to the need to adjust the headlights.
These works boil down to changing the position of the optical element of the headlight, including a lamp and a reflector, in the horizontal and vertical directions.
Additional lighting devices are not included in the optical element, so adjustment does not affect them in any way.
At specialized service stations, the position of the headlights is adjusted using special mobile optical devices.
This operation is not particularly expensive, but not all service stations have such devices available.
Generators that replace G - 221
What models of generators are suitable for replacement in a VAZ 2101 - 2106 car?
- The first option is a generator from a VAZ 2105; it produces a maximum current of 55A. Not much, but if you don’t use a lot of additional equipment, then this is an ideal option. This generator replaces the G-221 generator without any modifications to the mounting. There are only minor changes in the connection to the electrical wiring; they are due to the fact that in the connection diagram of the G-221 generator the relay-regulator is placed separately, while in the five-wheel generator the relay regulator is combined with the design of the brushes.
- The next option for installing a chisel generator on a VAZ 2101 is 2106. It produces 55A, which is quite acceptable for a small amount of additional equipment.
- The third option for replacing a standard VAZ generator is a generator from a VAZ 21074, its marking is 372.3701-03. It is capable of delivering about 73A of current, which will be sufficient for the average motorist. The installation is practically no different from the previous one.
- The fourth option is to install a generator from an injection Niva. It produces about 80A, which will satisfy the requirements even if a large number of additional light bulbs and amplifiers are installed. It will not let the light go out at idle. But the installation does not require very big changes.
- The fifth and final option is to replace the standard G - 221 with a generator from a VAZ 2110, which produces 105 - 110A (depending on the specific model).
- There are other options (foreign cars, Chinese, our semi-underground companies), but you can consider them here endlessly.
We have listed the most realistic and easiest ways to replace a generator in a VAZ 2106 car. Next we will look at how to practically implement the installation of a generator from a VAZ 21074.
What will be required to complete the work?
It is also possible to independently adjust the position of the light, and no special equipment is required. It is enough to place the car on a flat area in front of the wall - the so-called screen adjustment.
The peculiarity of this adjustment comes down to proper preparation of the machine and adherence to a certain technology.
It is not so difficult to prepare a car for this operation - you just need to provide the workload on the axles of the latter.
It needs to be refilled, and the tank should be more than half full.
You should also check the tire pressure - it should be the same in all wheels and correspond to the norm.
If the car is loaded most of the time, then you need to provide additional weight in the trunk.
It is also necessary to have someone behind the wheel, or to ensure that the weight in the driver's seat is approximately equal to the weight of the driver himself.
As for the platform on which the adjustment will be made, it must be level.
You can check this in the simplest way - put the car on a platform, and then measure the height from the floor to the lower edge of the headlights - if there is no significant difference, the platform will do.
The wall in front of the car must be strictly vertical. If the unevenness of the wall is very obvious, then you can put a sheet of plywood on it.
In our case, no special tool is required.
But there are exceptions, for example, on the Grant fret, a 6-point hex wrench is used to adjust the headlights.
On other models, a smaller screwdriver may be needed.
Such troubles can occur frequently, so please read the instruction manual first.
Which PTF should I put on the Grant?
Today you can find foglights for Lada Granta on sale in two variations - with flat glass or spherical. In this case, the choice of devices depends entirely on the preferences of the car owner. As our compatriots write in their reviews, spherical glass by its design is more durable and strong. Car enthusiasts make such conclusions because it has better resistance to vibrations and impacts from stones. You can find special PTFs for Granta Liftback on sale; they can be installed on this car model, but usually car owners use foglights from Kalina (the author of the video is Vladimir Gennadievich).
Adjusting the headlights of the VAZ-2107
Next, we will consider the possibility of adjusting the headlights on different cars. Let's start with the domestic classic model VAZ-2107.
This model has two screws for adjusting the light beam on the inside of the headlight, that is, in the engine compartment - in the horizontal and vertical directions.
These screws are located at the top of the headlight.
The only equipment you need is:
- A sheet of plywood measuring at least 2 m wide and 1 m high;
- Tape measure at least 5 m;
- Marker;
- A flat wooden plank 2 m long.
So, the machine is placed on the platform and is located horizontally relative to the floor, the distance to the wall should be 5 m.
- A plywood sheet is placed against the wall, and then markings are made on it;
- First, apply a horizontal line along the entire length of the sheet at a height corresponding to the height of the center of the headlights above the floor. That is, use a tape measure to measure the distance from the floor to the center of the headlight and this must be done on both headlights.
- Next, you need to mark this distance on a sheet of plywood, make marks, and then use a wooden plank to draw a line connecting the marks along the entire width of the sheet.
- Then you need to draw another horizontal line across the entire width - 75 mm lower from the first.
- Then three vertical lines are applied. The most difficult thing to apply is the central one - it must correspond to the center of the car.
This can be done using a tape measure - measure the width of the front of the VAZ 2107, divide it by two, then mark the distance to the center on the floor.
Based on the resulting center, draw a line with a tape measure to a sheet of plywood and make a mark, and then draw a vertical line with a marker and a wooden strip.
The other two vertical lines should correspond to the centers of the headlights. In order not to carry out additional measurements, we note that the distance between the centers of the headlights of the VAZ-2107 is 936 mm, that is, set aside 468 mm from the center line on both sides of it, make marks through which then draw vertical lines.
At this point all preparatory work is completed.
If the VAZ-2107 is equipped with a hydraulic headlight leveler, you should move it to the extreme right position, but if there is none, you can immediately begin adjusting.
The car's ignition and low beam headlights are turned on, and there should be an assistant or just some kind of weight on the seat.
The headlights are adjusted one at a time - when adjusting one headlight, the second one must be covered so that it does not shine on the screen. This can be done with a sheet of thick cardboard, which is secured with construction tape.
Using the adjusting screws, you need to ensure that the upper boundary of the light beam coincides with the lower horizontal line on the plywood screen, and the center of this beam coincides with the point of intersection of the side vertical line with the lower horizontal one.
After adjusting one headlight, you can move on to the other. In this case, the adjusted one will need to be covered with a sheet of cardboard. The adjustment steps are completely identical.
The main task with such an adjustment is to achieve the correct direction of the light beam when the low beam is on.
It should illuminate the road ahead well without blinding oncoming drivers.
Therefore, the adjustment is carried out with the low beam, the high beam is not subject to any adjustments.
Headlight adjustment process
After you have prepared the wall and found the adjusting screws, carefully drive straight away from the wall 7.5-7.6 meters. It is best to measure this distance accurately; the quality of the headlight adjustment will depend on this.*. *In fact, not every car needs to move 7.5 meters away from the wall
This is the general average distance; for Chrysler, for example, it corresponds to 10.3 meters, and Toyota recommends aligning the headlights at a distance of 3 meters from the wall. This is another example where it would be a good idea to read the user manual
*In reality, not every car needs to move 7.5 meters away from the wall. This is the general average distance; for Chrysler, for example, it corresponds to 10.3 meters, and Toyota recommends aligning the headlights at a distance of 3 meters from the wall. This is another example where it would be a good idea to read the user manual.
Next, close one headlight and look where the second beam falls in relation to the marks made on the wall. For vertical adjustment, the top of the most concentrated part of the beam must be at or below the centerline of the horizontal mark.
For horizontal “aiming,” the headlight must be adjusted so that the side vertical lines are in the middle of the light spots, and the horizontal line is on top and touches the boundaries of these spots. Make the necessary adjustments; if the light does not fall on the marked area, turn the adjustment bolt a quarter turn and see where the beam falls. Now do the same procedure for the other headlight. Gradually, you will move the headlights to the desired position.
More information about the accuracy and standards of settings can be found in paragraph 4.3 of GOST under number R 51709-2001.
If the high and low beam headlights are combined, when setting the low beam, the second type will be adjusted automatically.
In general, the setup is carried out in a similar way. This way you can adjust the headlights as needed. Zero cost in terms of money, but the lighting fixtures will start to shine much better. However, we repeat once again that it is better to go to a car repair shop and pay less than 1000 rubles to get a perfect result in 10 minutes. With such headlights you will definitely pass inspection!
Adjusting the direction of the light beam on the VAZ-2114
The sequence for self-adjusting headlights is identical for many cars. But the overall dimensions of the vehicle models themselves affect the markings applied to the plywood sheet.
So, on the VAZ-2114 model the sequence of work is the same - the car is placed on a flat platform in front of a wall with a plywood sheet leaning against it.
Drawing the first horizontal line and the central vertical line is done in exactly the same way as on the VAZ-2107. But the lower horizontal line for this car is applied at a distance of 65 mm.
Also, the distance between the centers of the headlights of the VAZ-2114 is 964 mm, so the two side vertical lines are drawn at a distance of 481 mm from the central one.
These are all the nuances that should be taken into account when adjusting the headlights on a VAZ-2114.
All adjustment work on this model is also carried out using adjusting screws located on the back of the headlight.
Granta, Priora
In modern domestic cars VAZ Granta and VAZ Priora, the procedure for adjusting headlights is no different. One of the nuances to note is the distance between the horizontal lines; for these cars it is 75 mm.
Also, the adjusting screws of the Grant can be reached through special holes, and the screws themselves are located at an angle.
Adjustment is carried out using a 6mm hex key.
In Priora, the screws are located at the top of the headlight.
In general, headlight adjustment for all cars is done in the same way; only certain dimensional characteristics of the model itself and the location of the adjustment screws should be taken into account.
Chevrolet Lacetti
Let's consider self-adjustment of headlights on a foreign-made car - Chevrolet Lacetti.
The adjustment sequence for this machine remains the same. All the nuances again come down to the correct application of markings on the plywood screen.
This car is also placed on a flat area in front of the wall at a distance of 5 m from it.
Chevrolet Lacetti must be equipped, with a filled tank and an assistant in the driver's seat.
The headlight range control must be moved to position “0”, corresponding to an unloaded car.
Next, a vertical center line and a horizontal line corresponding to the level of the horizontal position of the headlights are applied to the plywood.
Another line is also drawn from the horizontal line below, at a distance of 65 mm. But the side vertical lines are drawn at a distance of 637 mm from the central one.
In general, the distance between the centers of the Lacetti's headlights is 1275 mm, but special precision is not needed when adjusting.
The rest of the work is carried out identically - first, one headlight is adjusted by aligning the boundaries and center of the light launch with the lines and their intersections on the plywood screen, and then the second.
A special feature of this model is the position of the adjusting screws - they are located not on the back side of the headlight, but on the top.