The clutch is one of the most important parts of a car. Without it, the car will not be able to move. That is why replacing the clutch on your vehicle is a procedure that needs to be taken very seriously.
This article is intended for those who prefer to repair their car themselves. Fortunately, the VAZ 21099 has a simple design and any car owner can replace the clutch on their own if they have the necessary tools and detailed instructions. In this article we will figure out how to change the clutch disc on a VAZ 21099 even without using a pit.
Adjusting and replacing the clutch on a VAZ 21099 car
The clutch is one of the components of a car's transmission. When this system breaks down, further movement becomes difficult, sometimes the car stalls, and sometimes it simply does not move when you press the accelerator pedal. Let's look at how to diagnose and replace clutch elements of a VAZ 21099 car with your own hands.
Clutch system failures are felt instantly, here is a list of the main symptoms.
- When driving uphill, when you press the gas pedal, the car does not move, despite the ever-increasing engine speed.
- When driving in a straight line, acceleration time increases significantly, the engine often overheats, and fuel consumption increases.
- When stopping, pressing the brake and clutch pedals simultaneously will stall the engine.
- It is difficult and crunching to switch gears on and off when the car is moving. When the engine is off, they switch without difficulty.
- In the morning, when you try to start the car, the starter has difficulty turning the flywheel, despite the clutch pedal being depressed, and after starting, the engine runs hard and stalls after a while.
- There is a noise when you press the pedal.
- When changing gears, the car makes a jerk, and sometimes the engine stalls after it.
- The clutch release pedal is difficult to press.
- Full pedal travel exceeds 16 cm.
Causes and troubleshooting
Installing the disk on the machine
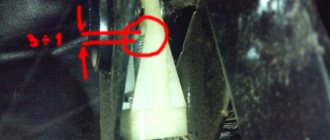
Symptoms 1 and 2 indicate critical wear of the clutch driven disc or contamination of it with engine oil that has leaked from the cylinder block or gearbox due to leaky seals of these units. To more accurately determine the cause, just look into the engine compartment and look through the window on the clutch housing cover. If there are traces of oil on the flywheel teeth, then the seals will have to be replaced. If there are no traces of oil, the clutch driven disc needs to be replaced.
Symptoms 3, 4 and 5 indicate incomplete shutdown of the mechanism. This occurs when drive parts break, driven and pressure disks are deformed, the cable breaks and the VAZ clutch drive is incorrectly adjusted.
Symptom 6 indicates a breakdown of the damper springs or wear of the release bearing. Symptom 7 indicates that the wheel hubs are jammed on the gearbox shaft splines. They just need to be removed, cleaned and lubricated. Symptoms 8 and 9 indicate that the cable needs to be replaced and the drive adjusted. Replacing the clutch assembly is also carried out after purchasing a used car.
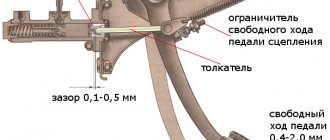
Adjusting the VAZ 21099 clutch drive is a very simple procedure, it is done like this.
- First you need to take a ruler and measure the distance the pedal moves when pressed. If it is less than 12.5 or more than 13.5 cm, we proceed to adjustment.
- We look into the engine compartment, remove the battery, find the place where the cable passes through the gearbox bracket (next to the ignition coil). It is secured with adjusting nuts on both sides of the bracket.
- If we need to increase the pedal travel, turn the nut located clockwise, located closer to the car interior. If, on the contrary, it is necessary to reduce the stroke, turn clockwise the nut that is closer to the front bumper.
- Again, measure the distance with a ruler: if it is within the recommended limits, the adjustment is complete.
Replacing the cable is also not a very difficult task.
- Open the hood and unscrew the adjusting nuts.
- Remove the cable from the gearbox bracket.
- Remove it from the clutch fork.
- We move into the interior, knock the lock washer off the pedal pin and remove the cable end.
- We take out the rubber gasket from the front panel from the side of the engine compartment and take the tip out.
The cable has been removed, now we install the new one in the reverse order. After installation, adjustment is required again.
All steps from start to finish
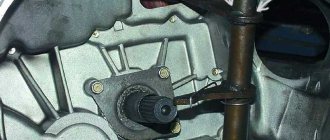
Open the hood and find the gearbox. The starter will be located nearby. All nodes are covered with a filter that needs to be removed:
- Disconnect the negative terminal of the battery (key “10”);
- We disconnect in turn: the mass air flow sensor connector (oval), the adsorber valve (we press the tongue from below). We also loosen and remove the fastening tie for the “thick wire”;
Getting rid of unnecessary details
A “fork” will be attached to the top of the crankcase - a bent plate with a slot. This is the clutch fork (see photo).
Found the most important detail
Using pliers wrapped in electrical tape, try to pull the tip forward.
Clutch adjustment on Lada Granta (first method)
Here we will look at how to adjust the clutch on a Lada Grant:
- Grasping the end of the cable, pull it forward as far as it will go.
- Using a caliper, measure the distance from the fork to the plastic leash. The distance should be exactly 27 mm.
If everything is set up and checked, measure the clutch pedal travel.
We measure the free movement distance
The distance from the “top point” to the “bottom” should not exceed 146 mm.
Alternative clutch adjustment method (second method)
No calipers are needed here:
- Carry out step 1 as indicated above - pull the tip forward.
- Let go of the tip and look: if the leash does not fit tightly to the fork, screw it onto the rod.
- Press and release the pedal (3 times), repeat steps 1 and 2.
Achieve the following: when the pedal is not pressed, the leash should be pressed tightly against the metal, at the same time, the displacement of the fork should not be noticeable. Let the displacement be equal to 1-2 mm.
How to change the clutch on a VAZ 21099?
The clutch is one of the most important parts of a car. Without it, the car will not be able to move. That is why replacing the clutch on your vehicle is a procedure that needs to be taken very seriously.
This article is intended for those who prefer to repair their car themselves. Fortunately, the VAZ 21099 has a simple design and any car owner can replace the clutch on their own if they have the necessary tools and detailed instructions. In this article we will figure out how to change the clutch disc on a VAZ 21099 even without using a pit.
Signs of a malfunctioning clutch system
- When a car is driven on a road with an incline, the car does not climb up the road, despite the car's engine speed constantly rising.
- Increased speed when driving in a straight line, increased fuel consumption, engine overheating, increased fuel consumption.
- If you press the clutch and brake pedal, the engine will stall.
- If the engine is running, it is quite difficult to change gears. Such problems do not arise with the engine turned off.
- During a cold start, it is difficult for the starter to turn the flywheel, although the clutch is intact. It is also difficult for the engine to run and stalls.
- When you press the clutch pedal, extraneous sounds may occur.
- When changing gears, the car may jerk or the engine may stall.
- Depressing the clutch pedal may be difficult.
- The clutch pedal travel exceeds normal (14 centimeters).
These causes indicate too much wear on the clutch disc or contamination of the working surface with oil. Inspect the disc as well as the flywheel. If they have traces of oil, the seals need to be replaced. If you do not see any traces of oil, be sure to replace the clutch driven disc with a new one.
How to change a clutch disc
The clutch replacement process is quite lengthy, so you need to stock up on time and patience.
To replace the clutch, you must first remove the gearbox.
- First of all, remove the crankcase protection and unscrew the gearbox mounting bolts.
- Remove the negative wire from the clutch housing.
- Using two wrenches, remove the clutch cable from its bracket.
- Disconnect the block from the wire from the starter contact.
- Remove the starter from the gearbox by unscrewing the three nuts.
- Remove the gear shift system drive end.
- Disconnect the speedometer and gearbox drive cables.
- Remove the contact with a wire from the reverse indicator switch block.
- Loosen the nut securing the arm to the suspension.
- Unscrew the three bolts that secure the braces to the body.
- Remove the ball joint nut cotter pin.
- Remove the ball joint.
- Remove the CV joints. Pull them aside.
- Unscrew the bolts that secure the clutch shield and also dismantle it.
- Unscrew the three bolts and the crankcase mounting nuts.
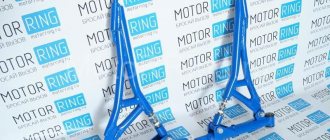
- Install suitable wooden beams on the fenders and place a block on top to hang the engine.
- The block should rest on the bars and nothing else.
- Attach the engine to a block that has a bolt with a hook. For this procedure, it is allowed to use rope or wire.
- Unscrew a couple of nuts securing the rear engine support to the body.
- Unscrew the nuts securing the engine to the gearbox.
- When removing the gearbox, first move the gearbox horizontally, otherwise the input shaft may be damaged.
Please note that this method is the most convenient, since it can be used to remove the gearbox without a hoist or hoist. This may only require a couple of jacks.
A dirty box will need to be cleaned of contaminants that appeared during operation.
Now that you have clear access to the clutch mechanism, you can remove it.
Replacing the disk yourself
How to adjust a hydraulic clutch
It should be noted right away that on front-wheel drive cars, replacing a disc is a little more difficult than on classic models. In addition, different brands and models of cars have their own nuances for removing and installing the clutch. First you need to read the instructions and recommendations for changing the clutch yourself. It would be a good idea to consult with experts.
When replacing the clutch on a VAZ 2109, there is no need to completely dismantle the gearbox, drain the oil, remove it completely, etc.
How to change a clutch in a garage
So:
- First you need to hang the front of the car on tripods.
- Next, the front wheels are removed.
- It is detached from the gearbox and removed from the bracket.
- You also need to disconnect the speedometer cable from the gearbox.
- After this, the mounting bolts that secure the ball joints and steering knuckles are unscrewed.
- Next, you need to loosen the rear left trailing arm fixation.
- Carefully remove the mounting bolts of the extension bracket on the left, after which the lever rotates 90 degrees.
- A “mass” can be attached to the gearbox, which is also dismantled.
- The lower flywheel protective cover is unscrewed.
- The engine mount on the left side is turned away.
- The engine mount located at the rear is removed from the body, this also applies to the gearbox drive clamp.
- The drive is removed from the gearbox.
- The gearbox mount is unscrewed from the engine.
- The gearbox is removed from the engine and will hang on the drives.
- The clutch is unscrewed, in some cases it is the clutch basket.
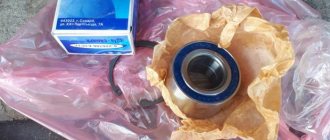
- The release bearing is replaced.
- Using a convenient mandrel designed for centering such disks, we replace the driven disk.
- Assembly is carried out in the reverse order of disassembly.
In practice, everything will not happen as quickly as in theory, especially for beginners. Today, thanks to videos and photos, you can replace almost any part with your own hands, and you don’t have to contact a car service center. Detailed instructions will help you easily dismantle and properly secure the clutch disc.
It is important not only to strictly follow the recommendations, but also to the quality of the purchased spare part. Among the wide variety, you must first of all understand that the price must correspond to the quality
How to install the clutch disc correctly
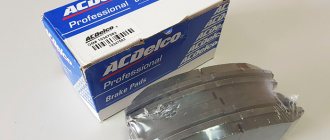
- Remove the six bolts from the clutch basket using an eight-millimeter wrench. Be careful not to strip the bolt heads.
- Remove the clutch cover along with the driven disc.
- Check its condition. The driven disk must be free of cracks and deformations. Otherwise it needs to be replaced.
- Check the working part of the flywheel and release mechanism. They must be free of chips, burrs and deep marks. If there are such deformations, then the flywheel and release mechanism need to be replaced.
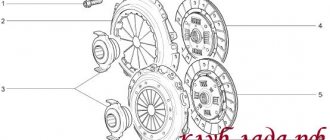
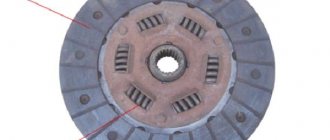
After inspection, you need to assemble the clutch disc. Pay attention to how to correctly install the clutch disc:
It is installed in the opposite order, but the less protruding part should face the flywheel.
Also, when installing a new clutch disc, it is better to use a centering mandrel. If it is not included in the kit, then purchase it. Fortunately, it is not expensive at all.
Source
Replacing the disk yourself
Clutch disc basket VAZ 2109
It should be noted right away that on front-wheel drive cars, replacing a disc is a little more difficult than on classic models. In addition, different brands and models of cars have their own nuances for removing and installing the clutch. First you need to read the instructions and recommendations for changing the clutch yourself. It would be a good idea to consult with experts.
When replacing the clutch on a VAZ 2109, there is no need to completely dismantle the gearbox, drain the oil, completely remove the VAZ CV joints, etc.
How to change a clutch in a garage
- First you need to hang the front of the car on tripods.
- Next, the front wheels are removed.
- The clutch cable is detached from the gearbox and removed from the bracket.
- You also need to disconnect the speedometer cable from the gearbox.
- After this, the mounting bolts that secure the ball joints and steering knuckles are unscrewed.
- Next, you need to loosen the rear left trailing arm fixation.
- Carefully remove the mounting bolts of the extension bracket on the left, after which the lever rotates 90 degrees.
- A “mass” can be attached to the gearbox, which is also dismantled.
- The lower flywheel protective cover is unscrewed.
- The engine mount on the left side is turned away.
- The engine mount located at the rear is removed from the body, this also applies to the gearbox drive clamp.
- The drive is removed from the gearbox.
- The gearbox mount is unscrewed from the engine.
- The gearbox is removed from the engine and will hang on the drives.
- The clutch is unscrewed, in some cases it is the clutch basket.
- The release bearing is replaced.
- Using a convenient mandrel designed for centering such disks, we replace the driven disk.
- Assembly is carried out in the reverse order of disassembly.
In practice, everything will not happen as quickly as in theory, especially for beginners. Today, thanks to videos and photos, you can replace almost any part with your own hands, and you don’t have to contact a car service center. Detailed instructions will help you easily dismantle and properly secure the clutch disc.
It is important not only to strictly follow the recommendations, but also to the quality of the purchased spare part. Among the wide variety, you must first of all understand that the price must correspond to the quality
Any car sooner or later needs repairs, and if the gearbox becomes difficult to engage, most likely the problem lies in a faulty clutch. Replacing it on VAZ cars is not a difficult job, but quite labor-intensive, and requires certain metalworking skills.
Replacing the VAZ 2109 clutch with your own hands
If, when starting the engine, noises are heard and vibrations appear, “working jerks” are felt, the pedal stroke has increased, the dynamics of the car have changed, the gasoline consumption has increased, most likely the VAZ 2109 clutch needs to be replaced. Most often, the reason for this is violation of the rules for using the vehicle. For example, the driver likes to start with a slip, or he had to get out of a snowdrift. One of the parts of the unit may also fail. For example, a release bearing. When it "flies" a strong "squeal" is heard. The result is clutch failure.
Tools required for repairs
To replace the VAZ 2109 clutch basket you need to prepare the following tools:
- standard set of keys;
- jack.
Do-it-yourself repairs are quite advisable, since the price for replacing a VAZ 2109 clutch as of March 3, 2022, on average in car services is 3.2 thousand rubles.
But self-repair is quite accessible even without an assistant, and without completely removing the gearbox. The principle of repair and the sequence of work are identical for models 2108-2115, so we suggest you see how such dismantling is performed on a VAZ 2114:
Order of Operations
To carry out repair work, you need to place the car on an inspection hole, put it on the handbrake, disconnect the negative terminal to de-energize the on-board network, and remove the engine mudguard. Now you can start disassembling:
- Install a jack that will temporarily replace the front pair of wheels. You need to unscrew the nuts on them, remove the chassis and put them aside.
- To remove the contact part of the ball joint from the hub, you need to unscrew the bolts.
- Instead of the 2 upper conventional bolts, you need to install cylinder head fasteners.
Now you can remove the starter; it is attached to three nuts that need to be unscrewed.
At this stage it is necessary to install a jack under the engine. After this, the side motor support is detached.
After this, you can disconnect the rear engine mount and unscrew the gearshift linkage.
The protective cover must be removed from the clutch.
- The box is secured with several bolts; first you need to unscrew the front one.
- Now the transmission is accessible, the rear nut is unscrewed first.
The gearbox bolts are located on the left wing side; they need to be unscrewed until they stop and the gearbox should be removed. It is important to ensure that the end of the assembly rests on the lever extension. This will create a gap that will allow you to remove the clutch.Disassembly is complete. At this point, the guide for the clutch remains. It needs to be thoroughly lubricated. After this, you can put the release bearing on the guide.
- Subsequent operations are performed in the reverse order of the above steps. Important! There is no need to rush while completing the work. All operations are performed consistently and calmly. Make sure that after assembly there are no “extra” spare parts left.
Complex procedures
Replacing the clutch on a VAZ 2108-21099 is a labor-intensive and time-consuming process. To do this, you first need to remove the gearbox. After the gearbox is removed, you can proceed to the following operations.
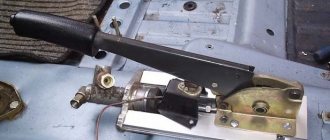
Replacing the clutch cable
Replacing the fork and release bearing.
- Using a screwdriver, remove the protective cover of the plug.
- Unscrew the bolts securing the clutch basket and remove it.
- Use a screwdriver to press the spring off the release bearing clutch legs.
- We remove the bearing.
- We remove the spring.
- Unscrew the 3 bolts and remove the bearing guide sleeve.
- Use a screwdriver to grab the special protrusion and remove the plastic bushing of the fork.
- We remove the fork axle from the support sleeve and remove it from the basket.
Disassembly is complete, now we install new parts in the reverse order. When installing, it is necessary to lubricate the fork bushings with CV joint-4 grease.
- First, remove the basket and lock the flywheel.
- Unscrew the 6 bolts securing the casing to the flywheel.
- Carefully remove the clutch cover along with the driven disc, holding it with your hand.
- We inspect all parts for cracks and wear. We replace defective parts.
- We put everything back together in reverse order.
Some useful tips.
- The driven disk must be installed with the less convex side facing the flywheel.
- When removing and installing clutch discs, it is necessary to use a special mandrel, inserting it into place of the gearbox input shaft. If you do not have such a mandrel, you can replace it with an old input shaft, which can be purchased at any recycling center for old cars.
Source
Let's summarize
If the check shows that the free play is normal, but you doubt your competence in adjusting the unit, contact a service station. Incorrect settings can cause rapid clutch failure. If you want to complete the work yourself, you can find the necessary information on the vehicle manufacturer’s website or in its service book. It is important to complete the work in a timely manner so as not to get into an unpleasant situation on the road. Monitor the service life of clutch parts; for example, the service life of the driven disc is 100 thousand kilometers. But, if a motorist has an aggressive driving style, it can decrease by 2-3 times. How to replace a VAZ 21099 clutch, watch this video:
Source
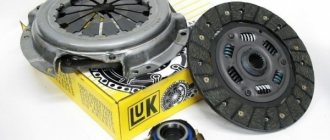
Clutch selection
When choosing a clutch kit, you should focus not only on your available budget. By saving or buying a fake, you risk getting even more problems in the future.
Valeo kit
Today there are several main manufacturers whose clutches should be purchased for the VAZ 2109.
Manufacturer
Peculiarities
VIS
This is a stock clutch that the VAZ 2109 is equipped with from the factory. If there are laser markings on the discs, this is definitely not a fake. Plus, the company allows you to send an SMS indicating an identification code. If it is a fake, you will be notified accordingly. Good quality, but nothing special to say about them
Valeo
French manufacturer, which is actively counterfeited on the domestic market
To catch fraud, pay attention to the cost and quality of components. Although the brand is from France, Valeo couplings can be produced in Italy, Spain, South Korea
Good quality components ensuring smooth, easy operation. Perfect for female drivers. If you use the clutch correctly, it will last for about 150 thousand kilometers. The flywheel is almost eternal, and the disks are not afraid of overheating within acceptable limits
Luk
A German company that has proven itself well in its homeland and has also earned a lot of praise among Russian motorists. They dampen vibrations perfectly, and real Luk clutches always have an element for damping vibrations of the pressure and driven disks.
Kraft
You can only find negative reviews about Kraft couplings from competitors. An impressive part of the sets under the Kraft brand, presented in Russia, were produced in Turkey, but under a German license. The kit includes a soft release bearing that performs well even under heavy use. The flywheel is very durable. On average, the clutch can withstand 150 thousand kilometers. But if you don’t spare the clutch, the life will be significantly reduced.
Kraft kit
Regardless of the quality of the selected kit, if it is installed incorrectly or due to rough operation of the vehicle, the life of the clutch will not be able to reach those declared by the manufacturer. Therefore, drive your car accordingly.