Backstage adjustment
Replacing the scenes of a VAZ 2110
Many owners of the domestic VAZ 2110 car confuse an incorrectly adjusted rocker not only with its failure, but also with a breakdown of the gearbox itself. Before starting to replace the rocker, I would like to dwell on such a stage of work as adjusting or checking the rocker. So:
- It is worth noting that the adjustment of the rocker should be carried out when removing the box or even replacing the cardan, or even in the case when the clamps holding the rocker are loosened, or when it rotates on its own on the hinge. Naturally, you shouldn’t start replacing it right away.
- The first symptom of slipper disease is when, instead of first gear, reverse gear is suddenly engaged. It also happens that the first and fifth gears are not engaged in any way. It’s interesting, but at such a moment there are no complaints about the lever itself. He stands rooted to the spot, strictly vertically.
Note. Sometimes it is enough to move the rocker relative to the cardan by one millimeter for the gearbox to continue to please the driver with its clear switching.
Stages
To adjust the rocker and check its serviceability, it is enough to drive at first speed onto an overpass (you should try to turn on this speed, even if the gearbox is stuck). We do the following:
- on the overpass we turn off the engine;
- leave first gear engaged;
- We put wheel chocks under the car wheels (precautionary measures must always be observed);
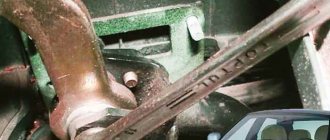
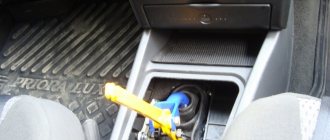
- we find a clamp under the car that secures the rocker to the hinge;
- We weaken it;
- we return to the car interior;
- here we move the rocker lever all the way to the left, but not forward or backward (the rocker may jump out of place and then you’ll have to start all over again);
- we return under the car;
- retighten the clamp;
- We check the operation of the box.
Diagnostics
In any car, the gearbox slide serves to prevent the car from switching gears on its own . This part needs to be monitored and looked after; in addition, over time it becomes loose and requires adjustment. If the adjustment has not been made for a long time or it was performed poorly, then the driver will feel uncomfortable when driving the car.
As practice shows, those car owners who forget about the rocker and its adjustment can, over time, destroy the entire transmission system. And this is a very expensive repair.
It is because of this that prevention should be carried out, as well as due attention should be paid to the scenes. If the car begins to behave somehow differently, then it is necessary not to delay the repair.
To understand that the rocker requires adjustment or replacement, you just need to monitor the operation of the gearbox.
As a rule, when a failure occurs, the following symptoms appear:
- Difficulty when engaging 1st gear. As a rule, it is difficult to engage the gear; the driver has to practically drive the lever in to engage 1st speed.
- Possibly difficult shifting from 1st to 2nd speed.
- Due to a loose lever, it is not 1st speed that is engaged, but reverse. This is very dangerous, especially at a traffic light, at the start. It is necessary to urgently repair the rocker, otherwise the problem will only get worse.
- Difficulty engaging 5th gear, while other speeds can be engaged smoothly.
- There is play in the shift knob. As a rule, the rocker only requires replacement and adjustment is not necessary.
- Extraneous sounds appeared coming from under the car, or rather from the gearbox. As a rule, the sound becomes ringing. This problem is a disease of the entire VAZ 2110-2112 family. As a rule, such a ringing can appear after repairing the car’s suspension.
- When driving, the speed may jump. In other words, the car, gaining acceleration, independently disables the engaged gear and switches to neutral speed. For further driving, you will need to keep the lever at the desired speed constantly so that it does not jump out.
- Strong vibration that occurs on the shift knob. This is due to the failure of the scenes. It will need to be repaired to solve the problem.
If the symptoms described above appear, then you will need to begin repair work. You should completely replace the linkage or simply adjust it and gear shifting will become comfortable again. Therefore, it should be adjusted before replacing.
Adjusting the work of the scenes
The adjustment procedure will save money that could possibly be spent on completely replacing it.
Adjustment is made only in cases where:
- The gearbox was removed and installed back;
- Previously, repairs were carried out to replace the cardan;
- In the case when the hinges on the slide have turned.
Of course, adjustments can be made at other points as described earlier. Do not forget that even minimal gaps can disrupt the correct operation of the entire transmission.
Naturally, before starting repair work and adjustments, you will need to prepare the right size wrenches . With their help, the clamps will be loosened. You should also place bricks, stones or special anti-roll devices under the wheels.
Backstage replacement and repair
Backstage replacement and repair
If it was not possible to improve the performance of the gearbox, then the whole problem is in the linkage, which has failed. It will need to be replaced or repaired.
In addition to the symptom described above, when the gears do not shift normally, vibration of the shift lever can be a problematic symptom of a damaged linkage.
Note. If vibration of the shift lever is observed, this means that there is increased play in the lever hinges, which need to be repaired.
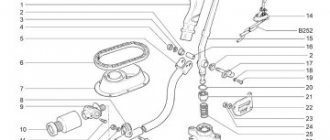
Backstage and its analysis
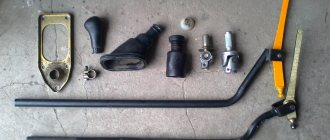
We arm ourselves with the necessary tools:
- keys 10, 12, 14;
- side cutter;
- screwdriver
Started:
- open the hood of the car;
- we find the nut of the bolt responsible for the terminal connection of the tip of the lever and the gear shift rod;
- remove the turnbuckle from it, as well as the protective cover;
- we return to the car interior;
- remove the frame of the lever cover that controls the gearbox (you need to remove the cover, despite the force of the latches holding it);
Replacement of the VAZ 2110 gearbox
- the lever cover must be turned inside out;
- We take a knife or side cutter with which we cut the clamp securing the cover;
- remove the cover from the lever.
Note. The clamp securing the gear lever boot is a disposable option. Therefore, it is not a pity to cut it, but during installation you should install a new one.
- remove the lining of the floor tunnel in the cabin (front part);
- Unfasten the axle lock from the lever;
- remove the lever axis, removing it from the holes of the rocker and lever;
- Now the gear shift lever will come out easily if you pull it up;
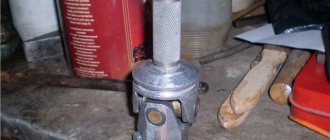
- it’s time to push the guide sleeve inside the lever body with a screwdriver (you should move it along the shaft);
Replacing the gearbox on a VAZ 2110
- now we find four bolts securing the lever housing to the body;
- turn them inside out;
- remove the body;
- remove the shaft;
- the guide sleeve is removed from the shaft.
Replacing the backstage of a VAZ 2110 gearbox
Note. We carefully inspect all removed parts. If, for example, the hole in the guide bushing is worn out or its rubber mass is deformed, the entire bushing is replaced as an assembly. Also, if there is play in the hinges or the hole for the lever axis is badly worn, the entire linkage is replaced.
- we install the parts back;
- We adjust the gear shift drive.
The corresponding video will help you learn more about replacing the scenes with your own hands. It is also recommended to study photo materials.
The step-by-step instructions presented above are a chance to save a lot on repairs, the price of which at service stations is growing every day.
You can also find out about replacing the rocker seal on our website.
Replacement of jet thrust of VAZ 2110
Hi all! Another experiment has come to an end. Last winter, I experimented with removing the gearshift lever linkage. www.drive2.ru/l/4751686/ The reason for this was excessive vibrations on the gearshift lever and clearly audible transmission noises.
The effect of removing the thrust was not bad, the lever dangled a little more when the engine jerked, but at the same time the shifts remained almost as clear as with jet thrust, vibrations were slightly reduced and these same noises completely disappeared. For half a year of such operation, the transmission has never been knocked out. In a word, everything was wonderful until summer came. In the cold season, the rubber on the engine mounts became dull and everything was fine, but in the summer, in the heat, the rubber on the engine mounts becomes much softer and the vibrations of the engine, and with it the gearshift lever, increase.
I decided to return the jet thrust back. In order not to saw or cook the old rod, I decided to buy a new one. Finding it turned out to be not so easy, the sellers looked at me like I was an idiot, like how did you break it?! They offered the assembled drawstring for 750 rubles, but naturally I didn’t want to overpay. As a result, I had to order, and a week later the cherished stick arrived. It cost 200 rubles.
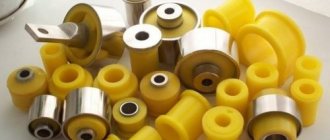
Together with the rod, I put back the modified hinge, on a Volgov silent block. www.drive2.ru/l/3350393/
As it turned out, this hinge in the cold season was precisely the source of increased vibrations and a conductor of transmission noise. At temperatures below 10C, the silent block became rigid and transmitted vibrations perfectly. With a regular, serviceable hinge, such effects would not have occurred, and the experiment with the removal of jet thrust would not have taken place. For the winter, you will need to install a regular hinge or choose a softer silent block. Of course, you don’t want to remove the modified hinge, because... the effect is very pleasant. The gears are switched on more clearly, and in the warm season it does not transmit any vibrations or noise. I think it will be possible to experiment with the stabilizer bar bushing VAZ 2108-2906079, this is the bushing that is used in the tuning torque joint from Avtoproduct.
Adjusting the backstage on a VAZ 2110
Many inexperienced drivers begin to panic and talk about a breakdown of the gearbox, although in fact the culprit of the problem is the rocker.
Practice shows that replacement and repair are rare and not very common measures. Much more often, the current situation forces you to simply adjust the scenes.
But today we will talk not only about adjustment, but also talk about the features of modification, repair and replacement of this element.
Signs of breakdown
In fact, it is not difficult to determine that the backstage is the culprit of all the troubles. After all, there are a number of characteristic signs that indicate this.
You can prepare to work on adjusting or replacing the rocker if:
- The first gear does not want to stubbornly engage or disengage, or move to another position;
- When you engage first gear, initially the gearshift knob behaves normally, but then the box spontaneously jumps into reverse gear;
- You cannot engage first and/or fifth gear, while changing to other speeds is no problem.
At the first sign of a problem, you should go to a service station or your own garage to have the problem repaired.
| Sign of breakdown | Explanation |
| There is play on the gear lever | Most likely the linkage is worn out. In this situation, the problem can only be solved by replacing the worn element |
| The ringing of the scenes | It occurs most often when there are problems with the gearbox on a VAZ 2110. The ringing can be caused by defects in factory production, or by poor-quality repairs |
| It’s hard to engage the gearbox, it gets knocked out | In such a situation, you can try two methods - adjustment and replacement. If the adjustment does not help, change the element |
| Instead of first gear, reverse gear is engaged | Everything is fine with the lever, but the rocker let you down. Make a replacement. Although repairs using a repair kit can also help |
| Lever vibrates excessively | Check the condition of your transmission handle joints. Most likely, there was a serious backlash in them |
Replacing the backstage
If adjusting the link does not correct the situation, then it will need to be replaced. To do this you will need to prepare the following tool:
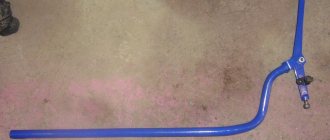
- The part itself (new backstage);
- Flat screwdriver;
- Wrenches of different sizes;
- Lubrication.
It is also ideal to use a lift for work, but if this is not available, then an overpass or pit will do. It is recommended to carry out the work with an assistant.
During the repair process you need:
- While sitting in the passenger compartment, remove decorative elements (cover, gear selector, etc.). You can use a screwdriver for this work. The selector can be removed by simply pulling it up.
Removing the gearshift knob cover
Unscrew the nuts and bolt of the reverse lock bracket
Unscrew the bolts of the gear lever shaft
Unscrew the pinch bolt of the drive rod clamp
We remove the link together with the gear shift knob
After replacement, adjustments should be made. As practice shows, such work does not take much time, approximately 1 hour of work. Therefore, you should not immediately go to the service center. It is better to do the repairs yourself and be proud of the successful work.
Video about DIY replacement
Adjustment
Now let's talk about how you can adjust the link if it shows primary signs of malfunction.
- First of all, try by hook or by crook to engage first gear.
- Place the car on an overpass, turn on the handbrake, place additional supports under the wheels to avoid the car moving.
- Do not turn off first gear on the transmission.
- At the bottom, find the clamp that holds the rocker and secures it. To do this you will have to crawl under the hood. You shouldn't have any problems finding the gearbox. The clamp needs to be loosened.
- Now return to the salon. Your task is to move the box lever as far as possible to the left. If you start to pull the handle forward or backward, the drawstring will most likely come off. You don't need it.
- Get back under the car and tighten the clamp back.
- In many cases, simply shifting the rocker relative to the cardan shaft by literally a few millimeters is enough.
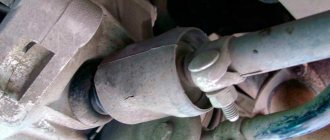
When adjusting, pay attention to the condition of the cardan shaft. It may require replacement if worn.
Finalization
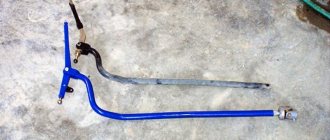
Now many owners of the VAZ 2110 are discussing the possibility of refining and improving the gearbox by replacing the rocker from a standard one to a short-throw one.
The short walk is the result of independent tuning. Decide for yourself whether to carry out such work or not. But from the point of view of the efficiency of the gearbox, installing a short-throw rocker is only beneficial, since gears begin to shift more clearly.
To install a short walker for yourself, it is not necessary to completely dismantle the standard version.
To do this you need to perform several operations:
- You just need to disassemble the ball joint from the outside;
- Next, the metal ring of the support is opened and the legs made of plastic are spread apart;
- This is how the ball will come out;
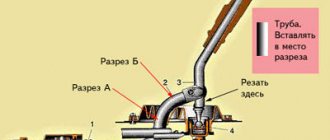
- Now the rod is disconnected from the support, and a small piece of pipe and a piece of sheet metal of good strength are welded to the rod;
- Be sure to lift up the hinge with the hook, otherwise erroneous switching of speeds will not be avoided.
Installing a short drive will entail the need to apply more force when engaging a particular gear. But on the other hand, switching becomes clear and smooth. Therefore, decide for yourself which option would be better for you - standard or short-stroke.
Symptoms of a malfunctioning rocker
Content
There are certain signs indicating that it is the gearbox linkage that has become unusable, and not the transfer case itself.
The most common signs:
- When turning on/off first gear, the driver experiences difficulties; it is difficult to move the gearbox handle to the desired position;
- The first gear is driven correctly, but after a while the reverse gear is set independently;
- The choice of any speed takes place in normal mode, but it is difficult to turn on the first and fifth, the lever does not obey.
As soon as the listed symptoms, even one of them, are noted while driving a car, you need to contact the service to fix the problem. If experience and desire allow, you can fix the breakdown yourself.
The most common symptoms of a link failure and possible cause:
- The play in the gearbox lever can be clearly felt: the cause could be physical wear of the linkage, the problem can be solved by completely replacing the part.
- The box slide rings when gears are changed: sometimes the sound indicates a poorly performed repair or a factory assembly defect.
- Speeds are switched with great effort: adjusting the VAZ 2110 rocker will fix this; if the problem persists, you will need to replace the element.
- When you engage the first gear, the lever shifts to reverse gear: the reason is precisely in the gearbox, a mandatory replacement is required. The situation can be corrected by a repair kit, but this depends on the severity of the damage or the detected wear of the assembly elements.
- When the engine is running, strong vibration is transmitted to the gearshift knob: the hinges need to be checked, the cause could be play.
Repair
Regardless of what exactly you do with the rocker - repair, adjust or change, you will still need to disassemble this unit.
Disassembly is performed as follows.
- Remove the cover from your gear shift knob.
- Place the car on a pit, or raise the front end with a jack.
- Remove the front console. It is held in place by mounting bolts.
- Now remove the curtain itself. To fix it, AvtoVAZ used 6 bolts in the case of the VAZ 2110 model.
- When carrying out dismantling work, be sure to examine the condition of all elements.
- By bending the boot, you will gain access to the support, oil seal and cardan shaft.
Now regarding the repairs. There may be several recommendations in this regard, depending on the current state of the node and its components.
- At best, repairs will require the use of a repair kit for the backstage. It doesn't cost much.
- If the bushing is deformed, it will need to be replaced with a new one.
- Check the lever shaft bore for wear.
- Make sure there is no play in the driveshaft. Otherwise, a regular repair kit will no longer be enough, that is, a complete replacement of the entire backstage will be required.
- Often the culprit of extraneous noise and rattling when shifting gears in gearboxes is the rocker pad. Changing it is quite simple, and even a beginner can perform the operation.
Replacing the oil seal
Quite often, VAZ 2110 owners are faced with a situation where, after parking under the car, they find traces of oil. There are two options here - the oil filter has worn out or there are problems with the oil seal.
As you replace the oil seal, you will be able to simultaneously inspect and change such elements as the cushion, cardan shaft, and boot.
But let's talk about everything in order. First of all, check whether it is really an oil seal and not a filter. If everything is fine with the filter, then we drive the car into a pit or find another way to end up under the bottom of your VAZ 2110. Beforehand, it would be a good idea to watch video materials regarding your current situation.
- Carefully inspect the boot. If oil leaks from the gearbox through the oil seal on your car, traces of it will definitely remain on the boot.
- Bend back the boot. This way you can get to the cardan, disconnect it and gain access to the cuff.
- You first need to dismantle the cardan from the lever, and only then from the rocker itself. Not the other way around.
- The cardan has been removed, so we move to the oil seal.
- The cuff is removed from the gearbox using a hook and an awl. Therefore, make sure you have these tools at hand in advance.
- Now a new one is installed in place of the old oil seal. Craftsmen have adapted to using ordinary plastic bottle caps. If you get used to it, it turns out to be very easy to change the oil seal.
- After replacing the element, return all dismantled components to their places. If some of them need replacing or signs of wear are already visible, it is better to replace them immediately. It is unlikely that you will want to repeat the same operation in a couple of weeks and lie under your own car.
Repair will not give the desired result if the adjustment was carried out with errors. To do everything carefully and competently, use the help of a partner. One will work under the car, the second will help from inside.
Why do you need a gearbox slide?
In fact, most often the gearbox is in good condition, but the rocker may fail.
You can replace the unit with a new one, or you can get by with proper adjustment of the rocker. Adjusting this element will help troubleshoot problems and make sure that the problem is related specifically to the gearbox linkage. It happens that a car owner simply begins to change one component after another without understanding the problem, wasting money and time to no avail.
The gearbox itself is designed to prevent gears from switching spontaneously . It happens that due to incorrect or erroneous adjustments, the entire transmission system begins to work incorrectly and may even fail. Therefore, you need to be able to adjust the gearbox rocker with your own hands, especially since this procedure is not complicated.