VAZ-11113 or “Oka” is the subject of ridicule and bad jokes of ordinary people. Meanwhile, a miniature runabout is in demand among a certain circle of motorists. You can see Oka on the roads almost several times a day.
It is quite difficult to make this car a competitor to foreign cars or the latest developments of the domestic automobile industry. Therefore, tuners work with great enthusiasm to give the car not just a tolerable, but quite presentable look. To date, Oka tuning options have been developed and are being successfully practiced.
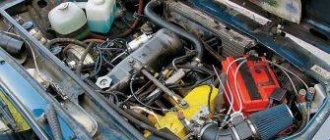
Engine VAZ 1111
Oka engine 650 cc. turned out from half of the 2108 power unit. The choice of exactly half of the already developed block and the engine itself was determined by the cost of developing equipment for the manufacture of a 2-cylinder engine. A design feature of this in-line petrol twin is the overhead camshaft, which controls the operation of four valves - 2 for each cylinder.
The working process in the engine occurs in two revolutions of the crankshaft, which causes vibrations during operation of the internal combustion engine. To compensate for the imbalance, two balancing shafts are installed to dampen vibration. Engine power is 29 hp. The maximum torque is 44.1 Nm, which is achieved at 3400 rpm.
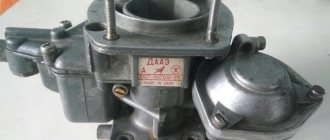
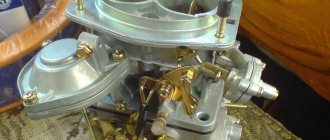
The fuel supply system is made according to the Euro-0 standard based on a carburetor. The fuel pump is mechanically driven by engine components.
The oil system is similar to the original 2108 using a gear pump. Oil is taken from the crankcase and sent through internal channels directly to the rubbing pairs of the camshaft and crankshaft.
The cylinder walls are lubricated by oil mist generated when the crankshaft rotates. The valve stems and parts of the valve timing mechanism, with the exception of the camshaft itself, are lubricated by gravity.
Tags: oka, jeep, SUV, dirt
Comments 43
what's wrong, it's just a normal road for my little girl)
Oka is not an SUV. Verified. We need to collect 4wd. I made it easier, bought Niva 3D
We are not looking for easy ways, and in fact it was interesting to try to assemble something with our own hands)
It’s fine, but put on other tires and it won’t go anywhere
It will go, the differential is welded)
The other one got dirty for the winter, I took off the Simex, put on the Goodrich and went for a ride, and I don’t take off the Simex anymore
It will go, the differential is welded)
Also brewed in front
How much do these tires cost?
I bought 2 sets of used tires, for 1000r and 3000r
On Avito I saw such kits selling for 35 k, I think.
Yes, but it was expensive for us, so we assembled everything on our own and spent 7k, including tires and body painting)
Well, it turned out okay) But it’s not official? )
No, front-wheel drive with welded differential)
Well done! Not everyone will decide to redo it. And it’s easy to scratch with your tongue!
I have an okushka) it will go through such mud and on ordinary wheels, suspension and tires)
the cheaper the car, the less a pity it is to kill it and the higher the cross-country ability)
Here at the opening of the hunt in the spring, Muscovites on Kruzak 200s and X6 boomers are bludgeoning through the swamps.
for them the price of those cars is like dust...that’s why they kill
Here at the opening of the hunt in the spring, Muscovites on Kruzak 200s and X6 boomers are bludgeoning through the swamps.
Well, not only you. We regularly drag such “hunters” out of shit. They are imported and they are expensive. They don't give a damn about knee-deep dirt, they talk through their lips. And when they come running “save, help!”, such people immediately become simple. I know a driver who spent 4 (four!) days in a salt marsh on Cayenne, and who the hell helped him. For during the day (at the opening of the hunt) this creature was rude to everyone he met, opened his hands a couple of times and was beaten. Listen to him - and his brother is a minister and he opens the door to the president with his feet and is the uncle of the general of all generals. And why is he hunting here, and the rest are rabble and go to hell! In my life I will never pull out these show-offs again. Normal men come up and ask in a humane way - I will always help you out. And these here will buy tough guys, but in the head it was like a cast bone, and remains so. They don’t ask, they just order, you fucking boyars! - “Whose UAZ, come on, pull me!” And fuck you with a thick layer and all over your makeup! Go ahead on foot behind the tractor!
Engine VAZ 11113
The Oka 11113 (VAZ 11113) engine appeared in the process of refining the VAZ 2108 power unit and bringing its working volume to 1500 hp. Again, a half solution was used. The engine blocks of both 650 and 750 cc volumes were absolutely identical in appearance. The changes affected the piston diameter, which was increased from 76 to 81 mm. The engine block has been modified in internal design.
The partitions between the cylinders were thinned and the additional combustion chamber cooling circuit was eliminated. The power unit has become more highly loaded in the temperature department. This shortcoming in the early stages led to jamming of the pistons, the formation of scuffing on the cylinder walls and other malfunctions arising due to insufficient cooling.
Due to the modifications, the 11113 engine became more powerful and already produced 35 hp. and 52 Nm of thrust. The engine remained carburetor and complied with Euro-0 environmental requirements.
"Oka" on unwelding
Unwelding is tuning wheels. There is no practical benefit to this, but the car stands out among other vehicles. You can just buy wide wheels. Finding the right discs is quite problematic. Therefore, stamped discs are cut (cast ones are not suitable) and inserts are installed between the two halves.
Before starting work, weigh the pros and cons of the procedure.
Positive points:
- Original type of wheels.
- Easy to make.
- Low costs.
- Cross-country ability is increased due to greater tire grip on the road.
Negative properties:
- Fuel consumption increases.
- Dynamic performance is decreasing.
- The car is difficult to control at high speeds.
- The load on the axles increases and the bearings wear out.
- It's hard to find wider width tires.
Discs with tuned changes in design lose their strength. Unwelding is a rather unsafe method of modifying wheels.
Basic faults
The main malfunctions of the first 650 cc engines and engine 11113 include increased noise and vibration. Increased noise appears when the engine warms up and is caused by the presence of balancer shafts. The noise is considered normal, although it causes concern for car owners.
Increased valve clearances can cause additional noise. Eliminated by adjustment. Vibration has a constructive reason and is caused by the operation of only 2 pistons, which have a working stroke of only 2 rotations of the CV, that is, during operation, 1 piston rotates the CV by 360 o.
Burnt out cylinder head gasket. It is caused by inaccurate manufacturing of gaskets in factories and improper tightening of the cylinder head, which allows the gasket to be incompletely compressed. During repairs, reuse of this sealing element is not allowed. Mandatory replacement is required, in this case you should pay attention to the surface of the gasket and if scuffing is detected, you should not use it.
Difficulties in starting a hot 750 cm 3 engine are due to the fuel pump diaphragm and the layout of the engine compartment. Elevated operating temperatures of the engine block lead to the formation of fuel vapors in the cavities of the pump, and the unit is not intended for pumping a gaseous medium.
If a malfunction occurs on the highway, just place a dampened rag on the pump body. This will be enough to get to the base location and replace the diaphragm.
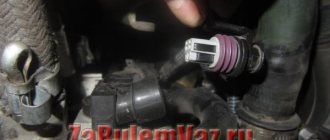
Loss of spark. The spark generation system in the cylinders is made according to a non-contact circuit using an ignition coil. The location of the coil allows water to enter when passing through puddles. This causes failure of the voltage boosting element and results in the inability to start the engine.
Cooling system. It has the same problems as all VAZ engines. Poor quality of the pump leads to its failure, which in due course leads to overheating of the engine. The same applies to the reliability of the thermostat. If problems arise, elements need to be replaced.
Failures of electronic sensors. They are caused by poor-quality electronics by Russian manufacturers, as well as poor assembly standards of power units, which allow for incomplete fixation of sensors on the motor housing.
Repair of the OKA engine can be performed in a garage if you have experience in servicing and repairing Russian-made internal combustion engines. With the exception of specific elements, engine repairs are carried out using components used for repairing VAZ 21083 and VAZ 21093 engines.
Sequencing
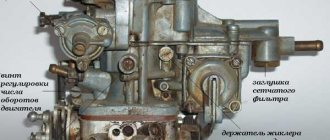
Let's move on directly to the process of replacing piston rings on a VAZ Oka without removing the engine (key points are shown in the photo). Everything is done like this:
- The car is placed on a viewing hole and immobilized;
- Working fluids (coolant, oil) are drained;
- The first stage of work takes place entirely in the engine compartment. For ease of work, you can completely remove the hood from the car;
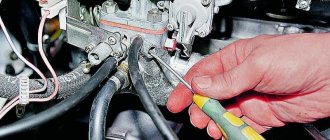
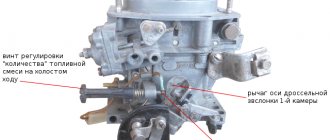
- We remove the air filter housing from the carburetor, disconnect the drive cables, the XX solenoid valve wire and the gasoline pipelines;
5. Remove the protective cover of the timing drive, loosen the drive roller, and remove the belt from the camshaft gear. We unscrew the bolt of this wheel and remove it from the shaft (carefully so as not to lose the key);
6. Disconnect the pipes from the valve cover, unscrew the bolts securing it and remove it from the car;
7. Disconnect the vacuum regulator pipe;
8. Unscrew the bolts securing the spark torque sensor and move it to the side;
9. Unscrew the fuel pump and put it aside;
10. Unscrew the fastening of the spark torque sensor drive housing and remove it;
11. Unscrew the upper bolt securing the rear timing belt cover and move it to the side;
12. Unscrew the nuts securing the camshaft bearing housing and remove it;
13. Carefully dismantle the camshaft along with the oil seal. When assembling, it is better to replace the Oka camshaft oil seal. If you are only replacing the camshaft on the Oka, further disassembly is not necessary;
14. Remove the generator mounting bracket;
15. Remove the tension roller;
16. Disconnect the cooling system pipelines leading to the cooling jacket;
Related link:
Oka engine malfunctions
17. Disconnect the wire of the coolant temperature sensor;
18. Unscrew the nuts securing the exhaust pipes from the head, then carefully remove them from the studs;
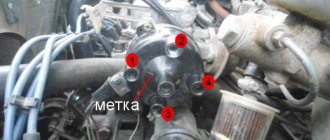
19. Unscrew the head mounting bolts. In this case, you need to follow the correct sequence of their relaxation. Remove the bolts;
20. Carefully remove the head along with the intake manifold and carburetor.
This concludes the disassembly in the engine compartment. The rest is done under the car. To remove the pistons, you must:
- Unscrew the engine sump mounting bolts and carefully remove it;
- Unscrew the nuts securing the connecting rod caps and remove them. It is important to immediately mark where each cover is and how it was installed. To do this, marks can be placed on the low tide by punching;
- We turn the crankshaft. At the same time, the pistons will come up, and the connecting rods will be removed from the shaft journals. All that remains is to use a screwdriver to completely push out the pistons along with the connecting rods and remove them.
After replacing the rings, using a special device for seating the pistons, we put them in place, trying to immediately guide and place the connecting rods correctly (you can ask an assistant to guide them from below). And then all the removed elements are simply installed in place.
Maintenance of Oka engines
The Oka engine of both the first and second generations is quite reliable. And if the factory requirements for maintenance regulations are met, it has a service life of 120,000 km.
According to the vehicle passport, both engine 11113 and engine 1111 have a maintenance program every 15,000 km. To undergo maintenance at this interval, it is recommended to use fully synthetic motor oil. When using semi-synthetics, and even more so mineral motor oils, the Oka engine requires changing the lubricant in accordance with the service life of the oil, that is, at least 10,000 km.
In this case, the oil system must be flushed and the filter element replaced. The oil volume in the Oka engine is 2.5 liters, but when replaced, 150-300 ml of lubricant remains on the engine walls, so the filling volume is controlled by the dipstick. Overfilling of oil is not allowed.
How to make a frame for a mini tractor
There are 2 known types of mini-equipment, differing in frame design:
- Both the Oka internal combustion engine and the driver’s seat are placed on a single platform. Such a frame can be assembled in the form of a rectangle from a channel. When using a 4x4 cm corner, you need to weld pipes with a square cross-section from the profile and use them for work, since the material itself is not strong enough to support the weight of the engine and driver. The frame spars can be made straight or stepped. To connect the side parts of the frame, there are front and rear traverses, as well as cross beams under the engine (2 pieces) and the seat that reinforce the structure.
- When using a breakable frame (breaker tractor), the master must assemble the front and rear half-frames and then connect them with a hinge. It is convenient to use the axle and bearings from KamAZ: the cardan system allows the semi-frames to move in horizontal and vertical planes. This is a more complex design that will require searching for additional spare parts for the transmission. But a homemade tractor from Oka will be more maneuverable. When making a fracture, you need to take into account that the front part must be of sufficient size to accommodate the engine, gearbox and steering. Only the seat is installed on the rear half-frame. Each half-frame carries 1 pair of wheels.
In order to correctly calculate the dimensions of the frame, you need to make your own drawings, which indicate the location of all structural components. After this, you can proceed to making a base for a mini-tractor. During assembly, it is advisable to use welded seams to ensure the frame has sufficient strength. Install a mount for mounted implements on the rear traverse.
Tuning and modification of Oka engines
Tuning the Oka engine does not make practical sense under normal operating conditions. Increasing power and torque when flashing ECM units can give an increase of up to 10% horsepower, which is about 30 hp. will not be particularly practical.
As a garage modification, Oka engine tuning is performed by installing an injector from a VAZ 21083i, but the cost of modification can be comparable to installing a Chinese liter TJ376QE FAW engine (Daihatsu), which was mounted on a Serpukhov-made SeAZ Oka 11116-02 car in 2007-08.
How to choose rings and pistons
Let's go through how to choose replacement rings. Everything is relatively simple here. When creating this engine, the designers tried to unify it as much as possible with another, namely the VAZ-2108. Therefore, the dimensions of the Oka pistons are completely identical to the Vosmerov pistons, only their number is different. In this case, you should focus on the engine size. To modify the VAZ-1111 with a 0.65-liter engine, rings from a 1.3-liter engine are suitable, since the piston diameter of the Oka and the V8 are identical. The same applies to another model - VAZ-1113 with a 750 cc engine. cm. Rings and pistons from a 1.5-liter engine of the same VAZ-2108 are suitable for it.
Related link:
How to start a VAZ engine in winter
When selecting, you should also take into account that when replacing, pistons and rings of repair sizes are used. In addition, configurations of the same rings specifically for Oka are practically not found, so you will have to purchase a complete set for the VAZ-2108, but use only half of it.
Other small-scale Oka power units
Only VAZ 1111 and VAZ 11113 engines were serially installed on the car. It was with these power units that the car was supplied to retail chains.
As options to save production and meet environmental requirements, both SeAZ and KAMAZ tried to use power units from other manufacturers. This was due to the fact that AvtoVAZ refused to continue producing minicars and actually stopped supplying power units to complete the car.
So in 2004, a trial series of cars with a Korean Hyundai Atos engine was produced. 15 cars were produced for trial testing, but the program did not go into series.
Also this year, small-scale tests were carried out at SeAZ of cars with engines from the Melitopol plant MeMZ 245. The car was called OKA-Astro and was subsequently produced in small series at the Kamov automobile assembly plant. Another version of the Ukrainian power unit was MeMZ 247.1. This engine, which complied with Euro-2 requirements, was not supplied for mass production, although such equipment is rarely found on the secondary market.
In 2007-2008, a Chinese three-cylinder injection engine was installed at the Serpukhov plant, which developed 53 hp.
The sports version of the Oka uses the engine from Priora.
The Oka-based tracked all-terrain vehicle uses a VAZ 2131 engine.
As an option for garage tuning, there are several examples of cars using three-cylinder Volkswagen diesel engines.
When installing shafts and heads there was always a feeling - they are capable of more, something is missing. Yes, there are results, and they have been achieved - engine 11113 produced 39-40 horses. For some it was enough, for others it was not. When I switched from the RS58 shaft to the RS628 , the highs improved, but overall it seemed to me that the shaft was defective or something. In particular, the torque at medium speeds has deteriorated, a noticeable pickup has appeared after 4500 rpm, and there is a torque hump at the bottom. But something was wrong, and the RS584 shaft sometimes gave more power in measurements than my motor. I was already starting to think that the shaft was bad, or I was doing something wrong.
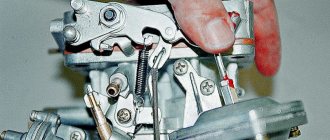
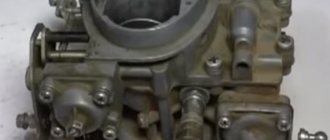
I didn’t think about modifying the carb - the combination of jets was selected, the engine seems to be running... They stopped reports from losers who sawed carbs, then they were removed because of their unsatisfactory performance. From their reports it followed that they did not see any results, and what could they see without having any diagnostic instruments on hand except their ass accelerometer? And so, recently something happened - we need to make a carb. The trial carb was disassembled and lay on the table for 2-3 months, having already stopped emitting any odors out of despair. But, having assembled a cylinder head with M11 shaft for Nikolai, I made a 21x27 . A head with a sports shaft and carb was installed and showed excellent results, but I will write about them later. I came home inspired - and the next day I made two 21x28 .
But first, a few words about the car. OKA, engine 11113, modified cylinder head and RS628 shaft. In January, the Motor Tester showed 39 hp. , which upset me somewhat at first - in comparison with the serial graph, a clear “provision” was visible in the average speed. It was inconvenient while driving - the maximum speed and acceleration time were lost. The results were as follows - 39 hp. at 5500 rpm , torque 5.5 kg at 2800 rpm , at 6000 rpm an increase of 1.1 kg and 9 hp. On the graph below the blue line is cr. torque of a serial internal combustion engine, red - power of a serial internal combustion engine, dotted line - respectively torque and power of my engine (click on the screenshots to enlarge):
In the spring of 2008, after a run of about 50 tkm after boring, I replaced the pistons and rings (without boring), I installed SM , which increased the engine efficiency by reducing friction in the “cylinder-ms ring” pair. Removing the VSKh again inspired me - the engine produced 43 hp. , noticeably raising the torque line after 5000 rpm . However, up to 5000 rpm everything remained unchanged. The measurement result is 43 hp. power at 5700 rpm , torque 5.5 kg at 5400 rpm (the second, top, “hump” became higher than the first). The increase at 6000 rpm was already 1.7 kg and 14.5 hp. Let's look at the graph (dotted line - VSKH before and after replacing the pistons):
And so, I installed a bored-out carburetor. It was a shock in every sense. After test rides, my hands were shaking. The carburetor required a different combination of jets, which is quite understandable - the diffusers increased, the flow rate decreased. The engine shook - the Motor Tester produced 46 hp. at 6000 rpm , the torque is already 6 kg at 5300 rpm , the increase at 6000 rpm was 2.2 kg (.) and 18.5 hp. (. ) . Need I mention that the production engine at 6000 rpm produces a measly 3.3 kg of torque and 28 horses! And here at 6000 rpm – 5.5 kilograms and 46 horses! But the main thing is to look at the graph. It all rose up, the gap between the humps leveled out and almost became level, forming a long shelf of torque - from the bottom to the top! The blue and red lines are the torque and power of the serial 11113 internal combustion engine, the purple lines are the torque and power after replacing the pistons and rings, the red dotted lines are after installing and tuning the 21x28 carburetor.
And once again let's look at the final graph 46 horsepower engine. Pay attention to the scale at the top of the screen, showing the amount of power and torque at certain speeds - it’s easy to see that the motor shows a flat torque level within 5-6 kg of torque in almost the entire range. From the bottom to the top. Look at 7000 rpm - there are 4.1 kilograms of torque and 41 hp. !!
Wiring diagram SeAZ VAZ-11116
in high resolution (1 MB).
1/1 – High beam headlight lamp; 1/2 – Low beam headlights; 1/4 – Side light lamp; 2 – Front direction indicator lamp; 3 – Side direction indicator lamp; 5 – Generator with built-in voltage regulator; 9 – Hall sensor; 10 – Ignition coil; 12 – Starter Lada Oka; 13 – Spark plugs; 14 – Sound signaling device; 17 – Water temperature indicator sensor; 18 – Oil pressure warning lamp sensor; 23 – Battery; 25 – Reversing light switch; 26 – Brake light switch; 30 – Relay-breaker for direction indicators; 31 – Handbrake warning lamp relay; 32 – Windshield wiper relay; 33 – Additional resistance of the heater electric motor; 35 – Windshield wiper motor; 37 – Heater electric motor; 38 – Radiator cooling fan electric motor; 39 – Electric fan relay; 42/1 – Turn indicator switch; 42/2 – Headlight switch; 42/3 – Windshield wiper and washer switch; 42/4 – Horn switch; 44 – Ignition switch; 46 – External lighting switch; 48 – Hazard switch; 49 – Heater motor switch; 52 – Instrument cluster; 63 – Speed sensor Lada Oka; 74/1 – Thermal cigarette lighter element; 74/2 – Cigarette lighter lamp; 75 – Brake fluid level sensor; 76 – Handbrake warning lamp switch; 77 – Diagnostic block; 81 – Cartridge for connecting a portable lamp; 83 – Windshield washer pump; 87 – Interior lighting switch in the front door; 89 – Interior lamp; 93 – Sensor for level indicator and fuel reserve; 98/1 – Side light lamp; 98/2 – Direction indicator lamp; 98/3 – Brake light lamp; 98/4 – Reversing lamp; 99 – License plate light lamp; 104 – Electric fan thermal switch; 108 – Rear fog lamp; 112 – Rear window wiper motor; 113 – Rear window washer motor; 115 – Rear window heating element; 121 – Relay for turning on the heated rear window; 125 – Additional relay; 126 – Headlight high beam relay; 127 – Relay for low beam headlights; 129 – Starter relay; 133 – Rear window heating switch; 136 – Rear fog lamp switch; 137 – Rear window wiper switch; 138 – Rear window washer switch; 158 – Fuel injectors; 159 – OKA watch; 168 – Relay for rear fog lights; 169 – Additional brake signal; 170 – Fuel pump relay; 171 – Electric fuel pump; 172 – Idle speed regulator; 173 – Throttle position sensor; 174 – Knock sensor; 175 – Canister purge valve; 176 – Oxygen sensor; 177 – Absolute pressure sensor; 178 – Main relay; 221 – Controller.
Useful: Pinout and diagram of a fuel pump with a VAZ relay
Content
Today, compact cars are quite popular. They are ideal for urban environments, as they are compact and economical. The class under consideration includes the VAZ 1111, which is also called “Oka”. The car began production in 1987, production was closed in 2008. The model is a prominent representative of the budget class, which determines the accessibility of the car. The fact that its production was established more than ten years ago is determined by outdated technical equipment. That is why many people decided to do the tuning of the VAZ 1111 with their own hands.
Preparatory stage
Most car enthusiasts began to understand the science of driving with the Oka car. But over time, all motorists replace old wheels with new ones, and it turns out that a working, although relatively “old” car is just collecting dust in the garage.
But if you are wondering how to make an ATV from oka, then you have already decided to give your old faithful car a chance at a new life. The assembly process itself will take a certain amount of time, and some parts will need to be purchased, but in the end you can still save a lot on the purchase of a new ATV. In addition, while turning the Oka into an ATV, you will acquire a lot of useful skills and knowledge.
What can the Oka be converted into?
The car in question can be upgraded in a variety of ways. The most common modernization methods are:
- Creation of an SUV. Even though the car has a low ground clearance, it can be converted into an SUV.
- Roadster. This name refers to a two-seater car with increased comfort.
- Cabriolet. If desired, you can use Oka to create convertibles: two doors, quite a spacious interior for two seats. However, it is worth remembering that there will be no room for a roof.
- Rally car.
The easiest way is to make an SUV, since it is enough to change the suspension and some body elements, and install large-diameter wheels. But other modernizations, for example the creation of a convertible, require serious interventions.
How to increase ground clearance (clearance)
Increasing ground clearance is most often done by off-road driving enthusiasts, hunters and other people who like to go out of town. Roads in the city are significantly different from country roads. That is why increasing the clearance for cars unsuitable for these roads is one of the most important procedures.
- First method. An increase in ground clearance is achieved by installing wheels with a larger diameter. This is especially true for cars with basic equipment.
Among the disadvantages of this method are the appearance of a speedometer error and the limitation of the diameter by the wheel arches. This means that if you install a wheel that is too large in diameter, it will hit the arches on sharp turns.
- Second method . Installing spacers under the fastenings of suspension parts to the body, for example, springs, also allows you to increase ground clearance. Complete with spacers, you should purchase shock absorber extensions, or new extended shock absorbers, since when entering a deep hole, the shock absorber may fly out of the cup.
The disadvantage of this method is that the rear spacers are much thicker than the front ones and the increase in ground clearance occurs unevenly. In this regard, the brake force regulator, or “sorcerer” as it is called, receives incorrect information. However, the “sorcerer” has the ability to regulate.
- Third method. It is reminiscent of the second method and consists of replacing standard springs with springs with a large number of turns. In this way, a significant increase in ground clearance can be achieved. However, as in the second method, it is necessary to lengthen or replace the shock absorbers for the same reasons.
Compared to spacers, new springs will last much longer and more reliably, however, in addition to the same disadvantages, they have a high cost.
- Fourth method. Reinforced springs. This option is used for vehicles that are operated at full load. They can be pickup trucks and station wagons, which have the ability to transport large cargo. Reinforced springs do not increase the vehicle's ground clearance, but their use eliminates "sagging" under full load, while maintaining normal ground clearance and protects the underbody from damage due to uneven road surfaces.
Among the advantages of this system, one can note an increase in the service life of the entire chassis, however, the comfort of a trip without a load is reduced, since the rear part will “spring” on small bumps.
Engine tuning to increase power
When considering how to improve this car, you should pay attention to the installed engine. It has a relatively low power rating and low reliability.
There are two methods for improving the motor:
1. Installing a new one, for example, taken from a Rover Mini. This power unit has a volume of 1.3 liters, as well as higher reliability. This modernization method is considered preferable, as it can significantly improve the performance of the car. However, the method has one significant drawback - the high cost of implementation.
2. The second option involves improving the standard design. This method is cheaper and easier to implement, and allows you to achieve a high power level. Engine tuning begins with changing the carburetor: increasing the diameter of the throttle valve allows for the supply of a large amount of air, as well as increasing the service life of the structure. A new camshaft can be installed, which will also increase the number of revolutions. Replacing standard valves increases engine power and changes the combustion chamber. Modernization of intake and exhaust manifolds, installation of a new air filter - all these changes also increase engine power.
In general, we can say that there are quite a few methods for modernizing a motor. The engine that comes from the factory does not have high driving performance.
Assembly Features
Important points during assembly:
- During the assembly process, it is imperative to replace the gaskets of the cylinder head, sump, exhaust pipes, and valve cover;
- Tighten the block head bolts in a strictly defined sequence;
- After assembly, perform the adjustment correctly - align the marks of the crankshaft and camshaft to ensure proper operation of the timing belt, tighten the drive belts, check the thermal clearances;
And although there are quite a lot of operations that need to be performed to remove the motor or replace the rings, they are not complicated and all the work can be completed in a day.
Common methods of body tuning
The exterior design of the car in question does not look modern and is very simple. That is why many are considering the possibility of upgrading the body. Just a few years ago, body tuning involved creating a body kit yourself - painstaking work that required certain skills and technical equipment. However, today you can carry out tuning by purchasing a special kit. This tuning method can be characterized as follows:
- All elements are easy to use and do not require major modifications. When creating the kits in question, they are ideally adjusted for installation on a car.
- The entire body kit is made in the same style, which allows you to complete the style of the car.
- Installation work does not take much time. The fact that there is no need to change the design determines a significant acceleration of work. It is represented only by dismantling old elements and installing new ones. You need to be prepared for the fact that some fasteners will be covered with corrosion and dismantling will be difficult, and after removing the body kit, body defects will be discovered that require restoration.
- The cost of the sets sold is relatively low. Of course, homemade options will be much cheaper, but only if they are done on the first try.
In this way, you can significantly modify the car in question. However, this method only changes the Oka in appearance; significant modernization requires more serious intervention.
How to assemble a tractor
To mount tractor units on the frame, you will need the ability to select spare parts from other mechanisms. During assembly, the master must carry out the following stages of work:
- installation of undercarriage based on wheels or tracks;
- installation of engine and clutch;
- creation of brake and steering systems;
- seat mount.
To install the wheel axle shafts on the frame from below, weld the racks from the corner. It is better to take the front and rear axles of the same type, this will greatly facilitate other tasks. When using axles from Oka, it may be necessary to replace the hubs to install discs of larger diameter. Sometimes craftsmen make it simpler: they cut out a circle with a mount from an Oka wheel rim and weld it into a hole prepared on a rim from another car.
It is better to make the front axle for breaking yourself, from a steel rod at least 5 cm thick. In the middle of the part you need to install a hinge joint that will ensure the mobility of the bridge on uneven roads. Equip the ends of the homemade beam with ears for attaching axle shafts with hubs. To lubricate the system, install a separate oil tank. A distributor for front-wheel drive cars or tractors in Belarus will help make these wheels drive.
When creating a mini tractor with your own hands with an Oka engine, the easiest way is to use standard brakes and clutch. On a solid frame, this part of the assembly should not cause any difficulties, especially when using axles from the same car. Only the problem of placing the engine itself is solved individually. This large unit is most often installed in front, but craftsmen, concerned about the compactness of the tractor, move the motor back, under the driver’s seat.
When working with a broken frame and a homemade front axle, you can use parts from other cars. In this case, they are adjusted to fit existing structures. When making a crawler-mounted tractor, you will need to purchase tracks and rollers for them, which will significantly complicate the work.
A homemade mini tractor with an Oka engine is equipped with a gearbox from the same car. At the break, the unit is mounted on the front half-frame. When using a solid base for homemade work, the gearbox is placed in a convenient place, facing the driver.
Steering involves a standard procedure for installing linkages that match the chassis used in the design. Both the Oka unit and the corresponding motorcycle part are used as the steering column.
Interior modification - how to do tuning?
When considering the most popular tuning methods, do not forget about the possibility of changing the interior. Let's highlight the following most popular tuning methods:
- Interior insulation. In order to feel comfortable while driving in noisy cities, you should take care of proper insulation.
- Installing more comfortable seats. The seats installed in the car at the factory, to put it mildly, do not provide adequate comfort.
- Modernization of control units and instrument panel. An example is the work of changing the instrument panel in order to increase the readability of information.
- Improving the quality of finishing. You can also install panels from high-quality materials.
Important! You can finish the interior at the lowest cost due to the fact that there are quite a large number of ready-made kits on sale.
SUV from Oka: photo and description, technical characteristics
all the best! Not long ago I converted the Oka into a jeep, but only now, with the arrival of spring, the Oka was finally able to take mud baths (including us). The ride was light, or rather even the first ride into the mud after assembly. checked for strength and cross-country ability, in general, nothing came loose or fell off. I was pleasantly surprised by the cross-country ability, it really can) on the car: - body lift, 13 cm spacers - quad tires with splices - differential welding p/s we are planning more combat trips in the near future , everything will be documented)
Providing car tuning services
You can modernize the Oka yourself or entrust this work to professionals. When considering the services provided by professionals, we note the following points:
- Such companies appeared relatively recently and provide professional services for car modernization.
- The cost of services is quite high, but this is how they can change a car almost beyond recognition.
As a rule, the services of such companies are used by those who have enough money to replenish their garage with a tuning car. This is due to the fact that even with proper and high-quality tuning, many of the Oka’s shortcomings will remain.
Advantages and disadvantages
As user reviews indicate, the all-terrain vehicle in question has not only advantages, but also disadvantages. Among them:
- Increased oil consumption, especially if you practice overcoming water obstacles.
- Rubber on wheels wears out faster.
- Additional inspection of welds is required, since in some cases distortions and other problems with the frame part occur.
It is advisable to coat all parts and mechanisms with a special protective compound or paint them to avoid the occurrence of corrosive processes. If the connections are not sealed, water will enter the machine and cause problems over time.
Experts' comments
Yuri. In order to carry out tuning of expensive cars, you must have the necessary skills. To obtain them, I decided to use Oka as a training ground. This is due to the fact that the design of this model is simple, and the compact car itself has a relatively low cost. It is possible to modernize almost all components; the only question is how much time and money can be spent on this.
Michael. I got the Oka for practically nothing. There is another car in the garage, but I still decided to leave it, since I still won’t be able to get a lot of money by selling it. In order for it to be able to be used somehow, it was modified for an SUV. Now there is something to drive in the forest and on the field.
Victor. Considering the VAZ 2121 and its modernization, I note that the car has a simple design. The installed motor requires significant changes, like other power units.
What is clearance?
Ground clearance (or ground clearance) is a value that characterizes the distance from the lowest point of the car (most often, the threshold) to the road surface. Ground clearance is measured in millimeters and can vary depending on the purpose of the car. For example, SUVs have higher ground clearance than a regular passenger car. Increasing the ground clearance allows you to increase the vehicle's cross-country ability, but at the same time, its resistance to rollover on the road decreases.
Below, as an example, is a table that shows the ground clearance of the VAZ model range.
How to earn points and participate in auctions
You can activate certain functions by exchanging points for items in auctions. But first you need to earn them. To do this, go to the website ok.ru, enter your username and password, and in the menu on the left, find the “OK Moderator” section.
Then click on the “Select game” button.
At the moment there are 3 options for tasks:
- check photographs and videos for the presence of pornography, obscene language and scenes of violence;
- recognize images on stickers;
- note whether there is a phone number in the pictures.
You perform verification and help the administration of the social network monitor various content. Your marks are compared with the opinions of the majority of participants, points are awarded for correct decisions, and points are deducted for mistakes. Select the appropriate option for tasks, read the rules and start completing them.
If you choose the first type of check, keep children away from the screen; some images actually contain pornography.
After you earn at least 200 – 300 points, go to the “Auctions” section.
In the window that opens, we see what features can be purchased for points, the bid for each lot and the auction deadline. It is better to bet on positions that will close soon, then there is a greater chance of becoming a winner.
You can view current lots at any time, the points are saved and will not go anywhere until you spend them. It’s convenient to access “Auctions” through the list of sections on the main page. First, tap “More” and then find the item you want.
Lada Oka All-wheel drive Syncro › Logbook › all-wheel drive gearbox is ready
Let me remind you: the most important task was to make the same shank for transmitting torque to the bevel gear, this operation is not simple, and most importantly there were very serious concerns that this unit would not fall apart on the first exit, in the end the decision was made to implant gearbox VAZ differential housing from the Passat. they look almost alike
It would probably have been easier to just attach the entire VW box at once, but it is very heavy, and most importantly, I need a lowering pair because the car is built for driving on dirt roads, light off-road and for household needs (pulling a trailer) in fact, this is a “tuning main pair” with a ratio of 5.3 instead of the standard 4.1
The differential housing was modified many times on a lathe; in order to fit into the VAZ gearbox housing, both the housing itself and the bearing mounting locations had to be modified
The bearings themselves from the VW differential are installed through adapter rings
As I already said, the differential housing was machined several times in order to go as deep as possible to the bottom without touching the crankcase walls. The final operation was to measure the gap between the crankcases and groove the bearing so that no distance shims were required
I also had to modify the planetary gear because it should be attached to the VW differential housing on one side and on the VAZ on the other
I also had to prepare a diff housing for mounting on the other side for the planetary gear
Remodeling Oka's salon according to Feng Shui
The first impression of the interior may seem sparse and insufficient for such a powerful car. Tuning the Oka's interior includes interior firmware, modern upholstery with high-quality material, installation of electric glass lifts and high-quality vibration and noise insulation. Head units, midbass, amplifiers and subwoofer are being updated.
The dashboard is also equipped with sound insulation, and electric lifts can move the windows at the touch of a button. The pedals have aluminum pads, which are often found in sports cars. A loud rectangular muffler will highlight the spirit of sport.
The car has a low degree of passive safety, so this feature needs to be urgently corrected. For the safety of passengers and the driver, install a safety panel and additional airbags. Plus, you can install disc brakes and a dynamic stabilization system.
Sometimes, as an Oka tuning, car enthusiasts purchase starting chargers. Such devices are necessary on the road when the battery runs out randomly. Additionally, you can decorate your car with interesting multi-color airbrushing and vinyl decoration.
Here, give free rein to a professional artist, and he will create a “car” that will surprise and stun everyone on the road. The most popular paintings on the body are in the fantasy style, dark castles, uncharted planets, stars, or the sky.
Oka base, transmission – Niva
In this “passenger tractor” it is quite difficult to recognize Oka, which the owner managed to install on truly gigantic low-pressure tires on homemade rims, assembled from tubes that had become completely unusable and protected from mechanical damage by a dense fabric layer from a fire hose.
Moreover, the master went even further, providing all-wheel drive in his super SUV, using the transmission from the old Niva for these purposes. It is noteworthy that the entire chassis was also borrowed from the Niva, which makes it possible to overcome almost any off-road terrain.
In addition, a winch was provided on board this hybrid in case of various force majeure. As for the shortcomings, the durability of such tires and chassis does not inspire much confidence, although it is quite possible that these fears are completely unfounded.
A snow and swamp-going vehicle that can even swim
Even more solid results were achieved by a car mechanic from Rubtsovsk, who used not only the body, but also the Oka engine when creating his unique creation.
To ensure record cross-country ability, allowing the all-terrain vehicle to overcome any off-road conditions, snow drifts and rivers, the designer tried to make this model as light as possible, actually removing rear axles from its design.
In addition, the master made the wheels himself, using the tubes from an old trailer as a basis. In any case, the machine turned out to be quite solid in appearance, having served its owner faithfully for three years in a row.
Moreover, she has attracted the interest of other residents of the Far North, who call the talented master, offering to buy his masterpiece for a considerable sum.
All-terrain vehicle assembly instructions
To make a wheeled all-terrain vehicle based on the Oka car, you need:
- calculate the chassis structure and prepare detailed drawings;
- assemble a welded frame from a steel profile on a slipway;
- mount suspension elements and rear axle;
- install the steering mechanism on the chassis;
- calculate and install a rocker that allows you to change gears;
- install the power unit;
- carry out final assembly and test the functionality of the structure;
- eliminate detected faults and modify the all-terrain vehicle.
Spare parts and materials used:
- Engine and gearbox from Oka.
- Bridges from UAZ.
- Transfer case from Niva.
- Wheels from Kraz.
- Steering and springs from Volga.
- Square pipe 50*50*2.5 mm - 20 meters.
- Sheet metal.
I installed the springs from Volga, initially the springs contained five leaves, but two leaves were removed and, as it turned out later, it was in vain, it was necessary to leave all five. Shock absorbers from Niva.
The photo shows a homemade adapter for connecting the UAZ cardan with the Niva razdatka. It’s done this way, we take 2 flanges from a UAZ and a Niva, cut off the working part of the oil seal from the Nivovsk, connect the flanges with the reverse sides and weld them together, you get an adapter.
I painted the frame and bridges and installed the engine. The differential in the box is welded, the Okovskaya “grenade” is cut off and a flange for the Nivovsky cardan is welded to it.
I installed a Volga steering wheel, it’s a little hard to steer, and over time I’ll need to install a hydraulic booster.
Since the fit of the wheels on the UAZ bridges is a bit narrow, I decided to make the wheel rims with an offset to space the wheels further away from the body. This is necessary so that the turning radius of the front wheels is sufficient.
The tires were taken from Kraz; the peeling process was carried out using a chainsaw, which was used to cut strips. I peeled it off with an electric hoist and trimmed it with a utility knife.
One day on the road, both CV joints on the wheel side fell off. The reason for this is not known, but now I always carry spare ones. There may be additional load due to wheel offset, or there may simply not be enough strength for severe conditions. And so the all-terrain vehicle has been in service for several years and so far there have been no more serious breakdowns.