It is known that locks for VAZ-1118 car doors have an interesting property - you can replace their cylinder without removing the mechanism from the door itself. On previous models, dismantling is more difficult: you need to press the bracket holding the cylinder with a paper clip or an awl, getting into the hole on a mechanical drive. In the Kalina model, that is, VAZ-1118, this bracket is pressed out by pressing with a ruler or a screwdriver. Which, in turn, is done on the installed lock (there is no point in removing it). Next, the replacement operation is discussed in more detail.
Replacing the ignition switch on Lada Priora, Kalina and Granta
The ignition switch (lock) is changed if its cylinder mechanism, contact group or immobilizer fails.
Modern Lada car models have a similar ignition switch design, which was inherited from the VAZ “tenth family”. Therefore, the instructions for removing and installing it are similar. You will need: a Phillips screwdriver, a 10mm wrench, a thin chisel and a hammer.
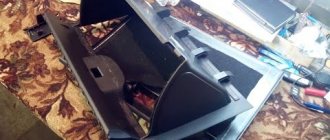
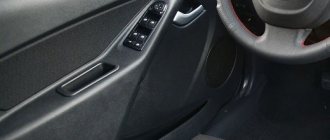
Remove the plastic steering column cover by removing several screws from the bottom.
Remove the left steering column switch by disconnecting the block with wires from it. This will free up space for further work.
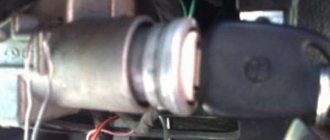
The ignition switch is held on the steering shaft using a metal bracket (No. 1), which is secured with 4 bolts with shear heads (No. 2). To unscrew them you will need a chisel and a hammer. Disconnect the block with the wires and remove the ignition switch from the steering column.
Installation of the ignition switch is carried out in the reverse order. Instead of bolts with shear heads, you can use regular ones. The process is also shown in the video:
Let us remind you that Lada Granta and Kalina also use the same type of electric power steering, which can be a source of knocking noises when turning the steering wheel.
Source
Replacing the ignition switch on a Grant
I think that many car owners have encountered such a problem when, with excessive force when turning the key, it could remain in the ignition switch, or rather, its blade. In this case, you will have to replace the lock, since it is almost impossible to get the key. On the Grant, as on other front-wheel drive VAZ cars, the lock is mounted on the steering shaft and secured using breakaway bolts. This was done specifically for security purposes, so to speak, to prevent unauthorized access to your car.
To replace the lock, you will need the following tool:
- Phillips screwdriver
- The chisel is narrow and sharp
- Hammer
- Key for 10
Replacing the larva in Kalina
First of all, replacing the lock elements means that the door trim will be completely missing. Therefore, first we will figure out how to dismantle the trim on Lada Kalina cars. The second chapter is devoted to how to remove the larva and install a new one in its place. The last step will actually be the simplest.
Removing the door trim yourself
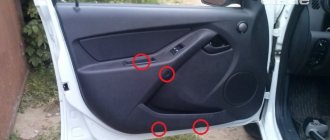
The casing is attached not only to screws, but also to plastic pistons. The number of screws holding the part in question is four:
Numbers here indicate all fastening elements. But to get to them, you need to remove the screw cap “3”, as well as the inner door handle. The pawl handle also needs to be unscrewed.
If these actions are completed successfully, the casing begins to be dismantled, moving it away from the metal. Dismantling is carried out starting from any of the corners, but care must be taken: the pistons holding the plastic are fragile.
If the package includes power windows, you will need to disconnect the connector connected to the button block. Also, another similar connector is present in most trim levels - where there is a central lock. Both connectors must be disconnected.
All the steps described here involve electronics in any case.
Therefore, at the stage before dismantling the trim, you need to open the hood, take the “10” key and unscrew the negative terminal. We are talking about the battery terminal, which can be connected last (when the last screw is screwed in). Anyone who breaks this rule will look for blown fuses. Draw a conclusion.
How to get to the door mechanism
According to the recommendation of the magazine "Behind the Wheel", in the absence of casing, access to the lock is always available. Simply put, there will be no need to remove the inner lining made of metal. The steel sheet is simply bent to the side.
The rotating part with the protrusion is called the “drive”, and this is what you will need next.
Replacing the larva will be easy:
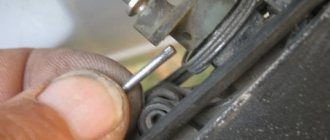
- The key in the cylinder currently fixed in the door is turned 90 degrees;
- Using a steel ruler, knife or thin screwdriver, you need to press the locking tongue located opposite the slot in the body of the cylinder. You need to place a screwdriver between the rotating and stationary parts of the mechanism. Know that in the driver's door the slot is made from the bottom (looks “to the floor”), in the passenger doors - from the top!
- By pulling the key towards you, the larva is pulled out;
- The new cylinder is installed like this: with the key inserted, it is pushed into the lock until it stops. The locking tab will need to be pushed inward.
Replacing locks on Lada Granta (VAZ Granta)
The ignition switch in a Lada Granta car performs the function of supplying and interrupting power to electrical consumers under various operating modes of the vehicle. In fact, the ignition switch is one of the main power distributors in the entire car. The Lada Granta ignition switch (lock) with a mechanical locking device, an immobilizer antenna unit, a key position sensor and an electrical contact group is mounted on the steering column housing behind the steering wheel. The electrical contact group of the switch and the locking device are connected to each other, operate synchronously and are activated by the ignition key. You will need: hammer, chisel, flat-blade screwdriver.
Design of VAZ-2109 locks and disadvantages
The lock cylinder is a cylinder that is equipped with a secret mechanism. In all locks with a flat key, the cylinder is replaceable. For example, on VAZ-2109 cars it is replaced like this.
The rotating part that is connected to the rod is called the “drive”. As we can see, this drive has a hole for removing the cylinder. By applying pressure with a thin axle or an awl, the larva is pulled out.
There is only one drawback - it is hardly possible to complete the steps indicated here without first removing the lock completely.
It should be noted that even when the mechanism is removed, it will not be easy to pull the larva out of it.
Therefore, before dismantling, be sure to insert a key into the cylinder and turn it left or right 90 degrees. The purpose of this action is to be able to dismantle the larva. This action is performed effortlessly, and the key is then simply pulled towards you.
How to remove the ignition switch on a Grant
In order to get to the ignition switch structure on the Lada Granta, you need to remove the steering column cover. This can be done using a Phillips screwdriver.
After this, using a chisel and a hammer, we tear off the lock fastening bolts, as is clearly demonstrated in the picture below.
When the caps are already loose enough, you can unscrew them using long-nose pliers.
When all the bolts are unscrewed, hold the lock and remove the clamp securing it to the shaft.
And the lock on the back side.
Now you need to disconnect the two plugs with the power wires from the lock, as is clearly shown in the photo.
How to install the activator
The only way for the viburnum to get into the trunk is to turn the key and press the button. Naturally, doing this is not always convenient. Weather, busy hands and other troubles contribute. At this stage, many car enthusiasts begin to think about the trunk activator. It is quite possible to do this, you just need to try a little.
The Kalina station wagon trunk lock activator is easy to install. It is enough to take a self-drilling screw and secure it on one side with it and on the other with a wire holder. To check the device, you need to connect it to the standard connector.
The only problem in all this work may be the back door being picked up at the wrong time. After the current stops supplying the activator, it closes with the first latch, but the trunk is not completely closed. In order to get into the so-called fifth door, you will have to use the key again.
A lock with a button is not difficult. But during work it is necessary to assemble the circuit and stretch the wires. In this case, one programmable alarm channel (additional) should be used.
There are two main connection options. First: the button goes to +12 on the activator, bypassing the relay. The advantage of this connection is its simplicity and the absence of unnecessary elements, the disadvantage is the need to run additional wires.
Installing the activator using the second method is more labor-intensive. You will have to use additional elements, namely diodes. In addition, there is a need to search for “mass”. The main advantage is the use of a minimum number of wires.
Let's sum it up
The ignition switch in the LADA Kalina model is sufficiently reliable and is not capable of causing any problems to the owner. However, in rare cases it needs to be dismantled for repairs or replacement procedures. You can do this yourself, for which you need to stock up on the previously designated list of tools. Now you know how to replace and also how to remove the lock if any faults are present.
Replacing the ignition switch on a Lada Granta
is carried out in the event of its premature failure, if the ignition is switched on intermittently or the command to start the starter does not work. One of the main tasks performed by the ignition switch is to interrupt the power supply to various electrical consumers of the car, depending on the operating mode (car parking, driving, etc.). Also, through the ignition switch, a command is sent to the starter when starting the engine and subsequently stopping the engine by interrupting the supply to the ignition circuit.
The ignition switch of the Lada Granta is mounted on the steering wheel shaft and also contains a locking anti-theft mechanical steering shaft lock, an immobilizer antenna and an electrical contact group. The electrical contact group and the mechanical lock are interconnected and are activated by the car's ignition key.
To perform work on removing and replacing the device, you will need the following tools: a hammer, a flat-head and Phillips screwdriver, and possibly a chisel. A small drill may also be required. Sequence of work
| 1. | So, we start work as usual by turning off the power to the car’s on-board network (remove the terminal from the battery). |
| 2. | Remove the steering shaft casing of the car. Here you will need a Phillips screwdriver to unscrew the screws securing the upper and lower parts of the casing. |
| 3. | Now we find the ignition switch wiring harness connector. |
| 4. | We disconnect it by squeezing the latch holding it |
| 5. | Now release the clamp of the harness block |
| 6. | Disconnect the connector from the immobilizer antenna unit |
| 7. | Now you can proceed directly to removing the ignition switch from the steering shaft. Using a hammer, lightly tapping on the edge of the bolts with a chisel, we tear off the bolts securing the ignition switch to the steering shaft. There are 4 of them in total. These are special disposable bolts that come with a double head. The upper one is turnkey and breaks off at a certain tightening torque of the bolt. With some skill, the operation does not cause any inconvenience. New mounting bolts should be included with the new ignition switch. If you still cannot unscrew the bolts, then carefully drill them out from the head side. |
Installing the ignition switch
A new lock on Granta can be purchased at a price of 1,800 rubles. This is the cost of the kit with all the door cylinders and trunk lid. Installation is carried out in reverse order. We first install it on the shaft and try on the casing so that the lock sits exactly in the hole. After which you can finally tighten the fastening bolts.
It is necessary to tighten until the head of the bolt comes off when a certain torque is reached.
After which you can install the casing in place, having previously connected all the power wires.
Adjusting the front left (right) door lock on the Lada Granta
In the process of systematic use of the door, its frequent opening and closing, the lock and adjacent elements wear out. As a result, the door closes with a distinct knocking sound.
Often knocking occurs after an accident due to changes in body geometry. The functionality of the lock can be restored by partially repairing it, and in case of deformation, by completely replacing it with a new one.
- screwdrivers, set of auto tools;
- lubricant;
- liquid WD-40.
Sequencing
- We inspect the gaps around the entire perimeter of the door. We mark areas with deviations. The factory standard is 2–3 mm, anything higher or lower is a defect.
- Using a screwdriver, unscrew the screws securing the hinge to the body. If necessary, use an impact screwdriver.
- Move the hinge a few millimeters up and down and check the tight fit of the door to the body. If you hear a rumble when closing, lower the hinge; if you hear a dull knock, raise it.
- We carry out a control measurement and tighten the bolts.
By analogy, we adjust the lock on the opposite side.
Egnition lock
The ignition switch is a complex device designed to control the power supply to the vehicle systems, prevent the battery from discharging and ensure that the engine starts from the starter system. The castle includes two components:
- mechanical, represented by a lock cylinder;
- electrical, which is a set of contacts that close electrical impulses when the key is turned in one way or another.
The ignition switch on the Lada Kalina has three modes:
- Mode "0". In this position, the key can be easily removed, and the lighting, emergency lights, and audio system work.
- Mode "1", fixed. It is no longer possible to remove the key from this position; when it turns on, the ignition system is turned on and power is supplied to all systems except the starter. But it is worth considering that keeping the key in mode “1” for a long time can lead to battery discharge. This position is used when turning on the starter, so that the running fuel pump pumps up the required pressure to ensure further ideal operation of the starter.
- Mode “2”—activation of the starter system.
The Lada Kalina ignition switch kit contains a key for the lock, which serves not only in its straight profile, but also as a key for the doors and trunk.
Ignition switch malfunctions
Like any electronic device, the ignition switch of the Lada Kalina is subject to frequent breakdowns. Malfunctions can occur for a variety of reasons, the most common of which are the following.
- Oxidation of contacts always leads to serious damage (usually due to moisture and dampness in the machine)
- Contact burnout , which occurs due to sudden voltage surges. Voltage drops usually occur when the power unit is started, during which the temperature inside the system rises sharply, causing the insulation to simply burn out. This is why it is so important to approach the launch issue wisely.
- Mechanical damage . If, when you are about to turn the key, you notice that it has become more difficult to do so than usual, it means that something happened to the lock cylinder, perhaps it was simply clogged with dirt or dust, or maybe there was a defect at the factory that came to light only now.
If the problem lies in burnout or oxidation, then when you turn the key in the lock, you will not see any reaction from the ignition system. In this case, you just need to replace the contacts without changing the entire lock; if the defect in the wires is not severe, then you can get by with cleaning the contacts.
Damage to the lock cylinder also occurs when someone tries to steal a car. In any case, the lock needs to be changed completely. But how to do it yourself?
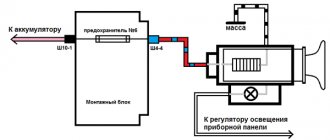
Electric drive: easy installation
The manipulation algorithm is very simple. Here you will need to make the rotary plate together with the rod yourself. The wiring is laid directly to the lock and connected to a special control unit. When the car is “disarmed”, the electric drive of the luggage lock is activated following the unlocking of the button responsible for opening the rear door of the Lada Kalina.
The whole essence of the action comes down to connecting the electric lock to two cable lines. You can buy the product at a specialized retail outlet. The end of the luggage compartment will need to be hidden in order to prevent the risk of moisture getting into it. If this is neglected, then with the penetration of water a short circuit will be observed in the designated area.
Much attention should be paid to the area near the door hinges, because broken wires are a common occurrence here. To prevent this, it is recommended to regularly monitor this section of the highway.
Before starting the procedure for installing the electric drive in a Lada Kalina car, you will need to remove the plastic trim. Here you need to be careful not to damage the specified protective element.
The choice of a lock for LADA Kalina should mean that there is no subsequent need for modifications before installation. This means drilling additional holes.
An important point in the installation procedure is the laying of electrical lines. For these purposes, you will need about 3.5 m of appropriate cable. You can use standard wiring suitable for the rear door. The power source can be a cigarette lighter socket. It is also important to install the fuse correctly.
We do all switching in LADA Kalina in accordance with the diagram.
Important! The main line in this version may include a wire that goes to the courtesy lamp for lighting the space inside the trunk.
Replacing the ignition switch yourself
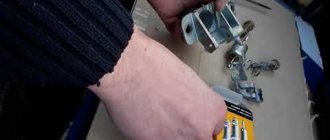
Unfortunately, the Lada Kalina cannot please you with its reliability and durability; many systems, including the ignition switch, fail within a couple of years, so in order to save on repairs at expensive car repair shops, it is better to find out how to do it yourself. So, having come to the conclusion that the lock needs to be changed, we buy a new lock, which costs around a thousand rubles. In the kit we will receive three cylinders (on the doors and trunk) and 2 keys. You also need to purchase four shear bolts , since the old ones will no longer be suitable after dismantling.
In addition to the product itself, we will need the following tools:
- chisel;
- two screwdrivers, a flat one for removing the clamps and a cross for the bolts;
- 10mm wrench or 10mm ratchet;
- key to 8.
Let's get started
1. First you will need to disconnect the battery cable from the negative.
2. Armed with a cross-head screwdriver, unscrew the fasteners on the steering column. To make it more convenient for you, we immediately warn you: there are two bolts on the right and left sides (3), two at the bottom in the middle (2), and two at the very bottom (1). There is also a self-tapping screw located directly under the steering wheel (4).
3. We take out the clamps holding the steering column switches. We dismantle the switches.
4. Now we need the help of a chisel. It is necessary to apply blows of medium power and unscrew the bolts. Bolts, as a rule, become very sticky after several years of use, so you will have to work hard. As soon as you notice that the bolts begin to move out of place, you can pick up pliers and continue to work only with their help.
Adjustment process
If the gap is smaller, lower the glass all the way down. Then close it with one click, take it by the top edge and push it towards you a couple of times with a little effort. And if the gap on the front door turns out to be wider, then you need to open it with the window down and, resting your foot on the trim, pull the door to the inside several times. Then it will be possible to move on to the main problem associated with the poor functioning of the lock.
- special screwdriver;
- Silicone Grease;
- limiters.
When there is a slight bulging outward, you need to put a soft and durable gasket in the opening and on the central post, in the place where the hinges are, and then try to close the door. If the door is slightly recessed relative to the body itself, then you need to support the outside with your knee in the hinge area and pull the open door towards you. By making such adjustments to the rear doors, you can achieve soft operation without various side effects.
You can install them either on the opening or on the door itself. Due to the presence of springs, closing/opening will be smooth and the sound will not be too loud. Basically, those who are faced with a similar problem most often try to solve it with the help of lubricant. In a way it helps, but only for a short time. And it can only get worse in the future.
The article describes the process of removing the exterior door handle of a car. The handle is removed when replacing it, as well as for the convenience of replacing the lock cylinder.
You will need: an “8” wrench, flat-blade and Phillips-blade screwdrivers.
Removing the ignition switch, replacing the contact group and immobilizer coil of Lada Granta
Tools:
- Ratchet wrench
- 10 mm head
- Medium Phillips screwdriver
- Small flat screwdriver
- Driver for socket attachment
- 8mm wrench attachment
- 24mm wrench attachment
- Chisel and hammer or electric drill
- Long nose pliers
Parts and consumables:
- Sandpaper (fine grit)
- Return spring (if necessary)
- Microswitch (if necessary)
- Contact plate on light guide (if necessary)
- Ignition switch contact group (if necessary)
- Bolt with shear head M6 - 4 pcs.
Review of spare parts prices
| Name/article | Price, rub.) |
| 00001003833121 Bolt M5x10 with serrated shoulder | From 100 |
| 00001003831801 M5 nut with serrated shoulder | From 100 |
| 00001002624101 Washer 5 mm | From 50 |
| 00001003275901 Screw M6x10 | From 50 |
| 00001002605371 Lock washer 6 mm | From 50 |
| 21230610542000 Lock cylinder | From 550 |
| 11180610515000 External front right handle | From 650 |
| 11180610515100 External front left handle | From 650 |
| 21900610518000 Inner front right handle assembly | From 950 |
| 21900610518100 Inner front left handle assembly | From 950 |
*prices are current as of November 27, 2018.
Recommendations for choosing and replacing door handles
When choosing spare parts, always give preference to original ones. Good, high-quality parts are always 10 - 15% more expensive than analogues. At the same time, by purchasing a factory part, you can count on a long service life of the mechanism.
A cheap counterfeit does not provide even a third of the required resource. The final choice is up to the owner of the technical device. The deciding factor is the budget.
Malfunctions of the ignition switch LADA “Granta”
Ignition switch failures can be divided into two types: electrical and mechanical. Electrical faults include malfunctions of the contact group of the lock, as a result of which individual energy consumers (most often the starter) or the entire Granta electrical system as a whole stop working. This also includes a breakdown of the car's immobilizer. Mechanical malfunctions occur due to breakdown of parts of the ignition switch or contact group, as well as physical wear of the contacts. This also includes cases when, due to poor contact, heating and melting of the plastic parts of the contact group occurs. Signs of a malfunction in the ignition switch of the LADA Granta:
- the key does not turn;
- when turning the key the ignition does not turn on;
- The starter or other electrical appliances do not work.
The last two signs do not necessarily indicate problems specifically in the ignition switch, but they certainly appear when the contact group is faulty.
To eliminate the malfunction, it is necessary to replace the LADA Granta ignition switch or part of it, for example, a contact group.
What is needed to replace the Granta ignition switch
To replace the ignition switch you will need:
- key to 10;
- a thin chisel and a hammer (or a drill with a drill bit to drill out bolts with self-cutting heads);
- screwdriver;
- new ignition switch LADA “Granta” or contact group.
Troubleshooting methods
List of common malfunctions of the standard door lock of the Lada Kalina:
- difficulty opening;
- the key is not fully inserted into the cylinder;
- lock jamming;
- jamming of the locking mechanism;
- metallic knocking when driving on a bad road.
Difficulties when opening doors are associated with incorrect adjustment of the position of the locking bracket. This can be easily fixed by loosening the screws that secure it to the opening. Adjustments to the position of the bracket should be made in the direction of greatest wear. After this, you need to tighten the fastening screws.
Replacing the Kalina door lock cylinder is necessary if it is damaged. First you need to remove the left front door trim, then insert the key into the lock and turn it, if possible. Then you should press the cylinder mechanism lock with a knife blade or a thin plate and, pulling the key, pull out the cylinder from the outside. Replacement on the right follows a similar procedure. The difference is that the latch is located on top of the mechanism, in contrast to the driver's door, where it is located at the bottom.
A metallic knock that occurs when a car moves on an uneven road is caused by wear of the locking mechanism bracket and loss of elasticity by the seal. These defects can be easily eliminated by replacing the lock assembly and seal. Jamming or jamming of the locking mechanism can be eliminated by repairing the components. Applying lubricant is often sufficient.
Operations for removing the ignition switch Lada Granta
1. Disconnect the wire from the negative terminal of the battery2. Remove the steering column casing (see Removing and installing the steering column casing for Lada Granta)
3. Squeeze the harness clamp
4...and disconnect the block from the contact group of the ignition switch (lock).
5. Press the clamp of the wiring harness block...
6...and disconnect the block from the immobilizer antenna unit
7. Using a chisel and hammer, remove or drill out four self-cutting bolts...
8 ...and remove the ignition switch from the steering column.
This is what the ignition switch looks like when removed from the car.
9. Bend back the ignition switch wiring harness block clamp...
10. ...and remove the wire stamps from the block.
12. Remove the plastic cover from the switch housing
The following is information on the revision of the contact group of the ignition switch of the Lada Granta. It is worth noting that the contact group is used from cars of the previous generation, so additional information on disassembling and assembling the contact group in the body of a similar ignition switch can also be found in the article “Replacing the contact group of the ignition switch VAZ 2110 2111 2112”
13. Press out the two plastic clips
14. Remove the contact group from the ignition switch cover
15 Inspect the contacts. Clean oxidized or burnt contacts with fine sandpaper; in case of severe deviations in shape, replace them.
16. Reassemble the ignition switch in reverse order 17. Installing the ignition switch on a Lada Granta car is also done in the reverse order. When installing, it is necessary to recess the locking rod of the anti-theft device. To do this, insert the key into the ignition switch and set it to position - O
When replacing the ignition switch, it is necessary to replace the electronic code elements in the ignition key housings, that is, remove the elements from the old keys and insert them into the keys of the new ignition switch.
A breakdown of the ignition switch is a rare but unpleasant problem, the solution of which requires replacement of the unit or part of it. Replacing the ignition switch of a LADA Granta is quite feasible in a “garage” environment and does not require high plumbing skills or specialized equipment.
Changing the secret code yourself
Often, after time has elapsed on a Lada Granta car, the doors begin to open and close with some effort. To fix the problem in question with this car produced by AvtoVAZ, you have to contact a service station. In this case, you need to purchase door closers and door stops for Lada Granta.
Sometimes the owners of the Lada Granta Liftback, produced by the famous AvtoVAZ company, have to deal with various modifications after purchasing the vehicle. This happens for the reason that after even a short mileage, minor breakdowns or problems often appear at first, and if they are not eliminated in time, they develop into more serious ones. Many owners consider the most common defect to be the fact that the front door locks do not function well and open with great difficulty.
You can, of course, buy Lada door closers and door stops and make repairs in accordance with the instructions. But this operation can be performed in a more productive way. To carry it out you need:
A common symptom of a broken lock is that a loud sound appears before the door opens/closes. The design of the front door lock is made in such a way that the metal can sometimes rattle. In order to eliminate this problem, you need to remove the lock itself and put rubber tubes of the required size on the levers. Immediately all sounds coming from ahead will disappear. When closing the doors, only a bang will be heard, and all sharp and loud sounds will be a thing of the past.
How to replace the ignition switch of a LADA Granta
The work can be done both indoors and outdoors. To avoid a short circuit, before removing the ignition switch, you must disconnect the ground terminal from the Granta battery. The ignition switch of the LADA “Grant” is removed as follows:
- Unscrew the left and right side bolts securing the casing;
- dismantle the lower part of the “Grants” steering column casing;
- remove the upper part of the casing;
- squeeze the latch of the wire connector connected to the ignition switch;
- disconnect the connector from the contacts of the Grant ignition switch;
- release the lock of the immobilizer antenna unit wire connector;
- disconnect the connector of the antenna unit of the LADA “Grant” immobilizer;
- using a thin chisel and a hammer, unscrew and remove the bolts with self-cutting heads that hold the ignition switch to the steering column or drill out the bolts with a drill;
Ignition switch Lada Granta - removal, disassembly and maintenance
The main purpose of the Lada Granta ignition switch is to supply and disconnect power to the main electrical consumers of the car in various operating modes. In other words, the ignition switch can be considered the main power distributor, the condition of which largely determines the normal operation of the car. Among other things, the Lada Granta ignition switch is combined with a mechanical locking device, a key position sensor and an immobilizer antenna control unit.
The operation of the locking device and the contact group of the switch is synchronized to provide control from the ignition key.
It should be admitted that the Lada Granta ignition switch is quite reliable, however, due to the high workload of this element, it is possible that sooner or later it will need to be dismantled for the purpose of replacement or, at least, prevention.
Sequence of operations when removing a VAZ-2190 (Lada Granta)
First of all, as with other work related to tampering with the car’s electrical system, the corresponding power wire should be disconnected from the negative terminal of the battery, after which, to facilitate access to the switch, the protective cover is removed from the steering column;
To disconnect the block connected to the contact group of the lock, release the latch. In the same way, disconnect the block from the immobilizer antenna control unit;
Due to the fact that the lock body is secured to the steering column using bolts with self-cutting heads, a hammer and chisel are indispensable in this case. Alternatively, you can use a drill to remove the bolts;
How to disassemble the ignition switch of a LADA Granta
To disassemble the ignition switch, follow these steps:
After disassembling the lock, it is necessary to inspect the condition of the contact group and terminals on the wires and clean them with fine sandpaper or replace them with new ones.
Assembling the ignition switch and installing it on the LADA Granta is performed in the reverse order of disassembling and removing it from the car.
Removing the side mirrors
Side mirrors are needed to monitor the situation on the road while driving. They are:
- salon - installation is carried out inside the car;
- side – located on both sides of the front door pillars.
Interior mirrors are mounted in car interiors using self-tapping screws or bolts, suction cups, or glue. Regular bolts are simply unscrewed after first removing the plug. Care should be taken with the adhesive connection; first try to separate the bracket from the platform glued to the glass. In most cases, for these purposes, it is enough to perform a slight turn or carefully move the latches. When this is not possible, the bracket is dismantled along with the windshield. The glue holds the working elements very firmly, so you should act with extreme caution to avoid the risk of damaging the glass.
Before starting work, carefully read the technical operating instructions. The dismantling process should be strictly followed so that you do not have to buy new glass; its price starts from 500 rubles.
To remove and replace the interior mirror, presses and mediators are used. The case is divided according to a principle similar to a TV remote control or mobile phone. Find the area where the body and the mirror product meet, insert the spinner into the compartment and press firmly. There should eventually be a small gap on the body. Go over it with a pick and separate the parts of the body. Warm up the area where the reflector connects to the body with a household hair dryer and remove the mirror.
A construction hair dryer is not suitable for heating - it is too powerful.
Removing and installing the ignition switch Lada Granta
Usually the ignition switch is removed to replace it, as well as to replace the contact group of the switch or the APS coil.
To check the ignition switch, sequentially set the key to the positions at which the circuits indicated in the table should be closed.
When the key is turned to position “III”, the anti-theft device should be activated.
When turning the key from position “III” to position “0”, the anti-theft device should turn off.
This can be checked by turning the steering wheel.
When restarting from position “I” to position “II”, the locking is activated.
The key can only be turned to position “II” from position “0”.
If there are defects, replace the contact group or ignition switch.
You will need: hammer, chisel, flat-blade screwdriver.
First of all, disconnect the negative terminal from the battery.
Remove the steering column switches.
1. Ignition switch mounting bolts with cut heads.
Therefore, we unscrew them with a chisel.
As soon as the bolts are loosened, they can be unscrewed using pliers.
2. Remove the bracket from the steering column
3. Remove the ignition switch
Using a screwdriver, pry up the clamp of the APS coil wire block
4. Disconnect the coil wiring block from the APS block wiring block
5. Press the connector latch and disconnect the ignition switch contact block from the wiring harness block
6. Remove the anti-theft locking rod
Turn the key in the ignition switch
7. Remove the locking rod drive. Remove the rod spring from the drive
8. Remove the stopper with the spring
Push the cylinder out of the switch body
9. Remove the locking ball.
10. Remove the cylinder from the switch body
12. Remove the locking ball spring from the hole in the cylinder
13. Use a screwdriver to pry and disengage the two plastic latches of the wire block cover
14. Open the connector cover.
Mark the wires located in the block
15. Use an awl to bend the locking tendrils of the wire lugs
16. Remove the wires from the connector
17. Remove the insulating tube from the wires
18. Squeeze the three plastic latches with a screwdriver and remove the contact group from the body
19. We bring out the wires through the holes in the housing
Pinout of the ignition switch for LADA “Grant”
The number of ignition switch connector terminals on the Grant has been reduced to three:
- contact “30” (“plus”, connected to the ignition switch);
- contact “15” (circuits powered when the ignition is turned on);
- contact “50” (power supply for the starter solenoid relay).
The ignition switch has three positions: “ignition off”, “ignition on” and “starter”. Accordingly, the power circuit is either open or supplied to the ignition or to the ignition and the solenoid relay at the same time.
Source