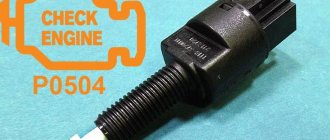
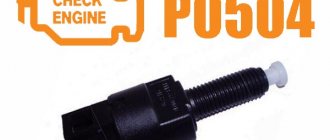
Owners of LADA cars with an electronic gas pedal may encounter error P0504 (mismatch of brake pedal sensors). Along with it, malfunctions in the engine may appear (stalls, speed fluctuates, does not start, etc.). Most often the cause is the brake pedal position sensor (brake light sensor or frog).
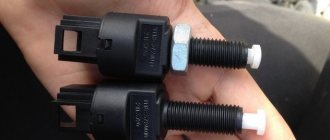
The brake pedal position sensor and brake light switch are mounted in one housing. Most often, the cause of its malfunction is a broken spring. In this case, you can repair the sensor yourself by replacing the spring with a new one. Or replace the sensor with a new one.
How to adjust the brake light switch on LADA cars
On LADA cars, depending on the model and year of manufacture, AVTOVAZ used different brake light sensors (brake pedal position sensor or “frog”). During operation of the vehicle or when removing/installing the sensor, it must be adjusted. Do you know how to adjust this sensor yourself?
Reverse sensor for VAZ 2114
Reverse sensors for VAZ 2114
The reverse sensor of the VAZ 2114, or frog, as it is popularly called, does not last forever. It does not break down as often as other sensors, and the failure of the frog is not such a collapse as the failure of the mass air flow or detonation sensor. A breakdown of the device responsible for the rear light signal is easy to detect.
Old style sensor
On Lada Granta, Kalina, Priora and Lada 4×4 cars with E-Gas, a brake pedal position sensor with article number 1118-3720010 is used.
- Screw the sensor until the pedal goes down.
- Turn the sensor slightly (counterclockwise 90 degrees) and secure with a lock nut.
As a result, when the brake pedal is released, the switch rod should be completely “recessed”, and when the pedal is pressed, it should completely come out of the switch body. Details in the video:
Self-repair price
The cost of a new reverse sensor depends on the manufacturer. The average price of a part is around 300 rubles; you can find options three times cheaper. Please note that the less a spare part costs, the lower its quality and, accordingly, reliability and service life. It is advisable to place orders in trusted stores.
Replacement will also require contact cleaner such as WD40. Many additionally replace wiring if it is deformed, kinked, or otherwise damaged. We do not recommend working with wires without proper experience; it would be better to contact a specialist.
Sensor bulbs cost up to 50 rubles apiece. It's easy to unscrew the old ones and screw in the new ones yourself.
New sensor
The Lada Vesta, XRAY, Largus, Granta FL uses a Renault brake sensor with catalog number 8200168238 (or 253206170R, 21700372001000).
Brake light switch adjusts automatically
depending on the position of the brake pedal. During automatic adjustment, clicks of transition through fixed positions are heard. However, it may be necessary to extend the stem slightly. To do this, pick up the antennae on both sides with an awl and pull out the rod.
If adjustment of dimension X is required more than three times, replace the brake light switch sensor.
Share on social networks:
Found an error? Select it and press Ctrl+Enter..
Source
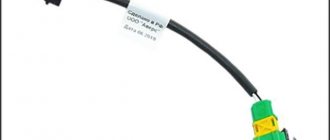
Brake pedal sensor Lada Granta / Kalina-2, Datsun (old model)
Brake pedal sensor (brake signal switch) Lada Granta / Kalina-2, Datsun (old model).
To connect the sensor, you may need a sensor connector.
Product characteristics
We recommend watching
Connector for connecting the brake pedal sensor 1118-3720010 old model for Lada Gran..
New items
Original factory trim for the left (driver) seat on the inside for Lada Vesta. The cladding will need to be replaced..
LED fog lights with low and high beam from the manufacturer Sal-Man with 7 lenses. The headlights are suitable for cars:..
LED rear bumper fog lamp for Lada Granta (liftback) and Vesta (all body types) cars with a pattern in...
LED rear bumper fog lamp for Lada Vesta cars (all body variants) with the inscription VESTA. Lantern mouth..
LED fog light in the rear bumper for Lada Granta (liftback) cars with the inscription GRANTA. The lantern is installed..
Reversing lamp GE / TUNGSRAM. Power: 16W Voltage: 12V Brightness, lm: 310 Base: W2.1×9.5d ..
Car lamp R10W 12V GE, used in the rear lights of Lada Granta (liftback and station wagon), Kalina-2, Datsun Mi-Do and others..
The turn signal lamp is orange, applicable for cars Lada Largus, Niva, Vesta, Xray, Granta, Kalina, Kalina-2, Priora, ..
Caliper repair kit for Lada Niva (4x4 Legend), Chevrolet Niva, Niva Travel. Includes: 21210-3501051-00 ring..
Camshaft plugs for the 16-valve K4M Lada Largus engine, set of 2 pieces. ..
This product belongs to a group of products that are manufactured (painted) individually for each customer. This item is shipped..
Rear bumper diffuser for Lada Granta FL sedan. The texture of the plastic is shagreen. The diffuser is installed using a double...
Original standard anti-roll bar with a diameter of 24mm for Lada Granta, Kalina-2 and Datsun cars, assembled...
A set of original front and rear plastic fender liners with sound insulation for the Lada Niva Travel car. The price is indicated..
A set of original front and rear plastic fender liners with sound insulation for the Lada Largus FL car (except Cross) (from March..
A set of original front and rear plastic fender liners with sound insulation for the Lada Largus Cross FL car (from March 2021.
A set of original front and rear plastic wheel arch liners for Lada Vesta sedan and SW (station wagon) models..
Set of rubber interior carpets with honeycomb-shaped cells for Lada Priora (any body). Avtodriver car mats -...
Brake pedal limit switch VAZ 2114
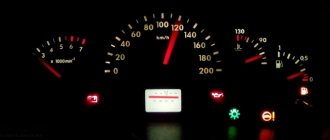
During operation of a modern car, defects in engine operation may appear: failures, short-term lack of response of the gas pedal, etc. At the same time, the “Check Engine” icon lights up on the instrument cluster panel, which translated from English sounds like “check the engine.” The car owner goes for diagnostics, where a computer connected to the car detects error P0504. The brake pedal position sensor (frog) is responsible for this failure in the system. Next, we will tell you where the sensor is installed, how to check, repair and replace it.
Causes and symptoms of malfunction
Most often, error P0504 worries owners of Lada: Grant, Priora, Kalina and other VAZ cars with an ECU. Often a defect appears on GAZ cars, for example, GAZelle NEXT. But owners of foreign cars are less likely to contact the service to eliminate error p0504 and replace the sensor (frog). Most likely, the quality of foreign spare parts is much better. What symptoms indicate that the brake pedal sensor is faulty:
The cause of incorrect operation of the “frog” can be: mechanical damage, oxidation of contacts or wire breakage. Sometimes a failure occurs due to the burnout of both brake light bulbs. Due to the listed defects, an error appears in the system under code p0504. It can be removed, but it will appear again soon.
How to check
Turn on the ignition and press the brake pedal, the brake lights should light up. After releasing the pedal they should go out. If the lamps do not light up, check the brake pedal sensor and the voltage supply from the battery to the wiring harness block.
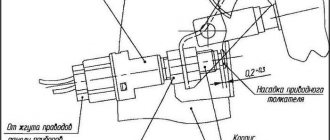
(Largus, Vesta, XRAY) Move the rod lock to the right position using a screwdriver. We check the brake pedal sensor using a multimeter in ohmmeter mode. Circuit 3-4 should be closed (resistance value is close to zero), and circuit 1-2 should be open (resistance should tend to infinity). After pressing the rod, circuit 3-4 should open, and circuit 1-2 should close. Before installation, move the rod to the left position.
(Priora, Kalina, Granta, Niva 4x4) Circuit 1-4 should be closed, and circuit 2-3 should be open. After pressing the rod, circuit 2-3 will close, and circuit 1-4 will open.
Thus, the cause of error P0504 may be:
- faulty sensor or its wiring
- Brake pedal sensor is not adjusted
- it is necessary to reprogram the ECM (instruction No. 46-15 for Lada Granta and Kalina 2 with automatic transmission, site users can download it)
To download files you need to log in to the site.
How to change
The sensor is located slightly above the brake pedal lever. To find it, you need to look under the torpedo. On Lada Priora, Grant and Kalina, a 19 mm open-end wrench will be required for dismantling. The replacement process looks like this:
The old sensor is quite repairable. In most cases, the cause of the malfunction is a broken spring. If you disassemble the body and install a new spring, the “frog” will work again.
Car owner's comment: On my Lada Grant, a spring broke in the sensor and began to close the contacts of the limit switches. When I left the car overnight, the ignition did not seem to turn off, which is why the battery ran out completely several times. I bought a new battery, but the problem did not go away until I made diagnostics and replaced the sensor. At the same time, the Check Engine did not light up.
where is the switch, frog and repeater located
The purpose of the brake light is to warn drivers behind you about braking. It should turn on as soon as the brake pedal is pressed. If the stop is faulty, it can cause an accident. The article discusses the brake light, the principle of operation, typical malfunctions, methods for eliminating them, and provides instructions for replacing them yourself.
The principle of operation of the brake light
The brake lights are located at the rear of the car. Red lanterns. They light up automatically if the driver brakes. When the driver takes his foot off the brake pedal, they are also automatically turned off. The presence of stops is mandatory for vehicles.
The lights should be located symmetrically and burn brighter than the side lights. Brake lights are installed on the sides, on the rear window, in the center above the line of the side stops.
Primary and secondary brake lights can be a single bulb, a neon tube, or a set of LED bulbs. The car enthusiast is additionally equipped with a brake light repeater. The rear brake light can also serve as a fog light. You can install a formula 1 brake light (the author of the video is Mikhail Ermolaev).
The simplest brake light includes a breaker (switch) and a flashlight. The brake light switch is often called the frog switch. The plastic body of the breaker contains two terminals, a rod and a spring. This device is installed on the brake pedal.
When the driver presses the pedal, the rod enters the breaker body, the contact closes and the light comes on. As soon as the driver removes his foot from the brake pedal, the spring pushes out the rod, the contacts open and the light goes out.
LED brake lights consist of a chip and a sensor, which in this case is a frog, it sends a signal when the driver presses the brake. As with the single lamp, the frog is mounted under the brake pedal.
Which one to buy
Experts and service workshop specialists recommend purchasing an original brake sensor. It is of better quality and lasts longer.
Table 1. Price of brake pedal position sensor
| Manufacturer | Code | Cost, rub. |
| AvtoVAZ | 11183720010 | 170 |
| Avar | 2113720 | 180 |
| AMY | 11183720010 | 95 |
Before changing the “frog”, you can “ring” it with a tester to make sure the part is working.
Error P0504 or problem with the brake pedal sensor; ""
Below we will find out how it works and how to replace it.
Purpose, location and operating principle
The essence of the system is that when you press on the brake, the piston in the cylinder begins to move. After this manipulation, fluid enters the brake system from the intake valve. It passes through the pipelines towards the main wheel mechanism, thus creating a suitable situation for the pads to move towards the wheel discs and drums. As a result, contact and subsequent braking occur. The controller itself turns on the brake lights.
When is pumping required and how to prepare for it
Bleeding the brakes is not always necessary - if the brake system is functioning properly, then bleeding is not necessary.
It is required only in the following three situations:
- When the pedal begins to “fail” (as was mentioned at the very beginning of the article).
- After replacing any component of the brake system.
- After replacing the fluid.
All these situations are caused by one single reason - air entering the system. So, if the pedal began to “fall” by itself, then, most likely, the brake tract was depressurized in some area, and air leaked inside.
When replacing parts, air also enters the brake system in large quantities and remains inside, causing its failure (the same applies to a complete replacement of the brake fluid).
Error P0504 Lada Granta: how to check and reset ⋆ I Love My Lada
Regardless of the mileage and condition of the car, the Lada Granta may display error P0504 against the backdrop of a lit Check Engine light. The reasons why this happens can be different, and the consequences can be different. How to eliminate error code P0504, what to do if the Check Engine light comes on - all the causes and methods of elimination.
What is error P0504 on Lada Granta
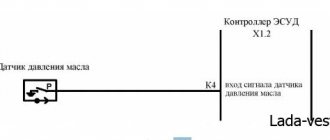
Error P0504 is in any case associated with the brake pedal sensor. Calling it a sensor, however, is not entirely correct, since it is a regular limit switch with two contacts. A simple device with a spring-loaded contact pad that supplies voltage to the brake light lamps when the brake pedal is pressed.
Brake pedal limiter Lada Granta
The problem is that on Grants with an automatic transmission and an electronic gas pedal, the readings of this switch are taken into account when calculating the transmission algorithm. This means that when the limit switch contacts are closed, a signal is received from the ECU to the throttle valve, which seeks to limit engine power. In this case, the brake lights may light up, or they may not work at all if the lamps are working.
In this case, the cause of error P0504 is a broken brake light switch spring.
Causes of error P0504 Granta
An error regarding an incorrect signal from the brake pedal switches occurs in some cases solely due to an unadjusted limit switch. The fact is that after reflashing the electronic control unit M 74 and M 74.9.7, engineers made some adjustments to the engine control algorithm, which ultimately should have affected the reduction of harmful emissions. In practice, changing the firmware only strangled the engine and caused a bunch of problems with sensors and limit switches.
The end switch and its catalog number
The Lada Granta has both a brake pedal position sensor, a limit switch and a brake light switch installed in one housing. The first reason for the appearance of error P0504 is incorrect adjustment of the position of the sensor housing.
How to adjust the Grant brake pedal sensor
The sensor is fixed to the bracket with two nuts screwed onto a plastic housing. The upper nut is responsible for the position of the sensor relative to the brake pedal. The nominal gap between the pedal platform and the heel of the sensor should be 2-3 mm when the pedal is fully released.
Adjusting the brake pedal sensor gap
If there is no gap, the sensor may be triggered at the slightest touch of the pedal, which leads to error 0504 and activation of the Check Engine warning light. After simply adjusting the gap with two keys, we start the car and look for errors. P0504 will not reset immediately, but if the problem was an adjustment, the error code will disappear after 10-15 minutes of running the engine at idle speed. If this measure does not help, we check and look for the reason further.
Broken brake pedal sensor
One of the likely reasons for the appearance of this error on Grant is a malfunction or defect of the brake pedal end itself. The quality of AvtoVAZ components has always left much to be desired, and this happened this time too. Even domestic sensors, as a rule, are equipped with cheap Chinese springs and contacts. As a result, the springs break and the contacts simply burn out after 5-8 thousand mileage.
The left sensor is not working, the rod does not return to its original position
The sensor rod does not return to its original position (due to the spring), so the system perceives the signal from the sensor as a signal that the brake pedal is pressed. In this case, the ECU interprets the situation as simultaneous pressing of the gas and brake pedals, thereby forcibly closing the throttle valve.
In some cases, replacing the brake pedal sensor solves the issue with error P0504 on Grant, but if a known-good sensor after installation did not lead to any results, we dig further.
Lamps and wiring - causes of error 0504
And again about the components. If it were not for the reviews of Lada Grant owners, it would be difficult to accuse a working brake light of sabotage. But the fact remains a fact. The working spiral of a single-contact brake light lamp is stretched, and the antennae that hold it close with others. In this case, replacing the stop lamps will help get rid of error P0504.
Repair methods
To repair the reverse signal, you can proceed in two ways. They differ in the way the sensor is accessed.
- Drive the car onto a lift or pit.
- Do the work by climbing under the car.
If you have already encountered a similar problem, then you will probably agree that replacing the DZH is best done using a pit or overpass. This makes access to the sensor as comfortable as possible, plus you minimize the risk of being splashed with oil from the gearbox.
Replacing the DZH is not the cleanest job
Of course, there is another cleanest way - sending the car to a car repair shop. But then you will have to pay not only for the sensor, but also for the services of the specialists. And this is another 2-3 times the cost of the sensor. The choice is yours anyway.
Self-replacement
It’s not difficult to get to and replace a failed DZH on your own. Follow the instructions, do not break the sequence of operations, and then the process will not take you much time and effort.
- Place the car on a pit or overpass. Be sure to apply the handbrake and place the transmission in first gear. This will help prevent your car from accidentally rolling away.
- Remove the protection from the contacts of your sensor, disconnect the contacts.
- Prepare a container into which the oil will be drained when unscrewing the DZH.
- When the container is ready, remove the sensor. In some cases, it may not be unscrewed by hand. In such a situation, use a 22 mm socket.
- Very rarely even the key cannot help, since the sensor becomes stuck to its location. Here you will have to arm yourself with a hammer and chisel and try to remove it as carefully as possible.
- Take out the failed device and insert a new one in its place.
- If oil gets on the gearbox housing, remove it with dry rags. There is no need for extra dirt. Plus, it can lead to a decrease in the efficiency of the device.
- Return all contacts to their places, put the protection back on.
- If a decent amount of lubricating fluid has spilled out of the box, be sure to top it up. Just use fresh ones. By the way, this is one of the reasons to completely change the oil in the gearbox if it has been there for more than the first season.
- The decision to change the oil will simplify the task when removing the sensor. If the liquid is drained in advance, it will not flow in different directions when the sensor is unscrewed. The work will be cleaner, plus you will kill two birds with one stone - replace the sensor and gearbox oil.
Description of the clutch pedal sensor
What kind of device is this and how to replace it is below.
Purpose, location and operating principle
The clutch sensor is installed directly on the clutch pedal. It influences engine control with an electronic gas pedal and provides a convenient and flexible control scheme for machine modes. On its own, it looks like a nondescript switch that has on and off modes.
Typical malfunctions and methods for their elimination
If the controller does not detect signals from the clutch, then there is a risk of error 0830. The occurrence of this problem is usually a malfunction of the clutch sensor or a short circuit or open circuit. To correct this state of affairs, it is necessary to identify the reasons. That is, inspect the contacts for breaks or corrosion.
Functionality check
Before blaming the sensor for the malfunction of the reverse signals, make sure that the device has actually lost its functionality. To do this, run the diagnostics:
- Turn the wheels to the left all the way and look at the sensor from the driver’s side - there is a protection on the side of the gearbox, and contacts inside it;
- Remove this protection and inspect the device. There are also two contacts going to the sensor;
- Close the contacts on the frog limit switches (this is the same reverse sensor) and start the engine, engaging reverse gear;
- If everything is fine, the wires and contacts are working properly, then the white headlights will turn on;
- If the headlights do not light, use a tester to check the voltage on the wire (orange) and ground;
- If there is voltage, check the light bulb board and the quality of the contacts.
Causes of the problem and solutions
There are several most common reasons why the DZH fails. But there are countermeasures that can return the sensor to operation.
Causes of the problem
The contacts on the wiring have oxidized
They just need to be thoroughly cleaned and returned. In this case, the negative terminal of the battery must be disconnected
As the sensor is used, it may move out of its seat. Screw it in tighter
There is no contact with the wiring in the gearbox
Check the condition of contacts and wires. Clean or replace damaged parts
There is no contact between the plug and the fuse box
Also check the condition of the contacts, clean them, change the wiring
Here the situation can only be corrected by replacing the fuse
In some situations, the sensor is working properly, the contacts are intact and the wiring is undamaged. In this case, the light bulbs themselves burned out. They are easy enough to replace.
WHY ARE THE STOP LIGHTS NOT GOING ON?
The brake light indication is one of the most important signals indicating driver actions. Therefore, it is impossible to postpone repairs if the brake lights are not on. If you notice a malfunction along the way and you are unable to eliminate the cause of the breakdown, turn on the hazard lights and drive at low speed to the nearest service station or a place suitable for DIY repairs.
SEARCH PRINCIPLE
To find a fault in any vehicle on-board network system, you should use the method of sequential elimination of elements. The point is to consistently check electrical appliances and sections of the circuit, excluding elements from the list of reasons that could cause a breakdown. To do this, you need to clearly understand the design and operating principle of the system. When troubleshooting, you need to move from the components that require the least effort to check, to the most difficult to diagnose elements.
Video “Replacing a foot on a Mercedes”
This video demonstrates how to replace a brake light with your own hands using the example of a Mercedes (the author of the video is Ivan Poknya).
The reverse sensor turns on the rear white lights when you back up. The opinion that the device is unnecessary is erroneous. The signal sent by the reversing sensor to the white lights tells other road users that you are moving back or have already started and are driving in reverse. At night, these white lanterns illuminate the path back for your convenience, signaling your intentions to others. The rear light signal device is a necessary thing. As has been said in other articles, everything in the car must work properly!
Video “Eliminating squeaks”
You can learn how to solve one of the problems associated with the clutch in a car from the video from the author Konstantin Biyanov.
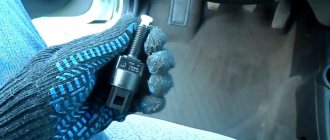
The mileage of the car is 2500 km, and the check is already lighting up with alarming frequency. The pre-installed BC multitronic displays a message that error P0504 is a problem with the brake pedal sensor. I erase it so that it doesn’t become an eyesore, but nevertheless, the error pops up. What to do? How can I adjust/change this button? In the photo this bastard is indicated by a red arrow. As people write, you need to play with adjusting it, which is done with two nuts. The most common thing is that people adjust so that the sensor button barely touches the brake pedal pad. In general, let's give it a spin and see. My BC immediately starts yelling as soon as I start the car, saying there is a mistake. I'll go dig around this weekend.
I noticed that the error pops up more often when you stand on the brake with the selector “D” on. I think the problem is deeper than just adjusting the sensor.
Yesterday, April 14, 2014, I was at the dealer for maintenance. In particular, he voiced hemorrhoids with error P0504. The dealer cheerfully undertook to fix everything. But he didn’t fix it, he said that we need to order a brake sensor, they say it’s defective. I drove out of the gate and wasn’t even surprised when the CHECK light came on again. And this morning the car did not start from the remote control, the BRAKES light was displayed on the key fob, which was corrected by pressing the brake a couple of times, then the car simply did not move, became dull, twitched, but after hitting the brake pedal again, everything was corrected, but then again. In general, the morning did not go well. I freaked out, went to the store and bought this damn sensor.
Here he is, the bastard, in the photo. I went to the dealer, where they changed it for me in 25 minutes without charging a penny. On my part, the cost is 170 rubles for a purchase in a store. So far nothing lights up or jerks. I want to disassemble the removed sensor at home and see what in such a cheap and simple part for 170 rubles was ruining the life of a car worth 450,000 rubles! The truth is, I don’t know how to assemble it, the upper part is on three clips, which are very hard, I wouldn’t want to break it.
About the VAZ 2114 system
As you know, the VAZ 2114 is practically a copy of the VAZ 2109, but only subjected to restyling. The VAZ 2114 inherited almost all the parameters of the “nine” with the exception of one; the fourteenth model was always produced only with injection engines, but the “9” started off the assembly line with carburetor engines.
Everyone knows about the reliability and unpretentiousness of an injection engine compared to carburetor counterparts. Currently, there are fewer and fewer cars with carburetors, and the production of such cars is completely prohibited due to European standards.
The VAZ 2114 injection system is equipped with a huge number of different sensors that are involved in the operation of the engine. Sometimes it happens that one of the sensors may fail and then the operation of the entire internal combustion engine becomes incorrect, the “CheckEngine” lamp lights up, fuel consumption increases and much more. To quickly and accurately identify vehicle malfunction problems, you need to know all the signs of sensor malfunctions to identify the culprit of the problem.
When is clutch adjustment required?
VAZs use a dry type of clutch, that is, there is a basket consisting of two parts - driving and driven
Clutch adjustment of the VAZ 2114, and other vehicles, is carried out in cases where defects associated with the operation of this mechanism appear. Such malfunctions include:
- clutch pedal adjustment;
- clutch cable adjustment;
- pedal height adjustment;
- clutch adjustment.
In another case, the need to adjust the clutch drive may arise due to previous incorrect adjustment. It is possible to reduce or increase the working stroke of its pedal.
The photo shows the clutch of a VAZ 2114
As a result, malfunctions occur in the operation of the drive - the clutch begins to “slip” or “drive”, gear shifting becomes difficult, jerks appear when starting from a standstill, fuel consumption increases, etc.
Checking the brake fluid level
The brake fluid level is checked periodically: daily during vehicle operation, during each maintenance, after operations to pump the brake system hydraulic drive and replace the brake fluid, when a warning lamp lights up on the instrument panel, indicating an insufficient level of brake fluid in the master cylinder reservoir.
1. We prepare the car for work.
2. Use a rag to remove dirt from the master brake cylinder reservoir.
3. Visually check the brake fluid level in the reservoir. It should be between the MIN and MAX marks on the tank body.
4. Check the degree of wear of the brake pad linings of the front and rear brake mechanisms.
5. If the wear of the brake pads is within normal limits, and the fluid level in the reservoir is below the MIN mark, then disconnect the tip of the wiring harness from the emergency brake fluid level drop sensor, unscrew and remove the reservoir cap.
6. Add new brake fluid to the reservoir up to the MAX mark (when installing the reservoir cap, the sensor float will be immersed in the liquid and its level will increase).
7. Close the tank lid tightly.
8. Connect the wiring harness block to the sensor connector.
9. Check the operation of the emergency brake fluid level sensor: with the ignition on, press the rubber lining of the reservoir lid from above. If the sensor is working properly, the warning lamp on the instrument panel will light up.
Location
First you need to understand where exactly the device is located.
- Fly under the bottom and look up at the suspension. The desired object on the VAZ 2114 is located on the gearbox. There are only two sensors - speed and reverse.
- If you don’t want to crawl under the car or can’t, try getting to the device through the engine compartment by opening the lid. Although the first option is objectively more convenient.
Device location
Checking brake pad wear
We check the degree of wear of the brake pads of the front brake mechanisms in the following sequence.
1. Place the car on the inspection ditch.
2. Remove the front wheels.
3. When checking the pads of the left brake mechanism, turn the steering wheel completely to the left, and when checking the pads of the right brake mechanism, turn it to the right.
4. Through the inspection hole in the movable caliper bracket, we visually determine the thickness of the brake pads.
If the thickness of the lining of at least one pad is less than 1.5 mm, we change all the brake pads of the brake mechanisms of the right and left wheels.