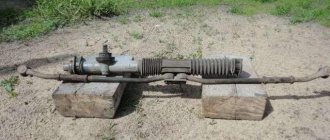
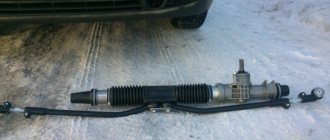
The vehicle control system is responsible for the direction of its movement, as well as, to a large extent, for the safety of the driver and passengers. One of the most important elements of this system is the steering rack. Its role is to transfer force from the steering wheel to the rods, which, in turn, force the steered wheels to turn in one direction or another.
With the exception of the latest versions in VAZ-2110 cars, the steering rack is not equipped with a power amplifier, but this does not mean that its mechanical design will last forever. Like any other moving mechanism, it sometimes fails. We will talk about what the VAZ-2110 steering rack is and what problems happen with it in this article. In addition, we will figure out how to repair or replace it yourself.
Design and role of the steering rack in the control system
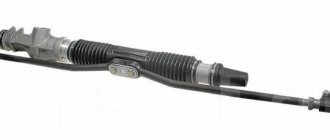
The VAZ-2110 steering rack is a steel form, one side of which has teeth that mesh with the teeth of the drive gear. The latter is driven by the steering wheel through the shaft and its cardan. In VAZ-2110 cars, the steering rack is located in a column, which is mounted on the partition between the engine compartment and the passenger compartment.
Its upper part has a mount for two rods, which are connected to the shock absorber struts through the tips and their fingers.
When you turn the steering wheel, its shaft rotates and transmits force through the cardan to the drive gear. As it rotates, it moves the rack along with the rods in the desired direction. This is how the car is controlled in such a simple way.
Naturally, to ensure normal operation of the rack, the design of the steering mechanism includes a number of other parts:
- column housing (case);
- protective casing (corrugation) with clamps;
- two drive gear bearings (ball and needle);
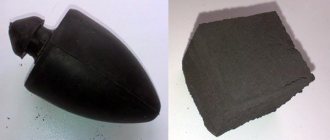
- support sleeve (fluoroplastic);
- emphasis;
- thrust nut;
- anthers, plugs, washers, etc.
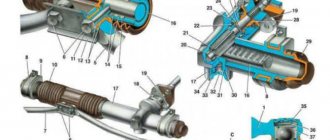
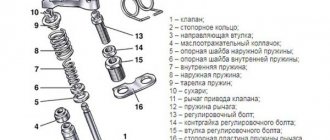
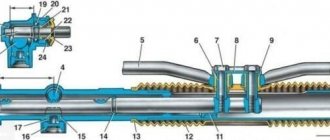
Steering mechanism assembly with drive
1 – tie rod end; 2 – ball joint of the tip; 3 – rotary lever; 4 – adjusting rod; 5 and 7 – inner tie rod ends; 6 – bolts securing the steering rods to the rack; 8 – steering gear mounting bracket; 9 – steering gear support; 10 – protective cover; 11 – locking plate; 12 – connecting plate; 13 – rubber-metal hinge; 14 – damping rings; 15 – rack support sleeve; 16 – rack; 17 – steering gear housing; 18 – coupling bolt; 19 – elastic coupling flange; 20 – roller bearing; 21 – drive gear; 22 – ball bearing; 23 – retaining ring; 24 – protective washer; 25 – sealing ring; 26 – bearing nut; 27 – intermediate steering shaft; 28 – boot; 29 – protective cap; 30 – sealing ring of the stop; 31 – rack stop; 32 – spring; 33 – stop nut; 34 – retaining ring of the stop nut; 35 – plug; 36 – liner spring; 37 – ball pin insert; 38 – ball pin; 39 – protective cap; A, B – marks on the boot and crankcase; C, D – surfaces on the ball joint and swing arm
How to eliminate backlash?
If you identify signs of a malfunction, do not despair; perhaps everything will cost you with minor repairs, especially since the rack itself very rarely fails. First, let's figure out whether there is play in the steering wheel and how to tighten the steering rack on a VAZ-2110 to get rid of it. First of all, open the hood and find the location of the column. We dismantle the engine elements that interfere with free access to it (air filter, air duct). Holding the steering rods with both hands, try to move the rack left and right. If play is detected, we get rid of it by adjusting the thrust nut.
Adjusting the VAZ-2110 steering rack is a fairly simple process, but this will require a special 17mm wrench with an octagonal head. Without this tool, work can not begin. If the key is at hand, go under the car and remove the engine protection. After this, move under the front of the car and find the location of the column. Remove the plastic plug from the thrust nut. Further adjustment of the VAZ-2110 steering rack is carried out by tightening this nut inside the column body. Rotate it 10-15 degrees, then check the amount of play. If necessary, repeat the procedure. It is important not to overtighten the thrust nut, otherwise the steering shaft will be difficult to rotate.
In addition, check the reliability of the tie rods. If necessary, tighten their fastening bolts.
Which steering rod silent blocks are better?
Recently, there have been many samples of low-quality products, especially in the range of auto parts. Among the main manufacturers of high-quality auto parts, the following Korean and Polish companies can be distinguished: CTR, GUMEX. The main thing is not to fall for cheaper Chinese-made analogues. The part must be manufactured with high quality and meet the necessary requirements, both in size (width and diameter) and rubber quality. for a beginner to decide on a quality part, so you should rely on the seller’s recommendations.
I would like to note that steering rod silent blocks for VAZ-2110, VAZ 2111, VAZ 2112, Balakovo (BRT) production fit perfectly into steering rods of Daewoo Lanos, Daewoo Nexia, Daewoo Sens, ZAZ Sens (ZAZ Sens).
What tools are needed to replace steering linkage silent blocks?
- jack;
- wheel wrench;
— ring wrenches 15, 19;
- screwdriver;
— it is desirable to remove the steering tips, but no one canceled the old, good hammer;
- vice.
It is better to replace the steering rod silent blocks of VAZ 2109, VAZ 2110, VAZ 2112, Daewoo Lanos, Daewoo Nexia, Daewoo Sens in an inspection pit or, if possible, on a lift. In case of replacing the silent blocks of steering rods with an 8-valve engine, the replacement of the silent blocks is carried out from above.
Removing the steering column
If after adjustment the problem with the rack does not disappear, you will have to disassemble and repair it. But to do this it needs to be removed. There are two methods of dismantling: with and without tie rods. The latter method is preferable as it requires much less time. Before removing the steering rack on a VAZ-2110, the front part of the car needs to be jacked up on both sides. This is necessary in order to unload the traction.
In the cabin, in the area of the pedal block, you need to unscrew the steering shaft cardan bolt. After this, we go to the engine compartment and unscrew the 2 bolts securing the rods, having previously bent the locking plate. Then you need to unscrew the 4 bolts securing the steering column to the car body. When this is done, remove the column and remove it through the opening of the left wheel arch.
↑ Steering gear
The steering drive includes two composite steering rods and swing arms 11, welded to the telescopic struts of the front suspension. Each rod, in turn, consists of two parts - internal 12 (long) and external 9 (short) with split tips with internal threads, as well as an adjusting rod 8 (connecting the internal and external rods) with external threads of different directions at its ends and a hexagon in the middle. The length of the tie rod changes when the adjusting rod is rotated.
For a reliable connection, it is necessary to ensure the distance between the ends of the tips and the hexagon: on the inside within 10.8-14.2 mm, on the outside - 10.6-16.3 mm. After the adjustment is completed, the tie rod ends are bolted together. The outer (short) rod 9 is connected to the rotary lever 11 through a ball joint 10, consisting of a liner, a liner spring and a pin. To protect against dirt, the hinge is covered with a rubber protective cover (boot). The hinge forms a non-separable structure with the tip, therefore, if it fails, the tip should be replaced with subsequent adjustment of the wheel toe.
What is a do-it-yourself VAZ-2110 steering rack repair?
Take care of your tools in advance. Here you will need two special keys: a 17 octagon and a 24 octagon, as well as bearing pullers. It is worth noting that repairing the VAZ-2110 steering rack involves replacing parts that are most susceptible to wear. These are bearings and a drive gear boot, a stop, retaining rings, a support sleeve, and seals. All these elements can be purchased as a set. There are three types of repair kits on sale:
- minimal, including a support sleeve, boot, retaining rings and seals;
- standard, which in addition to the listed parts includes bearings;
- complete, which also includes a new rack.
It is recommended to buy a repair kit only after you remove the column, write down its markings (different versions of the VAZ-2110 may have different configurations) and disassemble it, identifying the spare parts that need to be replaced.
Diagnosing the malfunction
Like any other mechanism, the steering rack fails sooner or later.
A similar mechanism is present in any car, both equipped with electric and hydraulic booster and without it.
Muffled sounds and impacts can be felt when driving over uneven surfaces, and can also be transmitted to the steering wheel.
The malfunction manifests itself in a similar way when the car is stationary and the steering wheel is turned.
When turning the steering wheel, a significantly increased force may still be observed.
These main symptoms indicate that the steering rack needs to be repaired, no matter what brand of car they appeared on: VAZ 2110 or another model.
To determine the state of this node, we do the following.
Grasp the steering shaft where it meets the rack.
Jiggle it up and down. If a knocking noise occurs, this is evidence that either repair of the steering rack housing will be necessary, or a possible cause of the knocking may be a lack of lubrication in the so-called needle bearing.
Lubricate the bearing or replace this part.
The next step is to check the bushing for play and the contact of the rack with the steering gear.
To do this, grab the joint of the steering rods in the engine compartment and try to move the steering shaft.
This may result in insufficient tightening of the knots, which is not a big problem.
If knocking noises are definitely heard from the rack, then this particular mechanism is faulty and the steering rack will have to be repaired or replaced with a new one.
Now you must make a decision about which path to take next.
Of course, buying a new rack will be the best option, but also the most expensive.
Repairing the slats from specialists allows you to get by with a smaller, but still impressive amount.
There is also no guarantee how long the rake will last after restoration.
The most cost-effective solution will definitely be to do the repairs yourself.
Disassembling the steering column
We begin disassembling the control unit by removing the protective casing by cutting the plastic clamps. After this, use a special key of 17 to unscrew the thrust nut, take out the retaining ring, the spring and knock out the rack stop. Next, remove the boot and drive gear seal, remove the lock washer, and then use a 24mm wrench to unscrew the nut securing the ball bearing. We remove the gear. Now that there is nothing holding the rail in the case, we remove it through the right side of the case. We remove the needle bearing of the drive gear from its seat. To do this you will need a special puller. Check the drive gear bearings for play. If present, the bearings will have to be replaced.
The support sleeve must also be replaced. It has a cylindrical shape and is located inside the steering housing. The bushing is removed by prying it off with a screwdriver.
Step-by-step disassembly and repairs
The steering rack of a VAZ 2110 car must be disassembled, following a certain sequence of steps.
Step #1:
- fix the crankcase assembly in a yew that does not have hard jaws;
- pull off the stop and spacer ring located on the right side of the crankcase;
- remove the clamps holding the protective casing and remove the protection itself;
- remove the support located on the left side of the crankcase assembly, remove the protection in the form of a cap;
- Using a 17" hex key, unscrew the thrust nut and remove the rack;
- remove the spring and locking ring;
- hit the crankcase assembly against a wooden base and try to knock the thrust element out of the groove;
- remove the engine compartment seal and use a screwdriver to remove the gear boot element;
- use a special octagonal wrench set to “24” to unscrew the bearing fixing nut, not forgetting to remove the lock washer first;
- Using a key set to “14”, resting on a special protrusion, pull the gear out of the crankcase along with the bearing assembly, after which the rack is removed;
- Use a screwdriver to remove the bushing for the stop, turning it so that the protrusions coincide with the grooves of the crankcase.
In order to install a new bushing in the crankcase assembly, you will need to put on damper rings. Here the thin side should be placed opposite the cut. Next, you need to return the support sleeve back to the seat in the crankcase so that the protrusions fit strictly into the groove. Then you need to cut off the rubber ring and remove the excess rubber.
Step #2:
- removing the locking ring from the shaft on which the gear is mounted;
- Removing the bearing using a special puller.
Good to know! When there is no puller, a drill is used to tighten the needle bearing, which makes two holes in the end of the crankcase assembly so that they are directed towards the bearing to be removed. Through them, knocking out of the seat is performed.
A properly functioning steering system will give the driver, in addition to a feeling of comfort, also a guarantee of safety on the highway. It is necessary to constantly monitor the working condition of this mechanism, and at the first sign of a breakdown, take immediate action.
Assembly procedure
We begin repairing the VAZ-2110 steering rack by installing the needle bearing of the drive gear. The seat is first generously lubricated with a special lubricant such as “Fiol-1”. After this, we press a new ball bearing onto the drive gear shaft. Next, install the support sleeve from the repair kit inside the control unit housing. Now we fill the inner cavity of the column with lubricant and insert the steering rack into it.
We mount the drive gear and secure it with a locking ring and nut. We put a new boot on its shaft.
We install the stop with the seal in place, secure it with a stopper and a thrust nut. That's basically it. Now you need to adjust the control unit and put the protective cover on it.
How to make repairs
- Fix the rail in a vice in a vertical position. Clean the surfaces with a brush or cotton cloth previously soaked in white alcohol.
- Take out the steering rods. To do this, unscrew the bolts on the bracket that hold the rods, bend the force at the locking plate using a 22mm wrench.
- Remove the plate rods - locking and connecting.
- Pull out the tie rods.
- On the right side of the steering assembly housing, remove the retaining ring and support.
- Cut off the clamps that hold the protective cover. These are disposable items made of plastic. Replacing them is very easy and cheap.
- Remove the cover.
- On the left, remove the support and protective cap.
- Armed with a 17mm wrench, unscrew the nuts that are located on the rack stop. Remove it, take out the spring and ring.
- Knock the rack stop out of the socket. Hit the crankcase against a wooden base. To seal the groove, install a rubber ring on the stop.
- Remove the seal, remove the gear boot by prying it off with a screwdriver.
- Remove the lock washer.
- Using a 24mm wrench, unscrew the nut that holds the gear bearing.
- Remove the nut from the shaft.
- Using a 14mm wrench, unscrew the gear from the crankcase, simultaneously with the bearing itself.
- Remove the rack and remove the bushing. The element is pryed off with a screwdriver so that the protrusions fit into the holes in the crankcase. This will allow you to get the part without any problems.
- Install a new bushing. It is recommended to attach new damper rings made of rubber to it. This must be done so that the thin part of the ring is opposite the cuts in the bushing, and the protrusions on the bushing are freely placed in the crankcase hole.
- The rings need to be cut along the edges of the sleeve and the excess elements removed.
- Remove the retaining ring from the gear shaft.
- Use a two-jaw puller to compress the wide bearing.
- Press out the needle bearing with the same device, or make two holes with a diameter of 2 mm in the end of the crankcase, and then the bearing will come out onto the ring.
- Rinse the crankcase thoroughly, press in the needle bearing using a piece of pipe. Treat the holes made with cold welding.
- Using Fiol 1 lubricant, treat the bearings, rack and gear teeth. Place UNIOL 1 grease into the cavity under the nut securing the drive gear bearing.
- Reassemble the structure in reverse order.
- Place the new cover in place.
- Be sure to try to maintain a gap of 0.12 mm between the rack stop nut and the stop itself.
- Tilt the nut after adjusting the gap, which will prevent it from unscrewing.
If such a DIY repair of the steering rack on a VAZ 2110 does not give the desired result, simply replace the element. You have already become familiar with the process of dismantling the rail. Having taken out the old unit, put a new one in its place, following a strict sequence of steps.
Replacing the steering rack of a VAZ-2110
It is rare, but it happens that replacing consumables is not enough. The steering rack, although made of steel, is still subject to wear. Most often, the reason for this is the negligence of car owners who do not monitor the condition of the steering mechanism. In addition, the rack may also be damaged as a result of a traffic accident. But there is no need to despair here either. The VAZ-2110 steering rack is replaced according to the scheme described above. The only thing you need is to purchase a complete repair kit, which costs on average about 1,500 rubles.
How to replace silent blocks in steering rods on a VAZ 2110-VAZ 2112?
1. First, remove the steering rod you need, or both at once, to remove them, you will need to unscrew the bolts that attach the rods to the steering rack (How to do this is explained above), then you will have to remove the tie rods from the holes and you can remove the rods (Regarding tips, it is written in the article: “Replacing steering tips on a VAZ”).
2. After which you will have to use a bolt of the appropriate size, the bolt that secures the wheel (One of the fastening bolts), it will need to be inserted into the hole of the silent block and using a hammer, you will have to hit the bolt several times and it, together with the silent block, will come out , but just keep in mind that you need to hit in such a way that the silent block can be pressed out without problems, that is, putting a rod on the asphalt and hitting the bolt with a hammer simply won’t work, you will have to either look for a vice and knock out the silent block as shown in the photo below, or just a couple of bricks Place it side by side, they will replace the same vice and the silent block will easily come out the third or fourth time (Instead of a bolt, you can use a head of a suitable diameter).
Useful tips
Finally, here are some useful tips that will extend the life of the steering rack and other elements included in the control unit:
- At least once a quarter, check the condition of the steering at a service station or yourself.
- Pay attention to the condition of the steering column protective cover.
- Try to limit driving on uneven surfaces, especially at high speeds.
- Do not test the strength of the steering rack and the entire mechanism by moving away with the steering wheel turned all the way to the side.
- If play or other signs of steering rack malfunction are detected, repair or replace it.
Dismantling, diagnostics and installation of the steering rack
Regardless of whether the rack is being repaired or replaced, it must be properly removed and reinstalled.
List of DIY tools
For dismantling and repair you will need the following tools:
- flat screwdrivers of different sizes;
- pry bar or mounting blade;
- small hammer;
- pliers;
- torque wrench;
- a set of socket and ring wrenches ranging in size from 10 to 27;
- open-end wrenches for 10, 13, 15;
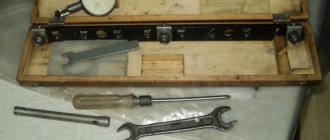
- special key for adjusting the steering rack. Such a key can be purchased at a car dealership or made independently.
Example of a wrench for tightening a steering rack
How to remove a part from a car for inspection
You need to know the location of the parts in the rack in order to carry out diagnostics carefully and scrupulously
Removal sequence for the rack:
- We unscrew the fastening of the steering cardan to the steering rack shaft in the cabin.
Remove all mounting bolts
Removing the dismantled part
The need to replace the steering rack: diagnostics
To restore the performance of the steering rack, it is not always necessary to replace it; often the problem can be solved by carrying out maintenance with the replacement of tips, covers and bushings. Beginners should not service the steering wheel on their own. The design of this mechanism has many springs and pressing washers, and not everyone can disassemble the mechanism, sort through the parts and correctly replace them with new ones. Unprofessional installation of these parts will lead to incorrect functioning of the mechanism. The same applies if you need to loosen the mechanism or tighten it. It is also necessary to remember that repair work may well be more expensive than replacement, so the choice is sometimes obvious.
Experienced car owners restore the slats themselves, but this is not always possible
It is necessary to change the part in the following cases:
- a crack in the rack body or the threads for fastening the tips are broken;
- very strong knocking in the rack, increased play in the steering mechanism;
- corrosion of the internal parts of the steering rack caused by rupture of the rubber boot;
- the rack was deformed after the accident.
In the above cases, restoring the removed part does not make sense. Restoration by professional craftsmen will cost a lot of money. Therefore, it would be more expedient to change the entire rail, which will require less time and financial costs. It will be much easier to purchase a new one in the store and install it assembled in place of the old one, ensuring excellent operation of the steering mechanism for several years to come.
Installing a new
After diagnosing and repairing the rack, we install it in place:
- We set the rack to the middle position. To do this, unscrew the shaft in any direction until it stops and return it 2.5 turns. The shaft flat should be on the right and located vertically.
- Carefully insert the mechanism through the arch and secure it in the reverse order of dismantling. Tighten the bolts with a torque wrench.
If the steering system malfunctions, you should not immediately call a service station or buy the entire unit. If you have basic plumbing skills, you can repair and adjust the steering rack in your own garage. At the same time, you will be sure that you did not spend extra money and the work was done to a high standard.
Every car enthusiast in the country who owns the tenth model of a Lada is faced with the issue of a faulty steering rack. When such a defect appears, the car does not “hear” well while driving, especially when moving on an uneven road surface. A strong play appears, radiating to the steering wheel.
In addition, this malfunction affects the performance of the front axle. It creates sound that sound insulation does not protect against. The listed factors indicate that it is necessary to repair the steering rack on the VAZ2110 or replace the mechanical unit.