The connecting link of the whole organism
There is a misconception among most car owners that the main thing in a car is the engine, transmission, and chassis. Someone will ask, why is it wrong? It is necessary to consider the machine as a single, whole organism. And all components and assemblies are exclusively components.
For example, a breakdown of the starting system will lead to the fact that the vehicle will stop and will not be able to continue moving. Requires prompt repair. How well the example was chosen is the topic of today’s article. However, whether or not the reader agrees with my statement is up to him to decide individually.
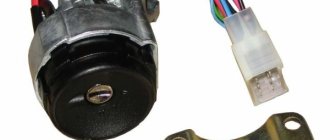
Board layout and layout
For the entire Lada line, the lock is located on the right side of the steering wheel, sewn into a plastic box, presented in the form of a complete block made of duralumin alloy. On the back side there is a board with contact connectors (8 in total). The contact group of wires has strictly its purpose, the diagram (pinout) is as follows:
- Key microswitch;
- Driver's door weight;
- Circuit for starter to supply “plus”;
- 12 W. for supply to the starting system;
- Zero on the key when it is in the keyhole;
- Illuminated lock slot;
- Voltage directly from the battery;
- Reserve socket for connecting other devices at the driver’s discretion.
Despite the fact that old and new locks are sold, with and without backlighting, the structure of the core and contact board is absolutely identical. When the wire connection diagram does not match, carefully refer to the operating instructions.
Device Features
Let's start with some basic things you should be aware of before embarking on a replacement or repair.
- The ignition switch (IZ) is the main element of the car's starting system. You will not be able to start the engine without it.
- The lock has a built-in anti-theft system. Therefore, if the protection does not work, the risk of becoming a victim of car thieves increases significantly.
- The ZZ is capable of blocking the starter from being turned on again, but without initially turning off the ignition.
- For tens, the key can be removed from the lock when it is in the “zero” position. By taking it out, you will thereby extend a special rod, which is responsible for the anti-theft functions.
- If the key moves from position zero to “one”, then the locking rod goes away and the ignition contacts close.
- When the car is started, all electrical equipment receives power and is energized. This applies to the dashboard, headlights, generator, windshield wipers, power windows, heater, turn signals, etc.
- By turning the key to position “two”, you thereby close another group of contacts, which makes it possible to apply voltage to the starter relay. This will start the engine and you can drive.
”
Key position
- The main position is “0” when the system is completely de-energized;
- O will indicate that the system is active and turned on. It is possible to turn on the dimensions, headlights, direction indicators, windshield wipers, the informative instrument panel lights up, the stove heater is activated, the heated filaments of the rear window of the car glow, a lamp on the console shows the status of the units;
- Key on: the car's power unit is started. But to start the engine itself, moving the key to position “II” is not enough. You need to turn it a little further until it stops. Voltage will be supplied to the car starter, which will start the engine. After a successful start, the key will return to position “II”, the starter will turn off, and the internal combustion engine will continue to operate. Sometimes the engine does not start the first time.
Symptoms of a problem
- After starting the engine, the car key does not return to position “II”. This indicates that the ignition switch cylinder is already very worn, the return spring is weak, and the resistance has decreased. At this moment, the starter and motor work simultaneously, which is detrimental to both components of the car. Systematic such “starts” will lead to the fact that the owner will have to buy new “brushes” for the starter, worse when the starter is entirely. And this is not a cheap pleasure. The spring cannot be repaired, so purchasing a new one is required.
- Mechanical damage due to an attempt to steal a vehicle by intruders;
- The entire system does not work: due to careless handling by the driver himself. It's no secret that each of us has our own manners and driving style. Some treat their “favorites” with care, others change them like gloves.
Solutions
Drivers without experience, as practice shows, at the first breakdown, run to service stations or car markets to buy a new ignition switch, giving away their hard-earned money. My advice is, don't rush to do this. Perhaps the reason is completely trivial, not worth such waste. Do-it-yourself replacement will take no more than 5 minutes. If you are not sure, contact a highly qualified electrician at a service station to carry out diagnostics and identify the fault. Having the skills, disassemble the lock and repair the damage. The lock from Priora is similar in design to the younger and older models, for example, the VAZ 2107, and the VAZ 2114 has a similar structure.
Installation of a new larva
To replace the lock core due to mechanical failure, remove it from the vehicle as described above. Then follow this algorithm:
- Insert the key into the slot and use a Phillips screwdriver to unscrew the 3 screws holding the 2 halves of the lock body together.
- Separate the housing while holding it with the key facing up. If you hold the lock in a different position during disassembly and do not insert the key, the insides will spill out and you will not understand how to put them back together. In this case, the ball with springs may get lost.
- Remove the locking mechanism, which consists of two spring-loaded parts, and pull out the spring itself.
- After removing the key, carefully remove the core so that the ball with the spring (located on the side of the cylinder) is not lost.
To disassemble the case, you need to unscrew 3 screws
Before replacing, it is necessary to remove the return spring from the old cylinder, since it is not sold complete with a new core. The spring is inside the part on the back side in a cocked state; it must be installed in the same form on the new cylinder. Also, do not forget to remove the thin spring from the hole where the ball is inserted.
The locking mechanism tongue peeks out from the bottom of the case
Important point. Remember that if you replace the core because it is broken, the new key will no longer fit the door lock. There are 2 options: use two separate keys or simultaneously change the cylinder in the door. The last method becomes the only applicable one when all the keys are lost.
The larva must be pulled out so as not to lose the details
When installing the core, you need to move the spring for the ball into the hole and insert the part into the body. Then push the larva all the way, while simultaneously inserting the ball into the socket. After that, all that remains is to assemble the locking mechanism and tighten the housing with screws. When finished, check the operation of the ignition switch by turning the key to different positions.
The ejection spring from the old core needs to be moved to the new one
How to replace and disassemble?
- Remove the terminal on the battery from the o. If there is a central toggle switch in the car, you can turn it off.
- Using a Phillips screwdriver, unscrew the screws at the bottom of the steering wheel housing.
- We directly remove the casing itself.
- Using an “8” spanner, unscrew the ignition switch mounting bolts and disconnect the contact board.
- If the failure is in the core, then we replace it entirely with a new one; if the contact is damaged, then we replace the board.
- Assembly is carried out in a similar manner, only in reverse order. Electrical wiring must be packaged carefully and without damage.
For those who are unsure, you can use the car's operating manual, which describes in detail this or that unit, connection diagram, assembly, and photos are attached. Agree that the difference in price is significant, whether to buy the entire lock, or just the core.
Recommendation: good quality spare parts and components from the Dimitrovgrad Automotive Assembly Plant (DAAZ). Buy it, you won't regret it. The online store will help you quickly buy a part directly from the manufacturer. To choose a particular brand, be sure to read customer reviews and watch video tutorials.
The main thing when starting the car is to use the original key that “comes” from the factory. Since the immobilizer is a kind of anti-theft device that will prevent the engine from starting. The electrical circuit is connected to the car alarm or central locking.
The most common causes of failure
Electrical diagram of the lock
Replacing the ignition switch may be necessary in the following cases:
- Criminals tried to take possession of the vehicle, resulting in significant mechanical damage to the ignition switch.
- The car key was stolen or lost by the owner of the car.
- The contact group of the node is unstable or has completely failed.
Troubleshooting
Before tackling the question of how to change the ignition switch on a VAZ 2110, you need to find out the nature of the malfunctions. How to check the ignition switch of a VAZ 2110 is described in the instructions.
1-reserve; 2-minus backlight; 3-starter; 4-plus after the ignition switch; 5-reserve; 6-plus backlight; 7-constant plus; 8 is a constant plus.
| 1-5 | On the VAZ 2110 it is used for the immobilizer. You can connect any device you wish. |
| 1-6 | Castle lighting. |
| INT | On the VAZ 2107, these are lighting, wipers, and washer - a constant plus. |
| 50 | Starter. |
| 30/1 | A constant plus. |
| 15 | A plus appears when the ignition switch is turned on. |
Troubleshooting the ignition switch on a VAZ 2110 is carried out in the following steps:
- The battery will be disconnected.
- The casing is removed from the steering wheel shaft column. To do this, unscrew several screws.
- The lock connector is removed from the back.
- Using a multimeter, the voltages in the contact groups are checked. The installed key switches in different positions.
- Voltage on pins 8 and 30 is present only when the key is in zero position.
- In position 1, the servicing devices are turned on: turns, headlights and heated glass.
- In position 2, voltage is supplied to devices related to engine operation.
- In position 3, the starter is activated. The key then returns to its original position.
If there are interruptions during the verification process, then the ignition switch on the VAZ 2110 requires disassembly and repair.
Disassembly and replacement procedure
When the source of the malfunction is identified, the question immediately arises: how to disassemble the ignition switch on a VAZ 2110.
To do this, first it is removed. Since the preparatory work has already been done, the following actions remain:
- The housing mounting bolts are unscrewed.
- The lid made of plastic material is removed. The lock is removed.
Replacing the larva
Before changing the ignition switch on a VAZ, sometimes it is enough to replace the cylinder.
The process consists of several steps:
- A small diameter pin holding the cylinder is removed from the side. The work is carried out using a thin screwdriver and a hammer.
- The old larva is removed and the new one is installed.
- To check, the steering wheel is turned and the reliability of the jamming is checked.
- Sometimes the blocking is adjusted.
After replacing the used element, you need to know how to assemble the ignition switch of a VAZ 2110. This process occurs exactly in the reverse order.
Replacing the contact group
Knowing how to change the ignition switch on a VAZ 2110 with your own hands, this is not always necessary. Ingod the contact group fails, which, like the larva, changes.
Its replacement is carried out in the following order:
- All contacts are numbered before they are disconnected.
- Then they are disconnected.
- 2 latches are removed.
- The old group is removed and a new one is installed in its place.
- Then, in the reverse order, the assembly is assembled.
Complete lock replacement
Craftsmen who know how to change the ignition switch on a VAZ 2110 with their own hands have long realized that this process is much easier than replacing individual structural parts.
After disconnecting the battery, removing the steering casing and unscrewing the bolts, the plug is disconnected and the lock is removed. This completes the operation to remove the old node. A new product is installed in its place.
If you still have questions about how to change the ignition switch on a VAZ 2110 with your own hands, I recommend watching this video:
Replacing the ignition switch on a VAZ 2110: wiring diagram
If the ignition switch fails, there is no time for jokes. In fact, without the functioning of this unit, you will not be able to start the car. Unless you use the method from movies, where the main characters rummage through the wires under the steering wheel, connect a couple of wires and start the car. And then, it’s far from a fact that it will work on your top ten.
Therefore, let’s better discuss the real problems with the lock, talk about the principle of its operation, the features of pinout and replacement.
Professional advice
Such advice is as follows:
- Even having an understanding of the rules for replacing larvae and contact groups, it is better to refrain from this work. The repair process is complex and time-consuming. If you have an idea of how to change the ignition switch on a VAZ 2110, then it is better to replace the entire assembly.
- Graphite grease is used as a lubricant for the cylinder. It reduces the risk of biting the part.
- Even knowing how to change the ignition switch on a VAZ 2110, as well as how to change the door lock on a VAZ 2110, in the process of work you should give preference to branded products.
The procedure for replacing the ignition switch on a VAZ 2110 is a simple type of repair work. Even a beginner will not experience big problems. The main thing is to have the necessary equipment and tools on hand, and also to read the instructions well.
Ignition switch VAZ 2110
When the car does not respond to turning the key in the lock, the engine does not start, the instruments do not turn on, or the key itself rotates with jamming, then repairing the VAZ 2110 ignition switch will solve the problem. There are two ways to solve this problem: replacement and repair. Repairing the lock yourself will cost less than replacing it, but replacement will probably be faster and, of course, more reliable. In any case, you shouldn’t jump to conclusions; it’s better to first find out the cause of the malfunction.
Basic principles
Regardless of the type of engine used, the basis of the wiring used in the VAZ 2110 car is the same. It's easy to find a diagram, but not so easy to understand.
Let's look at the basic principles of wiring.
- All equipment and devices powered by electricity in the VAZ 2110 are based on a single-wire connection. VAZ designers specially provided for wires of certain colors to each be responsible for their own functions. Therefore, certain equipment is connected using wires of their own color. This allows you to independently understand the wiring, make it easier to carry out repair work and not spend money on car repair services.
- The downside to the VAZ 2110 is that the mass is the car body itself.
- The positive wire of the batteries on the top ten always comes only in red. Therefore, when making repairs, try not to change the color of the wire, so as not to confuse yourself.
- For each system that is connected to the electrical system, it is equipped with its own separate wiring harness.
- The VAZ 2110 is designed in such a way that when the battery is turned on, all electrics and electrical equipment are energized. This is related to the most common recommendation, which you have seen more than once in our materials, where we described the repair or replacement of certain components - disconnecting the negative terminal from the battery.
- Do not forget about the existence of the so-called contactless system. This system is required to create a high-quality spark, which is simply necessary to ensure combustion of the air-fuel mixture. In order for a contactless system to function, high voltages are indispensable.
Carburetor models
The first versions of the VAZ 2110 model, which the domestic plant began to produce, were equipped exclusively with carburetor engines. Only after some time more modern injection versions appeared. They are objectively better. But this does not take away the fact that many have dozens of them under the hood with a carburetor.
Are there any significant differences in terms of electrical circuitry between a carburetor and an injector? We can say no. The carburetor systems used are almost entirely the same as on the more modern version.
Part of interior wiring
Also, you will not encounter serious problems in the form of electrical wiring if you suddenly want to replace a carburetor engine with an injection engine or equip the car with additional electrical equipment. You will even find identical plugs in the engine compartment.
The only nuance of switching from a carurator to an injector is the need to install additional wiring from the fuel pump to the on-board computer.
Injector
In addition to the wiring, which is identical for the carburetor and injector, the latter is additionally equipped with fuses and sensors.
In practice, due to the large number of regulators that ensure the operation of an electronic engine control unit of an injection type with 8 or 16 valves (there is none on the carburetor), the system turns out to be more complex. To repair it, you need to carefully understand all the components and their location.
Purpose of the lock
The lock is a breaker that opens and closes the contacts necessary to start and operate the motor. It was originally intended to protect the car from theft. Now, when car thieves are able to break into even the most complex electronic locks and new generation anti-theft systems, it has lost its significance as an anti-theft agent. The breakdown of this device creates a lot of trouble for drivers, and some even replace it with a “start” button. Let's look at how to diagnose the ignition switch of a VAZ 2110, repair or replacement, decide for yourself.
Determining faults
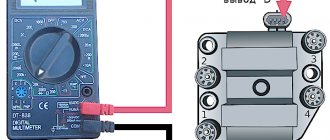
To identify faults in the lock, it is enough to test it (check it with a tester), to do this:
- Remove the terminals from the battery
- Unscrew the casing around the steering column
- Disconnect the lock connector
- We insert the key and use an ohmmeter to check the resistance of its contacts when switching modes 1, 2, 3 using the key
- When the ignition switch is fully operational, the resistance of the contacts we have selected should be zero
Using a tester we check the resistance of the lock contacts
Let's consider circuits that open and close at different key positions; in the photo below the table we show a diagram:
| The key is in position | Contacts (diagram below) live | Closable circuits |
| Position 0 (means off) | Contact 30 | None |
| Position I (ignition) | Contacts 30-15 | Ignition system circuit, generator excitation is started, power is supplied to headlights, turn signals, control panel, windshield wipers and glass washers, the heater fan motor is powered, the rear window heating and cigarette lighter are turned on |
| Position II (starter) | Contacts 30-15 and 30-50 | Starting the starter, all position devices are also energized |
Electrical diagram of the VAZ2110 lock operation
Lock pinout diagram:
- Pin 1 - 12V comes to the micro switch of the inserted key
- Contact 2 - ground arrives (zero) when the driver's door is opened
- Pin 3 - 12V goes to the starter (to pin 50)
- Pin 4 - 12V goes out after connecting the ignition (to pin 15)
- Contact 5 - 12 Volts go out when a key is inserted into the lock at 5 to the BSK contact
- Contact 6 - 12 Volts are supplied to the lock cylinder illumination
- Pin 7 - 12V comes from the battery (to pin 30)
- Pin 8 - not used
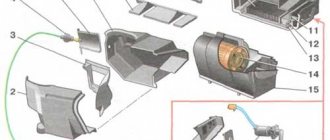
Removing the lock
After we have checked the condition of the lock using the electrical diagram, it is time to remove the ignition switch from the VAZ 2110; it is more convenient to carry out repairs with the lock removed:
- And so we have already removed the terminals from the battery, as well as the plastic covers from the steering column (to do this, unscrew the fastening screws from below)
- Disconnect under the steering switches (to do this, simply unclip the latches) and take a simple tool - a hammer, chisel and pliers
- For greater safety, the bolts securing the ignition switch have sheared heads.
- Therefore, you will have to unscrew them using a chisel and hammer
Unscrew the lock bolts using a chisel and hammer
- Now you can unscrew the bolts with pliers
- Remove the bracket from the column
- Remove the ignition switch
Instructions for removing the element
For disassembly you need to prepare a simple set of tools:
- 10 mm head and ratchet drive;
- Phillips screwdriver;
- narrow chisel (width 5-8 mm);
- hammer;
- round nose pliers with tapered, curved ends.
Ignition switch replacement tool
To successfully install a new or repaired lock in place, it is advisable to purchase 4 special fastening bolts with M6 threads with a head size of 10 mm and a length of 20 mm. Their feature is the heads that come off with a key at a certain tightening torque. After tearing off the heads, semicircular caps remain on the surface, which are much more difficult to unscrew for an untrained person. But you will have to do this during disassembly.
The battery must be disconnected before starting work.
Like any event related to tampering with the electrical part of the car, dismantling the ignition switch begins with disconnecting the negative terminal of the battery. Then proceed in this order:
- Using a Phillips screwdriver, remove the screws holding the two halves of the plastic frame of the steering column together.
- Lower the handle that fixes the position of the steering wheel during adjustment all the way down and remove the plastic panels. Disconnect the ignition switch block and carefully cut the tape connecting your bundle of wires to the common harness. In order not to cling to the steering column switch during operation, it can also be pulled out of the connector.
- On the metal casing of the steering column you will see a lock mount consisting of two clamps. They are held together by 4 bolts with the heads torn off (visible on the left side). Pointing the chisel at the semicircular caps, use a hammer to loosen the tightening of these bolts one by one.
- Using pliers and then your hands, unscrew all 4 bolts and remove the ignition switch.
Unscrewing the plastic steering column cover
Note. There are “dozens” in which not all the bolt heads are torn off during assembly. This simplifies the matter; the fasteners can be easily unscrewed with a 10 mm socket.
Bolts with intact heads can be unscrewed with a wrench
Dismantling the lock
To replace the backlight bulb:
- Disconnect the connector
- Remove the light bulb socket using small pliers
To replace a contact group:
- Use a screwdriver to remove the latches
- Then we remove the entire contact group
To change the micro switch:
- You need to unscrew three screws using a Phillips screwdriver
- Remove the rod
- Press the latch
- We take out the micro switch
We remind you that the ignition switch has its own catalog number 2110-3704005 or KZ-881, in case you buy a new one. After the repair, we screw everything back in the reverse order; we recommend screwing the lock with bolts that have break-away heads, so as not to make it easier for thieves.
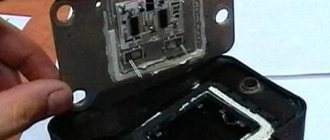
Replacing the contact group
In the event that, as a result of diagnostics, a malfunction of the contact group is detected, you will still have to remove the ignition switch, since it will not be possible to get to it in any other way. After removing the element, disassemble it using the following algorithm:
- Disconnect the connectors with the backlight power wires.
- Remove the decorative plastic cover by releasing the 4 latches. Work carefully because these clips are easy to break off, and buying a cover separately is quite a task. It is not advisable to change the entire lock because of it.
- By bending the 2 clamps holding the contact group, remove it from the ignition switch.
The plastic cover can be removed using a screwdriver
The contact group is located immediately under the cover
First of all, examine the status of the contacts. If they have darkened (oxidized), then clean the current-carrying surfaces with fine sandpaper P1000. Then put the group in place and, without installing the lock, connect it to the vehicle's on-board electrical system to check its functionality. If unsuccessful, the part must be replaced. The same will have to be done if the contacts are burnt or the group does not work without any external signs of malfunction.
The part is removed after bending two latches
Replacing the lock cylinder
Sometimes troubles arise when the key turns poorly or is poorly inserted into the lock. The problem is solved by replacing the cylinder, the price of which is less than the full cost of the complete lock; for this you will need:
- Hammer
- Pliers
- Chisel
- Thin drill bit and drill
- Phillips screwdriver
- Thin screwdriver
- New larva with keys
Let's start replacing
Our instructions will help you replace the lock cylinder without any problems:
- We carry out all the steps, as in the previous article, de-energize the electrical system of the machine, remove the covers from the column
- You can start replacing the lock cylinder now without removing the lock itself
- To do this, you just need to pull out the side pin that holds it in the lock.
- For this we need a clock screwdriver, we knock out the pin by tapping it with a hammer
- When the pin cannot be removed so easily, you can drill out the cylinder using a drill and a thin drill bit
- To remove the lock before proceeding to replace the cylinder, then first unscrew the bolts that secure the ignition switch
- Their heads are cut off, so use a hammer and chisel, then pliers
- Then the bracket and the ignition switch itself are removed from the steering column, do not forget to disconnect the electrical connector
- We unscrew the screw securing the relay, pull it out from under the panel, then disconnect the connector
- Disconnect the ground wires from the relay
- Use a Phillips screwdriver to unscrew the screw and press out the latch
- Now remove the cover and group of contacts
- Removing the lock
- We take out the larva as described above
- We make a replacement
- Before putting the ignition switch in place, you need to insert the key into it and turn it to position “I” so that the latch, which will block the steering shaft mechanism, is hidden in the lock body
- We install the ignition switch on the steering column together with the fastening bracket and tighten the new bolts that have breakaway heads with the “10” key. We remove the key and check the operation of the steering shaft locking mechanism
- If the shaft does not lock, then it is necessary to adjust the location of the ignition switch relative to the steering column so that the lock latch fits exactly into the groove of the steering shaft
- Then tighten the breakaway bolts until the breakaway heads break off.
Dismantling
If previous activities have shown that intervention in the design of the ignition switch is required, work in any case will begin with dismantling the device.
We have special step-by-step instructions for this.
- To begin, disconnect the negative terminal from the battery of your VAZ 2110. This way you will ensure your safety and the safety of all wiring. You know what the consequences of a short circuit are.
- Next, remove the casing on the steering column. This is how you gain access to the castle.
- If you feel that the rotary switches will interfere with your work, it is better to remove them immediately. The work does not last for a couple of minutes, so all irritants should be put aside.
- Armed with a chisel and hammer, unscrew the mounting bolts with round heads. Don't get confused, they are the only ones there. Try to perform this operation as carefully as possible so as not to knock off the bolt head.
- Now take the pliers and remove the bolts.
- Insert the key into the ignition and turn it to position zero. This will disable the anti-theft system.
- Next in line is the bracket that held the previously removed bolts and the ignition switch itself.
- Mark the contact wires using different colored markers. Otherwise, you can easily mix them up during reassembly.
- Often it is not necessary to completely replace the lock, but only partial repairs. For example, change the backlight bulb, or fix a microswitch problem.
- Disconnect the connectors that used to operate the ignition switch.
- To replace the backlight bulb, disconnect the corresponding connectors, and then use pliers to remove the bulb.
- To replace the contacts, use a screwdriver to press out the special latches.
- Using a shaped screwdriver, unscrew three screws, after which you can remove the rod.
- Use a regular flathead screwdriver to pry out the clips and remove the microswitch.
- Next, new ones are inserted in place of the dismantled elements.
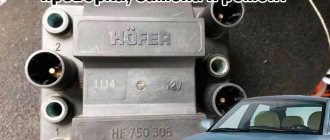
Problems with the ignition module
The ignition module is an electronic analogue of a distributor (see VAZ distributor design: the difference between contact and non-contact ignition systems and ignition timing adjustment) and an ignition coil. A faulty module can fail at the wrong moment, according to the famous law of meanness. Checking it and identifying malfunctions will take no more than an hour, but it will allow you to determine the approach of serious problems in time.
VAZ2110 ignition module
- The main symptom of a module malfunction is the absence of a spark in one or several cylinders at once.
- In this case, the engine stalls or does not start at all.
- The second common phenomenon is a failure in the timing of the ignition cycle, due to which it is impossible to coordinate the interaction of the piston and gas distribution system with the module
- There are several methods for identifying module malfunctions
Checking for a spark
This method is most suitable for testing the module in “field” conditions. However, it requires having at least one new spark plug on hand in your car's inventory:
- One by one, remove the spark plug caps from the cylinder head cover, insert a new spark plug, which we ground to ground or to the body
- We rotate the starter, if there is no spark, then the problem does not lie in the spark plugs, and we should continue to study the ignition system
- Let's try to replace the armor wire on the cap on which there is a lack of spark.
- All wires are numbered on the module cover, so remove the wire from the non-working contact and put it on the working one (let's swap them)
- Thus, we will check the condition of the connecting contacts themselves and the integrity of the core
- If a spark appears after changing a non-working wire to a working one, then the problem was in the wire
- If the problem remains, it means that for the VAZ 2110, repair of the ignition module is inevitable, or replacement if repair is impossible
- If there is a complete absence of spark on all spark plugs, it means failure of the module or its high-voltage coil
- In cars with fuel injection, the electronic system that controls the ignition and fuel distribution may be damaged, signs of such a failure as if the ignition module breaks down
- To repair the module you will need a screwdriver, a soldering iron and spare parts, if you have nowhere to rush, then you can sit at home and calmly disassemble it and re-solder it, after watching a video on this issue
- It is often much faster to replace the ignition module or high-voltage armor wires with similar ones purchased or temporarily removed from a car of the same brand
- Replacement does not take long, the module can be removed easier than a distributor, the cylinder numbers are always marked on it
- This operation allows you to determine general faults of the entire system without unnecessary effort in some cases
That's all, we wish you success in self-repair and troubleshooting.