It is important for every driver that the car obeys him well in any situation. One of the main systems of a car is the steering system. Therefore, every breakdown of the steering system leads to a deterioration in driving quality, and possibly even to an accident.
It is for this reason that it is important to always monitor the condition of the steering system and promptly carry out its repair and maintenance. Today we will talk about the VAZ 2114, or more precisely about its steering rack.
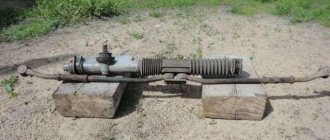
The steering rack itself is a long rod with attachments and two outgoing parts. The steering rack is responsible for the handling of the car and also for the safety of the driver, so if it breaks down, you should immediately begin repairs.
You can understand that the rack requires replacement by the following signs: when you turn the steering wheel, you hear a knock and play appears. In this case, the knocking sound most often appears only when driving; if it is heard when turning the steering wheel while parked, then the steering rack definitely requires immediate replacement - this means that the breakdown has started and the rack is in critical condition.
Steering rack VAZ 2114 - what it consists of
Before proceeding directly to the verification process, you need to know the design features of the steering rack. Let's look at what elements it consists of:
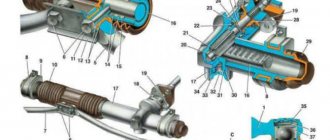
Steering rack structure: 1 – protective cap; 2 – steering gear housing; 3 – rack; 4 – drive gear; 5 – inner tie rod end; 6 – spacer sleeve; 7 – tie rod mounting bolt; 8 – connecting plate; 9 – support sleeve; 10 – steering gear support; 11 – rack support sleeve; 12 – protective cover; 13 – clamp; 14 – rack restrictive ring; 15 – sealing ring of the rack stop; 16 – nut; 17 – rack stop; 18 – roller bearing; 19 – ball bearing; 20 – retaining ring; 21 – nut sealing ring; 22 – gear bearing fastening nut; 23 – boot; 24 – lock washer.
Steering rack repair
The car is secured against unexpected movement by installing stops under the rear wheels. Pull the handbrake and lock the steering wheel.
So:
The front wheels are removed. Using a puller, remove the fingers from the lever struts, having first unscrewed the tip nuts. After installing the puller, tighten the screw until it stops. When the key is in tension, the finger is knocked out of the lever with a hammer. The nuts securing the rack brackets are unscrewed. The bolt on the steering shaft is loosened from inside the passenger compartment. Having completed all preliminary operations carefully so as not to damage the splines, using oscillatory movements, the gear shank is disconnected from the steering shaft. The entire assembly is pulled out through the right hole in the car body.
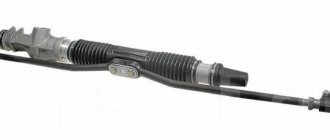
Steering mechanism with tie rods
Next, the VAZ 2115 steering rack is directly repaired:
- The structure is clamped in a vice. Use a special brush or a cloth soaked in white spirit to clean all surfaces of the product.
- The steering rods are removed. To do this, unscrew the bolts on the bracket securing them, after bending the “antennae” of the locking plate, using a “22” key.
- The locking and connecting rod plates are removed.
- The tie rods are removed.
- On the right side, the support and retaining ring are removed from the steering gear housing.
- The clamps with which the protective cover is attached are cut off. Disposable parts are made of plastic.
- The protective cover is removed.
- On the left side of the device, the support and protective cap are removed.
- Using a “17” wrench with an octagonal head, the rack stop nut is unscrewed, the part is removed, the spring and the retaining ring are removed.
Removing the nut, spring and retaining ring
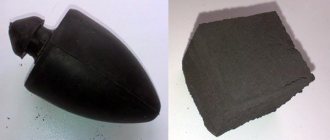
The rack stop is knocked out of its socket. To do this, the crankcase hits a wooden stand. For sealing, a rubber ring is mounted in the groove of the stop.
- The seal is removed.
- The gear boot is removed by simply prying it off with a screwdriver.
- The lock washer is removed.
- Use a special 24mm wrench with an octagonal head to unscrew the nut that secures the gear bearing.
- The nut is removed from the shaft.
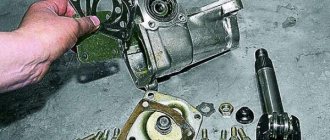
- Using a “14” wrench, the gear is removed from the crankcase along with the bearing.
Removing the gear with bearing from the housing
- The rack is removed.
- The bushing is removed. To do this, use a screwdriver to pry up the support sleeve, its protrusions should fit into the crankcase holes and the part can be freely removed.
Removing the support sleeve
- A new bushing is installed. To do this, new damping rubber rings are put on it so that the thin parts of the ring are located opposite the cuts in the bushing. The protrusions of the bushing must fit freely into the holes in the crankcase.
- Along the edges of the bushing, the rubber rings are cut and the cut off parts are removed.
- The retaining ring is removed from the gear shaft.
- Using a two-jaw puller, the ball bearing is pressed.
Removing the ball bearing
Pressing out the needle bearing is done using a special puller. If it is not there: two holes with a diameter of two millimeters are drilled in the end of the crankcase to allow the needle bearing to exit onto the ring. Through it, the bearing is knocked out of the crankcase.
Pressing out the needle bearing
The crankcase cavity of the structure is washed. The needle bearing is pressed into place using a piece of pipe. After this, the hole is sealed with preparations similar to “cold welding”. Bearings, drive gear and teeth on the rack are generously lubricated with FIOL-1 lubricant.
UNIOL-1 lubricant is placed in the cavity, which is located above the nut holding the bearing of the drive gear. The steering rack assembly is assembled in the reverse order. The protective cover is attached and secured with clamps. The rack stop and nut are adjusted so that there is a gap of 0.12 millimeters between them. After adjusting the rack clearance, the stop nut is capped to prevent unwinding.
Steering rack VAZ 2114 - signs of malfunction
Let's look at each of the signs and what can cause them to appear. It should be noted that some problems, for example knocking, may not be related to the mechanism itself.
- So, the free play on the steering wheel has increased, that is, it dangles more; the increased travel can additionally manifest itself in the appearance of a beating in the steering wheel when braking.
This problem may be associated with loosening of the ball pins to the stabilizer strut, increased clearance in the ball joints, or increased clearance between the rack and pinion.
- If play is detected in the steering wheel, first of all you should inspect the steering ball joints. It rarely happens, but it is possible that the nuts securing the tips have become loose and the pin has begun to come out of the seat, causing a significant gap to form at the mounting point. Fixing such a malfunction is simple, just tighten the nuts.
- Ball end wear is much more common, resulting in a gap between the pin and the body. This problem can be eliminated by changing the tips.
- Play in the steering wheel can be formed due to an increase in the gap between the rack and pinion. During the operation of this mechanism, these elements gradually wear out, and the gap between them increases. Repairing this problem comes down to an adjustment that just requires tightening the adjusting stop nut correctly.
- A knock in this mechanism can be caused by play in the tips, an increased gap between the rack and gear, as well as loosening of the mechanism itself.
- As for the tips and rack clearance, the repair of the mechanism is indicated above, that is, just tighten the thrust nut and that’s it.
- Regarding the loosening of the fastening, it is enough just to tighten the nuts securing the clamps that hold the mechanism, and the problem will be solved.
- Stiff rotation of the steering wheel may be due to damage to the support bearing of the shock absorber strut (the case when a problem with the suspension affects the steering mechanism), damage to the rack bushing, wedging of the steering tips, or wedging of the steering gear bearings.
- In the case of a worn support bearing, the repair boils down to removing the support and replacing the bearing.
- If the reason for the tight rotation is the support bushing, then you need to put a new one in place of the damaged one, and lubricate the mechanism itself.
- If there are problems with the tips, they should be checked and replaced if necessary. The same applies to drive bearings.
Adjusting wheel alignment with a caliper
It should be noted that after repairing many faults, adjustment of the wheel position (wheel alignment angles) will be required.
All work with the steering mechanism can be done with your own hands; there is nothing particularly difficult about it. But after work, especially on the steering tips, the toe angles will need to be adjusted, which is best left to specialists.
If a malfunction occurs, you will first need to diagnose the mechanism to identify the unit that caused it. First, the condition of the tips is checked. To do this, they are removed from the support and checked manually. With a working tip, the finger moves in its body with effort, but it should not get wedged to any position; such a tip can be put in place and continue to look for faults. If it moves freely and there is some play, then it is replaced.
Next, the gap between the rack and gear is adjusted. For this, a special 6-sided key is used. With its help, the thrust nut is tightened until it stops, and then loosened by ¼ turn. After this, the nut is fixed using punching. If the adjustment is made correctly, and the condition of the rack is still satisfactory, then the knocking should disappear. If the adjustment does not help, then most likely the wear of the main components is quite severe and a major overhaul of the mechanism is required with the replacement of the rack, which can also be done with your own hands.
Preparatory work
If you want to repair the steering rack yourself, then you should purchase the following spare parts:
- Tubes for rack.
- 2 tips - they already come with nuts.
- Repair kit.
- 2 silent blocks.
- Cover for the rack.
Repair requires replacement of the above parts even if only the tubes are damaged. The wear of elements must occur simultaneously, so it is not recommended to skimp on parts. You will also need bearing grease, clamps, White Spirit, and a can of WD-40. It is worth preparing rags in advance, as you will need a lot of them. As for tools, repairs require sets of wrenches, screwdrivers, socket heads, and wrench extensions. Special tools include special wrenches for the adjusting nut, as well as a puller for tips.
Advice! When the defects in the operation of the steering rack are minor (for example, knocking), then it is better to start with adjustment. If the adjustment does not help, then you should move on to diagnostics and repair.
Before starting repairs, it is recommended to carefully study the structure of the steering rack, which is described in detail in the VAZ 2114 operation and maintenance manual. You should first apply WD-40 to the four nuts that secure the steering rack to the car body. You also need to shed the only tightening nut and the threads of all the tips. After 3-4 hours the work must be repeated. Repairs can only begin the next day.
Do-it-yourself diagnostics and check of the VAZ 2114 steering rack
So, to check the steering rack you need to measure the gaps in it.
This can be done either on a removed mechanism (which is even better) or directly on the car. Now let's move on to the process:
Set the mechanism to the middle position. It can be determined by its dimensions - ( 87±0.25 ) mm from the gear axis to the rack end. Using a special device, we load the unit to a force P = 500 ± 20 N (51 ± 2 kgf). The distance from the gear axis should be – 84 mm .
The maximum permissible movement of the rack “X”, measured through the relative movement of the pressure punch 1, should not exceed 0.12 mm . After assembly, the torque of the gear in the area of the rack stroke should be in the range of 50–200 N·cm (5.1–20.4 kgf·cm) at a rotation speed of 30 min-1 .
Let's summarize
As you can see, the work will require some skill. But, if desired, they can be performed by a beginner who knows how to handle the tool and has common sense. Repeating the operation no longer causes problems.
After repairs, you should perform a wheel alignment procedure or do a simple check. To do this, you need to start the car and drive at a slow speed. If, with the steering wheel in a straight position, the vehicle does not pull to the side, everything is in order.
To protect fasteners with threaded connections from dirt and water, experts recommend using lithol or graphite-based lubricants. Parts must be lubricated carefully. You can further enhance the protection with tubes. They are put on the joints of the steering tips and traction devices (heat shrink can also be used).
How to disassemble the steering rack of a VAZ 2114 and replace worn parts
In addition to a helper and new slats, you will also need a set of tools and materials. Be sure to include in this list:
- Set of wrenches;
- Jack;
- 17mm hex wrench;
- Balloon wrench;
- Bricks or similar materials (to support the front of the car without wheels);
- Puller for steering rods (not necessarily needed, you can do without it);
- Dry rags;
- Litol type lubricant;
- The almighty WD40.
Now you can proceed directly to replacing the steering racks. We strongly recommend that you follow the established procedure for conducting operations.
- Place the car on a level surface. No, a simple floor in your garage is enough, it is not necessary to level it with cement.
- Apply the parking brake to keep the car from moving.
- Raise the car on a jack, place logs or bricks under the front, and then remove the wheels.
- Remove the negative cable from your battery for safety reasons. Nobody needs electric shocks today.
- On the driver's side inside the passenger compartment, near the pedal block, unscrew the locking fastening bolt of the cardan of your steering shaft.
- Remove the adsorber directly from the engine compartment. You can put it aside for now.
- Remove the cotter pins, which will allow you to then remove the mounting nuts from the tie rod ends.
- Using a rod puller, the ends are removed from the racks. If for some reason the puller is missing, it can be replaced by gentle, successive blows to the tips. Don't damage their threads just by doing this. They usually lend themselves, so many people do without pullers.
- Treat the rack clamp fixing nuts with an anti-rust agent. Now we are talking about the almighty WD40. Wait a while for the composition to be absorbed.
- Using a wrench, unscrew the fastening nuts. Processing with a Vedash should greatly simplify this task for you. There are four nuts in total.
- Remove the rack by pushing it through the passenger side, that is, the right side of your VAZ 2114.
- We recommend replacing the boot at the same time as replacing the racks. Over time and during the period of operation, the steering boots seriously wear out, so it is hardly worth trusting old boots to work with new racks.
- The tips are removed from the slats. At the same time, try to count the number of turns with which the nuts were tightened. This will allow you to fasten them back as close to precision as possible at the reassembly stage and, with peace of mind, go to the service station, where they will adjust the wheel alignment.
- Take your new rail, remove the plugs from it.
- Next, take Litol or a similar lubricating liquid into your hands and fill the body with this composition as much as possible.
- The ends are mounted back onto the rods. Try not to mix up the places of the nodes, although they are different from each other. However, as practice shows, this does not prevent many do-it-yourself repairmen from confusing them.
- The new rail is placed in its rightful place. To do this, the nuts are attached to the studs of the clamps.
- Now you will need your friend, comrade, assistant. Ask him to help guide the shaft drive gear to the seat located directly on the rack housing. The splines must line up exactly. Be sure to check this moment.
- A locking bolt is fixed on the cardan.
You can safely perform all other work in the reverse order of the dismantling described above. In this case, each thread must be treated with Litol. This event will allow you to more easily deal with disassembling the elements during subsequent repairs. Or it will be a pleasant surprise for the new owner of your VAZ 2114.
Price issue
A new rail will cost you about 3 thousand rubles. The cost of service stations for replacing slats costs about 2 thousand rubles. That is, in total you will have to spend 5 thousand rubles if you entrust the work to the masters.
Repair kit
However, the rack is not difficult to repair. Most VAZ 2114 owners perform this event with their own hands. Plus a decent saving of money.
VAZ 2114, is it possible to install an amplifier yourself?
The work will take no more than two hours if you do everything without haste and with breaks. There is no need to remove the VAZ steering rack; there is no need to even disconnect the rods. You will need a small set of keys: for 10, 13 and 17. The last two are needed. It is advisable to have a good set of tools, since pliers, for example, may be needed at any time.
First you need to remove the left clamp and install the amplifier clamp located on the left on the studs. Moreover, its eye should be facing upward. After this, tighten all the nuts. The clamp on the right side of the steering rack is replaced in the same way. Then you need to put the corner of the rack on a pin located on the cross beam of the car body.
If there is an adsorber tube, remove it first and then install it on top of the corner. The entire structure must be tightened by placing a large washer on the stud. Next, the cross member is installed; its two bolts must be tightened simultaneously.
If there is a gap of about 1 cm in the structure, you will need to rearrange the clamps. Most likely, you mixed them up and installed them incorrectly. This completes the installation, now you can check the VAZ power steering rack in action.
The difference will be immediately felt, the car's handling will become much better, and it will be easier for you to stay on course. If necessary, adjust the rack to minimize the backlash.
How to tighten the steering rack of a VAZ 2114 video
Conclusion
The VAZ-2114 steering rack must be checked and repaired regularly. It is recommended to do this operation with in-line maintenance. If a car enthusiast is unable to determine the malfunction, then you should not skimp and contact a car service center, because not only the life of the driver, but also those of those around him depends on it.
Repair
After disassembly and cleaning, it is necessary to “defect” the parts and determine the extent of replacement:
– the body is visually inspected. For chips, cracks, etc.;
– inspection of shafts for burrs, wear, scratches, etc.;
Once the defective parts are identified, assembly can begin:
– a new plastic bushing is pressed in;
– new bearings are pressed in;
– shafts are inserted and assembled;
– generously lubricated with suitable lubricant (litol, fiol, uniol)
– preliminary adjustment is made (the adjusting sleeve is tightened until it stops, then loosened until the shaft can be turned by hand);
– put on and secure the rubber boot (it is advisable to use a new one);
– install tie rods with ends without tightening them;
Repair of steering rack VAZ 2108, 2109 (Video):
Which is the best steering rack for the VAZ 2114
» />
Full size
In general, the steering wheel is knock knock... There was an idea to refute it, but it’s not a fact that the mileage is 155,110 at the moment.
I was choosing between the factory one for 3500 and the company PILENGA 2500. Your way out, gentlemen.
Advice from car enthusiasts
- I bought a repair kit, went through it after 1500 and the knocker rattled. No matter how much the monkey’s work went through all this to people, it wouldn’t last long, he always warned them about it. But I had no finances and out of desperation I overdid it for myself. Now I'm looking for a new one. The range in prices is great, native from 3300 to 3650. CC20 from 5400 to 6200, so I’m thinking about what to insert.
- Then there was the problem of replacing the rack. Mileage 83. I bought a repair kit, removed the rack, disassembled it and realized that there was no point in repairing it, the difference in the thickness of the teeth on the rasp in the middle and in the extreme positions is visible. The bushing and thrust bearing are intact. The repair kit went into the trash bin. After reading positive reviews on the drive about the peeling slats, I was seduced by an oblique tooth and decided to try it. I couldn’t find it in stock anywhere in stores, so I ordered it on the Asta store website. When the manager of this store called to confirm the order, he asked me whether I was going to continue driving my car or selling it... In general, all these pelings, according to the manager, are complete slag. I'll take the factory.
- I took the factory one in January 2015, in Lada, drove 57,000, so far it seems to be working.
- The rack itself is knocking, I decided that I would change it. I read the information, everyone scolds it, depending on your luck. I chose between trialli and pilenga; they differ from the factory design in that they have a worm drive and the rack shaft has an additional stop.
- There was a slight play in the steering wheel, and naturally there was a knock, the boot broke. When replacing the boot, I also used a repair kit. At the time of repair, the mileage was about 140 t.km., now it is 157 t.km. so far everything is fine. The repair kit is not expensive and the work is done in the evening if you do it alone.
- VAZ Inter service is a complete mess, it’s hard to find a good one, LGR has never heard of anything like it. Install the SS-20 and forget about the rack for the rest of the life of the car.
- After annual replacement of rails from VIS, I installed Pilenga. So far the flight is normal, let's see what happens next. PS SS-20 is not brought to our village, I would 100% install it.
Why should you order from us?
Experienced craftsmen
Diagnostics in just 1 hour
Repair in just 1 day
Hunter 3d stand
Guarantee on all work
Your own turning park
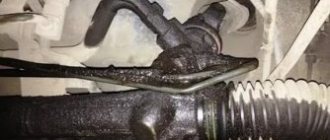
The steering rack of the VAZ 2114 dangles and knocks, causes and solutions
Well, let me start with the fact that after winter, on our spring roads, it would be necessary to eliminate extraneous knocking in the suspension... Namely, what was bothering me was that when the wheel is turned out, when driving at low speed on an uneven road, an unpleasant knock appears in the steering wheel...
I changed the steering joints and ball joints, but the knocking noise remained. When parking the car on a flat surface, I moved the steering wheel left and right and there it was, the same sound as when driving.
We performed the operation together with an assistant, he dangles the steering wheel, I hold the inner steering tip, and the knocking comes from there at the point of attachment to the rack. If you pull the tip, it seems to be wobbling, but if you hold it, press it, like, as if at a break, and the assistant wiggles the steering wheel, then there is no knock.
Question! What could it be? Are the internal lugs broken where they are attached to the rack, or is something in the rack itself broken, or is it possible that the bolts securing the lugs to the rack need to be tightened? Where to start first, what to sin on? I really hope for advice from knowledgeable people, but if the weather gets better, I’ll follow your advice to eliminate the unpleasant, annoying knocking... Thanks in advance!
Possible reasons
- Of course, first of all, check the fastening of the steering rods to the rack. The second question is about the rack - they are weak on your cars and you often have to change the bushings - they play.
- Replace the bushings and the problem will most likely go away.
- There is an adjusting nut at the bottom of the rack; an elastic band is inserted into it; you need to tighten it a little with a special wrench so as not to bother calling in for service; this adjustment costs a penny, but you can see for yourself which key and where to tighten it in the future.
- Bolts have nothing to do with it. This is increased play in the rack mechanism. The rack needs to be adjusted. Only there is a trick there. The rack shaft is commercially called a “stick”. So, over time, wear appears on the stick, and it is not uniform. It's stronger in the middle and fades away at the ends. If you adjust the play with the wheels in a straight position, then when the steering wheel is turned, the rack may jam. And the nut must first be turned to loosen, and then slowly tightened. You need to pull the steering rod with your left hand, and use your right hand to turn the adjusting nut until the play disappears. And when tightened, the steering wheel becomes “heavy”.
Installation
When installing the steering rack, you must remember the following conditions:
- when installing the steering column, the steering wheel must be in the center and have an equal number of turns in one direction and the other (small deviations are allowed, they will be corrected at the wheel alignment stand);
- screw the rack to the body;
- insert and tighten the tie rod ends;
- put on the wheels and lower the car;
- stabilize the suspension and tighten the steering rods on the silent blocks;
Check and adjustment
After installation, the rail must be finally adjusted. There should be no vertical play in the steering rack when checking the steering rods. The play on the steering wheel should be within normal limits (approx. 15 degrees). The steering wheel should rotate easily, without biting, with an equal number of turns in both directions. When driving and turning, the steering wheel should return to its original position on its own, without driver assistance.
The next adjustment should be in the first 500 - 800 km, after repair.
Also, after repair, it is necessary to check and adjust the wheel alignment angles. PS If you were unable to repair the steering rack yourself, then contact a professional car service center for help.
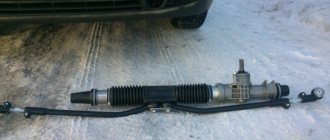
Replacing the rack on a VAZ 2114 does not require special skills, just a certain dexterity, because many parts need to be unscrewed in very hard-to-reach places, where the presence of at least a ratchet is simply necessary.
The steering rack is a key element of the vehicle control system. Therefore, its serviceability is very important. If there is play in the steering rack, this affects the geometry of the wheels, which leads to unstable driving at high speed, as well as increased tire wear.
How to tighten the steering rack on a VAZ-2114 yourself
No one will deny that a working steering wheel is one of the factors influencing the guarantee of the safety of the driver and passengers. Regardless of the type of steering gear, they all need to be serviced periodically. All second-generation cars, including the VAZ-2114, have a reliable and easy-to-repair and adjust steering mechanism. It is not equipped with a hydraulic power steering, which allows you to tighten and service the steering rack without any problems.
Before tightening the steering rack on a VAZ-2114, you need to consider the prerequisites indicating the need for its tightening or repair.
AvtoVAZ provides a ten-year warranty. This is a fairly long service life of the steering mechanism. But do not forget that the guarantee is given for ideal conditions of use of the mechanism. The basis for calculating the service life is normal roads and constant high-quality lubrication located in the rack housing and a moderate driving style.
In real life, a ten-year service life is practically unattainable. Bad roads, questionable quality of spare parts and hard driving of the car end up with the mechanism making itself felt ahead of time.
When is replacement required?
If you encounter one of the above signs of malfunction, the rack must be repaired or replaced. By ignoring this need, you risk losing control at any moment. While on the road and driving at high speed, losing control of the car can lead to the most dire consequences.
There are three ways to solve the problem of faulty steering racks.
| Way | When is it relevant? |
| Adjust the rack | If diagnostics show that the unit does not require repair or replacement |
| Repair | If diagnostics allows for partial replacement of elements. Replacement is provided using a repair kit |
| Replacing the unit | If the test shows a complete failure of the node. Installation can be carried out with new rods or old ones, depending on their condition. |
Let us add that if the old steering racks on your VAZ 2114 have covered more than 100 thousand kilometers, their malfunction is unlikely to be corrected with the help of a repair kit. The best option in this case is a complete replacement of the unit.
Signs of malfunction of the steering mechanism on the VAZ-2114
The first symptoms that indicate that the steering rack needs to be tightened are:
- large backlash of the left wheel;
- lubricant flowing through the rack seals;
- unexpected biting of the rack while driving;
- knocking noise under the hood when driving on a bad road.
Biting the steering rack in the middle of the road can lead to an accident, and in most cases a tightening is not enough, but this does not mean that it cannot be adjusted. There are two ways to tighten the steering rack: without removing it from the car or using a removed rack.
The second method is used after major repairs or replacement of the mechanism. We will look at a simple method, the purpose of which is to remove increased play and knocking under the hood.
What you need for repairs
Before starting repairs, purchase a repair kit. It can be small and include only bushings, oil seals, boots, etc. There is also a large repair kit, which also includes a rack. There are a lot of companies that produce such repair kits, so which one to choose is up to the owner to decide. But it’s better to choose a manufacturer who is an official supplier of spare parts to the car plant.
To make repairs, you won’t need much:
- Set of open-end wrenches;
- Screwdrivers;
- Rags;
- Lubrication;
- Repair kit;
New or refurbished?
Among car enthusiasts, the question often arises regarding the steering rack - should I purchase a new one for replacement or restore the “original” one? It is impossible to answer unequivocally here.
If the repair was carried out independently and using a high-quality repair kit, then after restoration the rack can serve for quite a long time.
But if you purchase a restored rack or if it is repaired at a service station, there is a high probability that problems will soon arise. After all, it is unknown who, how and with what help carried out the restoration.
As for new units, there are a lot of defective racks on the market.
In general, it is still better to try to repair the rack first, since it is much cheaper. It is worth purchasing a new mechanism only after you have already become convinced that the restoration did not help.