More than 20 years ago, development of a car began, which later received the name Lada Kalina. Although prototypes of cars with various body styles were presented to the public back in 1999-2001, the first Kalinas for mass use rolled off the assembly line only 5 years later. Interestingly, Kalina was initially produced only as a sedan. Now this series is classified as the first generation of cars.
The second generation has 2 body styles: hatchback and station wagon. AvtoVAZ positions the Lada Kalina as a compact, maneuverable city car with a European level of showroom comfort. At the same time, it is emphasized that the car’s suspension height is almost comparable to SUVs. And, of course, Lada Kalina is famous for the fact that the current president of the country once drove along the federal highway.
Like any car, the Lada Kalina has its pros and cons in design, operation, and repair. However, now we are interested in a small but very important detail - the trunk lock of the Lada Kalina with station wagon and hatchback body types. We will talk about it in detail.
How to repair or replace the trunk lock on a Lada Kalina
- Changing the larva
- Now let's change the lock
- Install the activator
- Connection options
- Let's sum it up
Hi all!
The domestically produced Lada Kalina car is still in demand on the market. The car is affordable and also quite reliable for the money. But problems happen. One of them is Kalina’s faulty trunk lock. It can be repaired or replaced. It is not necessary to contact a car service for this. Better to save money. And do the work yourself.
There is nothing complicated here. To change or restore the trunk lock of a Kalina station wagon, hatchback or sedan, follow the instructions.
Electric drive: easy installation
The manipulation algorithm is very simple. Here you will need to make the rotary plate together with the rod yourself. The wiring is laid directly to the lock and connected to a special control unit. When the car is “disarmed”, the electric drive of the luggage lock is activated following the unlocking of the button responsible for opening the rear door of the Lada Kalina.
The whole essence of the action comes down to connecting the electric lock to two cable lines. You can buy the product at a specialized retail outlet. The end of the luggage compartment will need to be hidden in order to prevent the risk of moisture getting into it. If this is neglected, then with the penetration of water a short circuit will be observed in the designated area.
Read also: Organization of pre-trip and post-trip medical examinations
Much attention should be paid to the area near the door hinges, because broken wires are a common occurrence here. To prevent this, it is recommended to regularly monitor this section of the highway.
Before starting the procedure for installing the electric drive in a Lada Kalina car, you will need to remove the plastic trim. Here you need to be careful not to damage the specified protective element.
The choice of a lock for LADA Kalina should mean that there is no subsequent need for modifications before installation. This means drilling additional holes.
An important point in the installation procedure is the laying of electrical lines. For these purposes, you will need about 3.5 m of appropriate cable. You can use standard wiring suitable for the rear door. The power supply can be a cigarette lighter socket
It is also important to install the fuse correctly
We do all switching in LADA Kalina in accordance with the diagram.
Methods for installing the trunk lock activator
The first option is to saw off one “tongue” from Kalina’s lock.
Particularly gifted craftsmen do this without any removal of the lock, right on the spot, using an angle grinder. You have to work very carefully. If you don’t have a grinder, the same steps can be done with a hacksaw. It just takes much longer, and one can only guess about the physical effort required for such a process. If you are not confident in the intricacies of your own work, it is better to remove the lock for modification. In this case, it will be easier to work with both a grinder and a hacksaw. The second option is to replace the lock. Many car owners installed a trunk lock for their Lada Priora instead of the original one. This option is perfect for those Kalina owners who do not have the desire and/or ability to cut anything. All other steps for installing the Kalina station wagon trunk lock activator are extremely simple.
- A rotary washer is installed on the plastic activator pusher, then the entire system is secured with a locking ring.
- The complete activator is placed in a standard place.
- The activator wires are connected to the corresponding connectors. Naturally, all electrical work is carried out only with the battery disconnected. The point is not what can “knock” an electric current: 12 volts of direct current for a person is just nonsense. But capricious electronics, if something suddenly “shorts”, may suffer. In the best case, problems with functionality will begin, in the worst case, something will completely fail.
- The next stage is installing and adjusting the rods.
- A check is in progress. First, the lock itself, regardless of whether the original one was modified or another one was installed (from Priora). All detected problems are corrected. The activator is being tested.
If everything worked perfectly, then it is quite possible to install the trunk trim in place, if only there were “hedgehogs”. Car owners are advised, since they had to remove the trunk trim, to also check which parts are making noise, knocking or vibrating. If such small problems are discovered, they can be solved by installing plugs from pieces of foam rubber of the required size. This will not only solve the problem with the lock, but also increase comfort when driving the car.
Advantages and options for upgrading car locks
The technique is simple, the only thing needed is to make a rotating plate and a rod for it yourself. The wiring should be routed to the electric lock and connected to a special control unit. When disarming the car, the electric trunk lock will be activated after the fifth door opening button is unlocked.
The entire installation task is based on connecting the electric lock to two wires. You can purchase the part at any auto store. The trunk end must be additionally hidden to prevent water from getting into it. Otherwise, it will periodically short out during rain.
An important attribute is the trunk hinges. Wires are often broken in this place, so their condition must be carefully monitored.
Before installing the electric drive, the trunk lid trim is removed. The main thing is not to damage it during this process. It is recommended to choose a lock that will not need to be modified during operation.
An important step in the installation process is wiring; you can use those wires that are standardly suitable for the fifth door of the car.
Power is taken from the cigarette lighter. An important point is the installation of a protective fuse. The wire is laid along the threshold; it will take approximately 3.5 meters. Then the installation takes place.
It is advisable to choose an option that does not require drilling additional holes. The procedure consists of connecting the wires according to the diagram. Important: you can use the wire that goes to the trunk light.
Any option for modifying your own car has its pros and cons. It was already discussed at the beginning why exactly it is worth modifying the trunk lock of the Kalina hatchback and station wagon. Now about the possible options. Installing the trunk lock activator alone solves one problem - the issue of using the key.
True, you no longer have to remove the key from the ignition. That is why the issue of installing a trunk release button for Kalina hatchback and station wagon remains relevant. This modification option has its drawback: you will have to run the electrical wire through almost the entire car. Most car owners are willing to put up with such inconveniences, since they are one-time use.
DETAILS: Replacing lamps on a Mazda 3 Photo instructions on how to change the front lamps on a Mazda 3
The Kalina hatchback trunk lock drive and the issue of modification are a matter exclusively for the car owner. It is possible that it is impossible to independently modify the trunk lock of the Kalina hatchback, and there is nowhere to turn. In some regions, purchasing a lock for a Lada Priora car can be difficult. According to many motorists, this disadvantage can somehow be put up with.
For particularly skillful car owners, options for controlling door opening/closing mechanisms, including the fifth door, are available. For example, the simplest option is one in which all the doors of the car are unlocked simultaneously.
How to dismantle the lock to replace the cylinder?
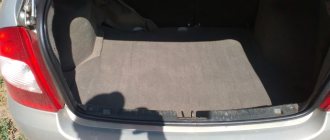
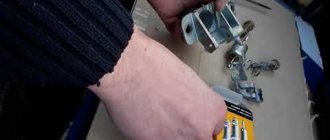
You can gain access to the lock mechanism by removing the plastic upholstery inside the luggage compartment. This protective component is fixed by means of two bolts, which are located in the places where the special handle is installed. They are also called latch caps. They are pryed off with an ordinary screwdriver.
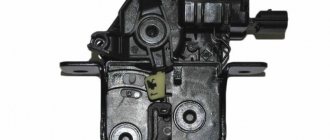
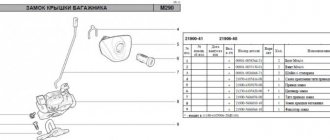
Structurally, the trunk lock in the Lada Kalina is made of two parts, regardless of the body type, hatchback, station wagon or sedan. They are presented in the form of a cylinder and the unlocking mechanism itself. If it is necessary to replace the trunk lock, then the dismantling of these components is carried out in a separate order.
When you only need to replace the larva, this can be done in a few simple steps. Here you will need a screwdriver and a socket.
- By unscrewing the bolts, we release the necessary part of the body.
- Next, remove the retainer using a screwdriver. It is attached directly to the body of the larva itself.
- It is recommended to remove it very carefully, while holding the spring.
- Installation of a new element is carried out strictly according to the reverse manipulation algorithm.
If there is a need to replace the lock itself, the operation becomes a little more complicated due to the need for additional actions.
- First, the door lock is unscrewed using a screwdriver. This is not difficult since the element is held in place with only two screws.
- Now we pull the trunk lock outward, and it freely comes out of the landing niche.
As you can see, removing the trunk lock is not difficult.
Luggage compartment lock
You can, if desired, modify the trunk lock of the Kalina hatchback in exactly the same way as was considered in the case of the Kalina station wagon. One of the main nuances, oddly enough, is not in the electrics or body design features, but in the fastening of the trunk trim. The point is that the Kalina hatchback is supported not only by pistons, but also by plastic corners.
That is why, when removing the trunk trim of a Kalina hatchback, you must pull the trim from the top: while the “hedgehogs” are easy to replace, the stationary plastic holders are only easy to break. And more about plastic. The bottom line is that the Kalina hatchback has a plastic trim on the trunk lid.
Constant efforts to open the fifth door, combined with a small number of stiffeners, gradually lead to the appearance of cracks in the plastic. Then everything follows domino rules. Perhaps the plastic will soon “fly”, and then you will have to think about repairs.
There are also aesthetes among Kalina hatchback owners who simply do not like the look of the trunk lid opening button. In general, all of the above reasons often lead hatchback owners to the same decision: an opening button on the fifth door is not needed.
How to install the activator
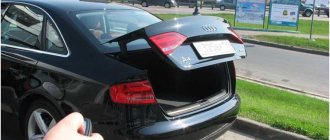
The only way for the viburnum to get into the trunk is to turn the key and press the button. Naturally, doing this is not always convenient. Weather, busy hands and other troubles contribute. At this stage, many car enthusiasts begin to think about the trunk activator. It is quite possible to do this, you just need to try a little.
The Kalina station wagon trunk lock activator is easy to install. It is enough to take a self-drilling screw and secure it on one side with it and on the other with a wire holder. To check the device, you need to connect it to the standard connector.
The only problem in all this work may be the back door being picked up at the wrong time. After the current stops supplying the activator, it closes with the first latch, but the trunk is not completely closed. In order to get into the so-called fifth door, you will have to use the key again.
A lock with a button is not difficult. But during work it is necessary to assemble the circuit and stretch the wires. In this case, one programmable alarm channel (additional) should be used.
There are two main connection options. First: the button goes to +12 on the activator, bypassing the relay. The advantage of this connection is its simplicity and the absence of unnecessary elements, the disadvantage is the need to run additional wires.
Installing the activator using the second method is more labor-intensive. You will have to use additional elements, namely diodes. In addition, there is a need to search for “mass”. The main advantage is the use of a minimum number of wires.
Many experts prefer the first option due to its simplicity. The wire can be copper PV-3 with a square cross-section. It must be pulled along the left side and thresholds. The switching can be crimping and electrical tape on top.
A standard pink-red wire is used to control the activator. It must be connected to the relay, wrapped and hidden under the BUS mounting frame. All operations are carried out with the negative battery terminal removed. This is how the electric trunk lock drive is mounted.
How to install the activator
The only way for the viburnum to get into the trunk is to turn the key and press the button. Naturally, doing this is not always convenient. Weather, busy hands and other troubles contribute. At this stage, many car enthusiasts begin to think about the trunk activator. It is quite possible to do this, you just need to try a little.
The Kalina station wagon trunk lock activator is easy to install. It is enough to take a self-drilling screw and secure it on one side with it and on the other with a wire holder. To check the device, you need to connect it to the standard connector.
The only problem in all this work may be the back door being picked up at the wrong time. After the current stops supplying the activator, it closes with the first latch, but the trunk is not completely closed. In order to get into the so-called fifth door, you will have to use the key again.
A lock with a button is not difficult. But during work it is necessary to assemble the circuit and stretch the wires. In this case, one programmable alarm channel (additional) should be used.
There are two main connection options. First: the button goes to 12 on the activator, bypassing the relay. The advantage of this connection is its simplicity and the absence of unnecessary elements, the disadvantage is the need to run additional wires.
Installation of the locking device drive
Removing the fifth door opening button is the easiest thing. It is more difficult to seal the remaining hole. This can be done using a special putty. One of the tricks is to process the hole cavity so that the surface becomes as rough as possible. This will create optimal adhesion to the putty. Next comes sanding, priming and painting. The work can be done independently without special training and practical skills. After that, you don't have to worry about aesthetics.
Of course, all dismantling work can be carried out only after the installation of the electric drive is completed, as well as the installation of the trunk opening button in the cabin. The trunk lock drive and how to install it are all relatively clear. Both the location and the connector of the wires in Kalina are determined in advance for this.
But where to install the button will have to be decided by the owner himself. The two most popular places are the dashboard in front of the gear shift and the driver's door. The first method is convenient because the button can be reached from almost anywhere in the cabin. The button on the driver's door is primarily a convenience for him.
Once the location for installing the button has been selected, it is time to install the electrical wiring. About 4 m of wire will be required. The connection point is located under the rear seat. The connection is made to connector 13, it is signed, so searching will not cause any difficulties. The work can easily be done independently. Thus, it became clear how to make a trunk lock drive.
How is the activator installed?
The only way to get inside the trunk of a Lada Kalina is this manipulation - turn the key and press the button. This action is not always associated with convenience. For example, in bad weather or when your hands are full, this is not easy to do. This circumstance prompts owners to consider purchasing and installing an activator. Installing this useful element is quite simple. Here you will need a self-tapping screw, which will secure the device we are considering. To check the functionality of the activator, you should connect it with the standard connector from the on-board network.
How to install the activator
The only way for the viburnum to get into the trunk is to turn the key and press the button. Naturally, doing this is not always convenient. Weather, busy hands and other troubles contribute. At this stage, many car enthusiasts begin to think about the trunk activator. It is quite possible to do this, you just need to try a little.
The Kalina station wagon trunk lock activator is easy to install. It is enough to take a self-drilling screw and secure it on one side with it and on the other with a wire holder. To check the device, you need to connect it to the standard connector.
The only problem in all this work may be the back door being picked up at the wrong time. After the current stops supplying the activator, it closes with the first latch, but the trunk is not completely closed. In order to get into the so-called fifth door, you will have to use the key again.
A lock with a button is not difficult. But during work it is necessary to assemble the circuit and stretch the wires. In this case, one programmable alarm channel (additional) should be used.
There are two main connection options. First: the button goes to +12 on the activator, bypassing the relay. The advantage of this connection is its simplicity and the absence of unnecessary elements, the disadvantage is the need to run additional wires.
Installing the activator using the second method is more labor-intensive. You will have to use additional elements, namely diodes. In addition, there is a need to search for “mass”. The main advantage is the use of a minimum number of wires.
Many experts prefer the first option due to its simplicity. The wire can be copper PV-3 with a square cross-section. It must be pulled along the left side and thresholds. The switching can be crimping and electrical tape on top.
A standard pink-red wire is used to control the activator. It must be connected to the relay, wrapped and hidden under the BUS mounting frame. All operations are carried out with the negative battery terminal removed. This is how the electric trunk lock drive is mounted.
Let's get started!
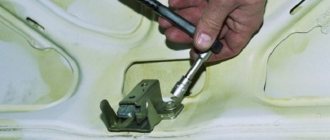
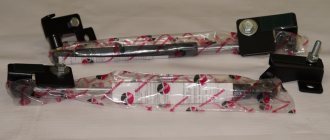
- The task is to put the spring on the rod of the “lift” or trunk shock absorber, depending on who you say. To do this, you need to unscrew the hinge-mount. This is best done using a vice.
- We clamp the rod in a vice using fabric or other gasket that will prevent damage to the rod.
- Carefully unscrew the hinge and put on our springs. It is recommended to cut two turns to achieve the desired effect. Although everything needs to be looked at locally, it all depends on the length and stiffness of the spring.
- You can install washers or rubber gaskets under the springs, thereby eliminating contact between the spring and the elevator.
- After this, the spring is either fixed, for example, with electrical tape, or remains “free floating”.
- Some experimenters use a valve spring from a VAZ, adding one washer at the top and bottom; it is advisable to use rubber ones.
Next, this entire structure is returned to its place and checked. Be prepared for the lid to close with some force that was not there before. This is because of the springs that provide resistance. The disadvantage of the design is that over time the springs “sit down” and cease to perform their function; here, in principle, there are options. You can either find a stiffer hardened one, or stretch this spring from time to time, making it stiffer. You can also find suitable springs and change them from time to time.
Removing the lock, drive and latch of the trunk lid
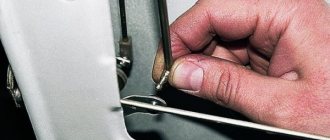
To remove the lock, remove the four pistons by prying them off with a screwdriver.
. and remove the lock drive trim.
. disconnect the rod from the lock drive.
Squeezing the clamps, disconnect the lock wire block from the rear wiring harness block. We use a marker to mark the position of the lock relative to the trunk lid.
Using a socket or a 10mm wrench, unscrew the three nuts securing the lock.
Remove the trunk lock with rod and wires. We install the trunk lock in the reverse order according to the previously marked marks. To remove the lock drive, disconnect the lock rod from the drive (see above).
We use a marker to mark the position of the lock drive relative to the trunk lid.
Using a 8-mm socket, unscrew the two nuts securing the lock drive to the trunk lid.
Remove the lock drive.
Using a screwdriver, remove the retaining ring.
Remove the pressure lever.
. and remove the lock.
Remove the pusher with the washer and spring.
We take out the cylinder lock mechanism. We assemble and install the lock drive in the reverse order according to the previously applied marks. To remove the lock retainer.
How to remove the lock and replace the cylinder
Unfortunately, malfunctioning trunk and hood locks are far from the only surprises awaiting Kalina buyers. A broken door lock can be much more frustrating for the driver and his passengers. This problem is typical not only for the sedan, but also for the Lada Kalina station wagon and hatchback. Having discovered a breakdown, you should immediately begin replacing the faulty part.
Before installing a new lock, it is necessary to disassemble the door trim. Having carefully dismantled the covering, take a screwdriver and unscrew the 3 fastening screws of the inner door handle. Next, disconnect the handle and set it aside. After that, using the same screwdriver, we unscrew the door lock rod.
When replacing the door lock in a Lada Kalina station wagon, sedan or hatchback, you must remove the outer part of the lock. To do this, dismantle the outer handle and unscrew the 2 fastening nuts. Then unscrew 2 more mounting screws from the outside of the door. Having done this, we have full access to the rest of the locking mechanism.
DETAILS: Alternator belt tension Kalina 8 valves. Installing a generator without a fret tensioner Kalina
Unfastening the plastic clip, carefully disconnect the door lock release button. Then we pull out the corkscrew washer to gain access to the internal drive rod. Next, we insert a new lock into the door hole, connect the lock button and the internal drive rod. At the final stage, we assemble the structure in reverse order.
Replacing the locks has helped many owners of Lada Kalina with hatchback, station wagon and sedan body types. Many experts advise doing such work immediately after purchasing a Lada. What to do is up to you.
Door lock adjustment
Dimensions of the trunk of the Lada Kalina station wagon
A car lock is used to prevent the door from opening spontaneously and is a protective element of the security system. The standard Lada Kalina lock consists of two parts: mechanical and electronic. It often becomes the reason why the door handle is difficult to open; Kalina sometimes has such a defect already from production. As in the case of adjusting door gaps, there are two options for correcting the deficiency:
- Take your car to a service station and trust the professional technicians. Recommended for beginners and inexperienced car owners.
- Fix the problem yourself using available tools. Suitable for car enthusiasts with extensive driving experience and basic training.
Adjusting the lock at home is done using a Phillips screwdriver. Before starting manipulations, it is recommended to mark the original position of all elements for possible return to their original state.
To move the lock module, loosen the three screws that secure it. The bracket is now not fixed and can move in the plane. Once it is in the correct position, the screws are tightened into place. The structure is treated with lubricant and undergoes mandatory testing by opening and closing doors.
If the lock is the reason that Kalina’s door does not open well, and the adjustment did not help, resort to more stringent means:
The locking bracket is pulled out 3 - 5 mm and secured in this position. The method allows you to use this additional distance for a smoother door movement
It is important to find the optimal size for the structure to bulge from the body. If the door is extended excessively, it will make sounds on uneven sections of the road and allow dust and moisture into the interior. Reducing the area of the locking hook. This is usually achieved by filing the mechanism and restoring the locking system to its original state.
The size of the cut area affects the ease of opening the doorway. If too much volume is removed, the door may open and close on its own. During processing, it is advisable to round off the sharp tip of the lock tooth.
This is usually achieved by filing the mechanism and restoring the locking system to its original state. The size of the cut area affects the ease of opening the doorway. If too much volume is removed, the door may open and close on its own. During processing, it is advisable to round off the sharp tip of the lock tooth.
A lock malfunction leads to the following difficulties:
- door jamming when opening or closing;
- the appearance of metal knocking when driving onto an uneven section of the road;
- deformation of the larva, while the key cannot be inserted into the hole;
- failure of the door module locking mechanism.
If loud rattling sounds occur, rubber tubes of the appropriate diameter help. They are placed on the levers after dismantling the entire system. Sometimes bending the impact area of the outer handle helps. In some cases, the car door lock must only be completely replaced, since adjustment is impossible.
Install the activator
To get into the luggage compartment on Kalina, you need to turn the key and also press the button. It's not convenient to do this.
In such a situation, it makes sense to install an activator. It's not difficult to do. This can really be done with your own hands.
The activator is attached using a self-tapping screw and a wire holder. Check the device first. To do this, connect the device to the standard car connector and test it.
The main problem with the activator's operation is that the back door may not be picked up in time. When the current stops flowing to the activator, the trunk closes with the first latch, but the compartment may not be completely closed. To get into the trunk, you will have to pick up the key again.