Tools:
- Straight box spanner 13 mm
- Curved box spanner 24 mm
- Hex key 12 mm
- Driver for 3/4 socket bit
- Knob attachment 24 mm
- Large flat screwdriver
- Syringe for filling transmission units with oil
- Waste oil container
- Small hammer
- Torque wrench
Parts and consumables:
- Transfer case shaft seal
- Transmission oil
- Sealant
- Litol-24 lubricant
Note:
We carry out the work on an inspection ditch or overpass.
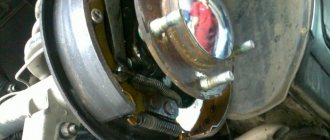
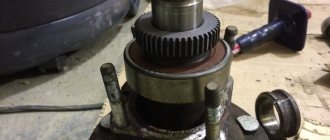
1. We replace the shaft seals of the front and rear axle drives by disconnecting the cardan shaft flanges from the shaft flanges, as described here. We change the transfer case drive shaft oil seal only after removing the intermediate shaft, as described here. The operations for replacing all three oil seals are the same - we will show them using the example of a rear axle drive shaft oil seal.
2. Drain the transfer case oil as described here.
3. We insert two bolts into the holes in the flange and screw the nuts onto them.
4. Using a 24mm socket, unscrew the flange mounting nut, holding it from turning with a screwdriver or a mounting spatula inserted between the bolts.
Warning:
Self-locking nuts must not be reused; replace them with new ones!
5. We remove the washer.
6. Remove the flange.
7. We pry off the oil seal with a screwdriver.
8. We remove it from the transfer case cover socket.
9. Apply sealant to the seating surface of the housing in the crankcase under the oil seal. Apply Litol-24 lubricant to the working surface of the new oil seal.
10. We press in the oil seal with a piece of pipe or a tool head of a suitable size.
Helpful advice:
You can use an old oil seal as a mandrel.
Warning:
The transfer case shaft seals have the same mounting dimensions, but have oppositely directed oil drainage notches. When installing, follow the direction of shaft rotation indicated on the oil seal.
11. We install the dismantled parts in the reverse order. Apply sealant (threaded) to the threads of the flange nut and tighten the nut with the prescribed torque H*m(kgf*m)96–117.6 (9.8–12.0), using a torque wrench.
We check the oil level in the box as described here and, if necessary, top up.
The article is missing:
- Photo of the instrument
- Photos of parts and consumables
- High-quality photos of repairs
Source: Chevrolet niva device, operation, maintenance and repair. Publishing house "Behind the Wheel".
Reg.: 12/06/2004 Threads / Messages: 628 / 51730
Reg.: 12/06/2004 Threads / Messages: 4031 / 23190 From: Moscow Age: 65 Car: 21214M, 2013
When replacing, the oil seal must be placed on sealant. I've written about this many times, try searching for ABRO.
Before you shoot anything, find out what the sound is and where it comes from. I doubt it's a bearing. Maybe some shield is resonating, maybe it’s touching something.
Alexey aka ALER.
Reg.: 12/06/2004 Threads / Messages: 628 / 51730
Reg.: 12/06/2004 Threads / Messages: 4031 / 23190 From: Moscow Age: 65 Car: 21214M, 2013
Alexey aka ALER.
Reg.: 12/06/2004 Threads / Messages: 628 / 51730
Thank you. Today I installed oil seal 2121-2302052 on the rear axle flange. I hope this is true? Otherwise, the first time I put 2101-2402052 there from the classics and it drained my oil in a terrible way. By the way, is it really possible to change the oil seals in the front and rear axles on a lift without a torque wrench? One service center told me that the shank nuts are tightened very cleverly. And what if they are not tightened correctly, then you can safely change the gearboxes
NIVA oil seals
1. NIVA gearbox seals:
-Oil seal for the input shaft of the gearbox (gearbox) NIVA-2121, -21213, -21214, -2131, -2123:
Catalogue number: 2101-1701043
oil seal dimensions: 28x47x8mm
- Seal of the secondary shaft of the gearbox (shank) VAZ-2121, -21213, -21214, -2131, -2123:
Catalogue number: 2101-1701210
oil seal dimensions: 32x56x11mm
2 . NIVA front axle oil seals:
-Oil seal for the front axle gearbox NIVA- 2121,-21213,-21214,- 2123,-2120
catalog number: 2121-2302052
-Drive seal -2121,-21213,-21214,-2131,-2123, universal (without direction)
Catalog number: 2123-2303120 / 121 2 pcs.
seal dimensions: 57.15 x 40 x 9mm
But it is better to install seals with a notch (left, right):
Left drive oil seal -2121,-21213,-21214,- 2123
Catalog number: 21213-2301035 1 piece.
Oil seal dimensions: 57.15 x 40 x 9mm
Right drive oil seal -2121,-21213,-21214,-2123
Catalog number: 21213-2301034 1 piece.
Oil seal dimensions: 57.15 x 40 x 9mm
3. Transfer Case Seals 3pcs:
2 identical oil seals are installed on the valve:
catalog number: 2101-2402052-01 (this is the rear axle gearbox seal on the VAZ-2101 and NIVA-2121 of right rotation),
one is installed on the drive shaft of the RK:
(in the lower diagram), the second is on the front shaft of the RK differential (see the upper diagram - highlighted in red)
Dimensions of these seals in mm: 35.8 x 68 x 10(12) 2 pcs.
An oil seal is installed on the rear shaft of the RK differential - this is the 3rd oil seal (highlighted in blue in the top diagram)
with catalog number: 2121-2302052 left rotation 1 pc.
Dimensions in mm: 35.8 x 68 x 11(12)
4. Rear axle gear oil seal :
catalog number: 2101-2402052-01 (rear axle gearbox VAZ-2101) 1 pc.
5. Axle shaft seals for Chevy NIVA-2123:
Seals for VAZ-2110 drives of right and left rotation are installed
catalog numbers of oil seals: 2110-2301034 right - 1 piece
gland dimensions in mm: 57 x 35 x 9
In the photo: VAZ-2123 axle seals (BRT) red-left, black-right.
The arrow on the oil seal indicates the direction of rotation of the shaft (when the vehicle is moving forward).
Source
Advice on how to remove drives without dismantling the Niva front gearbox
- To dismantle the drives, it is necessary to unscrew the fastenings of the gearbox (in this case, some kind of stop is placed under it).
- Then the steering knuckles are released. To do this, simply unscrew the shock absorber mount from the lower arm and the lower ball joint.
- To relieve the load, jack up the lower suspension arm.
- Unscrew the hub nut and remove the centering ring. The nut is too tight, so we use a wrench extension (for example, a metal pipe).
- We move the steering knuckle to the side. The drive can then move freely.
- To ensure free movement of the drive during removal, the gearbox must be moved back slightly.
- We remove the drive, being careful not to damage the anthers. If the boot is torn, it must be replaced.
- The procedure for removing the right and left CV joint drives is similar.
Before dismantling, it is necessary to mechanically remove dirt from the inside of the steering knuckles and from the bottom of the car above the work area. The best option is to wash the bottom with a high-pressure apparatus one day before carrying out work.
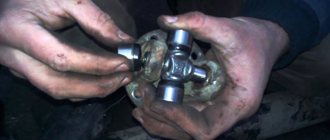
Driving at high speeds with broken universal joint crosspieces does not go without consequences. The rear axle gearbox on the classic and Niva is designed in such a way that when the car moves forward, the shank seems to be unscrewed from the engagement of the main pair. The drive gear of the main pair (also known as the shank) rotates on two bearings: front and rear. The distance between them is elastically fixed by the pretension created by the spacer sleeve when the shank nut is tightened. The vibration of the cardan, transmitted to the rear axle gearbox, gradually unscrews the shank nut. Radial play appears in the shank - especially on the front bearing, because When moving forward, the shank is unscrewed from the joint of the main pair and the front bearing is freed for play. Radial play wobbles the unfixed spacer sleeve and oil flinger washer, gnawing out metal fragments that fall into the tapered bearing. After the fragments cut “patterns” on the rollers and bearing race, noise begins, which continues even after the shank nut is tightened or the spacer is replaced. In theory, in such cases, repair of the rear axle gearbox is required. Repair with complete disassembly, troubleshooting and assembly. The last stage is not performed by anyone in a city of millions at a reasonable price. Everyone just replaces the gearbox with a new one and moves on.
Replacing the front shank bearing.
I decided to go a different route. Replace the front tapered shank bearing without disassembling the gearbox. I calculated the distance between the shank and the front bearing race, which was exactly 13 mm. It is necessary to select a puller into this distance, the clamping tab of which can squeeze through. We searched for a long time at the service station, but found a puller with a suitable jaw width size - 13 mm. Only the puller was external, but we managed to twist the legs for internal removal. We started working with this tool.
The flanges were uncoupled. We tightened the nut, took out the bearing, bushing and washer.
Now all that’s left to do is pull out the outer race of the front shank bearing.
How to determine when it's time to change?
Under the influence of temperature and aggressive substances contained in the oil, the elastic cuffs become rigid. Rotating shafts gradually wear out rubber or silicone. As a result, the connection loses its tightness. This manifests itself in the form of oil leaks. If there is severe wear after parking, you can find oil drops under the car in the area of the gearbox.
If the input shaft seal is damaged, lubricant leaks onto the clutch disc. As a result, the oil begins to burn, as evidenced by a characteristic odor. In this case, the clutch may slip under heavy load.
Important! Seal wear is also indicated by a drop in oil level. In this case, the parts must be replaced with new ones.
Replacing the secondary shaft oil seal
To work, you will need a standard set of wrenches, a hammer, a mandrel and a screwdriver. The materials you will need are sealant and kerosene for washing spare parts.
Replacing the secondary shaft oil seal of the Niva Chevrolet gearbox requires preliminary dismantling of the oil seal. After this you need to do the following:
- Remove the centering ring seal.
- Unscrew the nut holding the shank flange.
- Remove the centering ring.
- Pull out the lock washer.
- Remove the flange.
Using a screwdriver, remove the oil seal from the mounting hole.Apply a thin layer of sealant to the outer surface of the body of the new part.
Using a mandrel, press the part into the gearbox cover.
After this, all that remains is to check the oil level and install the flush valve in place.
To replace the input shaft seal of the Niva Chevrolet gearbox, it is necessary to dismantle the gearbox. After this, all that remains is to wipe its body with a rag and get to work. To replace a worn part, you must:
Using a 13mm wrench, unscrew the nuts and remove the clutch housing cover.
When the replacement is complete, you need to put the box back in place.
Front axle structure.
To replace the oil seal, it is not necessary to dismantle the front axle. When replacing oil seals yourself, it is not recommended to use a lift; it is better to carry out the work on an inspection pit or overpass. The rear wheels must be secured with supports. The gearbox and transfer case levers must be adjusted to the neutral position. When using a jack, it is better to hang the front part on special supports.
First, the replacement area is cleaned of drips and traces of technical fluids. After this, the crankcase plug is unscrewed and the oil in the gearbox is drained into a special container. After this, the plug is installed in place.
To carry out the replacement, you need to stock up on the following set of tools:
- set of socket wrenches and hexagons
- hammer and pry bar
- Screwdriver Set
- puller with two or three legs
- pipe sections equal to the diameter of the seals
- Liquid for removing oil residues, such as kerosene
- metal mesh
- rags
Transfer case device
The Chevrolet Niva transfer case redistributes engine torque between the drive axles and, if necessary, changes the gear ratio and locks the center differential. The parts of this assembly require significant force. Therefore, RK gears and bearings operate in an oil environment.
To prevent oil leakage from the transfer case, oil seals are installed at the joints of the housing and rotating drive shafts. They consist of two parts: a metal body and a rubber cuff, tightened by a spring. The latter ensures sealing of the connection due to the tight fit of the rubber to the shaft.
Chevrolet Niva Manual
Chevrolet Niva Replacing transfer case shaft seals
We carry out the work on an inspection ditch or overpass. We replace the drive shaft seals of the front and rear axles by disconnecting the cardan shaft flanges from the shaft flanges (see Removing the cardan shaft). We change the transfer case drive shaft oil seal only after removing the intermediate shaft (see Removing the intermediate shaft). The operations for replacing all three oil seals are the same - we will show them using the example of a rear axle drive shaft oil seal.
We insert two bolts into the holes in the flange and screw the nuts onto them.
Using a 24mm socket, unscrew the flange mounting nut, holding it from turning with a screwdriver or mounting spatula inserted between the bolts.
We pry up the oil seal with a screwdriver... ...and remove it from the transfer case cover socket. Apply Litol-24 lubricant to the working surface of the new oil seal...
...and press in the oil seal with a piece of pipe or a tool head of a suitable size. The transfer case shaft seals are the same size. Moreover, they have different directions of oil removal notches. We install the dismantled parts in the reverse order. Apply sealant (threaded compound) to the threads of the flange nut and tighten the nut to the prescribed torque (see Tightening torques for critical threaded connections). We check the oil level in the box (see Checking the oil level in the transfer case) and top up if necessary.
Source
Article, size and manufacturers of reinforced cuffs
Initially, oil seals with an outer diameter of 68 and an inner diameter of 35.8 mm were installed in the transfer case. two types:
- 2121-2302052 — one oil seal. A similar part is installed on the drive gear of the front axle;
- 2101-2402052-01 — two oil seals in the Republic of Kazakhstan. The same part is located on the drive gear side of the rear axle.
The installation of different seals is explained by the different directions of rotation of the drive shafts.
Useful! Nowadays oil seals with article number 2123-1802120-12 are installed in the RC and axles of the Niva Chevrolet. They are designed for shaft rotation both clockwise and counterclockwise.
Spare parts from the Balakovo plant (Rosteco) are popular. According to reviews from Chevrolet Niva owners, they are characterized by high wear resistance at an affordable price.
Drive seal VAZ 21213, 21214, Chevrolet Niva left 21213-2301035
in stock see availability in other cities
| Manufacturer: Brand: | BRT Balakovo |
| Vendor code: | 21213-2301035 |
| Catalog: Catalog N: | 212132301035, 21213-2301035-00 |
| Name: | Drive seal VAZ 21213, 21214, Chevrolet Niva left 21213-2301035 |
| Product from category: To category: | Wheel drives and driveshafts VAZ |
| Availability: |
Pickup from a warehouse in Yekaterinburg
- Cash
- Transfer to card
- By bank card
- By invoice (for organizations with VAT)
Important. Before receiving the product, check its availability by phone or place an order on our website.
Delivery by courier in Yekaterinburg and nearby cities
- Payment in cash upon receipt of goods
- The cost of delivery within the city and nearby cities is 100-250 rubles
- Free delivery throughout Yekaterinburg for orders over 10,000 rubles.
- Please check with the RusAvto manager for delivery times and costs.
For minimum order and delivery costs, see the Delivery section.
| Minimum order | Cost of delivery | Free delivery from | |
| Ekaterinburg | 1000 | 150 | 6000 |
| Upper Pyshma | 3000 | 200 | 10000 |
| Berezovsky | 3000 | 200 | 10000 |
| Aramil | 3000 | 200 | 10000 |
| Revda | 5000 | 400 | 17000 |
| Pervouralsk | 5000 | 400 | 17000 |
| Polevskoy | 7000 | 500 | 26000 |
| Sysert | 7000 | 500 | 26000 |
| Novouralsk | 10000 | 600 | 34000 |
| Nevyansk | 12000 | 700 | 37000 |
| * does not apply to large spare parts and special goods. price | |||
- Prepayment 30% of the cost of the goods (Cashless payment on invoice)
- The balance of the amount is cash on delivery upon receipt of your goods at the post office.
- Delivery services are paid by the recipient according to the current tariffs of Russian Post.
Why do we ask for partial payment in advance before shipping? In our practice, there have been cases when goods sent by cash on delivery remained for a long time in the recipient’s post office and were not picked up. We were forced to pay for storage and incur additional costs for returning unclaimed goods to our warehouse.
Source
When and how do you need to change the seals of the VAZ 2123 transfer case?
Reference! Parts must be replaced if transmission oil leaks occur at the interface between the drive shafts and the transmission housing.
If this is not done, the transmission will leak. Without lubrication, transfer case parts will quickly fail.
Step-by-step instructions for replacing the oil seal of the Niva Chevrolet
To work, you need to have free access to the bottom of the car. Therefore, replacement of the oil seals will be carried out on an inspection ditch, overpass or lift.
You will need the following tool:
- hexagon 12;
- open-end or socket wrench 24;
- waste container;
- flat screwdriver;
- hammer;
- mandrel;
- syringe for filling transmission oil;
- new self-locking nuts for fastening the flanges.
The algorithm for replacing the Niva Chevrolet transfer case oil seal is as follows:
- drain the oil from the transfer case into the prepared container;
- unscrew the bolts securing the cardan, the drive shaft oil seal of which is to be replaced;
- engage the gear, lock the differential and put the car on the handbrake;
- Unscrew the nut securing the propeller shaft drive flange.
- remove the washer;
- pull the flange off the shaft;
- use a screwdriver to remove the old oil seal;
- clean the seat and apply sealant;
- lubricate the rubber seal of the new oil seal with oil;
- using a mandrel and a hammer, press the part into place;
- install the flange and washer, tighten them with a self-locking nut;
- secure the cardan.
Important! The self-locking design does not allow for reuse of parts. Therefore, the flange nuts must be replaced with new ones.
After completing the work, it is necessary to fill the transfer case with fresh transmission oil.
Drive seal VAZ 21213, 21214, 2123 Niva right 21213-2301034
in stock see availability in other cities
| Manufacturer: Brand: | BRT Balakovo |
| Vendor code: | 21213-2301034 |
| Catalog: Catalog N: | 212132301034, 21213-2301034-00 |
| Name: | Drive seal VAZ 21213, 21214, 2123 Niva right 21213-2301034 |
| Product from category: To category: | Wheel drives and driveshafts VAZ |
| Availability: |
Pickup from a warehouse in Yekaterinburg
- Cash
- Transfer to card
- By bank card
- By invoice (for organizations with VAT)
Important. Before receiving the product, check its availability by phone or place an order on our website.
Delivery by courier in Yekaterinburg and nearby cities
- Payment in cash upon receipt of goods
- The cost of delivery within the city and nearby cities is 100-250 rubles
- Free delivery throughout Yekaterinburg for orders over 10,000 rubles.
- Please check with the RusAvto manager for delivery times and costs.
For minimum order and delivery costs, see the Delivery section.
| Minimum order | Cost of delivery | Free delivery from | |
| Ekaterinburg | 1000 | 150 | 6000 |
| Upper Pyshma | 3000 | 200 | 10000 |
| Berezovsky | 3000 | 200 | 10000 |
| Aramil | 3000 | 200 | 10000 |
| Revda | 5000 | 400 | 17000 |
| Pervouralsk | 5000 | 400 | 17000 |
| Polevskoy | 7000 | 500 | 26000 |
| Sysert | 7000 | 500 | 26000 |
| Novouralsk | 10000 | 600 | 34000 |
| Nevyansk | 12000 | 700 | 37000 |
| * does not apply to large spare parts and special goods. price | |||
- Prepayment 30% of the cost of the goods (Cashless payment on invoice)
- The balance of the amount is cash on delivery upon receipt of your goods at the post office.
- Delivery services are paid by the recipient according to the current tariffs of Russian Post.
Why do we ask for partial payment in advance before shipping? In our practice, there have been cases when goods sent by cash on delivery remained for a long time in the recipient’s post office and were not picked up. We were forced to pay for storage and incur additional costs for returning unclaimed goods to our warehouse.
Source
Transfer case device
The Chevrolet Niva transfer case redistributes engine torque between the drive axles and, if necessary, changes the gear ratio and locks the center differential. The parts of this assembly require significant force. Therefore, RK gears and bearings operate in an oil environment.
To prevent oil leakage from the transfer case, oil seals are installed at the joints of the housing and rotating drive shafts. They consist of two parts: a metal body and a rubber cuff, tightened by a spring. The latter ensures sealing of the connection due to the tight fit of the rubber to the shaft.
Article, size and manufacturers of reinforced cuffs
Initially, oil seals with an outer diameter of 68 and an inner diameter of 35.8 mm were installed in the transfer case. two types:
- 2121-2302052 — one oil seal. A similar part is installed on the drive gear of the front axle;
- 2101-2402052-01 — two oil seals in the Republic of Kazakhstan. The same part is located on the drive gear side of the rear axle.
The installation of different seals is explained by the different directions of rotation of the drive shafts.
Useful! Nowadays oil seals with article number 2123-1802120-12 are installed in the RC and axles of the Niva Chevrolet. They are designed for shaft rotation both clockwise and counterclockwise.
Spare parts from the Balakovo plant (Rosteco) are popular. According to reviews from Chevrolet Niva owners, they are characterized by high wear resistance at an affordable price.
Applicability:
VAZ 2101-07, 2120 (Nadezhda), 2121 (Niva), 21213, 21213-214i, 2131
Sales are carried out from a warehouse in Ulyanovsk. Delivery of the product “Cuff (oil seal) of the rear axle gearbox VAZ 2101-07, 2120 (Nadezhda), 2121 (Niva), 21213, 21213-214i, 2131 Espra” is carried out to Moscow, Samara, St. Petersburg, Nizhny Novgorod, Ekaterinburg, Saratov , Krasnodar, Kazan, Perm, Orenburg, Penza and any other cities and regions of Russia.
For regular customers and wholesale buyers, cooperation with us is beneficial thanks to the existing system of discounts, the program of which you can find out from our managers.
The photo of the product card is for informational purposes only. There may be some differences in the completeness and appearance of the original product from the image shown in the photo. For detailed information on the characteristics of the product, contact the manager (Autogur73 store), the call within Russia is free.
When and how do you need to change the seals of the VAZ 2123 transfer case?
Reference! Parts must be replaced if transmission oil leaks occur at the interface between the drive shafts and the transmission housing.
If this is not done, the transmission will leak. Without lubrication, transfer case parts will quickly fail.
Step-by-step instructions for replacing the oil seal of the Niva Chevrolet
To work, you need to have free access to the bottom of the car. Therefore, replacement of the oil seals will be carried out on an inspection ditch, overpass or lift.
You will need the following tool:
- hexagon 12;
- open-end or socket wrench 24;
- waste container;
- flat screwdriver;
- hammer;
- mandrel;
- syringe for filling transmission oil;
- new self-locking nuts for fastening the flanges.
The algorithm for replacing the Niva Chevrolet transfer case oil seal is as follows:
- drain the oil from the transfer case into the prepared container;
- unscrew the bolts securing the cardan, the drive shaft oil seal of which is to be replaced;
- engage the gear, lock the differential and put the car on the handbrake;
- Unscrew the nut securing the propeller shaft drive flange.
- remove the washer;
- pull the flange off the shaft;
- use a screwdriver to remove the old oil seal;
- clean the seat and apply sealant;
- lubricate the rubber seal of the new oil seal with oil;
- using a mandrel and a hammer, press the part into place;
- install the flange and washer, tighten them with a self-locking nut;
- secure the cardan.
Important! The self-locking design does not allow for reuse of parts. Therefore, the flange nuts must be replaced with new ones.
After completing the work, it is necessary to fill the transfer case with fresh transmission oil.
How to turn on the transfer case on a Niva Chevrolet
The transfer case is controlled using a lever. Features of the device allow you to turn on lowering and locking at the same time. To select a lower gear, you need to pull the lever up. To add a lock you need to pull it to the far left position. To make it easier to navigate, there are special symbols on the handle:
- L-lowered,
- N-neutral,
- H-increased (standard operating mode).
How to use the lowering device correctly. Let's say a car is moving along a dirt road in second or third gear. If you come across a large puddle on the way, it is best to stop and engage a lower gear.
The downshift is only activated when the vehicle comes to a complete stop. This is a feature of the Chevrolet Niva differential. At the same time, it is not necessary to completely stop the car to activate the lock. At the same time, having the lock turned on is not a prerequisite for off-road movement. Usually it is used only if there is a risk of the car hanging diagonally.
But is it possible to turn on the lock not only in diagonal mode? Of course yes. But at the same time, the owner of a Chevrolet Niva may have some problems. Very often the lock jams and it remains on. At the same time, driving like this is not very useful for the car, especially at high speed. There are several basic ways to turn off the lock. To do this, you need to put the car in reverse, accelerate the car a little and try to dislodge the lock. This procedure needs to be done only at speed; this method helps quite often. To check whether the lock is enabled, you need to look at the dashboard, there will be a corresponding icon there.