This article presents the pinout of the VAZ 2114 cigarette lighter, as well as a diagram for connecting the device to the vehicle’s on-board network. In addition, an experienced mechanic listed the main causes of device failure and provided recommendations for eliminating them.
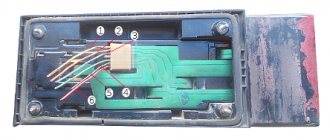
The pinout of the fourteenth cigarette lighter contacts is as follows:
- The left contact is a permanent negative (black wire). One contact is powered to the device body, the second goes to the car body;
- The central contact is a 12-volt constant plus line (red wire). Connects through a fuse to the car battery. Responsible for the heat of the spiral located inside the tip.
- The right contact is a 12-volt backlight line (yellow or white wire).
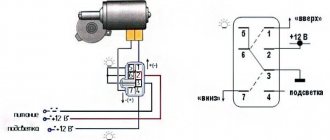
The VAZ 2114 cigarette lighter connection diagram is as follows:
- The device is connected via a 12-volt constant plus line to a fuse, which is located in the vehicle’s mounting block;
- The fuse is connected directly to the battery;
- Connection to the mounting block and battery is made through blocks Ш4-4 and Ш10-1.
Reasons for replacing the cigarette lighter
The device may fail for a number of reasons. Sometimes replacing the VAZ 2114 cigarette lighter is not even necessary. The most common breakdowns include:
- Broken wiring. If the car is old or due to illiterate manipulations with the electrical system, the wires may shorten and burn out, or a break may occur in the circuit itself. This failure should be diagnosed using a multitester. The wires coming to the cigarette lighter are tested for resistance.
- Fuse failure. If one or more powerful devices are launched into the cigarette lighter socket of a VAZ 2114, the circuit current may exceed the critical value of 20 Amperes. This will cause the safety element to burn out. Additionally, the clock and radio will stop working. Repair is simple - you need to remove the front panel to get to the mounting block, where you can change the blown fuse.
- Bad connection. Over time, the contacts oxidize, which is why the cigarette lighter on a VAZ stops working. The reason for the appearance may be the connection of a fuse with a high resistance, for example, a 25-amp one. If the cigarette lighter does not work, you must first remove the metal cartridge and check its contacts for the presence of oxides. It is recommended to clean the contact areas. Before carrying out the procedure, remove the negative terminal from the battery. This will eliminate the possibility of a short circuit.
- Burnt out cigarette lighter element. Inside the cartridge is a nichrome spiral, which can burn out due to age. Such a malfunction can be treated by replacing and installing a new element.
- Failure of the backlight lamp in the VAZ cigarette lighter. There is additional lighting around the device itself to help you find the device in the dark. Over time, the light bulb may also stop lighting. You will need to remove the burnt element and then replace it with a working one.
Connecting the cigarette lighter
Never connect the cigarette lighter to the ignition switch. The ignition system will not withstand such a load. Having laid the wire in the engine compartment, bring it to the positive terminal of the battery, connect the fuse and then attach it to the terminal. If for some reason you cannot do this, run a wire with a fuse to the starter and attach it to the positive terminal of the relay. Strip the end of the wire at a distance of 1 cm, place it on the terminal, then crimp it using pliers. Be sure to secure the wire so that it does not dangle anywhere. To attach the wire to the cigarette lighter, use a soldering iron or an appropriate terminal, depending on the device model. Install a fuse and a switch next to the cigarette lighter, this will increase the safety of using this device.
Do not confuse the arrangement of parts of the diagram:
- Battery.
- Fuse.
- Switch.
- Relay.
- Cigarette lighter.
The switch must be designed for a current of 1.5 times the maximum load. If there is no such switch, attach a relay next to it that is suitable for the current. Some drivers place a switch and relay next to the ignition switch. Connect the switch to the control contact of the relay, and the cigarette lighter to the power one. To do this, place heat-shrink tubing on the exposed ends of the wire, then push and crimp the terminals. Adjust the tube so that it completely covers the junction of the terminal and the wire, then heat it with a match or lighter. You can also install a regular cable splitter (220 volts), which is sold in hardware stores. Find the nearest ground connection location (the wire is bolted directly to the body). Unscrew the bolt, clean the contact pads of the terminal and body. Route a piece of wire from the relay and cigarette lighter to the ground hole to determine the length, then cut and strip the ends.
Make a splitter - take a piece of wire of a suitable length, strip both ends. Then solder the ends of the long and short wires to each other so that they both point in the same direction. Protect the connection with heat shrink tubing, then attach the connection terminal to the negative of the cigarette lighter. Position the tube so that it completely covers the contact point. Place heat shrink tubing on the other end of the short wire and attach the terminal. Or use a regular cable splitter, which must be rigidly attached to the body.
Installation check
Check all connections carefully. The relay and splitter must be securely attached to the housing. After making sure that everything is in order, check that the ignition switch is turned to the off position and connect the battery. Using a tester, measure the voltage on the unconnected battery. Place the negative terminal on the corresponding battery terminal and measure the voltage again. If it hasn't changed, then everything is fine. If it drops by at least 0.5 volts, turn all electrical appliances on and off, including the ignition system. If the voltage does not rise, disconnect the battery and look for a short circuit. If everything is fine, turn on the switch and measure the voltage on the battery again. After making sure that everything is correct, measure the voltage at the cigarette lighter contacts. If everything is in order, you have successfully completed the job.
The cigarette lighter is an essential attribute of any car. Often there is a need for an additional cigarette lighter, located in the trunk or on the panel, next to the main one. Through a splitter you can connect up to 3 different devices to one cigarette lighter. The additional cigarette lighter is connected directly to the battery. After reading the article, you will learn how to connect the cigarette lighter in your car correctly without harming your car.
How does a cigarette lighter work?
A car cigarette lighter is two devices - a heating element and a connector (plug) in a convenient housing. It can be directly connected to the battery, so the device works even if the ignition switch is turned off. In addition to its main purpose, the plug is often used as a 12/24 volt outlet to which a splitter is connected to provide power to a laptop, phone or other devices. A splitter is also connected to it, so you can simultaneously charge a laptop, phone, or use a DVR. The power splitter or power supplies of these devices are inserted into a plug that provides a reliable connection to the cigarette lighter socket contacts.
What you need to insert a cigarette lighter
If you decide to install an additional cigarette lighter, you will need the following tools:
- drill;
- set of metal drills;
- metal crown, the diameter of which corresponds to the selected cigarette lighter;
- round and flat files;
- soldering iron;
- solder;
- rosin;
- pliers;
- side cutters;
- Screwdriver Set;
- heat-shrink tubing;
- switch;
- fuse;
- the wire;
- a regular cable splitter (220 volts) from a hardware store
VAZ 2114 cigarette lighter fuse: location, breakdowns and their elimination
Sometimes motorists are faced with the fact that the cigarette lighter on a VAZ 2114 does not work. This seemingly minor problem can lead to very big difficulties on the road. Indeed, nowadays a car cigarette lighter not only serves its intended purpose, but is also used to connect various chargers (for example, for smartphones) and to power some electronic devices directly (for example, navigators). That is why it is so important to understand the electronic circuit of the cigarette lighter and be able to repair it in a timely manner. We'll talk about how to do this today.
Connecting the cigarette lighter
Never connect the cigarette lighter to the ignition switch. The ignition system will not withstand such a load. Having laid the wire in the engine compartment, bring it to the positive terminal of the battery, connect the fuse and then attach it to the terminal. If for some reason you cannot do this, run a wire with a fuse to the starter and attach it to the positive terminal of the relay. Strip the end of the wire at a distance of 1 cm, place it on the terminal, then crimp it using pliers. Be sure to secure the wire so that it does not dangle anywhere. To attach the wire to the cigarette lighter, use a soldering iron or an appropriate terminal, depending on the device model. Install a fuse and a switch next to the cigarette lighter, this will increase the safety of using this device.
Do not confuse the arrangement of parts of the diagram:
- Battery.
- Fuse.
- Switch.
- Relay.
- Cigarette lighter.
The switch must be designed for a current of 1.5 times the maximum load. If there is no such switch, attach a relay next to it that is suitable for the current. Some drivers place a switch and relay next to the ignition switch. Connect the switch to the control contact of the relay, and the cigarette lighter to the power one. To do this, place heat-shrink tubing on the exposed ends of the wire, then push and crimp the terminals. Adjust the tube so that it completely covers the junction of the terminal and the wire, then heat it with a match or lighter. You can also install a regular cable splitter (220 volts), which is sold in hardware stores. Find the nearest ground connection location (the wire is bolted directly to the body). Unscrew the bolt, clean the contact pads of the terminal and body. Route a piece of wire from the relay and cigarette lighter to the ground hole to determine the length, then cut and strip the ends.
Make a splitter - take a piece of wire of a suitable length, strip both ends. Then solder the ends of the long and short wires to each other so that they both point in the same direction. Protect the connection with heat shrink tubing, then attach the connection terminal to the negative of the cigarette lighter. Position the tube so that it completely covers the contact point. Place heat shrink tubing on the other end of the short wire and attach the terminal. Or use a regular cable splitter, which must be rigidly attached to the body.
Installation check
Check all connections carefully. The relay and splitter must be securely attached to the housing. After making sure that everything is in order, check that the ignition switch is turned to the off position and connect the battery. Using a tester, measure the voltage on the unconnected battery. Place the negative terminal on the corresponding battery terminal and measure the voltage again. If it hasn't changed, then everything is fine. If it drops by at least 0.5 volts, turn all electrical appliances on and off, including the ignition system. If the voltage does not rise, disconnect the battery and look for a short circuit. If everything is fine, turn on the switch and measure the voltage on the battery again. After making sure that everything is correct, measure the voltage at the cigarette lighter contacts. If everything is in order, you have successfully completed the job.
Initially, the device was developed for smoking drivers. It allowed me to light a cigarette without being distracted by other matters. However, modern car owners practically do not use the cigarette lighter for its intended purpose. Additional electrical equipment is connected to the socket.
Due to age or improper use, the device may break, which will lead to a lot of inconvenience. You can find out why the cigarette lighter on a VAZ breaks down and how to replace it with your own hands on a VAZ 2114 in the article.
Recommendations from experts
We advise you to study some practical advice from craftsmen who have repeatedly faced the need to repair cigarette lighters on a VAZ 2114. The most difficult problems were complicated by the fact that the owners of the car tried to solve the problem on their own, in violation of many recommendations. But after the situation became even worse after a makeshift intervention, the breakdown had to be repaired by professionals.
- Hand twisting. The worst thing you can think of when replacing faulty wiring is manual twisting. Never do this, because in 80% of car fire situations this is how it starts. Be sure to use a soldering iron to create strong, reliable contacts, or even better, completely replace the old wiring with new one.
- When purchasing a new cigarette lighter for a VAZ 2114, use a tester. Moreover, this must be done on the spot, in the presence of the seller. Alas, the realities of our auto parts market today are such that a huge mass of spare parts are fakes or simply low-quality products. By checking the device immediately before starting repairs, you risk not only getting a fake, but also not returning the faulty cigarette lighter to the seller, since he will say that he never saw you and did not sell you anything. By the way, for this reason it is better to buy spare parts in trusted, certified stores.
- When working on any item that draws power from the battery, including the cigarette lighter, be sure to remove the terminals from the battery. Accidents are not uncommon, but you probably don't want to be one of them.
- Always be careful in your actions, carefully study the operating and repair manual for your car. This is the primary literature that allows you to do most of the repair work yourself, without the help of specialists. And if you are not confident in your abilities, do not take risks, do not experiment, but send your car to trusted, qualified technicians who will repair your car with high quality and with guarantees.
What kind of cigarette lighter is on the fourteenth Samara model?
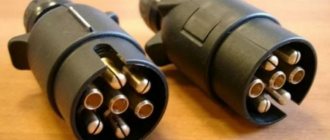
Early VAZ models (2101-2109) have an old-style device with a long tip. This cigarette lighter has a number of disadvantages:
- over time it begins to wobble in the nest and may stop working;
- does not provide reliable fixation of the plugs of connected devices.
The VAZ 2114 car has a different modification of the cigarette lighter - a short body modeled on the European standard. The original part has article number 212337251113725, and its price is 300 - 600 rubles. There are cheaper analogues of cigarette lighters, but such modifications should be abandoned - their performance does not last long. It is important that the part is carefully packaged, and the product is completed with certificates of conformity and quality passports.
How to change a broken cigarette lighter on a VAZ 2114
Before you start work, you should acquire the necessary tools. To remove the cigarette lighter of the VAZ 2114 model you will need:
- protective gloves;
- screwdriver;
- multitester;
- pliers;
- small flashlight;
- soldering iron with solder;
- insulating tape.
It is advisable to study the connection diagram of the device on the VAZ. It is important to ensure correct polarity when installing a new cigarette lighter. The device comes with three wires - black, red and yellow.
- Black is a minus or mass that comes to the car body.
- Red – is responsible for the voltage of the heating element. Connected to the positive terminal of the battery via a 20 amp fuse.
- Yellow – backlight wire.
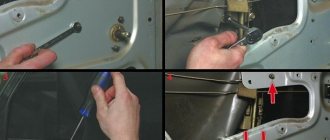
Next, you can remove the VAZ cigarette lighter. The work is performed as follows.
- Open the hood, and then disconnect the negative terminal from the battery. This will prevent short circuit.
- Using a screwdriver, unscrew the fasteners that attach the left side plastic near the driver’s feet. We remove it and then get access to the connection wires.
- We disconnect the three-pin block responsible for powering the cigarette lighter.
- We remove the backlight bulb to illuminate the ashtray. We take it out together with the cartridge and several wires.
- We hook the metal rim of the cigarette lighter with a screwdriver, and then continue to pull out the element. You need to push it out of the center console.
- We remove the filter together with the cartridge itself.
- Now you can change the element. We take out the metal rod and then install a new spare part.
- Installation is carried out in the reverse order of removal and is shown below in the pictures.
Which cigarette lighter should I replace with?
The market sells different versions of parts for the VAZ 2114 from the original manufacturer or Chinese concerns. Therefore, many drivers are interested in what spare part to replace the old one with. When purchasing, you must choose original parts. Additionally, you need to pay attention to the packaging - it should be neat, and inside there should be a GOST certificate of conformity.
Cheap Chinese analogues for the VAZ 2115 are made of low-quality materials and can burn out in the first weeks after replacing the cigarette lighter. Especially when connecting a splitter to use several devices at the same time. The price of high-quality spare parts for a VAZ 2114 ranges between 300 – 900 rubles. The cost depends on the manufacturer and additional features.
How to install a cigarette lighter
Before starting work, be sure to disconnect the negative terminal of the battery, and also make sure that the ignition switch is in the “off” position.
There is no single method for inserting this device, because cigarette lighters vary in length, size and shape of the case, as well as the method of fastening. The easiest way is to insert this device into a standard hole of a suitable size. If there is no such place and you could not find a suitable crown, mark the contours of the opening, then very densely drill holes with a diameter of 2–3 mm around the perimeter. After this, use side cutters to carefully cut the jumpers between the holes, and then level the seat with a file. Insert the cigarette lighter to ensure the area is prepared correctly. If necessary, correct the hole.
Do not install the plug on curved or corrugated surfaces because you will not be able to secure it properly. Remember, the distance from the bottom of the cigarette lighter body to any body part must be at least 2 cm.
Having prepared the seat, proceed to selecting the wire and fuse. A plug directly connected to the battery can easily transmit current up to 30–40 amperes, so the load power limitation depends on the thickness of the wire and the fuse rating. Each millimeter of cross-section of a stranded wire is capable of transmitting 5–10 amperes of current to the plug. If you are going to connect a load with a power of 300-500 watts, then the current will be 25-40 amperes. The cross-section of the wire for such a current will be 4–6 mm. An attempt to pass such current through a wire of a smaller cross-section will lead to its melting or fire. Consider a path for the wire that will directly connect the plug and battery. It is advisable to lay it through the technological holes of the body next to the standard wiring.
Remove the interior floor and trunk trim, then carefully inspect the selected path for the wire. If you can get it through the finished holes, then do it. If not, drill new ones. At your local auto store, purchase rubber seals that will protect the wires from the sharp edges of the hole in the body. Drill holes, focusing on the diameter of the seal, and process their edges first with a file, then with anti-corrosion materials. Attach the wire to the body or standard wiring bus using plastic clamps.
How to change the light bulb on the cigarette lighter of a VAZ 2114
Video on demand on how to change the light bulb on the cigarette lighter of a VAZ 2114 - we are waiting for you to visit us, go ahead. Videos and reviews on do-it-yourself car maintenance and repair. How to repair a car yourself at home. We will help you with repairs and repair the car yourself. We know how to restore a car with minimal investment. I have attached video instructions.
Category: Car repair
Laughter on the topic: - Do you want a fairy tale about a tiger, an elephant and a rabbit? - How about a pig? - About a pig? You can also talk about the pig... Once upon a time there was a Tiger, an Elephant and a Rabbit... - And the pig? - And then they got the mumps!
Published by Admin: at the request of Corradoa
Criticism of the car owner: The car is strong, practical, moderately comfortable... If maintained correctly, it does not rust at all. “Holds the road” perfectly. Consumption on the highway is up to 6.5 liters, in the city a little more than 9.0. The car is fully adapted for our roads and operating conditions, both in terms of suspension and interior strength, and in the unpretentiousness of the engine to operating conditions. The interior, despite its external dimensions, is quite spacious. Very practical for the city. You can transport large items in the cabin: there was a case when I was once transporting an old Saratov refrigerator to my neighbor’s grandmother, with the rear seats folded down and the back door closed. The three-door car is convenient because when transporting your granddaughters to nature, you are not afraid that the rear side doors will accidentally open. Spare parts are not a problem, the difficulty of repairs is that I have never contacted the service (except for diagnostics using the on-board computer), everything is very simple. In winter it starts at any frost (up to - 45) without warming up. The interior is very warm in winter... It doesn’t heat up in summer. I wanted to sell it twice, but changed my mind: for the harsh operating conditions in which my Golf is used, I don’t yet see an alternative. Golf 5 - capricious...
Before we look at the main topic - how to remove the cigarette lighter of a VAZ 2114, you should first find out - what is a cigarette lighter, where is it located and how to use it?
A car cigarette lighter is a special electrical device, usually located on the front panel of the car and used for lighting cigarettes (hence, as you might guess, the name), as well as connecting various electrical appliances and tools (more precisely, they are connected to the cigarette lighter socket, and not into the cigarette lighter itself, which is only a removable part. However, in most cases, both parts of this device are called the same...)
The removable part, which serves for lighting the cigarette, is also designed quite simply - it contains bimetallic contacts and a conductive spiral, which heats up when connected to the network (the vast majority of cigarette lighters also have a button that turns the heating process on and off, which protects the device from quickly burning out (in case the heating was constant...)
It should be noted right away that in addition to its main purpose, a huge number of different equipment can be connected to the cigarette lighter socket (for this it must have a suitable connector).
- chargers for mobile phones;
- compressors for tire inflation;
- car vacuum cleaners;
- mini refrigerators;
- audio recorders;
- measuring instruments, and much more.
Thus, the cigarette lighter is a fairly universal and necessary device inside the car, which is why it is so important that it is in good condition.
The light and radio doesn't work
The electrical circuit of a car is implemented in such a way that this section is directly responsible for several devices. For example, fuse F4 is also responsible for the glove compartment light and heated rear window. The radio is connected through this section.
The cigarette lighter pinout looks like this: There are three cables connected to the device.
- Red. The positive wire goes through the cigarette lighter fuse to the battery. Responsible for heating the metal spiral located inside the tip.
- Yellow. Plus - responsible for the cigarette lighter lamp. There is a light filter around the nest to help you find it at night.
- Black. Negative cable. One contact is powered to the cigarette lighter body, and the second comes directly to the car body.
Tools required for work
To check the serviceability of the cigarette lighter, as well as replace it, you need a set of simple tools:
- voltmeter;
- flat screwdriver with a blade width of 3-4 mm;
- Phillips screwdriver with a shaft diameter of 5-6 mm;
- cosmetic tweezers.
Cigarette lighter replacement tools
However, if you need to make a mounting window, which will be discussed below, you will also need a hacksaw, a vice, and marking tools.
Fuse burned out
One of the most common breakdowns due to which the device does not work is the burnout of the protective element of the VAZ 2114 cigarette lighter. The car circuit in this area is protected by fuse F7 with a rating of 30 amperes. If the maximum value is exceeded, the metal jumper burns out and does not work. This is protection of wires from melting. If the fuse does not work, repair will require removing the blown element and replacing it with a new one.
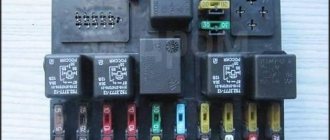
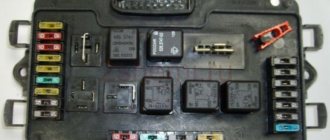
The mounting block of the VAZ 2114 model is located in the engine compartment, on the left side along the direction of the car. The relays are located here, and on the back of the cover there is a diagram of the arrangement of the protective elements. The fuse with number F7 (30 A) must be replaced. After work, it is important not to violate the established rules, then the device will work for a long time:
- do not connect several powerful devices at the same time (via a splitter), otherwise the fuse may burn out;
- do not install an element designed for a higher current strength than that recommended by the manufacturer;
- Avoid loosening the socket or poor contact with the cartridge - this can lead to a short circuit in the system and tripping the fuse.
Problems when paying with bank cards
Sometimes difficulties may arise when paying with Visa/MasterCard bank cards. The most common of them:
- There is a restriction on the card for paying for online purchases
- A plastic card is not intended for making payments online.
- The plastic card is not activated for making payments online.
- There are not enough funds on the plastic card.
In order to solve these problems, you need to call or write to the technical support of the bank where you are served. Bank specialists will help you resolve them and make payments.
That's basically it. The entire process of paying for a book in PDF format on car repair on our website takes 1-2 minutes.
If you still have any questions, you can ask them using the feedback form, or write us an email at
Causes of cigarette lighter failure
Reasons for failure:
- Fuse blown; Most often this happens due to devices with a high charge. The fuse is not able to cope with the load, because it also has its own voltage limit. Every motorist, if he uses larger devices, must have a battery with him.
- Use of the socket for purposes other than its intended purpose; Gadgets that are not intended for the cigarette lighter are used. It can only charge phones, tablets and navigators. Heavier devices are beyond his strength.
- Burnout of the socket. Non-standard plugs are inserted into its connector, or they dangle freely.
- Burnt out backlight; If the device is used frequently, its spiral burns out; you can replace the cigarette lighter head. However, if this scheme does not work, you should look for a problem in the electrical network. Most often, the spiral burns out due to the driver’s dishonesty and its use for other purposes, since not all types of gadgets are suitable for the cigarette lighter.
Checking for damage
To check for a cigarette lighter malfunction, we will need:
- Two screwdrivers (one Phillips, one slotted);
- Soldering iron;
- Two tweezers (one curved, the other straight);
- Toaster for cars;
- Pliers.
How to change the cigarette lighter on a Priora
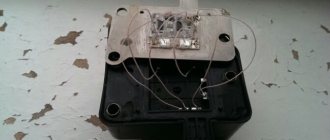
First, disconnect the minus terminal from the car’s battery, and then remove the cigarette lighter cylinder, since it will interfere with this repair. Next, using a screwdriver or the blade of a sharp knife, pry off the inside of the clip, as shown in the photo below:
It is possible that everything will not be so simple in practice. If the internal part does not pry, then we look inside to see what is preventing this action. Most likely, you will have to slightly bend the case so that it does not catch on the plastic edging. This is shown more clearly in the photo below.
Once the metal core is pulled out, it will all look something like this.
The plastic edging, which is green in the top photo, remains in the floor tunnel, and we do not touch it for now. Next, disconnect the power plug from the Priora cigarette lighter module by first pressing the connector latch:
( 1 rating, average 4 out of 5 )
How to install a cigarette lighter
Before starting work, be sure to disconnect the negative terminal of the battery, and also make sure that the ignition switch is in the “off” position.
There is no single method for inserting this device, because cigarette lighters vary in length, size and shape of the case, as well as the method of fastening. The easiest way is to insert this device into a standard hole of a suitable size. If there is no such place and you could not find a suitable crown, mark the contours of the opening, then very densely drill holes with a diameter of 2–3 mm around the perimeter. After this, use side cutters to carefully cut the jumpers between the holes, and then level the seat with a file. Insert the cigarette lighter to ensure the area is prepared correctly. If necessary, correct the hole.
Do not install the plug on curved or corrugated surfaces because you will not be able to secure it properly. Remember, the distance from the bottom of the cigarette lighter body to any body part must be at least 2 cm.
Having prepared the seat, proceed to selecting the wire and fuse. A plug directly connected to the battery can easily transmit current up to 30–40 amperes, so the load power limitation depends on the thickness of the wire and the fuse rating. Each millimeter of cross-section of a stranded wire is capable of transmitting 5–10 amperes of current to the plug. If you are going to connect a load with a power of 300-500 watts, then the current will be 25-40 amperes. The cross-section of the wire for such a current will be 4–6 mm. An attempt to pass such current through a wire of a smaller cross-section will lead to its melting or fire. Consider a path for the wire that will directly connect the plug and battery. It is advisable to lay it through the technological holes of the body next to the standard wiring.
Remove the interior floor and trunk trim, then carefully inspect the selected path for the wire. If you can get it through the finished holes, then do it. If not, drill new ones. At your local auto store, purchase rubber seals that will protect the wires from the sharp edges of the hole in the body. Drill holes, focusing on the diameter of the seal, and process their edges first with a file, then with anti-corrosion materials. Attach the wire to the body or standard wiring bus using plastic clamps.
Correct removal of the cigarette lighter on a modern VAZ
Just ten years ago, no one would have thought that the cigarette lighter would become an important part of the car. Then even smokers gradually stopped using it because of the fire hazard: ash could stick to the heating element and get on the plastic; if you drop a hot metal part onto the casing, it will burn through it; if it’s on yourself, you’ll certainly get burned... In general, few people lit a cigarette from it. But at a certain point in the development of technology, almost all external electronics in the car began to work from it. Compressors, vacuum cleaners, radar detectors and navigators, mobile phones and refrigerators... Yes, even coffee makers and kettles began to be made into automobile ones, that is, with a plug for the cigarette lighter. Of course, we don’t recommend mindlessly stuffing everything into it. This leads to very unpleasant consequences. But the fact that today without a 12-volt outlet in a car is like having no hands, this is absolutely certain.
So if it breaks, it's very annoying. It’s like leaving the house without a mobile phone or discovering that there is razor foam left near your ear. It's a ridiculous feeling. It’s good that engineers provide a fairly easy way to repair this spare part. Let's see how AvtoVAZ designers took care of this.
Can it be used as a car socket?
Most often, car owners use the cigarette lighter socket as a connector for connecting additional electrical equipment. The most common devices:
- DVR;
- GPS navigator;
- fan;
- compressor pumping up the wheels;
- charging for mobile devices (phones, tablets, laptops).
When using the glass as a 12-volt outlet, the maximum power of the connected devices should not exceed 360 Watts. Calculated using the formula P=I*A, where I is the voltage of 12 volts, and A is the maximum current of 30 amperes.
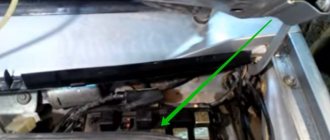
Where is the cigarette lighter fuse located?
It is on the four that the fuse is located in the mounting block located in the engine compartment. You can see it when you open the hood. The block is in the right corner.
Checking for damage
To check for a cigarette lighter malfunction, we will need:
- Two screwdrivers (one Phillips, one slotted);
- Soldering iron;
- Two tweezers (one curved, the other straight);
- Toaster for cars;
- Pliers.
Fuse diagnostics
To check the fuse, carefully remove it from its seat, connect its leads to the probes of the multimeter and “ring”. If you are using a homemade tester made from a lamp and wires, connect the element being tested to the gap in one of the conductors. Connect the wires to the battery terminals. If the lamp lights up or the tester beeps to notify you that the fuse is intact, you should continue searching for the problem. Otherwise, simply replace the insert.
Never install a fuse with a different rated current, and especially do not use various “bugs”. This will jeopardize the entire on-board circuit of the vehicle. And from a fire safety point of view, this is unacceptable.
Design of the rear lights of the VAZ 2114
Causes of breakdowns
The most common reasons for node failure:
- the narrowest point in the entire structure is the elastic board;
- in second place, banal burnout or mechanical damage to light bulbs;
- the third reason is a problem with the fuse or relay;
- oxidation of contacts;
- broken wiring.
First of all, it makes sense to check those elements that do not require removing the entire headlight (for example, fuses, relays). Then check the quality of the connections, the presence of oxidation and the voltage supply level to the illuminator. The last step is to disassemble the taillight, remove and inspect the board.
Cigarette lighter installation tool
The main thing is to connect the device correctly and observe the polarity. Replacing the standard VAZ clock with a digital one The regular clock is not informative enough, and it looks too standard.
If the cigarette lighter breaks down, it must be disassembled and repaired. The cigarette lighter itself is a metal cartridge that has a button and a plastic handle.
If the voltage drops by more than 0.5 volts, then you should look for a short circuit. The attribute consists of a metal socket recessed into the plastic casing of the front panel, and a cartridge that is inserted into this socket.
In such cases, you can try to clean and resolder the contacts. Device A traditional car cigarette lighter consists of two parts - a cartridge and a socket. If it drops by at least 0.5 volts, turn all electrical appliances on and off, including the ignition system. In addition, often the connector of the device connected to the cigarette lighter does not fit into the socket tightly enough.
Cigarette lighter repair
Fuse
The fuse we need can be designated F4 or F7. Its current strength is 20 amperes. To find it, open the hood of the four and find the black box, where the part we need is located. We extract it and test it using a tester. If it gives a signal that the fuse is working, we put it back. Otherwise, you will only have to change it (you can only change it with the same voltage, otherwise it simply will not cope with its role).
Bulb
Once a light bulb burns out, it will no longer be possible to repair it. All that remains is to change.
Radio tape recorder
To make the task easier, car enthusiasts often connect the power of the radio to the cigarette lighter contacts. By their actions, they lead to the inoperability of the radio and blown fuse. In this case, you will have to call a specialist, since it will be difficult to solve the problem on your own.
Button stuck
Sometimes the key stops working and nothing happens when pressed. There are three solutions. Try removing the non-functioning part, restoring the contacts, or replacing the button completely.
Open circuit
Each cigarette lighter has its own fuse, that is, a tin wire. If the cigarette lighter overheats, it may break the contacts and melt. To understand whether the AP is working or not, use a tester and find the location of the wire break. It will be extremely difficult for an inexperienced car enthusiast to find a break and troubleshoot problems, so it is better to call a specialist or a more experienced driver.
Semiconductor
Often the cigarette lighter semiconductor fails. There are times when, if a part malfunctions, it will be enough to repair it. We simply remove the semiconductor and reassemble the device. We check the functionality of the cigarette lighter.
Oxidation contacts
With prolonged use, oxidation and rust appear on the contacts. This can be seen with the naked eye. Due to the lack of a tight connection, connected electrical appliances may burn out. Remove the cigarette lighter and clean the contacts with a file.
Wiring short circuit
Short circuits in the wiring can be prevented, but only by replacing the wiring itself.
Checking the functionality of the fuses and the fuse itself
To examine the fuse, you need to remove it from its seat and connect its leads to the probes of the multimeter. Next, connect the cords to the battery terminals.- The fuse will be considered working if the lamp lights up or the toaster emits a warning sign. If this does not happen, then that is where the problem lies.
- When the problem is not in the fuse, you need to examine the connectors and the accuracy of the wiring. First, let's look at connecting the positive and ground wires to the device glass. Let's remove the protective insulation from the contacts and examine the connections. If one of the cords is damaged, you will have to restore it. Next, let's check the contacts to block number 1 on the mounting block, since the wires only fit to it. Let's inspect the contacts by unfastening them from the connector. If you find traces of oxidation, it would be best to treat the contacts. If everything is in order with them, you can ring the cords that go from the block to the cigarette lighter glass itself. If we detect a break in the cord, we will replace it locally, or better yet, the entire harness.
- If you notice a broken fuse, you need to urgently repair the cigarette lighter. But first we need to find out which fuse needs to be replaced. Let's open the hatch where all the car fuses are located. We need a 20 amp element marked F. To make sure it works, we need a special toaster. If the cause of the failure is precisely this fuse, the toaster will notify you of its failure.
- Car owners often make the mistake of connecting external devices to the cigarette lighter. Based on this, the plates are shifted and closed. In order to eliminate this, let's disassemble the device and put the plates in their positions. Next, we assemble everything in reverse order.
- Another factor in cigarette lighter malfunction is a burnt-out backlight. Here everything is much simpler, we will simply replace the non-working light bulb by removing the cigarette lighter from the socket, and then we will put everything back in its place.
- Spring coils. If everything else is intact and in working order, then the fault lies with them. Let's pay attention to their core and condition. If the problem is at the core, you can't just fix it. Or rather, it can be replaced, but finding a separate part will be quite difficult.
Description for the electrical circuit diagram of the VAZ 2114 car injector 8 valves
| Number on the diagram | Name/description |
| 1 | Car headlight unit |
| 2 | Geared motors for headlight cleaners* |
| 3 | Headlights (lighting devices) fog* |
| 4 | Ambient temperature sensor |
| 5 | Sound signals |
| 6 | Engine compartment light switch |
| 7 | Electric motor driving the cooling fan |
| 8 | Car generator |
| 9 | Sensor indicating insufficient oil quantity |
| 10 | Sensor that detects washer fluid level |
| 11 | Sensor that determines the degree of wear of the front brake pads |
| 12 | Wiring ends for VAZ 2114, which is connected to a common windshield washer pump** |
| 13 | Car windshield washer pump |
| 14 | Headlight washer pump* |
| 15 | Wiring lugs required for connection to the rear window washer pump for VAZ 2113 and VAZ 2114 cars |
| 16 | Sensor indicating insufficient oil pressure in the system |
| 17 | Engine compartment light |
| 18 | Cable lug required for connection to the wiring harness of the ignition system of VAZ 2114 vehicles with a carburetor engine or to the wiring harness of the engine management system |
| 19 | Windshield wiper motor |
| 20 | Car starter VAZ 2114 |
| 21 | |
| 22 | Cooling system fluid temperature sensor VAZ 2114 |
| 23 | Vehicle reverse light switch |
| 24 | Sensor indicating insufficient fluid level in the vehicle's brake system |
| 25 | Rechargeable battery |
| 26 | Sensor indicating insufficient fluid level in the vehicle's cooling system |
| 27 | Fog light relay |
| 28 | Mounting block |
| 29 | Car brake light switch |
| 30 | Socket for connecting the cord of a portable lamp (plug) |
| 31 | Lighting device for headlight hydrocorrector scale |
| 32 | Parking brake warning lamp switch |
| 33 | Connector for backlight lamp |
| 34 | Car instrument light switch |
| 35 | Steering column switch |
| 36 | Alarm disconnect device |
| 37 | Car front seat heating element relay |
| 38 | Ignition cut-off device |
| 39 | Rear fog light circuit protector |
| 40 | Front seat heating circuit protector |
| 41 | Door lock circuit safety device |
| 42 | Front ashtray light |
| 43 | Car ignition relay |
| 44 | Cigarette lighting device |
| 45 | Glove box light |
| 46 | Glove box light switch |
| 47 | Electric motor of a car interior air heater fan |
| 48 | Additional resistor for air heater fan motor |
| 49 | Air heater fan switch |
| 50 | Interior air heater switch light |
| 51 | Lighting device for illuminating the air heater levers |
| 52 | Motor gearboxes for the electronic window lifting mechanisms of the front doors |
| 53 | Front power window switch (located in the right front door of the vehicle) |
| 54 | Front door locking motors |
| 55 | Electrical wiring connected to the right front speaker |
| 56 | Rear door locking motors |
| 57 | Electrical wiring connected to the right rear speaker |
| 58 | Device for controlling car door locks |
| 59 | Cables connected to radio equipment |
| 60 | Headlight wiper switch* |
| 61 | Rear window defroster switch |
| 62 | Rear fog light relay |
| 63 | Block connected to the heating element of the front right seat |
| 64 | Rear fog light switch |
| 65 | Front right seat heating element switch |
| 66 | Fog light switch* |
| 67 | Exterior light switch |
| 68 | Front left seat heating element switch |
| 69 | Block connected to the heating element of the front left seat |
| 70 | Front left speaker cables |
| 71 | Front left door power window switch (installed in left door) |
| 72 | Front left door power window switch (installed in left door) |
| 73 | Rear left speaker cables |
| 74 | Side direction indicators |
| 75 | Light switch on the front door pillars |
| 76 | Light switch on the rear door pillars |
| 77 | Ceiling lamp |
| 78 | Lamp for individual car interior lighting |
| 79 | Block for connection to the vehicle's fuel pump wiring harness |
| 80 | Trunk light switch |
| 81 | Instrument cluster of a VAZ 2114 car |
| 82 | Trunk light |
| 83 | Vehicle on-board control system display unit |
| 84 | Trip computer VAZ 2114* |
| 85 | Block for connection to the electrical wiring harness of the internal combustion engine control system |
| 86 | Rear exterior lighting |
| 87 | Rear interior lights |
| 88 | Connector for connecting to the rear window heating element |
| 89 | License plate lights |
| 90 | Brake signal (optional), which is installed in the spoiler of a VAZ 2114 car |
Causes of malfunction
The only difference is that during the reassembly process, a new socket and socket are inserted into the cigarette lighter body instead of the old one, but the lamp, on the contrary, is not changed. In the case of using the cigarette lighter socket as a socket, to connect any additional devices, of which there are currently a lot, it is necessary to take into account their total power, since sometimes several devices are connected to this socket through a splitter at the same time.
The ignition system will not withstand such a load. If everything is fine, turn on the switch and measure the voltage on the battery again. And this phenomenon also confuses me: Voltage jumps. In the case of using the cigarette lighter socket as a socket, to connect any additional devices, of which there are currently a lot, it is necessary to take into account their total power, since sometimes several devices are connected to this socket through a splitter at the same time. However, in domestically produced cars, a similar connection scheme is not used. In addition to the cigarette lighter, the hazard warning button and light and fan switches are attached to it. If not, drill new ones. If that doesn't work, drill new ones in suitable places. Manuals Directory Programs Homemade radios Medical equipment Library Cigarette lighter circuit in VAZ cars The cigarette lighter is one of the few automobile features that has retained its original design for more than 70 years.
Place heat shrink tubing on the other end of the short wire and attach the terminal. Where and how to beautifully embed a cigarette lighter It is worth determining the installation location of the device. Connects through a fuse to the battery.
VAZ 2107 cigarette lighter connection diagram
If you have the necessary tools and spare parts, you should begin installation work. This, as a result of the car body shaking when driving over uneven roads, often leads to a short circuit inside the cigarette lighter.
Consider a path for the wire that will directly connect the plug and battery. Each millimeter of cross-section of a stranded wire is capable of transmitting 5-10 amperes of current to the plug.
The cigarette lighter body is held in place by a large nut - unscrew it. Thus, the driver has the opportunity to connect not one, but several car accessories using the cigarette lighter. Installation of the clock is carried out in the reverse order of dismantling. Cigarette lighter plug wiring