Toyota Corolla is the leader in sales among cars all over the world. It is for this reason that she was included in the Guinness Book of Records. Its fundamental nature, ease of operation, and impressive characteristics brought it such demand.
Corolla 120 sedan
Cars of this brand are considered among the most durable in the world and rightfully top numerous reliability ratings. But despite all these aspects, this car requires timely maintenance. In our article we will conduct a detailed analysis of an important part of this process - replacing the fuel filter for Toyota Corolla 120 and 150 bodies.
Self-replacement of the Corolla E120 fuel filter
Toyota Corolla is the leader in sales among cars all over the world.
It is for this reason that she was included in the Guinness Book of Records. Its fundamental nature, ease of operation, and impressive characteristics brought it such demand. Cars of this brand are considered among the most durable in the world and rightfully top numerous reliability ratings. But despite all these aspects, this car requires timely maintenance. In our article we will conduct a detailed analysis of an important part of this process - replacing the fuel filter for Toyota Corolla 120 and 150 bodies.
Step-by-step instructions for replacing the filter element and pump
Changing gas filters is important to maintain engine power, avoid problems when starting it, and to extend the life of pistons, piston rings, connecting rods and pins.
Replacing the gas filter in a Toyota Corolla in the 120 body is carried out independently, if the owner of the car has an understanding of working with tools of medium complexity.
Spare parts and tools
Before you change the fuel filter on your Corolla, you need to prepare. To do this, you should prepare the necessary tools and materials in advance. We will need:
- coarse gas filter;
- fine fuel filter;
- narrow slotted screwdriver for fasteners;
- Phillips head screwdriver.
- 8 wrench,
- hairdryer
Also prepare a large amount of rags and a container of water.
Execution of work
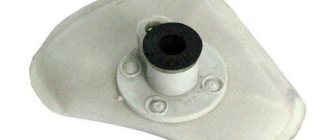
The Corolla fuel filter is located in the tank and is part of the fuel pump module, consisting of:
- fuel pump;
- primary gas filter - a component that cleans fuel from excess moisture and various impurities;
- final filter - a component that carefully filters fuel from smaller particles;
- float indicating the amount of fuel.
Before starting work, you should drain the fuel from the system so as not to flood the car interior with it later. To do this, you need to pull the fuse out of the fuse box and leave the engine idling until the fuel pump and line are empty and the engine stalls. Next, open the gas tank cap to release the pressure. It is also recommended to replace filters on the Toyota Corolla e120 with a small amount of fuel remaining in the tank.
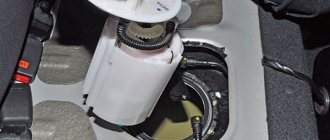
First you need to disconnect the negative terminal of the battery. Then remove the rear seat, secured with two latches and a guide. This must be done with sudden movements. Under the seat there is a gas tank cavity cover with wires connected to it. The cover is secured with sealant and lifted using a flat-head screwdriver. This frees up the entrance to the small space above the tank where the fuel system unit is installed. To prevent dirt from getting into the tank, you need to clean with a vacuum cleaner under the place where the seat was, and then above the tank itself.
Next, unscrew the 8 bolts and remove the fuel pump. This should be done at an angle due to the float, which is attached to the wire at a sufficient distance.
Now you can assess the degree of contamination of the tank and coarse mesh. The degree of contamination of the fine gas filter cannot be seen.
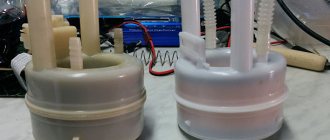
The next task is to disassemble the fuel module. To do this, remove the float by bending the plastic latch. Then the mesh is removed and the fine filter, which is secured with a rubber gasket, is disconnected.
When disassembling an old gas filter, it is important not to lose the rubber bands, in case new ones were not purchased. The most difficult thing to remove is the rubber band from the top of the gas tank.
We insert the rubber bands into the new filter element, similar to the location in the old one, and complete the structure. It is problematic to replace the coarse filter and the retaining retaining ring.
Now we return all the parts to their place in the sequence in which they were removed. We tighten the nuts again and connect the tubes. But before you put the seat back in place, it’s worth checking how the system works. To do this, insert the key into the ignition and turn it to the “ON” position, but without starting the car. The operation of the fuel pump should be audible. The sound should be familiar. The metal tank cap is installed using the same sealant, after which the rear seat can be replaced.
Possible troubles and difficulties
After replacing and placing the fuel pump in the fuel tank, the car may not start the first time. The reason for this may be poor sealing of the fuel pipes, as a result of which the fuel pump does not create sufficient pressure in the line.
When disconnecting the hoses from the body, you should be careful. The system retains pressure and fuel may spray into the passenger compartment or eyes. It is worth stocking up on enough rags for cleaning.
You should also be careful about fire and sparks near the work site, because... After removing the cap, gasoline vapors from the tank quickly fill the interior.
How often to change
According to the manufacturer's recommendation, it is necessary to replace the fuel filter on a Toyota Corolla 120 with a TO-8, which corresponds to the 80,000-kilometer mark. The frequency of inspection is not regulated by the manufacturer.
Signs of a clogged filter element
The need to change the fuel filter in a Toyota Corolla with a 120 body may be indicated by the performance of the vehicle. Some of its features may indicate problems with the fuel pump. And so that you don’t have to disassemble the fuel pump every time to check its serviceability, you need to pay attention to the following operating irregularities:
- It is difficult or impossible to start a cold engine;
- at idle speed the power unit is unstable;
- the car jerks when driving and slows down on its own;
- there is a feeling of “triple”;
- the dynamic properties of the vehicle deteriorate.
How often should I replace it?
Replacing the Toyota Corolla fuel filter in 120 (2000-2007) and 150 (2008-2012) bodies is not provided by the manufacturer as a routine operation. Such work is performed only at the beginning of diagnostic procedures, if a drop in pressure is detected when the load on the engine increases (that is, at times when the engine’s fuel consumption is highest).
Considering that the fuel filter is built into the body of the fuel module and is not cheap even in its non-original form, few people will decide to perform such a procedure as a preventive measure, especially since it is quite labor-intensive. We also recommend performing this procedure first when purchasing a car with more than 70-80 thousand kilometers or when there are specific signs of excessive filter contamination.
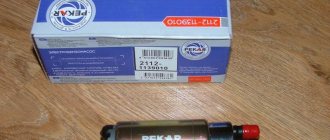
Fuel filter Toyota Corolla 120
The fuel pump and filter are one of the main elements of the fuel circuit. They are entrusted with the task of uninterrupted supply of fuel to the main line. Their failure can lead to complete immobilization of the vehicle. Therefore, the fuel filter and pump must be replaced at the first symptoms of their breakdown.
The original Toyota Corolla 120 fuel pump has article number 2322128030. Its price is more than 2,500 rubles. There are analogues from third-party manufacturers. Their best options are shown in the table below.
Table - Analogues of the fuel pump for the Corolla 120 car
| Manufacturer | Article number | Approximate cost, ruble |
| Stellox | 1001023SX | 900-950 |
| Asia360 | A380407 | 1000-1100 |
The original production fuel filter has article numbers 77024-02040 and 77024-12050. Its cost ranges from 4,000 to 5,000 rubles. It is also possible to purchase exclusively a coarse filter with catalog number 232170D090. The price in this case will be about 200 rubles. Good analogues of the original Corolla 120 product can be found in the table below.
Table - Analogues of the fuel filter for Corolla 120
| Manufacturer | vendor code | Cost, ruble |
| JS Asakashi | FS21001 | 2200-2500 |
| Masuma | MFF-T138 | 3000-3500 |
| Mk filter | MNFN0391 | 5000-6000 |
Frequency of replacing the fuel filter
The automaker produces the Corolla 120, which is equipped with fuel filters designed for the entire service life of the car. In domestic realities, the quality of gasoline is extremely low, which causes the filter to clog and the fuel pump to fail. Therefore, official dealers recommend replacing the fuel module every 80 thousand km.
In most cases, there are no obvious symptoms of a clogged fuel filter. This is due to the fact that throughput decreases gradually throughout the entire life of the vehicle. In this case, a clogged filter element can have a negative impact on the power plant and its associated components.
Replacement frequency
The Toyota Corolla operating instructions do not make any mention of replacing fuel filters. Manufacturers created a product intended for use around the world, and understood that the climatic, social, and technological operating conditions of a car can be extremely different.
Each region developed its own recommendations in practice. For example, in Russia, car repair services advise carrying out routine maintenance after 70–80 thousand kilometers (this interval has even been included in the reference and service literature since 2012).
Many craftsmen believe that it is more rational, especially when using low-quality fuel, to replace it every 50 thousand km.
But the most important criteria are always the normal operation of the engine and the opinion of the car owner.
Required Tools
In order to successfully replace the fuel filter on your Corolla 120, you will need the tools from the table below.
Table - Tools required to replace the fuel filter
| List of tools | Note |
| Screwdriver | With flat and cross blades |
| Vacuum cleaner | To clean dirt |
| Capacity | To drain remaining fuel |
| Pliers | Can be replaced with pliers |
| Technical hair dryer | Required for vehicles in which the service hatch is secured with bitumen |
| Brush | To reduce the risk of contaminants and foreign particles entering the gas tank |
Replacing the fuel filter on a Corolla E120 body
This relatively simple procedure is performed in order to maintain a high degree of fuel purification, since the engine power and the reliability of its starting, as well as the longevity of the service life of the rubbing parts of the piston group, depend on it. Replacing the fuel filter on a Toyota Corolla model with a 120 body can also be done at home if the owner has the skills to work with moderately complex mechanisms.
To prevent the car engine from getting impurities into it along with the fuel, a special filter is used. It is believed that the service life of the filter element depends on the good performance of the spark plugs and the quality of the lambda probe.
According to the Toyota Corolla operating instructions, the fuel filter should be replaced after 80 thousand kilometers. Many car enthusiasts continue to drive without replacing the filter and almost double the recommended mileage. But it’s still wiser to do as recommended by the manufacturer, basing the replacement only on the speedometer readings.
On Russian roads, the quality of fuel often leaves much to be desired, and the need for replacement may occur even before the specified mileage. True, such cases are very rare. Many Toyota Corolla owners recommend starting to replace the filter only when there are signs of a decrease in its throughput or a complete failure of operation. Since the filter becomes dirty very slowly, it is not immediately possible to notice obvious symptoms of its poor performance. But further operation with a clogged filter has a bad effect on the engine’s time between overhauls. They are shrinking.
If you don’t have the determination to carry out the replacement yourself, then why not contact a specialized center? The costs for this work will not be so great.
Here are the signs of a filter malfunction:
- Uneven operation of the engine, both under load and at idle;
- Low throttle response, slow acceleration;
- Poor starting and unexplained engine stalls
The fuel filter in a Toyota Corolla belongs to the fuel supply unit, and together with the pump are located inside the tank. This equipment is accessible from under the rear seat. The housing of the pump group unit is a plastic monolith and there is a filter inside it. So replacement in many Toyota models has to be done in a complex manner.
When replacing a filter, it is very important to correctly install all the sealing rings and gaskets - because the pressure in the injection system will depend on this, and therefore the quality of engine operation.
To work with the gas tank, turn off the ignition, pull out the fuel pump fuse (or better yet, just remove the terminal from the battery) and do everything in the sequence described below.
Signs of a clogged fuel filter
Many Toyota Corolla car owners start replacing the filter only when there are clear signs of a decrease in the throughput of the cleaning element or when the engine fails completely. Since filter clogging occurs at a slow pace, it is not immediately possible to notice the obvious symptoms of its poor performance. And further operation with a clogged filter has a negative impact on the engine’s turnaround time, which is reduced.
Here are the main signs of a clogged filter:
- Uneven engine operation both at idle and under load
- Slow acceleration
- Unstable engine starting
- Unexpected engine stalls
Types of fuel filters for Toyota Corolla on the Russian automobile market Many auto stores offer a choice of at least three types of products of this type for Toyota Corolla. First of all, these are products from Chinese and Korean manufacturers, as well as the original version. Many motorists do not consider that the quality of filters of different types varies greatly. The main thing is that when replacing the filter, correctly install the sealing gaskets that come with them.
Depending on the modification of the Toyota Corolla car body and the year of manufacture (before 2007 or after), you should individually select a fuel filter that is suitable for the design. There are designs for fuel supply units from the gas tank, where the filter is located in the pump itself, so replacement has to be carried out as a whole module. The procedure is expensive, but the car owner still has no choice. Unlike these Toyota models, Corolla cars produced in 2008 were equipped with different designs of fuel filters, which can be replaced and installed separately from the fuel pump.
A rich assortment of foreign spare parts allows the car enthusiast to make his choice on a line, on one side of which is the cost of the product, on the other - the high quality standard of replacement parts. For example, the price for individual copies exceeds about 10,000 rubles. This is especially true for original products made from non-separable filter and pump units.
So, before replacing the fuel filter, be sure to familiarize yourself with fire safety precautions, and also stock up on the necessary tools and spare parts.
Step-by-step steps for removing and replacing the filter element
- The Toyota Corolla 120 fuel filter is accessible from under the rear seat on the left side of the cabin. We remove the underbody trim under the rear seat on the left and gain access to the gas tank cavity cover.
Photo 1. Gas tank cavity hatch under the seat on the left.
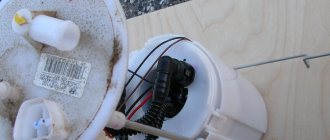
Photo 2. Open cavity above the gas tank. The cover of the Toyota Corolla fuel block with gas lines and an electrical connector is visible.
Photo 3 Disconnecting the direct gasoline supply and return hoses
Photo 4. Removed pump block. Below you can see the L-shaped mesh of the fuel intake filter.
Photo 5. Sawn housing of an old fine fuel filter. Traces of severe contamination are visible.
If the replacement is done correctly and the rubber O-rings are not forgotten, the engine will start without problems and will work better than before.
In other Toyota Corolla models, for example with the 150 body of 2008, instead of a metal fuel block cap with screws, a large plastic ring with a rubber seal is screwed onto the tank neck. To remove the block, you need to turn the ring counterclockwise, loosening the seal, and then remove the entire pump block.
Photo 6. Another design of the pump block cover for models with access from the right side under the rear seat.
You can unscrew the ring lid by carefully hitting the ribs of the lid with a hammer through the wooden inserts. Upon further disassembly, something differs from the design of the Toyota Corolla with a 120 body until 2008. For example, the intake mesh looks a little different; a fine filter may be a separate part, but the rest is almost the same.
Step-by-step instructions for replacing the fuel filter on a Toyota Corolla body 120
- The Toyota Corolla 120 fuel filter is accessed by removing the rear passenger seat on the left side of the cabin.
- Next, remove the underbody upholstery located under the seat. To do this, use a “10” key to unscrew the two fasteners (red arrows). Use a screwdriver to remove the piston (yellow arrow).
- We lift the carpet onto the seats. We secure it with the driver's and passenger's seat belts using the red protrusions. Under the mat we see a layer of foam that needs to be removed.
- Now you will see the fuel pump cover, which you can carefully pry up and remove using a knife or flat screwdriver (it sits on the black sealant).
- Before proceeding directly with the replacement, you should thoroughly vacuum the opened cavity, first under the rug, and then above the gas tank.
- Before disconnecting the pipes, we substitute a previously stored canister to drain the remaining gasoline. Next, remove the fuel hoses. The small pipe or return hose can be removed very easily; just pull the yellow bracket to the side with a thin screwdriver. Disconnecting the second hose will also not take much effort, however, if something happens, you can also help yourself with a screwdriver.
- Before directly dismantling the fuel filter, when the pipes are pulled out, you need to start the car and wait two to three minutes until it stalls. As soon as the engine turns off, you can crank the starter a few more times. This process will remove all fuel from the system and also relieve pressure.
- Next, you need to disconnect the battery terminals.
- Next, you should unscrew the eight screws with a Phillips screwdriver or an “8” key and remove the pump unit. Rags will come in handy here, as gasoline will leak out from all the cracks.
- To get to the fine filter and replace consumable components, we begin to disassemble the fuel pump.
- Remove the latch to disconnect the float.
- Next, press the plastic clips in a circle to disconnect the block body at the top.
- Apply slight force to pull the fuel pump out of the rubber seal.
- We insert the fuel pump into the new fine filter housing.
- Then you should rinse and blow out the intake mesh with compressed air and reassemble everything in the reverse order.
If you make the replacement according to all the rules and do not forget the rubber sealing rings, then the engine will start without problems and will work better than before.
Another modification of the Toyota Corolla model with a 150 body produced in 2008 has a large plastic ring with a rubber seal instead of a metal gas tank cap. To remove the block, the ring must be turned counterclockwise to loosen the seal. You can unscrew the ring lid using wooden choppers, which should be placed on the ribs of the lid and carefully hit them with a hammer.
During further disassembly, some parts may differ from the design of a Toyota Corolla with a 120 body until 2008. For example, the intake mesh and fine filter look a little different, otherwise everything is almost the same. In general, the replacement process is identical, so you can use the above instructions for a Toyota Corolla with a 120 body.
Fire safety during work
When working to replace the filter under the underbody from the passenger compartment, it is very important to follow fire safety rules. Within a few seconds after removing the gas tank cap, gasoline vapors penetrate into the cabin. Their explosiveness when mixed with air is mentioned everywhere. Therefore, in no case should there be sources of sparking and, especially, open fire!
When the pump unit is removed and work is being done somewhere on the table, the neck of the gas tank should be temporarily covered with a clean film or thick rag. At the same time, you should not close the car doors - the interior will be ventilated through them. It is also preferable to keep the vehicle outdoors while working.
It is better to replace the Toyota Corolla filter in a timely manner, according to the recommendations. You should not wait until the car breaks down - after all, all its systems are functionally connected to one another. If breakdowns begin because of this, then you will have to spend money not only on replacing the filter, but on expensive diagnostics and repairs.
Unpleasant consequences of untimely replacement
The entry of dirty fuel into the fuel system affects engine performance, increases fuel consumption, and leads to overheating and failure of the catalytic converter.
The inclusion of foreign fractions reduces the functionality of the fuel system, clogs the injectors, and provokes spontaneous engine stops, which can create an emergency situation on the road.
An inattentive owner not only risks turning a simple preventive procedure into an expensive repair, but also endangers the lives of those around him.
Replacing the fuel system filter on Corolla 120, 150
A car fuel filter is an important element that is used to clean gasoline or diesel fuel from foreign impurities and condensate, helping to extend the life of the engine and related systems. The filter on a Toyota Corolla requires replacement due to both natural wear and premature clogging, and it is important for the motorist not only to carry out the procedure itself correctly, but also to choose the appropriate spare part. This part has its own characteristics depending on the year of manufacture of the car and the type of body: for example, filters for Corolla 120 and 150 have a different design. Despite this, the replacement process does not differ significantly.
The design of the fuel filter and its necessity
The filter element is designed to provide the cleanest fuel possible for smooth engine operation.
There are 2 main types:
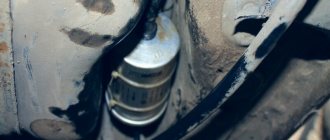
- submersible, which is installed inside the fuel tank;
- external, most often located under the hood or bottom of the car.
Both elements must be replaced.
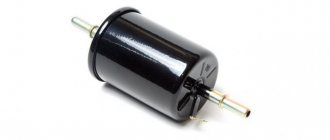
In most cases, the fuel filter consists of a single module, which includes elements of coarse (FGO) and fine (FTO) cleaning.
The first is a metal cylinder with a fine mesh that does not allow contaminants larger than 0.1 mm to pass through.
The second is a plastic housing with paper inserts inserted into it, ensuring complete purification of the fuel from the smallest particles and impurities.
However, on Toyota Corolla cars, these elements are divided into 2 independent modules, which are located in different places. The coarse filter (submersible) is placed at the inlet of the fuel pump in the gas tank, and the clean filter (external) is placed on the main line. There are different models installed on the machines.
Installation depends on the year of manufacture and body size (120, hatchback or 150). However, the principles of their replacement are similar, differ in minor details, and allow you to do the work yourself.
Selecting a filter for Corolla
Before replacing a part, you need to select it correctly. When purchasing, you need to pay attention to the article number and compatibility of the filter with a specific modification of the car. The following original parts can be found on sale:
- For Toyota Corolla 180. Product code – 23300-28040, it is also suitable for Corolla Verso. The cost is between 1300-1700 rubles.
- For Corolla 180 and Avensis. Number – 77024-02320, the product comes complete with a pump and costs more – from 8500 to 9000 rubles.
- Original product with article number 77024-12050, suitable for most modifications of the Corolla. Cost - about 5400-5600 rubles.
- For cars in the 120 body, a coarse filter with number 23217-0D090 is suitable, the price is 400-600 rubles.
- For modifications with the same body, the upper cover of the fuel pump housing with article number 77024-02040.
- For Toyota Corolla 150 part code 77024-12030. The price is about 4300-4500 rubles.
You can also choose high-quality Korean or Chinese analogues: the most popular are SAT ST-77024-05010, JS Asakashi FS21001 and JAKOPARTS J1332100. Their cost ranges from 500 to 1000 rubles, which allows for significant savings.
When choosing spare parts for a car (including consumables), it is best to use the VIN number, so the likelihood of an error can be reduced to almost zero.
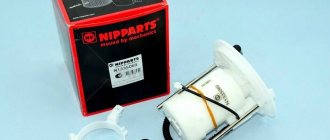
Toyota Corolla fuel filter disassembled
Recommendations for choosing a filter element for a Toyota Corolla car
When choosing a new fuel filter, you should pay attention to the product part number and manufacturer's brand.
The best replacements for Toyota Corolla are the modules from the same company:
- universal version 77024-12050, which is compatible with most Corolla cars (cost - 5.5 thousand rubles);
- modification 77024-12030 for body 150 (from 4.5 thousand rubles);
- original Toyota filter 23217-0 D 090 for body 120 (from RUB 700).
When replacing, you need to focus on the compatibility of the model with the manufacturer’s recommendations for this brand.
Universal version of filter element 77024-12050.
Replacing the fuel filter
Often, owners change the part only when there are malfunctions in the Corolla engine or obvious signs that the filter element is clogged. Clogging of the mesh occurs gradually, so the problem may not be detected immediately. If measures are not taken in a timely manner, you may encounter difficulties when starting the engine, a shortened service life and the need to make major repairs more often.
The fact that the Toyota Corolla fuel filter is clogged is indicated by uneven operation of the power unit, slow acceleration, and jerking when moving. The engine may also stall from time to time for no apparent reason. If such problems begin to appear, you must first check the condition of the mesh and, if necessary, replace it.
How often should the fuel filter be changed?
The manufacturer claims that it is recommended to replace this element every 80,000 kilometers under normal vehicle operation. Some Toyota owners delay replacement, almost twice the interval specified in the instructions, as a result of which they have to repair the engine much earlier. In addition, in difficult conditions, it is advisable to change the fuel filter more often, especially in regions with unstable fuel quality. Workshop and service station specialists recommend carrying out the procedure every 50,000 kilometers or more often. In addition, replacement may be required if foreign particles enter the fuel, which severely clog the mesh and contribute to accelerated wear.
Procedure
The procedure should be performed in stages. First, remove the negative terminal from the battery to de-energize the fuel system. Then provide access to the part: to do this, you need to remove the bottom upholstery under the rear left seat in the cabin, this allows you to open the lid of the fuel tank cavity.
Removing the fuel pump cover
The cover must be removed. Since it is fixed to the sealant, you will need to pry it off with a screwdriver. Before you start replacing the filter, you will need to vacuum the areas under the bottom upholstery and the container itself.
After this, you need to open the connector that powers the fuel pump. In order to relieve pressure in the fuel system, you need to try to start the engine several times. If this is not done, when you try to disconnect the hoses, gasoline under pressure will spray out. Open the fuel tank. Disconnect the hoses for direct and reverse fuel supply. To pull out the return line, you will need to use a screwdriver and use it to remove the lock; It is easy to recognize, it is yellow in color. Then you need to unscrew the 8 screws using a Phillips screwdriver and pull out the pump unit.
Remove the terminal and disconnect the hoses
The float is disconnected, for which you need to move the latch, after which the upper part is detached: to do this, you need to press the clips, which are placed in a circle. The fuel pump needs to be pulled out, then inserted into the new filter housing. The mesh needs to be washed and blown with air to remove dirt, then reassemble the structure in the reverse order, not forgetting to install new seals.
Old and new filters
These instructions are suitable for replacing the filter on a Toyota Corolla in the 120 body. If we talk about the modification in the 150 body, then instead of a metal gas tank cap, you need to put a plastic ring on the neck, which is equipped with a rubber seal. To remove the block, you need to twist the ring counterclockwise, and after loosening the rubber tab, remove the pump block. To unscrew the part, you can use a hammer; they need to strike carefully through the wooden attachments. The filter for a car in the 150 body is slightly different in design: it has a different intake mesh, and the fine cleaning device comes separately.
Step-by-step instructions for DIY replacement
The cost of replacing a filter in service centers ranges from 840 rubles. up to 2.5 thousand rubles. Some workshops offer to do it for 300 rubles, but only as part of a comprehensive service, which in fact costs even more.
And since there is nothing complicated in this operation, many owners carry it out on their own. It is only important when carrying out work to strictly follow the instructions and comply with all fire safety rules.
120th body
For this model, the following sequence of replacement work is adopted:
- Gain access to the hatch located in the bottom of the car. To do this, remove the left rear seat and remove the insulating covering.
- Thoroughly clean the hatch and the area around it.
- Using a slotted screwdriver, unfasten and remove the hatch cover mounted on the mastic (there is no need to clean the latter from adjacent surfaces - it is reusable).
- Remove dirt from the fuel module cover.
- Disconnect the power connector from the pump block.
- Since fuel continues to be stored in the line under pressure and when the pipes are removed it can flood the entire cabin, start the engine to completely exhaust it. This measure is mandatory and has not only a cosmetic and preventive purpose, but also a fire safety purpose.
- Disconnect 2 tubes: the direct fuel supply to the engine (move the lock to the side) and the return one from the adsorber (release the ring spring clamp).
- After removing the 8 screws with a Phillips screwdriver, remove the module from the gas tank. This is the most difficult operation, because during removal you must constantly ensure that you do not damage the fuel sensor and the attached float on the long lever.
- All other actions should be carried out on the pallet. Carefully releasing the detachable clips located in the upper part, separate the body into 2 parts.
- Remove the fuel pump using force, since the rubber sealing rings that provide pressure in the fuel system interfere with this. Disconnect the filter from the pump.
- Blow out the unit body and the cylinder with the FGO mesh with compressed air (additionally rinse in diesel fuel or carburetor cleaning compound).
- Replace paper FTO gaskets.
Assembling and installing the module in place is carried out strictly in the reverse order.
Remove the bracket that holds the filter housing.
On hatchbacks produced in 2006 and Toyota Corolla 120s built in England, fuel filters are installed differently.
Therefore, the replacement procedure has some differences:
- The hatch is not mounted with mastic, but with 4 bolts using a Phillips screwdriver.
- To dismantle the module, a special puller is required.
- Before disassembling the case, you need to disconnect the hose at the base, heating it with a hairdryer.
- The pump and filter inside the module are secured with 3 latches. To get to the FGO, you must first remove the fuel sensor. The filter can also be removed from the lid only with a hair dryer.
- Fuel pipes are cut off. At the same time, they need to be remembered (or marked), since there are no distinguishing marks on either the incoming or outgoing ones.
- The pump is removed from the filter by squeezing it out. You can use a bolt or screwdriver for this.
- When installing a new filter, you need to make sure that the mounted tubes bend easily (in the tank the module is in a pressed position).
- It is enough to wash the coarse filter located in a metal cup with carburetor cleaner.
- Particular attention is required when installing the tubes on the fittings and subsequent checking the tightness of the connection. To do this, you can use a soap solution and blow through with a pump.
150th body
The main nuances of replacement on the 150th body are:
- Remove the plastic threaded ring with a rubber seal that secures the module to the tank. The procedure requires care, as the plastic must not be cracked or damaged. To do this, it is best to use either a wooden block, which is pressed against the ribs of the ring and guided with gentle blows of a mallet, or a gas wrench. Dismantling is done counterclockwise. The tubes for ventilation of the gas tank cavity are disconnected in the same way.
- Selection of seals. A large rubber ring, 90301-08020, is installed in the place where the fuel pump is combined with the filter housing, and a smaller one, 9031-04013, is installed in the connection to the check valve (in the lower part).
- Installing a gasket under the nut (when reassembling the module). When tightening the nut, be sure to align the mark on it with the mark on the body located near the fuel hose, and only then begin tightening.
New filter in place.