Stable, reliable, uninterrupted operation of the Lada Kalina engine is ensured by a complex of systems, the most significant of which is the fuel system.
It includes many mechanisms that act harmoniously and complement each other, so when even the smallest part fails, it negatively affects the operation of the entire fuel system.
Today we will talk about how to replace the fuel pump mesh on Kalina, and also reveal the most important issues regarding the fuel pump. So, let's go.
What is a fuel pump
The gasoline pump is a key component of the power system; its job is to ensure an uninterrupted, timely supply of fuel to the system.
In each model, the design and location of the fuel pump is unique; for the Lada Kalina, this device is located on the opposite side of the power unit.
On the one hand, this arrangement allows you to benefit from the technical capabilities of the machine, but on the other hand, the device requires more powerful operation than models in which the fuel pump is located closer to the engine.
In order for Kalina’s fuel pump to cope with its job, it is presented in an electric version. Its advantages are:
- simplicity of design;
- good fuel supply;
- safety.
But, as one might expect, Kalina’s electrics are not yet a strong point; they often break down, which is the main disadvantage.
In addition, the disadvantages of the Lada Kalina gas pump include increased noise levels, sensitivity to the quality of gasoline, and the fact that it requires cooling.
The issue of high-quality gasoline in our country, unfortunately, still remains unresolved; this is one of the reasons why the fuel system of the Lada Kalina fails.
Filters become clogged, which disrupts the operation of the entire mechanism and ultimately leads to pump failure.
This is why filters, or meshes as they are also called, need to be changed regularly.
We’ll talk about this, but first, let’s figure out what malfunctions happen with the Kalina fuel pump?
Types of faults:
- One of the most common pump malfunctions is a rapid decrease in pressure after the engine starts. This fact indicates serious violations that can be caused either by a valve defect or a breakdown of the pressure level regulator; it is quite possible that the injectors are also clogged. A sharp drop in pressure leads to problems in starting the engine , which, if the breakdown is not corrected, can even lead to engine failure.
- It also happens that the engine loses power, or the engine does not start at all, even when cold or hot. All this happens when a membrane or spring breaks, a rod wears out, or filters become clogged, and the latter happens more often than anything else.
- In any case, having discovered that there is something wrong with the fuel system, you should first check the condition of the filters, because, due to low-quality gasoline, they become clogged quite quickly, and it is better to change them in a timely manner, without waiting for problems. Now let’s talk about how to change the mesh from the pump yourself.
Fault diagnosis
The first sign that the fuel system of a Lada Kalina car is faulty is a sluggish response to the gas pedal and difficulty starting the engine. When the pressure in the line is low, the power unit simply does not have enough fuel, hence the weak dynamics. If the pressure is too high, the car drives well, but starts poorly due to the overflow of fuel into the cylinders, especially in the summer. The first step in this situation is to measure the fuel pressure in the system using a pressure gauge with a spool nozzle, which is used to check tires. The sequence of actions is as follows:
- With the engine cold, open the hood and remove the plastic cap from the end of the fuel rail (diagram, item 1).
- Place a small container under the fitting and release the pressure in the network by pressing the spool. Unscrew the spool as shown in the photo.
- Put on the pressure gauge hose and, to start the pump, connect the positive terminal of the battery with a wire to the contact on the diagnostic connector. Contact marking is “11”, test time is 10 seconds. The ignition must be turned off.
Immediately after starting, the pump pressure may drop, and then rise again and stabilize. If the upper pressure threshold is exceeded (3.9 bar), then the fuel pressure regulator is clearly to blame. With low pressure (3.6 bar and below), several options are possible:
- dirty fine filter;
- one or more injectors have lost their tightness;
- the fuel pump itself does not pump well;
- RTD failed.
Further diagnosis is carried out by the method of exclusion. It is quite simple to sweep away leaking injectors: you need to repeat the check and, after stabilizing the pressure, clamp the rubber hose of the fuel line. If the pressure drops, the reason is most likely in the injectors. There is a nuance here: after checking and replacing them, it may turn out that the situation has not changed.
Changing the mesh with your own hands
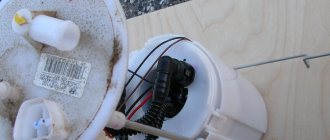
So, the mesh located in the fuel pump is forced to constantly come into contact with dust and dirt, because the pump itself is located between the seats, and dust constantly settles on its body.
That is why experienced motorists are not lazy to wipe the pump body with a damp cloth from time to time to avoid untimely clogging of the system.
Motorists advise carrying out such work every 45,000 - 50,000 km. mileage, this is exactly the time during which the Kalina mesh wears out. Of course, this work is classified as dusty, but, in principle, it is not as difficult as it seems, it can be done alone, in half an hour - an hour.
Fuel without foreign inclusions is the key to long service life of the injectors and the entire engine. The main “nutritionist” of the engine is the fuel filter. It traps foreign debris, providing the car with clean and healthy “food”.
Selecting new filter elements
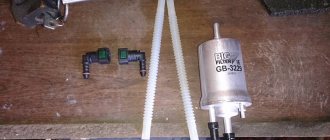
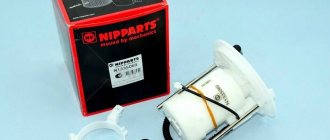
To purchase fuel purification system parts for VAZ 1117-19 models, you need to know what they look like:
- The coarse filter is a flat mesh bag made of chemically resistant plastic that captures large particles of 80-100 microns. In the center of the element there is a plastic fitting that fits onto the counterpart of the gasoline pump.
The mesh element is equipped with a pipe that fits onto the fuel pump fitting
The element is equipped with clamps for fastening fuel line connections
All modifications of the Lada Kalina, including the second generation, are equipped with absolutely identical filter elements - a “barrel” and a mesh catcher. The dimensions of the spare parts are also identical.
There are no tricks in choosing a coarse mesh - the parts are made according to a single sample and cost from 30 to 45 rubles. The only caution: in order not to purchase a low-quality product or a fake, contact well-established stores. Although the fuel pump mesh costs a penny, it plays an important role in the fuel system: it catches large debris that can quickly clog the filter paper of the next cleaning element.
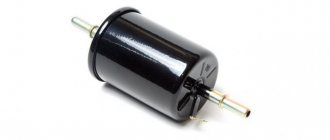
In operation, the plastic case is not inferior to the metal one in terms of reliability.
The material from which secondary filters are made does not play a big role. What is important is the contents of the “barrel”, which cannot be seen or touched. Therefore, there are only 3 selection criteria:
- correspondence between the body dimensions and the diameter of the fittings;
- the presence of plastic clamps;
- brand (manufacturer).
The mounting clamp on the Kalina is designed for a case diameter of 56 mm
In order for the spare part to fit the mounting clamp, the case diameter must be 56 mm. The internal size of the gasoline pipes put on the fittings is 8 mm.
There are many different fuel filters sold in stores, and not all of them are equipped with clamps (in other cars, the hoses can be secured with clamps). The part for “Kalina” must have latches, otherwise the tubes cannot be secured.
A plastic latch secures the hose to the filter fitting
In the countries of the former USSR, the following manufacturers of gasoline filters have proven themselves best:
At the moment, second-generation Kalina machines are equipped with fine filters made of polyamide. But users are not very complimentary about the factory spare parts: after disassembly, it was discovered that the paper “accordion” was poorly glued to the body. As a result, half of the fuel passed through the gas pipeline without filtering. At the same time, based on the practice of isolated cases, it cannot be unequivocally stated that metal filters are better than plastic ones.
Fuel filters Kalina
Like many other VAZ cars, the Lada Kalina power system is equipped with two stages of fuel filtration. The coarse cleaning function is assigned to a mesh filter or “mesh”, as it is commonly called. Installed together with the entire fuel module in the gas tank, the mesh protects the electric fuel pump and does not allow large debris to pass through, which can cause a breakdown or clog the fuel line.
The mesh protects the electric fuel pump and does not allow large debris to pass through.
For Lada Kalina you need a mesh with a cut. An inexpensive part costing no more than 50–100 rubles. plays an important role. A clogged filter makes it difficult for fuel to flow into the fuel pump, which is forced to operate at higher speeds in order to maintain the required pressure in the power system. This mode can cause premature failure and replacement of the pump at a cost of about 2,500 rubles.
Signs of trouble
There are several signs by which you can determine that the Kalina fuel pump is not working:
- the car does not start or stalls almost immediately;
- “Kalina” twitches when moving;
- the car does not develop maximum speed;
- extraneous noise or grinding noise coming from the fuel tank.
Similar symptoms are also observed when the fuel filter is clogged. Therefore, before removing the fuel pump on the viburnum, first replace the filter element. If the “symptoms” do not disappear, repair or replace the fuel module.
Common fuel pump malfunctions on Kalina:
The types of malfunctions described above require replacement of the fuel pump. The only type of work available to the car owner is cleaning the filter mesh.
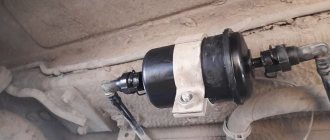
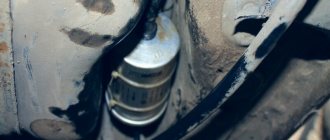
Location of Lada Kalina fuel filters
This element of the Lada Kalina is “hidden” under the bottom of the car next to the gas tank. To get to it, you will need to lift the car or drive into a viewing hole. The filter is clearly visible from below. Its location is to the right (in the direction of travel) of the gas tank.
The fuel pump strainer is installed inside the tank. To get to the neck, you will need to lift or remove the rear seat, unscrew the floor trim flap and unscrew the hatch cover.
The fuel pump strainer is installed inside the tank.
...and their replacement
The Lada Kalina service book recommends changing the filter every 30 thousand kilometers or more often when using low-quality fuel. Unfortunately, it is impossible to check the quality of gasoline after each refueling, but the likelihood of dirty gasoline getting into the tank is high. For this reason, motorists change the element approximately twice as often as the car manufacturer recommends.
There are no recommendations on service intervals for the fuel pump mesh in the regulations. Motorists determine the need to replace or clean it independently. Signs of a dirty coarse filter include low fuel pressure in the power system and excessively loud operation of the fuel pump. It is useful to inspect the screen element each time there is a need to remove the fuel module.
Work on removing and installing fuel filters is carried out by disconnecting the negative terminal of the battery from the car body. The sequence of operations for the Lada Kalina station wagon, sedan or hatchback, as well as for modifications with eight or sixteen-valve engines, is the same.
Replacing the fuel filter
Replacing the Lada Kalina fine fuel purification element will not take much time. To work, you will need a container for remaining fuel, a screwdriver and a 10 mm wrench.
Before removal, relieve pressure in the engine power supply system:
- Use a screwdriver and open the fuse box hatch in front of the gear shift lever.
Using a screwdriver, use a screwdriver to open the fuse box hatch in front of the gear shift lever. - Pull out the middle fuse that powers the fuel pump.
Pull out the middle fuse that powers the fuel pump. - Start the engine, do not turn it off until the gasoline is completely exhausted. After stopping, turn the crankshaft once or twice with the starter.
It is more convenient to change this element on an inspection pit or a lift. Replacement procedure:
- Disconnect the negative terminal of the battery.
- Squeeze the clamps and disconnect the inlet and outlet tubes from the fine filter. Collect any remaining gasoline that leaks out into a container.
Squeeze the clamps, disconnect the inlet and outlet pipes from the fine filter - Loosen the bolt of the metal fastening clamp.
Loosen the bolt of the metal fastening clamp - Remove the filter and drain the fuel into a container.
Remove the filter, drain the fuel from it into a container - If a plastic clamp is installed, simply remove the fuel filter from it.
If a plastic clamp is installed, simply remove the fuel filter from it. - Install the new one, placing the arrow on the housing towards the front of the machine.
Install the new filter with the arrow on the housing facing towards the front of the machine. - Tighten the metal clamp bolt.
- Place the fuel inlet and outlet hoses onto the fittings. Press them against the filter housing until the clamps click.
- Restore power to the fuel pump, connect the battery.
- Start the engine, inspect the fuel line connections, and check for gasoline leaks.
When developing the Kalina, VAZ implemented such modern solutions as the production model, such as LED backlighting of the instrument cluster and keys, electric locking for reverse gear, perfectly illuminating headlights with electric corrector and polycarbonate glass without a lens, a heating and ventilation system with recirculation built into the instrument cluster trip computer... Compared to other VAZ models of the late nineties, Kalina stood out, as they say, to everyone.
Oleg Polazhinets
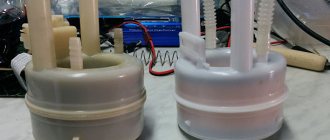
Why might the mesh need to be replaced?
Two grids - dirty and clean
First of all, because of bad gasoline. If you regularly refuel at dubious gas stations, then it’s only a matter of time before the fuel pump fails . Purification of gasoline from impurities in the gasoline pump occurs in several stages, and the mesh of the gasoline pump is the first line of defense, so to speak. It is the first to absorb all large particles of impurities and dirt. After passing through the mesh, gasoline enters the fine fuel filter, then passes through another mesh (which is located near the fuel pressure regulator), and finally goes through the third mesh (located directly in front of the injectors). If problems arise in any of these areas, you won’t be able to go far. The car engine simply will not start. Or it will start, but will work unevenly and jerkily.
recommends changing fine filters every 30,000 kilometers . But he doesn’t give any recommendations about the fuel pump mesh. Therefore, many car owners forget to change this grid, and remember about it only when the engine begins to behave strangely.
The general rule is: if the car has traveled 60,000 kilometers, the mesh should either be cleaned or replaced. It is advisable to clean it only if there is no serious mechanical damage to it. But if the machine has traveled the distance indicated above, then the mesh in the pump is often worn out to such an extent that it is easier to throw it away than to clean it.
How does a fuel filter work?
If we touch upon the qualitative aspects of domestic fuel, they have long been the subject of many complaints. Note that in this regard, both the manufacturers themselves and the large army of Lada Kalina owners are indignant. Often, if you have no choice, you have to fill the tank of your “horse” with substandard fuel. Such gasoline is full of various impurities and abrasive particles, in addition to which there is also water. Among the factors causing fuel contamination are the following:
- storage for a considerable period of time;
- ingress of dirt and dust during transportation;
- reactions of a chemical nature that occur inside the tank, etc.
Abrasive particles can play a cruel joke on the engine, because they, along with the fuel, go straight into the combustion chambers. To prevent this negative point, manufacturers use filters. And you need a timely replacement of the fuel filter on your car. Read below about where it is located, how to remove a clogged filter and how to replace it with a new one.
These components include:
- coarse filters that can “stop” particles larger than 0.1 mm; such an element is a mesh with an appropriate cell size and is located in the fuel supply pump housing;
- filters designed for fine cleaning; they are capable of trapping smaller particles, the minimum size of which is 0.15 mm; the product is installed in the line between the tank and the motor.
The structural composition of the filter is as follows. A working element made of specialized paper is integrated into the metal body. Operation leads to gradual clogging of various kinds of particles and impurities suspended in the fuel. This prompts periodic filter replacement to be included in the mandatory list of work performed on the vehicle as part of scheduled maintenance. This approach is also valid for Lada Kalina.
How to change the coarse mesh
The work package for replacing the first stage filter consists of several stages:
- Buying a new part.
- Preparation of tools and repair site.
- Disassembly, removal of the gasoline pump and replacement of the mesh catcher.
To replace the old dirty mesh, you need to remove the fuel pump
How to choose a Kalina mesh filter is described in the previous section. The location for repair work does not matter, since you do not need a car overpass or inspection ditch - disassembly is carried out from the interior.
Preparatory stage
In warm weather, disassemble the car directly on the street, but in windy weather, find a quiet place, otherwise dust will blow into the interior. In winter, it is more convenient to work in an insulated garage or box.
The tools you need to prepare are:
- a Phillips and flathead screwdriver;
- pliers;
- a small chisel or metal point;
- hammer;
- clean rags.
To disassemble and dismantle the fuel pump you will need a modest set of tools
Before starting work, remove unnecessary objects from the rear row of seats, and then remove the seats themselves. They block access to the technological opening with a hatch leading to the fuel tank. The latter is attached to the bottom of the car from the outside.
Removing the fuel pump and replacing the mesh
The first step is to relieve excess pressure in the fuel line, otherwise when the pipes are removed, a stream of fuel will splash around the trim and the pungent smell of gasoline will “linger” in the cabin for a long time. There are 2 ways to relieve pressure:
- Pull out the 15 A fuse for the fuel pump electrical circuit, located under the cover in the center tunnel. Start the engine and wait until it stalls due to lack of fuel. Repeat the operation 2-3 times.
The fuel pump electrical circuit fuse is located under the cover on the center tunnel.
- Open the hood and locate the injector fuel rail valve. It is located on the right side (in the direction of travel) under the receiver and is a regular spool (the same ones are found in tires). Place a small container and press the valve, after twisting the protective cap.
The pipe with the spool is located behind the engine to the right of the ramp
After removing the rear seat, you will have access to a hatch covered by a fold-down trim flap. Place the cover aside and proceed to disassembly, performing the operations in the following order:
Take a Phillips head screwdriver and remove the 4 screws holding the hatch in place. Remove the cover.
The hatch is screwed to the bottom of the car with 4 screws
Disconnect the negative terminal from the battery, then disconnect the fuel pump power connector.
To disconnect the connector, you need to pry the plastic tab with your finger.
Squeezing the plastic retainer with your hand, pull the first pipe from the pump fitting. To remove the second tube, bend the metal bracket and plastic latch.
The pipes leading to the pump are held on by plastic latches
The pump housing is held in place by a lock washer. To unscrew it, use a small chisel and lightly use a hammer to turn the washer counterclockwise.
The lock washer is loosened by light blows of a hammer through the adapter
Remove the locking plate and carefully remove the fuel pump from the tank. At the same time, tilt the body to the side so as to pull out and not bend the float
Cover the opened hole with a clean rag to prevent debris from accidentally getting into the tank.
Pull out the pump carefully so as not to damage the float
Disconnect the internal pump connector (located under the cover) and remove it from the glass by bringing together the 4 long plastic latches.
To remove the pump from the glass, you need to press the plastic latches
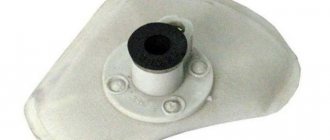
The old mesh is simply pressed onto the fitting and removed by hand.
The mesh is removed and placed on the pump fitting by hand
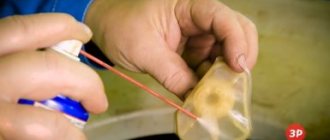
It is advisable to remove dust with a vacuum cleaner so that it does not fall into the open tank
The new strainer is installed on the fitting until the latch clicks, after which the assembly can be assembled in the reverse order. Before doing this, look inside the glass where the gas pump is located: if you find dirt at the bottom, remove it with a rag or wash it with a brush soaked in gasoline. Before starting the engine, turn the ignition on and off several times, allowing the fuel pump to raise the pressure in the line to normal.
The above-described procedure for replacing the coarse filter element is performed in the same way on Kalinas with different body types. The same technology is used when repairing a Lada Kalina Sport car.
Replacing the fuel filter on Kalina
If the filter is heavily clogged, then:
- the engine power indicator decreases;
- fuel consumption increases;
- while driving there are jerks and unstable operation of the unit;
- the engine tends to stall.
When the manifestation of these factors becomes obvious, the filter requires urgent replacement. To avoid bringing the engine to critical conditions, the regulations provide for the interval (mileage) for periodic replacement of filters:
- with regards to the coarse cleaning component - 80-95 thousand km;
- for a fine filter element – 30 thousand km.
Advice! Domestic fuel is not pleased with its quality, and therefore we recommend combining filter replacement with work on changing the oil filter component, that is, approximately every 10 thousand km of the distance traveled.
How often is replacement done?
There are clear regulations for replacing consumables, which include fuel filters. According to the requirements of the machine's operating instructions, they must be changed every 30 thousand kilometers. But given the different quality of fuel at gas stations and the operating conditions of the car, experienced auto mechanics recommend reducing the maximum interval to the following values:
- for a fine filter - 20 thousand km;
- for coarse mesh - 70 thousand km;
- when operating in northern regions, the service life is reduced by half from the regulations, that is, it is 15 and 35 thousand km, respectively.
Some motorists who carefully care for their Kalina offer their own replacement intervals. The principle is as follows: all consumables are updated simultaneously, along with the addition of fresh oil. With such a scheme, the interval is reduced to 7-15 thousand km, depending on the quality of the engine lubrication.
Compared to its predecessors, the Lada Kalina has a more modern and complex design. But the gasoline filtration scheme, inherited from the “tenth” VAZ family, remained unchanged. Thanks to this, it remains possible to change the cleaning elements yourself and not pay money for car service services.
Source
Changing the fine filter
The process of replacing this component in the Lada Kalina is a very simple action and is also included in the maintenance regulations. The most significant condition is to provide access under the bottom of the car, to where the filter itself is located, which may require a lift, overpass or pit.
How to remove the old filter? As a tool, you can arm yourself with a regular screwdriver. This operation will take a maximum of about forty minutes.
Information! Some modifications of the “Kalina” (for example, “1119”, “1186”, “21126” and “21127”) provide for fastening the filter component housing with a bolt, therefore, we can safely “change” the screwdriver to a wrench with a dimension of “10” .
1. At the very beginning of our “operation” we relieve the pressure present in the fuel circuit. For this purpose, we open the pump power circuit. This action can be accomplished in two ways:
- we take out the fuse with the number “F21”, located under the tunnel cover near the gearshift lever (to remove the cover you will need a screwdriver with a flat blade);
- disconnect the connector of the fuel pump itself, which is located under the rear seat cushion; here you will need to unscrew the 4 screws of the cover and after removing it, access to the connector will be provided.
Advice! We recommend using this method if it is necessary to replace the coarse filter component.
After turning off the pump, we start the Lada Kalina engine and wait for the fuel to be exhausted from the line, after which we observe a natural stop of the engine.
2. The filter itself is located under the tank and in most versions is secured with a plastic retainer.
3. Before dismantling the filter, you will need to disconnect the fuel pipes, also secured with clamps. They should be disconnected, after which the filter can be freely removed.
Attention! The filter, which is fixed near the tank using a combination of clamp-bolt fasteners, is dismantled using a wrench of the specified standard size.
4. The installation of a new element (its catalog code is “2190-1117010”) on a LADA Kalina car is carried out between the provided stops and following the reverse dismantling algorithm.
5. We put the previously removed fuel pipes onto the corresponding fittings until the characteristic click of the clamps is felt.
Important! We carefully examine the surface of the filter housing and find a schematic arrow on it, which on the installed component should be oriented towards the direction of fuel supply.
6. We make sure that the specified fasteners are securely fixed and return the fuse marked “F21” to its original place (or connect the cable harness to the pump block and install the cover).
7. Let's start the engine. Here you will need several correct actions:
- turn the ignition on and off immediately several times in a row;
- wait a pause to allow the pump to pump fuel into the line;
- finally start the engine.
Now you know how to change the fuel filter in a car.
When the unit does not fully start on the first try, we repeat this procedure again. This is necessary for the pressure in the fuel supply system to reach its operating value.
How to replace the fuel pump on a VAZ 1117-VAZ 1119?
Note! The fuel pump can be changed either separately from all other parts, or it can be completely replaced with a module; replacing the entire module with the entire module will be more expensive because the new module will have a Fuel Level Sensor, a pressure regulator and many other parts (Just why would you change them if they you are already in normal condition, most likely, if your sensor has become unusable and the regulator is still acting up, then change everything together), and separately, if you replace the fuel pump, then this is only one new part, and all the others will remain in place, if If you decide to replace the fuel pump separately, then in this case, after removing the pump itself, read the article entitled: “Repairing the fuel pump” in which everything is described!
Removal: 1) At the very beginning of the operation, fold back the rear seat cushion so that it does not interfere, this is done very simply, by hand pull out the hinges from under the inside of the seat (see photo 1) and then by pulling these loops, the rear seat cushion reclines like this shown in the figure under number 2, this gives you access to the fuel pump hatch and to the pump itself. As soon as access opens, fold the standard carpet to the side (it will be cut there specifically for the fuel pump, see photo 3 for more details) and remove the four screws which secure the hatch that closes the pump itself (see photo 4) and then remove it.
2) Now disconnect the block of wires from the pump itself, this is done by hand, that is, the latch that holds the block is pressed by hand and then the block is disconnected (see small photo below), then disconnect the two fuel pipes, to do this, press the latch with one screwdriver fastening one of the tubes, and with the other, slide the tube along the fitting and thereby disconnect it (see large photo), carry out exactly the same operation with the other tube and most importantly, after disconnecting them, do not confuse the tubes with each other, because they must be connected strictly in their places and if you connect them the other way around, the car simply won’t start, by the way, on some models (Depending on the year of manufacture of the car), the fuel pipes are secured not using plastic clamps on which you need to press and remove the tubes, but using metal spring clamps, So, if you have metal clamps, then you will need to wring them out and then disconnect all the tubes.
Note! Before disconnecting the pipes, do not forget to relieve the fuel pressure, this can be done in several ways, one of them is to remove the fuse that goes to the fuel pump (This fuse is not located in the mounting block where all the others are located, but under the cover which is located next to the gearshift knob, you can lift this cover with a screwdriver and the pump fuse is located in the very middle) and start the car and let it run until it stalls, the second method is described in detail in the article entitled: “Bleeding the pressure in the fuel rail on a VAZ”, well the last third method (Actually there are a little more of them, but these are the most basic of them) is very simple, disconnect the wire block as shown in the small photo above and start the car in the same way and wait until it stalls, when it stalls you can again just in case, start it up and the pressure in the power system after these procedures will be 100%!bled (The time you spend on bleeding off the pressure is a little more than one minute, but not everyone does this, but in vain, it’s safety first thing, just if you don’t bleed off the pressure in system, when the fuel pipes are disconnected, a little gasoline will flow out of them and your car will get dirty due to this, in addition, if a spark gets on the gasoline, then this will already ignite, which will not lead to anything good)!
3) Then, using two screwdrivers, rotate the plate that holds the fuel pump in one place counterclockwise until its cutouts align with the protrusions on the flange (see small photo below), once aligned, remove the plate and put it aside, and then After that, remove the fuel pump itself from the tank, but only remove it carefully without damaging the Fuel Level Sensor (The sensor just has a float, so you will have to carefully remove this float from the tank), by the way, as soon as the fuel pump is removed from the tank, look in that place where it was attached with a plate, a sealing rubber ring, if it is damaged in any way (compressed, everything is in cracks, for example, or even torn in some place), then in this case replace the ring with a new one because this ring is responsible for the tightness and if it will be damaged, then when driving over strong bumps, gasoline will flow out little by little (drop by drop) through this ring to the outside.
Installation: The new fuel pump is installed in its place in the reverse order of removal, the plate that secures the fuel pump during installation will need to be tightened a little more with light blows of a hammer through a drift and something else, there is an arrow on the fuel pump (you will see it right away), so install the new pump on its place so that this arrow points clearly to the rear of the car.
Additional video: You can briefly see the process of replacing the fuel pump with a new one in the video below, everything is shown there in pictures and in descriptions.
Note! If you want a live video clip, and not pictures, then in this case watch another video in which the fuel pump is removed using the example of a VAZ 2110 car (On Kalina it is removed a little differently and it is not secured by a plate but by nuts , but you have to look at everything so that you at least know approximately how to replace the fuel pump on a car)!
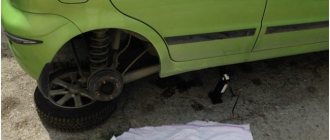
In order to get to the location of the fuel pump on the Lada Kalina, you must first recline the rear seats and remove the insulating trim on the floor.
We find the lace between the rear seat belt buckles and pull it up, raising both seats. Below I will tell you what tools may be needed for this repair:
- Phillips and flathead screwdrivers
- Hammer
- Pliers
Finally, about precautions when replacing
Compliance with the rules to ensure safety in this procedure is exceptional. Even following the utmost care during work, the release of flammable compounds and fuel spillage cannot be completely excluded. Otherwise, replacing the fuel filter on a LADA Kalina car is not a complicated procedure.
To prevent the risk of ignition of fuel vapors, you must:
- carry out the entire list of manipulations in a well-ventilated room or in an open area;
- Immediately clean up spilled fuel using a rag or filling it with sand;
- follow the rules for using portable lighting devices;
- stock up on a fire extinguisher;
- do not smoke during this repair process;
Remember to use gloves and goggles to avoid the risk of getting fuel on your hands or eyes.
Briefly about the main thing
It is recommended to change the cleaning element every 10-15 thousand km. The plan for replacing the fuel filter on a Lada Kalina looks like this:
- de-energize the fuel pump power circuit;
- relieve excess pressure in the fuel system and produce residual fuel;
- remove the filter located on the right side of the car tank;
- install a new element, observing the direction of fuel movement (the arrow on the body points towards the engine);
- restore power to the supercharger module and start the engine.
1200 rub. for the photo report
We pay for photo reports on car repairs. Earnings from 10,000 rubles/month.
Write:
The main fuel filter on the Lada Kalina (fine filter) is installed separately from the pump, sensors and mesh filter. The Kalina 1.6 with the VAZ-11186 engine has 8 valves, and the same fuel filter is installed on the 16-valve VAZ-21126 and VAZ-21127.