The thermostat in the VAZ-2111 ensures rapid heating of the engine. If nothing heats up, then we can conclude that the valve built into the thermostat is to blame, filled inside with a special substance that ensures the opening and closing of the product.
You've probably seen how when the engine is running, the car heats up to 80 degrees, and after 80 degrees the engine heats up less, when it crosses the border of 94 degrees, the device hardly heats up anymore. So, a breakdown of the thermostat in a VAZ-2111 does not allow the temperature to rise.
Reassembly
After removal and testing for functionality, it is necessary to either reinstall the working thermostat on the VAZ 2110 or replace it with a new one
If you do not have a complete installation, but only replacing the thermocouple, then it is important to know how to properly remove it and then put it back in place
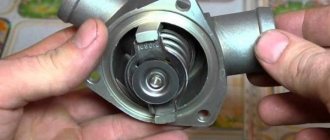
Having removed the cover, you need to push (overcoming some spring force) the fixing plate forward using tweezers, and after turning it a little, remove the thermocouple.
Installing a new element occurs in the same way, but in reverse order.
If you decide to replace the thermostat completely, then this is also quite simple: remove the old one, replace it with a new one.
Then you need to refill the cooling system with antifreeze (antifreeze) through the expansion tank. You can fill in either filtered antifreeze (if it is not yet time to fill in a new one, the old one has retained its color and texture) or new liquid.
To eliminate air jams that may appear, you should start the VAZ 2110, let it run until it warms up, at idle speed. This eliminates air pockets and, in fact, the entire installation is completed.
https://youtube.com/watch?v=qX3qBD0IXFI
Finally, just check if there are any leaks, if the coolant level in the tank has dropped (it should be at the top edge of the fastening strap), top up if necessary.
Features of replacing the thermostat on a VAZ-2111
To replace the thermostat, you first need to arm yourself with special tools and materials:
- heating radiator VAZ-2111 in high quality;
- from 4 or more clamps;
- a short screwdriver with a Phillips-type tip;
- tweezers.
Replacing the thermostat on a VAZ-2111 injector, designed for 8 and 16 valves, looks like this. Any beginner can do it:
- Drain the antifreeze from the engine block. Place a container of sufficient volume under the hole so that the liquid does not spill past.
- Remove the seal, made of rubber, in the form of a frill, also called a wind pad.
- Look under the brake cylinder, which is considered the main one, and disconnect the frill fixing screw.
- Now disconnect the 2 clamps to secure the wires and hoses.
- From the body, disconnect the wire coming from the fan on the negative side and the positive terminal.
- Carefully remove the 2 screws attached to the left side of the frill.
- Now you can move the frill slightly forward.
- Detach the windshield trim.
- Disconnect the terminal located in the coolant indicator sensor, remove the steam removal hose in the expansion tank.
- Remove the windshield washer hose.
- Remove the glass cleaner and remove the trim attached to the windshield.
- Next, remove the clamping devices of the housing of the heating device and the ventilation device. When the screws are unscrewed, you need to remember their location.
- Take out the VAZ-2111 cabin filter housing and be sure to replace it.
- Remove the rear half of the vent housing.
- Loosen the clamps and remove the antifreeze supply and discharge hose, do not forget about the steam exhaust hose.
- Finally, it's time to remove the heater core. This will not require much effort, if, of course, the dismantling is done correctly.
Next, get down to repairing the VAZ-2111 heating radiator, if the unit can still be repaired. Your task is to clean it properly, restoring the tightness to the maximum.
Along with radiator repair, proper repair of the furnace unit will be required. In doing so, follow these rules:
- if you install the plastic part of the fan of the furnace device, make sure that the pedal fits into the required hole;
- return the bolts to their original place and monitor whether the assemblies are seated.
6-7 hours - and the assembly will be completed. To ensure the job is done perfectly, it is advisable to also provide sound insulation. All that remains is to fill in the antifreeze and start checking the functioning of the stove. If there is no heating of the pipes, it’s time to deal with the air lock located in the system cooling device.
During your first trip to the VAZ-2111, you will notice that the air flow has become hotter, and the antifreeze levels in the expansion tank no longer decrease. If you learn how to perform simple repair work yourself, you will be able to save a certain amount of money and will not have to constantly contact a service station.
Instructions for replacing the thermostat are shown in the video: https://www.youtube.com/watch?v=JiOcujk1qYE
A video on how to properly check the condition of the thermostat in a VAZ-2111 is presented below: https://www.youtube.com/watch?v=XHnRqlf6gr0
If the thermostat is located separately from the engine, the following video will help with detailed instructions for checking the condition of the unit:
What are the features of the classic and alternative connection options?
In the first case:
- The main thermostat valve is flushed with coolant from the main radiator and engine;
- The thermostat opens for additional cooling - in this case, there is control not only over the entire coolant temperature in the system, but also over the temperature of the coolant leaving directly from the engine, and this, as is known, is the hottest place in the cooling system.
The standard connection diagram for a six-hole thermostat will look like this.
Connection example.
In the second case:
- The thermostat is additionally washed with coolant from the heater and bypass.
- The device controls the temperature, which is lower than the motor temperature (from the thermostat output or from the bypass). It turns out that in winter such a thermostat will work later than according to the classic connection scheme. The functioning of the stove also improves, which works more actively the lower the temperature outside.
The alternative connection diagram has two options.
As for the speed of warming up the engine, it remains unchanged, because the path of coolant flow until it reaches 82 degrees Celsius has not changed, as has the heat capacity of the system.
Symptoms of a problem
There are several main signs of a malfunction:
- The engine takes a long time to reach operating temperature.
- While driving, the engine overheats even on short trips.
- The engine temperature drops while driving and rises if you stop and let the engine idle.
- A few minutes after starting the engine (in warm seasons), the lower pipe is warm. This indicates that the thermostat is opening very early.
- If the engine (coolant) temperature is close to boiling and the lower hose is cold, it is most likely a stuck thermostat valve.
Replacing the thermostat on VAZ 2110, VAZ 2111, VAZ 2112
Welcome! Thermostat - thanks to it, the engine can heat up very quickly, and also practically not warm up at all, all this happens for the following reasons, in the thermostat itself there is a so-called valve, this valve is also filled with a special substance thanks to which the thermostat determines when it needs to fully open and when it needs to close completely, we all already know that when the engine is running (maybe you paid attention), the car heats up very quickly up to about 80 degrees, and after 80 degrees the engine heats up a little less, and after 94 degrees it does not practically does not heat up unless you are stuck in a traffic jam for many hours, the whole point is that the thermostat valve releases coolant into a large circle when it reaches 80 c°, and after 94 c° the liquid goes out to the same circle but only circulates the liquid in a small circle the circle stops altogether and as a result the car heats up less. Note! In order to replace the thermostat with a new one, you will need to stock up on: A screwdriver and one hexagon of approximately “5”!
Note! In order to replace the thermostat with a new one, you will need to stock up on: A screwdriver and one hexagon of approximately “5”!
Where is the thermostat located? It is located just below the air filter housing, you can see it very easily; to do this, open the hood of your car, then look for this same air filter housing in the engine compartment and after finding it, look a little lower, so to speak, under it, and that same thermostat will be installed there (Or rather its cover, and this unit itself is located inside the cover), for example, the location of the cover is also shown in the photo below:
When should you change the thermostat? It is replaced only if it has stopped opening the valve that releases coolant to a large circle, and also if it has left the valve in the open position and this valve is jammed.
Note! In the first case, if the thermostat does not release liquid in a large circle, then the car will begin to heat up very much, in no case allow it to overheat and, if possible, replace the thermostat as soon as possible, especially if the engine of your car operates at elevated temperatures, then your cylinder head gasket will gradually burn out, and the friction in your car’s engine will also increase, because as we all know from the law of physics, the higher the temperature, then the metal expands accordingly, and the larger the metal becomes, the larger it becomes its friction, so watch the engine overheating very carefully.
In the second case, if your valve gets stuck in the open position, although this happens rarely, you still decide for yourself whether you need to replace the thermostat or not, because if the valve is in the open position, then the engine will practically not heat up , but if it’s winter outside, it would still be better to replace this unit with a new one!
How to check whether the thermostat is working or not? There are several ways to check, namely with this unit removed, and you can also check it directly without removing it from the car at all, to do this, just start the car and warm it up to operating temperature and after warming up, get out of the car (By the way, open the hood again before leaving) and look into the engine compartment, there you will find the lower pipe that comes from the thermostat, so feel this pipe thoroughly, it should be slightly warm at the very beginning, and then gradually warm up (Depending on the temperature of the engine).
Note! If it turns out that the lower pipe does not heat up at all but constantly remains cold, then this indicates that the thermostat has become unusable and it is time to replace it with a new one, by the way, due to this course of circumstances, the engine will heat up very strongly and quickly, so if all the symptoms are obvious, then the thermostat has really become unusable, and by the way, about such a check, see in more detail in the video clip below:
If you bought a new thermostat or found an old one in your garage and want to find out if it works or not, then watch the interesting video below that explains in detail how to check this unit separately from the engine:
Functionality check
First of all, let’s not rush to remove the thermostat, because this requires a lot of fiddling. It may turn out that we are sinning against him in vain, but the issue is something else:
- Heat. We take hold of the lower radiator pipe and let someone start the engine. If there is no assistant, then start it yourself, you will have time to hold on to the hose. Please note that the car must be cold before this. At first the pipe is naturally cold, but when the engine is running it heats up very quickly. If this happens, it means that the thermostat is working properly, installing a new one is not required yet;
- Thermocouple. If doubts remain, you will have to disassemble. From the thermostat that has already been removed, it is necessary to remove the thermoelement - it is this element that is responsible for starting the cooler in a large circle, and it is this element that needs to be checked. This happens by lowering the thermoelement into fairly hot water (about 75'C) and then heating it. Naturally, you need to lower a thermometer into the water and monitor changes in temperature and the device itself. As it approaches 90°C, the thermoelement rod must extend. That did not happen? This means that this part needs to be changed. Most often, on a VAZ 2110, replacing the entire thermostat is not necessary - it is more expensive, and moreover, it is most often necessary only if some changes are detected in the “appearance” - such as a crack, chip, etc. ;
- Replacement. If we find problems or need to change the thermostat, we go to the car market or to the store where we buy a new one. Here, too, “pitfalls” may await us - the replacement will not bring the desired result if the new thermostat is, as they say, “flawed.” You need to blow hard into the fitting. If air does not pass anywhere, then the small circuit does not allow it to pass through, and its installation on a VAZ 2110 is possible.
Replacement
It is not difficult to replace the temperature-sensitive element on the 2110 with your own hands, following the step-by-step instructions. To perform repairs, you need to prepare the following tools and materials:
- new thermostat. Check which one is installed on the car (collapsible or solid body);
- silicone sealant;
- new pipes if the old ones are worn out or microcracks appear on them;
- new metal clamps;
- paronite gasket for a new type body;
- container for draining antifreeze;
- open-end wrench 13;
- Phillips and straight screwdrivers;
- antifreeze;
- rags.
Toolkit in the photo
Important! Replace the temperature-sensitive element on a completely cooled engine. Antifreeze heats up to 120 degrees and can cause burns.
Step-by-step instruction
- Place a container under the drain hole on the radiator. Open the tap and drain the antifreeze. There is no need for a complete drain; it is enough to reduce the level to the height of the temperature-sensitive element.
- Move the coolant container under the engine in the area where the thermostat is located.
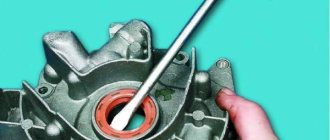
- Remove the thermostat housing. If the car has an old-style heat-sensitive element, then to remove it, just loosen the clamps and disconnect the pipes. On the VAZ 2110 since 2003, the thermostat is attached to the engine with two nuts. To dismantle use a 13 key.
- Replace the temperature sensing element if a six-hole housing is used.
- Change the gasket between the housing and the motor.
- Wipe with a rag and degrease the body terminals and pipes from the inside.
- Apply silicone sealant to the inside of the pipes and to the thermostat terminals.
- Place the pipes and tighten the metal clamps.
- Add antifreeze to the cooling system through the neck of the expansion tank.
Installation video tutorial
https://youtube.com/watch?v=SGs6EqsRCOg
To assess your strengths and understand the process of replacing the thermostat on the “ten”, watch the video:
https://www.youtube.com/watch?v=VfmIv7ise2w
Remember that replacing a faulty temperature-sensitive element on a VAZ 2110 cannot be postponed. If repairs are not carried out in a timely manner, a problem with the thermostat will lead to serious problems with the power unit and expensive repairs.
Sources
- https://ladaautos.ru/vaz-2112/kak-proizvoditsya-zamena-termostata-vaz-2112-16-klapanov-samostoyatelno.html
- https://masteravaza.ru/sistema-pitaniya-dvigatelya/inzhektor-sistema-pitaniya-dvigatelya/vaz-2110-zamena-termostata-inzhektora-651
- https://motorltd.ru/diagnostika-i-zamena-termostata-na-vaz-2110/
How is the VAZ 2110 thermostat replaced?
The procedure flow is as follows:
- the car battery is dismantled;
- the plug is removed from the expansion tank;
- unscrew the drain plug located at the bottom of the radiator;
- The liquid is drained from the tank, after which the plug can be tightened;
- the hose clamps on the thermostat pipes are loosened;
- hoses are dismantled (both rear and front);
- unscrew the bolts (there are three of them) that secure the thermostat cover and remove it.
In order to remove the thermostat from the cover, it is best to install the latter in a bench vice (you will need to mount jaws or soft pads on them to protect the aluminum surface from scratches). After this, press down the thermostat fixing plate (the spring will resist, you will have to apply some force), turn it and remove it from the grooves. Now the device we are interested in can be easily removed. And in its place you can install a new one, proceeding in the reverse order.
Removal
Before replacing a broken thermostat, you need to remove it:
- Unscrew the cap from the expansion tank; this is necessary so that antifreeze flows normally out of the system;
- Remove the plug from the drain hole at the bottom of the radiator tank, first replace it with a clean container and drain the antifreeze;
- Remove the entire thermostat assembly. Or, if you prefer, just its thermocouple.
In the latter case:
- Remove the hoses located on the thermostat cover pipes;
- Remove the cover with the thermocouple. Now you can check it, as already described.
How to replace a thermostat yourself
- Start work only with a cold engine to avoid getting burns on your hands.
- All liquid intended for cooling must be completely drained, since replacing the part involves disconnecting the pipe in which it accumulates. To avoid spilling liquid during this process, you should place a container of the appropriate size under the bottom of the car.
- For ease of operation, it is recommended to remove the hardened air filter housing.
- Using a screwdriver or wrench, unscrew the connectors that secure the hose to the thermostat. There should be two such hoses - one is for the radiator, the other is for the thermostat.
- Using a hex wrench, unscrew the bolts, in triplicate, that prevent the element cover from moving when the car is running. After removing the fasteners, you should simply carefully remove the part from its permanent place.
If, upon inspection of the cover, any defects are revealed in the sealing ring, for example, cracks or deformation, this will indicate that the ring has also become unusable and needs to be replaced.
All car parts should be assembled in the reverse order that was used during disassembly.
The information described indicates that replacing a faulty VAZ-2112 16-valve thermostat is an easy operation, and if you approach the event responsibly and carry out the process step by step, then everyone will be able to correctly replace the faulty part on their car.
The process of replacing a thermostat on a 16 valve valve
First, you need the thermostat itself for your car model, a screwdriver and a “5” hexagon.
Of course, the first thing you need to do is remove the no longer working thermostat:
- We drain the coolant, since otherwise it will not be possible to disconnect the thermostat (there will be liquid in the system).
- Remove the air filter housing so that it does not interfere with further work.
- After the 2 operations performed above, you can begin to remove the thermostat. First, take a screwdriver (or a wrench, depending on the fastener on the clamp). We unscrew the clamps on two hoses (to the coolant pump and the hose to the radiator) and loosen them.
- Now you will need to unscrew the 3 bolts that secure the thermostat cover using a hexagon.
- After this operation, remove the thermostat from the air filter, pay attention to the rubber in the thermostat, if it is intact, then we use it on a new one; if it is cracked or torn, we also replace it.
- Installing a new thermostat is carried out in the reverse order 4 - 3 - 2 - 1.
Purpose of the VAZ-2110 thermostat, design and principle of operation
Thermostat is a unit installed in the car’s cooling system that regulates the direction of coolant in a large and small circle (depending on the engine temperature).
The node performs two tasks:
- Helps the engine warm up faster in cold weather;
- Eliminates the risk of overheating.
Both functions are realized thanks to temperature control and the ability of the main valve to change its position (open or close under the action of the trigger element).
Structurally, the VAZ 2110 thermostat is a unit with a cylindrical cross-section and three, five or six outputs, depending on the design.
Main exits:
- To the pump;
- From the radiator;
- From the engine.
The functionality of the device is ensured by the following elements:
- Bypass valve;
- Main valve and its spring;
- Piston and its holder;
- Heat sensitive composition;
- Bypass valve spring.
Operating principle:
- Inside the device there is a valve with a special substance inside, which expands (contracts) as the temperature increases (decreases).
- When a certain temperature level is reached (80.6-81.5 degrees Celsius), the mentioned substance presses on the valve, gradually opens it and directs the flow of coolant through the outlet pipe to the radiator (large circle). When 94 degrees Celsius is reached, the main valve opens to its maximum (about six millimeters), and the bypass valve closes.
- At low temperatures, the thermostat bypass valve is in the open position (the main one is closed), and the coolant flows in a small circle (without the participation of the radiator). This ensures quick warm-up of the engine.
Read more about the operating principle of the thermostat here https://autotopik.ru/obuchenie/944-princip-raboty-termostata.html.
A stuck or other valve malfunction can cause the following problems:
- Overheating of the motor with the ensuing consequences;
- Inability of the power unit to reach the required temperature (relevant in winter).
Design and tasks of the VAZ 2112 thermostat
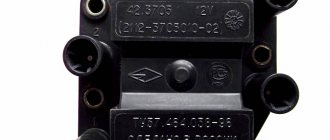
On cars under the Volzhsky Automobile Plant brand with a carburetor, and even on injection cars, until 2002, a thermostat was installed in an all-metal housing (i.e., on 8-valve gasoline engines). The unit was secured using four pipes. People call the VAZ thermostat a 4-hole thermostat. The first terminal of the housing is connected to the engine, the second is connected to the radiator, the third goes to the heater and the cooling system pump, the fourth (the thinnest) is connected to the expansion tank.
Until 2002, a four-hole tremostat was installed on carburetor and injection internal combustion engines
Inside the case there was a heat-sensitive element - a thermostat. You can see it only after complete disassembly. The operating principle is based on changing the shape of a bimetallic plate when heated or cooled.
When the engine starts, antifreeze circulates in a cold circle. When the power unit warms up, the coolant also heats up. At +87 degrees Celsius, the thermostat opens slightly and some of the antifreeze begins to flow in a large circle. When 102 degrees is reached, the temperature-sensitive element opens completely. A radiator is connected to the engine cooling process.
A car thermostat regulates the flow of antifreeze in the cooling system
On injection VAZ 2112 since 2002 (the engine by this time had become 16-valve), a thermostat is installed in a collapsible housing with six outputs. One additional terminal is connected to the stove when antifreeze circulates in a small circle. The second pin is used to heat the throttle valve.
Since 2003, a new type of unit has been installed on the VAZ 2112, as well as on the Priora and Kalina. The housing has 6 pins and is attached to the power unit unit using 2 nuts
When using a housing that can be disassembled, there is no need to purchase an assembled unit. Since 2003, on the VAZ 2112, Priora and Kalina, in the event of a malfunction, only the temperature-sensitive element must be replaced.
Where is the thermostat installed on the VAZ-2112?
Regardless of the type of power unit, the thermostat is located in one place - below the air filter housing. There you can see the cover of the device, under which the required element is installed.
This simplifies the search and replacement of the thermostat on a VAZ 2112 of any modification.
The role of the thermostat in the engine cooling system
The engine cooling system is divided into two circuits: large and small. The small circuit encloses the internal elements of the engine and the heater radiator for heating the interior. The large circuit includes the small one, but in addition passes through the cooling radiator located in front of the engine. Thus, when the coolant temperature reaches a set level, the valve opens the flow into a large circuit and the antifreeze is cooled by oncoming air, entering the cooling radiator. If there is not enough oncoming air, the engine temperature sensor transmits a command to the control unit, which in turn turns on the cooling fan located in front of the radiator.
As soon as the air entering the radiator cools the liquid to a certain temperature, the valve closes and the antifreeze again flows through the small circuit. As a result, the engine temperature is maintained in operating condition.
Principle of operation
VAZ 2112 injector thermostat 16 valves
The operating principle of the thermostat is characterized by the following points:
- Inside the thermostat there is a valve filled with a special substance. This very substance, due to its chemical and physical properties, expands with changes in temperature. Thus, when the substance expands, it acts on the valve, which overcomes the force of the spring and opens the flow of fluid from the radiator to the outlet - the outlet pipe.
- In addition, the design of the thermostat implies the presence of a bypass valve located on the antifreeze path from the engine to the outlet pipe.
- It is noteworthy that at a time when the antifreeze temperature is low and the engine is running but not warmed up enough, the coolant circulates in the so-called “small circle”.
Note. A “small circle” of coolant passage implies the opening of the bypass valve, resulting in rapid warming up of the engine.
- The main valve opening begins at temperatures between 80.6 and 81.5 degrees. It is at this moment that the liquid begins to move in a large circle, implying circulation through the radiator.
This is interesting: Repairing a Ford Explorer and Jeep Liberty will cost a pretty penny
VAZ 2112 injector thermostat
- When the temperature reaches 94 degrees, the main valve opens to its maximum value, approximately 6 mm. In this case, the bypass valve closes completely, and the coolant moves only in a large circle and is automatically cooled as it passes.
Note. In most cases, failure of the thermostat implies jamming of the valve stem, which naturally leads to the circulation of coolant in either a small or large circle. If the movement of antifreeze in a large circle is not so dangerous, then the first case threatens to overheat the automobile unit. How to check the thermostat status
VAZ 2112 injector thermostat
The simple test below will help you do this:
- The engine warms up to operating temperature (the arrow should be vertical);
- We feel the lower thermostat pipe with our hand, which should be slightly warm and gradually warm up.
If the lower pipe is cold, then most likely the thermostat is not functioning normally and the liquid circulates only in a small circle. If the lower and upper pipes have similar temperatures, then the probability of the valve being open is one hundred percent.
How to replace a temperature maintenance device
There is nothing difficult about replacing. Even a person who has little knowledge of cars can do the job after familiarizing himself with the basic steps. If you follow all the recommendations, you can replace the device in a few minutes. For work you will need.
- Silicone sealant.
- Clamps.
- Pipes (if the old ones have become unusable and cracked).
- Antifreeze.
- Container for draining coolant.
- Set of keys and screwdrivers.
Place the car on a level surface and remove the engine protection. When draining the liquid, it will interfere and you will lose a lot of antifreeze. Remember the main rule: do not carry out repairs on a hot engine. The temperature of the antifreeze sometimes reaches 100-120 °C, which can cause burns and serious damage to the skin.
Now place a container under the drain hole on the radiator. Open the stove tap just in case. You don't need to drain all the fluid, just make the level lower than the thermostat position. The second drain hole is located on the engine block and is unscrewed with a 13mm wrench. Replacing an old-style thermostat involves loosening all the clamps on it and removing them.
https://youtube.com/watch?v=OS4iugRTJFo
When installing a new device, it is advisable to lubricate the outer part, which will fit onto the pipes, with sealant. Just first you need to degrease the surface of both the body and the internal cavity of the tubes. Replacing the new thermostat is a little more complicated: there are slightly more pipes, you will have to unscrew two nuts from the engine block. Most often, the breakdown consists of a jammed thermal valve: it is either constantly open or closed.
Thermostat design and operating principle
It is advisable to consider some elements of the device (see photo). True, the most important ones are located inside; you can see them only with a detailed examination after disassembly. But on older cars, the VAZ thermostat is a non-separable unit, so if it fails, it needs to be completely replaced. This applies to all cars produced before 2003. They used an old, proven design that began to be used on the first VAZ-2108 cars.
The thermostat is connected to all units using pipes and clamps. The cooling system has two circuits: large and small. The liquid circulates in a small circle if its temperature is low (up to 87 °C). After reaching the specified value, the switch to the large circle occurs using a thermostat.
https://youtube.com/watch?v=VfmIv7ise2w
Simply put, the radiator is disconnected from the system while circulating in a small circle so that the liquid heats up faster and the engine temperature reaches the operating value. When the heating is too strong, the radiator comes into operation and the temperature drops. If the liquid begins to boil, additional cooling will be required. For this purpose, an electric fan is provided on the radiator.
The operation of the thermostat is based on the properties of the bimetallic plate. It is capable of changing its shape under the influence of temperature.
A valve with a temperature-sensitive element is installed inside the housing. When the operating temperature is reached (about 87 ° C), the valve begins to move slowly, opening the coolant supply. When the liquid warms up to 102 °C, the thermal valve opens completely. As a result, the liquid begins to circulate in a large circle.
Purpose, design and principle of operation of the thermostat
The coolant circulating through the working channels of the engine blocks, its main purpose is to remove excess heat accumulated in the power unit due to the friction of the working elements of the engine and the impact of the high temperature of the exhaust gases passing through the exhaust circuit.
The main elements of the cooling system of the VAZ 2114, which are responsible for lowering the temperature of the antifreeze, are the electric cooling radiator fan and the thermostat.
To understand the principle of its operation, you need to see what the thermostat on a VAZ 2114 looks like. Structurally, it is designed in such a way that the valve that regulates the coolant flow is located inside a housing with three pipes:
- two inputs - from the engine and radiator;
- one day off - to the pump.
The main working element of the valve itself, located inside the thermostat, is a solid heat-sensitive filler, which, when heated, through a rubber insert, acts on the piston that moves the main valve. When it heats up, it opens it, when it cools down, on the contrary, it closes the hole, preventing the flow of antifreeze.
The thermostat is attached to the engine through a pipe to the cylinder head on the left side, under the air filter. It is connected to the radiator and pump using rubber pipes. On a cold engine, the valve of this coolant flow regulator is closed and after starting, the liquid that begins to be pumped by the pump forces moves along a “small circuit” or “in a small circle.” Both of these expressions are used among motorists. When moving in a small circle, the antifreeze passes through the heater radiator, intake manifold and throttle assembly. Liquid is not supplied to the radiator; the valve cuts off this path.
As the engine heats up, the coolant takes away some of the heat, heats up and, passing in a “small circle” through the thermostat, heats the temperature-sensitive element. The piston begins to move and open the main valve. This begins to happen when the liquid temperature reaches 87 degrees. In this case, part of the coolant begins to circulate through the radiator. When the temperature reaches 102 degrees, the valve opens completely, moving eight millimeters. In this mode, the entire coolant flow rushes in a “large circle” through the cooling radiator.
Experts recommend checking the operation of the thermostat without removing it from the car. To do this, after starting the engine, you need to touch the lower pipes coming from the radiator with your hands. They should be cold until the temperature rises above eighty degrees. As soon as the temperature rises above 85 degrees, the tubes should begin to heat up and after a while you can feel that the “large circle” circulation is working. The tubes should get quite hot.
If the lower pipes leaving the radiator continue to remain cold, it means the main valve has not opened and the thermostat is faulty. A malfunction of this regulator may also be indicated by the fact that the lower tubes begin to heat up almost immediately after starting the engine. This indicates that the valve is open and does not close when cold.
In both cases, a thermostat failure does not bring anything good for the engine. In the case when the valve is open, the antifreeze, passing in a “large circle,” does not have the opportunity to heat up to working condition. This reduces engine power and other performance parameters. In the case when the main valve is closed, the engine has a high risk of overheating the blocks. This is the most dangerous condition for the power unit. If you drive in this mode for some, even not very long, time, you can damage the engine, even to the point of breaking the shafts. And this, at a minimum, is a major overhaul of the entire internal combustion engine.
There is a different way to check the thermostat on a VAZ 2114. To do this, you need to pour water into a pan and, placing it on the stove to heat, immerse the thermostat there. Knowing at what temperature the thermostat on the VAZ 2114 opens, use a thermometer to monitor the heating of the water in the pan. At about 87 degrees the valve should open. If this happens, then the device is fully operational. It is better to check it in this way before installing it in place of a failed one.
Many car enthusiasts often ask specialists whether it is possible to repair the thermostat.
There is only one fairly reliable way to help the valve work. To do this, lightly hit the device body with a screwdriver several times. The impact should open the valve.
If this does not happen, then the thermostat on the VAZ 2114 needs to be replaced.
Verification methods
There are several ways to check the VAZ 21102 thermostat, in particular:
- check without removal;
- checking a removed thermostat
To check without dismantling, start the engine and wait until it reaches operating temperature. Next, grab the lower pipe with your hand (it comes from the thermostat). At first, the pipe should be warm, and after a few minutes it should gain temperature. If the lower pipe is cold and the coolant temperature approaches 100-110 degrees, then the thermostat is not working and needs to be replaced.
There is also a simple and working way to check the thermostat removed from the engine. Heat the water to 80 degrees and lower the thermostat into it. Next, heat the water another 10 degrees and watch the thermostat; the valve stem should gradually come out.
It is not advisable to repair the VAZ 2112 thermostat due to the low cost of a new spare part.
Which one is better to choose as a replacement?
Experts do not advise experimenting with analogues, but using those components that AvtoVAZ develops directly for the VAZ 2110 model.
Although the company recommends using another technique - setting the thermostat from the VAZ 2111 to “ten”. Here is the answer to the question which thermostat for the VAZ 2110 is better.
The advantages of using an element from the eleventh model are manifested in the following:
- It is smaller in size;
- One hose and two clamps are used, which reduces the likelihood of leaks;
- The design of the product is compact and monoblock;
- The reduced cross-section of the small circuit guarantees better circulation through the stove;
- Relatively easy replacement.
New and old VAZ-2110 thermostats: installation features and differences
The type of thermostat used on the VAZ-2110 depends on the year of manufacture of the vehicle.
Initially, the same devices were installed as on the “eights” and “nines”, but due to low efficiency and frequent breakdowns they had to be replaced.
The main differences of the new design (5-hole thermostat) are the ability to disassemble and replace only the starting (heat-sensitive) element.
On older machines, the device was connected to the motor block using a short pipe.
In new models, fixation is carried out using a pair of studs. In this case, between the thermostat and the power unit there is a paronite gasket, which can be treated with silicone-based sealant (this procedure is not always necessary).
After 2003, 5-hole thermostats gradually changed to 6-hole ones.
According to the manufacturers, they are stable and provide better performance in extreme cold.
Advantages of the new device:
- Stable coolant temperature;
- No malfunctions in the heater operation;
- Greater work resource.
After installing a 6-hole thermostat, the engine easily reaches operating temperature at 20-30 degrees below zero, even with the heater on.
You also need to know that the bypass channels in 5 and 6 hole thermostats are different. In the first it is 16 mm, and in the six hole it is 11 mm.
This affects the fact that the circulating antifreeze through the bypass channel of 11 mm in a small circle flows faster than through the channel of 16 mm, which means that the flow (volume) of coolant through the stove increases, so it will be warmer inside the car.
The device is installed in two ways:
- Classic;
- Alternative.
In the first and second cases, to complete the work you will need three liters of antifreeze, a gasket for the thermostat, filler and supply hoses, as well as a new thermostat.
In addition, stock up on 15-28 mm clamps (5-6 pieces will be required).
To avoid spilling coolant during installation, remove the pipe from the throttle assembly (going to the saxophone) and gradually drain the antifreeze until the leak stops. After that, continue working.
We replace the thermostat on a VAZ-2115 ourselves
According to experts, the procedure for replacing a thermostat takes about an hour if tools and consumables are available. Therefore, you should take care of this before carrying out this operation. You will need the following:
- Tools:
- standard car mechanic kit (screwdrivers of various sizes and configurations);
- capacity of more than 7 liters for draining liquid waste.
- Materials:
- new thermostat;
- heat-resistant sealant;
- set of gaskets for repair;
- antifreeze or antifreeze (as a coolant).
Now you can begin the procedure for replacing the failed thermostat element, which consists of the following steps.
- Preliminary – stage of preparing the vehicle for the repair procedure:
- the car is installed on an inspection hole or on a flat surface;
- the engine is turned off;
- put on the handbrake;
- the engine is cold.
- Removing the old thermostat element:
- unscrew the expansion tank cap;
- open the radiator tap to drain the coolant from it;
- drain the coolant into a prepared container;
- remove the air filter (at the same time carry out a visual inspection for any malfunctions of this part);
- loosen the clamps of the radiator pipes;
- disconnect the hoses from the radiator and from the thermostat element;
- unscrew the fastening bolts (4 pieces);
- remove the thermostat (it is removed together with the seal ring).
- Installation of a new thermostat:
- lubricate the perimeter of the circuit with heat-resistant sealant;
- install a new sealing ring;
- put a new gasket;
- install a new thermostat;
- connect all hoses;
- tighten the clamps tightly;
- screw the plug on the drain valve at the bottom of the radiator;
- fill with coolant.
- Verification stage:
- start the vehicle;
- check for possible leaks;
- warm up the car to the optimal temperature - more than 90 degrees (this operation is necessary for the large circle of the cooling system to start);
- We check all hoses and pipes in operating mode - they should be hot.
A nuance of a working thermostat on a VAZ-2115: when starting a still cold engine, the lower pipe on the radiator will begin to heat up already at 85 degrees of coolant. This can be determined by touch.
To fully ensure that the newly installed thermostat element is functioning at the proper level, you should also turn on the heating element - the stove. If there are no failures or leaks in this mode, then the thermostat is installed correctly and without errors.
If you are not confident in your abilities, then to replace this part you should seek help from qualified specialists, that is, to the nearest car service center.
Welcome, friends, to the DIY car repair website. While everything is working, the car enthusiast thinks little about the design of his car and the purpose of certain elements.
But already at the first breakdown you have to look under the hood, and then on the Internet to expand your knowledge.
In particular, the bewilderment of most drivers is caused by engine overheating or, conversely, slow warming up of the power unit.
One possible reason is a thermostat malfunction. What to do in such a situation? How to check the device? Is it possible to replace the thermostat of a VAZ 2114 with your own hands?
Tips before starting the procedure
- Before you begin removing the thermostat on a VAZ 2112, be sure to ensure that it has completely cooled down after operation.
- The thermostat is removed when it is replaced due to unstable engine temperature conditions (overheating, insufficient heating). To carry out this procedure, completely draining the coolant is not necessary.
- To check the condition of the thermostat, start the car engine and touch the lower radiator hose, at first it should remain cold, and only after the coolant temperature reaches about 90 degrees, the hose will begin to gradually heat up. If there is no such reaction to the manipulations performed, remove the thermostat from the car and check its functionality; if defects are detected, it must be replaced with a new one.
This is interesting: How to paint a car bumper with your own hands?
What engines does the VAZ 2110 come with?
The VAZ-2110 car has been produced since 1996. At the same time, the power part gradually underwent changes:
- 21100 - base model produced in 1996-2000. The car was equipped with an engine with 8 valves and a volume of 1.5 liters (power 69 hp);
- 21101 is a model produced since 2004. Engine - injection, 1.6 liters, 8 valves;
- 21102 - 8-valve engine, 1.5 liters, injector;
- 21103 - 16-valve unit, 1.5 liters, injector.
- 21103 M - 16-valve engine, 1.5 liters, injector (produced since 2002);
- 21104 - 16-valve engine, 1.6 liters, injector;
- 21104M -16-valve engine, 1.6 liters, produced since 2004;
- 21106 GTI - 16-valve engine, 2.0 liters, 150 hp;
- 2110 “Premier” - 16-valve power unit, volume -1.5 liters;
- 2110 “Consul” - limousine, volume - 1.5 liters;
- 2110-91 - rotary piston engine, 1.3 liters.
How to check the thermostat on a VAZ 2113 - two ways
In order to check the thermostat on a VAZ 2113, you must perform the following steps:
- Take a pan with cold water, a thermometer up to at least one hundred degrees and a thermostat.
- We put it all on the tile to warm up and wait... We wait until the water temperature reaches 85 degrees.
- At this point we begin to look at the main thermostat valve. At 87 degrees it should open.
- If it does not open or opened earlier, then the thermostat is faulty.
There is another way to check the thermostat without removing it from the car. But for this, the car must be cold:
- After starting the engine, grab the lower pipe coming from the radiator with your hands.
- Until the temperature reaches 80 degrees it should be completely cold. When it reaches 85 degrees, the tube should begin to warm up slowly.
- And when 90 degrees is reached, full circulation of hot coolant should begin (i.e. the valve is completely open). The lower tube should be hot.
What is a thermostat?
The thermostat itself is an important part in the engine cooling system. It is designed to ensure that the engine is cooled according to its needs.
For example, you started the engine “cold”, then at degrees from 80 to 90 a large circle opens and liquid enters the radiator and begins to cool the engine more intensively than in a small circle.
The thermostat itself consists of:
- Frame.
- Internal compartment.
- 2 pipes with valves.
- "Core". Thermoelement (copper powders, a mixture of granulated wax, graphite and aluminum in a special proportion).
- Valves.
How to identify a breakdown?
The engine begins to overheat or does not reach operating temperature - these are the main two criteria for a faulty thermostat.
But there are also auxiliary signs: there is no heat in the cabin when it gets cold, a decrease in dynamic performance (power, speed), increased fuel consumption (about the passport consumption standards here).
Types of thermostat breakdowns
- The valve on the thermostat is stuck.
- “Stuck” or does not open at all.
- Incorrect start time.