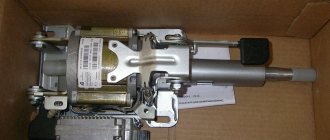
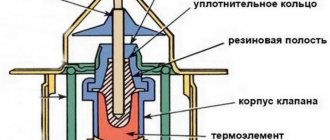
The cooling system on any car is important - it helps maintain normal temperature conditions. And last but not least is the thermostat. On older models it is made in the form of a valve with a thermoplate. But when tuning, many drivers install a thermostat from Granta on the VAZ-2114. It works much better, since it begins functioning at much lower temperatures - about 60 degrees. That is why it is called low-temperature. Similar thermostats are installed on new models - Vesta, X-Ray, Largus.
Features of the Grants thermostat
The factory installed thermostats on 14-series cars that were more similar in design and operating principle to those used on 9-series and 10-series cars. These are pump thermostats that operate only when the temperature reaches +90..95 degrees.
The main feature of the Granta thermostat is that it can be installed on a VAZ-2114 without major design changes. But engine performance will be much better, cooling efficiency will be higher. The thermostat's response temperature is approximately 60 degrees, which allows for normal movement in any traffic jams. Even standing for many hours in heavy traffic with the engine running will not cause the antifreeze to boil.
We install a grant thermostat on a VAZ-2114 with our own hands
- thermostat - expansion tank (the old one was too dirty) - tank cover - 2 studs with nuts for the thermostat - tee - pipe from the expansion tank - thermostat gasket - clamps
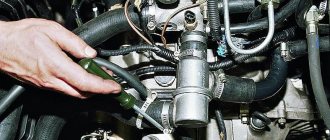
Well, when I came to the garage I started removing the old thermostat and installing a new one. Having replaced the studs, I installed the thermostat with a grant, placing the gasket on the sealant. We place the tee on the lower pipe of the cooling radiator/expansion tank/reversible from the stove. Into the thermostat, the upper pipe of the stove/stove. The throttle valve heating was removed altogether. The pipe going into the metal tube was simply plugged. Well, now raise the car, fill it with antifreeze, and remove the plug. I was amazed by the result, the stove was frying at 75 degrees, it became warm in the car.
The cooling system of any car contains a device called a thermostat. Its direct purpose is to cool the engine and reduce the amount of harmful substances resulting from spent fuel.
Different types of thermostats are installed on different models of VAZ cars. For example, on older models such as 2109, 2110, 2114, etc. a pump thermostat is installed that operates at an engine temperature of 90 - 95 degrees. But on newer models, such as Granta, Forza, Vesta, etc. a low-temperature thermostat is installed, which begins to work when the engine heats up to 60 degrees.
Features of the replacement
It is necessary to immediately make a reservation that it will be possible to install a thermostat from Granta on a VAZ-2114 only if several changes are made to the design. “Granta” is a relatively modern car, but the VAZ-2114 is a car that was developed in the 70-80s (more than 30 years ago). Therefore, some elements are not interchangeable. And this is quite normal, but not for a Russian person.
There is a way out of any situation. You can install a thermostat from Granta instead of a standard one, and this will require relatively few tools. The advantages are obvious: wear of the engine and its systems is significantly reduced. When metal elements operate at high temperatures, wear occurs more than at low temperatures. The thermostat from Granta simply does not allow the engine to get too hot. On the other hand, the efficiency of the interior heater increases - comfort in winter improves.
How to make a replacement
After all the necessary tools and materials have been prepared, you can begin tuning the cooling system itself.
Removing the old thermostat
Installing a grant thermostat on a VAZ 2114 is performed in the following order:
- Turn off the car engine and let it cool completely (only required if the car was running).
- After unscrewing the hose fastener, drain all the antifreeze from the system (you should first place a basin or other container under the bottom to collect coolant).
- Remove the air filter.
- Remove the distributor.
- Loosen the thermostat hose clamps.
- Remove old thermostat hoses.
- Unscrew the thermostat housing and remove it.
- Using two nuts, unscrew the original studs securing the thermostat housing (since they are slightly shorter than required).
- Screw in new M8 studs 85 mm long.
- Apply sealant to the contact plane and install a new thermostat gasket on top of it.
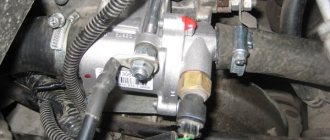
- Install the thermostat.
- Coat all thermostat pipes with sealant, then put rubber hoses on them, securing them with clamps (before installing old hoses, you should carefully inspect them. If leaks or even small breaks are found, they must be immediately replaced with new ones - especially since they are few).
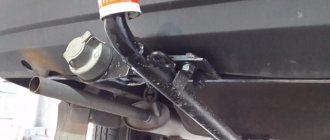
- Place a tee between the radiator return hose and the expansion tank and secure it.
- Wait about 1 hour for the sealant on the connections to completely set, then pour new coolant into the system (you can use old one, but it is not recommended) and start the engine, letting it run for a long time.
Installing a new thermostat from Grant
If the entire replacement was completed correctly and the new thermostat is working, then it will work at a temperature of 85 C and circulate the liquid in a large circle (that is, while the car is driving, the coolant will not heat up above this temperature).
As for the operation of the heater radiator, it will begin to supply heat to the cabin already at an antifreeze temperature of 55 C, and at a temperature of 70 C it will begin to blow hot air.
Tools for repair
Before you begin installing the Granta thermostat on the VAZ-2114, you need to partially disassemble the cooling system. And for this you will need the following set of tools:
- Phillips and flathead screwdrivers.
- A set of wrenches - spanners, open-end wrenches, socket heads.
- Silicone sealant.
- Clamps – at least 4 pcs.
- Thermostat from Granta.
If necessary, be sure to purchase new pipes. If the old ones are damaged, then after dismantling they may not be able to be reinstalled. Sometimes rubber is cut with clamps, so tighten as carefully as possible. Be sure to carry out all work on a cooled engine - this way you will ensure safety and the likelihood of getting burns becomes less.
What is needed for replacement
Before installing a grant thermostat on a VAZ 2114, you should purchase all the necessary parts and materials.
These include:
- the actual thermostat for Grant (to avoid mistakes, you can write down its catalog number - 21900-1306010-00);
- new thermostat gasket;
- a pair of M8 studs 85 mm long;
- lower radiator hose for Grant;
- tee for coolant return flow;
- clamps of the appropriate size;
- sealant (necessarily heat-resistant).
In addition to all of the above, it is recommended to purchase new coolant and replace it in the entire system after making the upgrade. This operation is not mandatory, but highly desirable.
Preparatory work
To install the Lada Granta thermostat on a VAZ-2114, you need to completely remove the old one. You start the repair with the following steps:
- Completely drain the liquid from the cooling system. To do this, alternately unscrew the plugs at the bottom of the radiator and on the engine block. Be sure to place a container under the engine - a cut 10-liter canister or pan. Preferably clean if you plan to reuse antifreeze.
- Free up access to the thermostat by removing the air purification filter.
- Loosen all the clamps that secure the thermostat to the pipes.
- The first to remove are the pipes located below - those that connect the expansion tank to the radiator.
- Unscrew the nuts that secure the thermostat housing after removing all the pipes.
- You can remove the element.
What is the difference between the VAZ-2109 cooling system and the Granta?
Experienced motorists often complain about the lack of heating system of their favorite “nine”, most of which are associated with a coolant leak from the engine cooling system and problems with the car’s expansion tank. Replacing the thermostat with a Grant thermostat solves these problems, because the Grant cooling system is liquid, with closed circulation. This means that coolant enters the heating device through the pump. There are differences in connecting the stove. For Granta it is connected in series, and for VAZ-2109 it is connected in parallel.
Installing a new element
The procedure is carried out in the reverse order of removal. When replacing a thermostat from Granta on a VAZ-2114, adhere to the same requirements as when installing a conventional one:
- Apply a thin layer of silicone sealant to the surfaces of the thermostat that will be in contact with the pipes. The sealant must work at temperatures up to 130 degrees.
- It is advisable to apply a thin layer to ensure better insulation of the system. Small gaps may appear, so they need to be covered with something.
- Reinstall the thermostat, be sure to place a gasket underneath it and apply a thin layer of sealant to it.
- Wait 20-30 minutes.
- Carefully put on all the pipes and tighten the fastening nuts with slight force.
- Tightening can be done no earlier than after 30-40 minutes, when the sealant has hardened a little. This will prevent it from getting inside the cooling system.
- You can pour liquid into the system no earlier than after 2-4 hours. This time is enough for the sealant to take its working form.
At this point, the installation of the Lada-Grant thermostat on the VAZ-2114 is completed, you can enjoy its operation. But first there are a few more steps you need to complete.
Changing the thermal insert
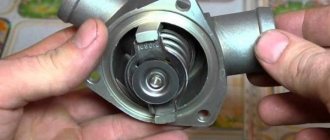
You can replace the entire thermal insert. Wahler inserts are ideal for the standard Grant thermostat: 3017.87 D (at 87° C) and 3091.92 B (at 90° C). The insert changes along with the spring. This modernization is carried out using thermostats manufactured by BEHR (which is equipped with the new BAZ-2190 car). There is no need to make any modifications or fit new parts. The BEHR thermostat is dismountable, and the Wahler “thermos” will have to be cut with a hacksaw in order to remove the thermocouple.
Alternatively, you can use a Daewoo Nexia, Renault Logan or Vernet 4898.92 part as a “donor”, but the diameter of the latter’s thermoelement is slightly larger than necessary and requires adjustment. For Luzar models such a replacement is not possible.
Some car enthusiasts who have made this modification claim that fuel consumption, although slightly, has decreased.
Checking the functionality of the thermostat
The first step is to fill the cooling system. To do this, close all drain holes, open the stove tap and fill in antifreeze. As soon as the “gurgling” in the tank stops, start the engine and warm it up to operating temperature - about +95 degrees. Carefully inspect the thermostat itself - there should be no evaporation or antifreeze leaks on it. Monitor its condition for at least a few minutes to make sure the assembly is reliable.
Turn on the stove - you should feel a flow of hot air (and it will be warmer than before). If the thermostat does not work, the air from the heater will come out cold. Only installing a new thermostat will help, since this one has an obvious defect. If you don’t want to spend money on purchasing an assembled thermostat, you can only buy a bimetallic valve.
Features of thermostat installation
According to reviews, the thermostat from Granta on the VAZ-2114 works very well, improving the efficiency of the heating system. But this can only be achieved if all work on installing the device is completed correctly. Be sure to open the heater tap when bleeding the system - this will allow the system to be completely filled with antifreeze. It is also advisable to install the machine so that its rear is lower than the front. Antifreeze will tend to the lowest point, completely filling all pipes. Only when the system is completely filled does the thermostat operate effectively.
The thermostat from Granta is installed on the VAZ 2110 and Priora to warm up the engine faster, especially when driving the “tens”. The thermostat is responsible for the redistribution of liquid flows in the SOD. Experts include frequent leaks and problems with the expansion tank as the disadvantages of this system on the VAZ 2110. Such malfunctions can be eliminated using tuning. The device of the SOD is preliminarily studied.
Refinement of a budget car
You can install a thermostat from Granta to Priora. To do this, you will need to buy pipes, a gasket, a tee, a temperature sensor, studs, and antifreeze. Since the Granta, unlike the Priora, has a radiator located further from the engine, a long pipe will be required for tuning.
You can splice standard pipes. To do this, use the SOD pump pipe from the “ten”. A straight section with fasteners is cut off from it. Experts attribute the advantages of such tuning to the rapid warming up of the interior and engine; the operating temperature of the internal combustion engine fluctuates within 92°C.
In order to correctly modify the ODS on the VAZ 2110 and Priora, it is recommended to use a book on the operation of these vehicles.
If necessary, it is recommended to consult with auto mechanics.
The maximum coolant temperature of Lada Kalina FL and Lada Granta cars after 1.5-2 years of operation is 78-80 ° C. It is slightly lower than that achieved in previous AvtoVAZ models. Therefore, some drivers consider this temperature regime of engine operation to be “non-optimal”. This, in their opinion, leads to increased fuel consumption and rapid wear of internal combustion engine parts. But plant specialists are not inclined to connect these indicators with each other, since no direct relationship between them has been noticed.
The fact is that the Lada Granta-2190 has a more efficient single-circuit engine cooling system, therefore the coolant temperature is lower while maintaining other characteristics of the car. This modernization made it possible, for example, to increase the ignition timing, and therefore save some fuel. The inertia of the thermostat has also decreased.
Technical points
Regardless of the vehicle brand, the ODS consists of the following elements:
- Water pump.
- Electric fan.
- Radiator.
- Expansion tank with plug.
- Thermostat.
On a cold engine, the valve of the latter device closes the pipe going to the radiator. In this case, coolant circulation is observed in a small circle (without a radiator). On the “ten”, the radiator, intake manifold, BDK, and liquid chamber are involved in a small circle. At a temperature of 87°C, movement of the thermostat is observed. This opens the main pipe. The liquid begins to circulate in a large circle. If the temperature reaches 102°C, then the pipe opens completely. The valve stroke is allowed within 8 mm.
How to correctly determine that the device is in working condition?
We warm up the engine to such a temperature that the needle does not reach the critical value, and turn it off. We open the hood, find a hose on top of the radiator (a black rubber hose with a metal clamp at the end) and the same one on the bottom. Then, very carefully, they may be quite hot, touch them. If one of them becomes hot, and the other is still cold, and the sensor shows a high engine temperature, this means that most likely the liquid does not enter the engine, but is retained in the radiator, and you need to change the thermostat to a new one.
Modernization of the "tens"
First, the old thermostat is removed from the “tens”:
- loosening the clamps of the radiator outlet and inlet hoses;
- dismantling the device.
The next stage is a comparative analysis of Granta SOD and VAZ 2110. On the first vehicle, the stove is connected in series, and on the second - in parallel. On the Lada Granta, the performance of the heating device does not depend on the pump speed. At the same time, the antifreeze in the expansion tank and radiator does not warm up.
The thermostat replacement process is carried out after purchasing the following parts:
- gaskets;
- lower pipe;
- washers;
- clamps;
- antifreeze;
- ABRO sealant.
The thermostat is installed on the VAZ 2110 after draining the antifreeze. To plug the hose coming from the throttle valve, use an M10 bolt and clamps. The next stage is connecting the hoses and installing the temperature sensor.
Tuned SOD system on a VAZ 2110: the stove inlet is connected to the thermostat, and the drain is connected to the saxophone. The damper heating is not activated. If necessary, connect a hose from the stove radiator to the throttle, which goes to the expander. Then pour antifreeze into the SOD and start the engine. During the warming up process, it is recommended to monitor the temperature of the antifreeze and the tightness of the connections. If there are no violations, then the tuning was successful.
Experts include the following advantages of such a replacement:
- warmth in the cabin;
- stable temperature under different operating modes.
The “new stove” will start blowing warm air at 55°C, and at 70°C hot air will come out of the stove (at idle and while the vehicle is moving). When driving, the engine temperature level will be within 85°C. At the same time, the power unit does not overheat in traffic jams, and the temperature is within 100°C. This helps the fan start.
Additional tuning
To make the thermostat work better, the bypass will need to be modified. A thermostat with 6 holes ensures quick heating of the air in the cabin (due to the reduction of the channel). The volume of liquid that circulates through the valve depends on the diameter of the bypass. As the channel decreases, the flow through the heating device increases. The interior of the “tens” becomes warmer.
When narrowing a thermostat with 5 holes, problems may arise with flushing the thermal element. To narrow the channel to the desired diameter, an aluminum plate is required. It is mounted inside the bypass. To do this, use rivets or cold welding. A new hole is drilled in the plate.
The tuned thermostat consists of a housing with an additional sixth hole (for the pipe), the pipe itself, threads, throttle washer, vehicle head, thermoelement and adjusting bolt. The pipe is screwed in and cold welded.
An additional pipe is installed parallel to the standard one on the stove (to allow the return flow from the heating unit to enter the measuring cavity of the vehicle). To increase the coolant current on a small circle, you will need a throttle washer. This eliminates pressure drop.
The adjusting bolt should rest against the leg of the element. This will allow you to regulate the opening temperature of the vehicle from the outside. Since the standard TS-82s are cold, additional modernization will be required. Experts advise converting carburetor TS-82s into injection ones. To do this, you need to drill and tap a thread for the DTOZH.
A tee is used for tuning. On the “ten” it does not need to be deployed. A thermostat with 6 holes, unlike the previous element, is easier to tune. After reducing this bypass, the coolant temperature will depend on the radiator temperature.