Problems with the exhaust system of a VAZ 2107 car are easy to recognize - the noise of the engine is complemented by a roaring sound coming from under the bottom of the car. In 90% of cases, a car enthusiast can solve the problem on his own by replacing or repairing a burnt-out muffler. You just need to understand the exhaust structure, correctly diagnose the malfunction and replace the worn element.
- Design and operation of the exhaust tract
- Problems with the muffler and other elements
- How to change the main muffler
Preparation of tools and workplace
- Replacement procedure
Video: replacing a VAZ 2107 muffler in a garage
- Video: how to seal an exhaust without welding
- Video: making a direct flow with your own hands
- Video: how to remove the resonator VAZ 2101—2107
Purpose of the exhaust system
Before combustion in the engine cylinders, gasoline is mixed with air and supplied through the intake manifold into the combustion chamber. There, the mixture is compressed eight times by the pistons and ignited by a spark from the spark plug. As a result of the process, 3 components are formed:
- heat and mechanical energy that rotates the crankshaft;
- gasoline combustion products - carbon dioxide and carbon monoxide, nitrogen oxide and water vapor;
- combustion under high pressure generates sound vibrations - the same exhaust sound.
Since the efficiency of internal combustion engines does not exceed 45%, about half of the released energy is converted into heat. One part of the heat is removed by the engine cooling system, the second is carried out by the exhaust gases through the exhaust tract.
The smoke at the exit from the duct is cooled to a safe temperature, you can calmly raise your hand - it won’t burn you
The VAZ 2107 exhaust system performs several important functions:
- Emission of combustion products from the chambers and ventilation of the cylinders after the next combustion cycle.
- Reducing the amplitude of sound vibrations, that is, reducing the noise level of a running motor.
- Removal and dissipation of part of the released heat in the atmosphere.
On “sevens” with an injection power system, the exhaust tract solves another important task - it cleans the exhaust from toxic gases CO and NO by afterburning in a catalytic converter.
DIY electrical equipment repair
The most common type of repair of the electrical system of a VAZ 2104 car is replacing the fuse. If an electrical appliance fails, first check the fuse. Whether it's a light bulb, an actuator, or an indicator, start with the fuse.
On the VAZ 2104 in the first years of production, finger fuses were installed. They were dielectric cylinders with metal contacts at the ends and a fusible element inside the cylinder. The design was not very reliable. The contacts got hot and the fuses failed.
Subsequently, fork-type fuses were used on the VAZ 2104. A fuse of this type consists of a plastic body, on which the rated current is color-coded and numerically marked, and two contact flat electrodes connected to each other by a fusible jumper. Through the window in the upper part of the case you can see the condition of the fuse element.
The fuse box is located in the engine compartment on the right side. The block is closed on top with a lid on which symbols for the purpose of the relay, fuse numbers and the circuits they protect are printed, which is convenient for repairs. Most of the circuits of the VAZ 2104 car are protected by fuses installed in the mounting block.
By removing the fuse that protects the circuit of the failed device, make sure that it has failed. Insert new one. It is not recommended to use “bugs” made from individual strands of stranded copper wire for repairs. Is it dangerous. Remember that replacing a fuse does not eliminate the cause of its blown and often only provides a temporary reprieve. After replacing the fuse, go to the workshop as soon as possible, determine the cause of the failure and make repairs.
A supply of fuses of three ratings for repairing a VAZ 2104 should accompany you on every trip.
Design and operation of the exhaust tract
The exhaust system includes 3 main elements (starting from the power unit):
- double exhaust pipe, in driver's jargon - “pants”;
- middle section equipped with one or two resonator tanks;
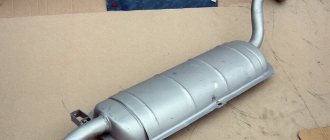
- the last section is the main muffler.
3 sections of the exhaust system are connected using clamps
According to the factory operating instructions for the car, the exhaust manifold is a part of the engine and does not belong to the flue gas exhaust system.
The number of resonators in the middle part of the tract depends on the type of engine installed on the VAZ 2107. If the car was equipped with a 2105 engine with a working volume of 1.3 liters, 1 tank was provided per section (modification of VAZ 21072). Cars with 1.5 and 1.6 liter power units (VAZ 2107-21074) were equipped with pipes for 2 resonators.
The length of the element is the same for all carburetor modifications of the VAZ 2107, but on cars with more powerful 1.5 and 1.6 liter engines, 2 resonator banks are provided
More information about the design of the carburetor: https://bumper.guru/klassicheskie-modeli-vaz/toplivnaya-sistema/karbyurator-ozon-2107-ustroystvo.html
On a VAZ 2107 with a 2105 engine, it is not advisable to install a section with 2 tanks - this reduces the power of the power unit. Dreaming of quiet operation of the 1.3 liter engine, I personally tried to change the 1-tank resonator to a 2-tank one. I didn’t notice a decrease in the exhaust sound, but I clearly felt a drop in traction under load.
The entire tract is attached at 5 points:
- the flange of the “pants” is screwed to the outlet manifold with 4 bronze M8 nuts;
- the end of the exhaust pipe is attached to the bracket on the gearbox;
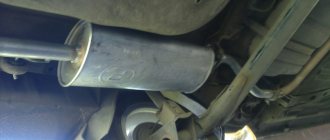
- the flat muffler tank is hooked by 2 rubber hangers;
- The muffler outlet pipe is fixed with a rubber cushion screwed to a metal body bracket.
The principle of operation of the tract is quite simple: the gases pushed out by the pistons pass through the manifold and “pants”, then enter the resonator section. There, preliminary suppression of sound vibrations and a decrease in temperature occur, after which the combustion products enter the main muffler. The latter reduces the noise level as much as possible and releases gases to the outside. Heat transfer and cooling of the smoke occurs along the entire length of the exhaust elements.
On the injection “seven”, the gases undergo additional purification in the catalyst
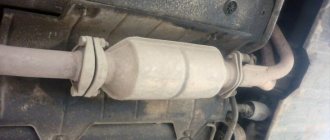
On “sevens” with an injector, the exhaust design is supplemented with a catalytic converter and oxygen sensors. The element is located between the receiving pipe and the second section, the connection method is flange. The catalyst cleans flue gases from toxic compounds (nitrogen oxide and carbon), and lambda probes inform the electronic control unit about the completeness of fuel combustion based on the free oxygen content.
How to eliminate the smell of gasoline in the cabin: https://bumper.guru/klassicheskie-modeli-vaz/toplivnaya-sistema/zapah-benzina-v-salone-vaz-2107-inzhektor.html
How to remove and replace pants and the receiving tube on a VAZ 2107
Of all the parts of the exhaust gas system, it is the pants (exhaust pipe) that is the most durable. If, for example, you have to replace the muffler at least once every 50-70 thousand km, then the pants can last more than 100,000 kilometers for your VAZ 2107.
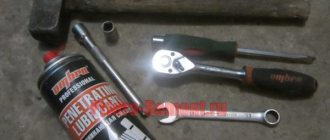
Tools needed to remove the exhaust pipe:
- Ratchet handle
- Head deep 13
- Open-end wrench or socket wrench 13
Before proceeding with this type of repair, the first step will be to disconnect the exhaust pipe from the resonator. All this is attached to a clamp, which is compressed with two bolts and nuts. These are the first things you need to unscrew.
Then you can start unscrewing the nuts securing the pants to the exhaust manifold, of which there are only 4 pieces. First, it’s better to disrupt connections using a regular key:
And then it’s most convenient to use the ratchet handle to make it more convenient and faster:
After all the nuts are unscrewed, you can move the exhaust pipe back a little by pulling it off the studs:
Then you can try to remove it completely, turning it a little from side to side to find the most convenient position for final removal:
And the photo below shows the final result of the work done:
If it is necessary to replace the pants, we buy new ones that will fit your VAZ 2107 and install them in the reverse order of removal. The price of a new exhaust pipe is about 500 rubles.
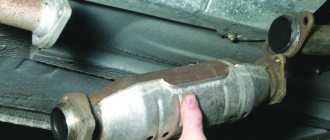
Problems with the muffler and other elements
The main noise reduction section of the VAZ 2107 lasts for 10-50 thousand kilometers. Such a wide range is explained by different product quality and operating conditions. The service life of the receiving pipe and resonator lies within the same limits.
The occurrence of muffler malfunctions is characterized by the following symptoms:
- the appearance of a rumble from the exhaust system, in advanced cases turning into a loud roar;
- constant dull knock - the pipe touches the bottom of the car;
- a more rare malfunction is a complete engine failure, the power unit does not start and shows no signs of “life”.
On injection VAZ 2107 models, malfunction of oxygen sensors causes increased fuel consumption, unstable operation of the power unit and loss of power.
Condensate accumulating in the tank provokes corrosion and the formation of through holes
A rumble and roar indicate burnout of the exhaust pipe or muffler tank, which occurs for the following reasons:
- natural wear and tear of metal;
- through damage from an impact or shot from the engine;
- the effects of corrosion caused by a large amount of condensate that accumulates at the bottom of the tank.
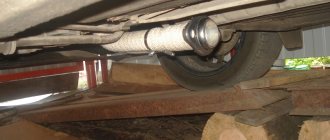
Typically, burnouts occur at the welded joints of pipes with muffler or resonator tanks. If the housing is leaky due to corrosion or mechanical stress, the defect is visible on the bottom of the element. Often the exhaust “cuts” - gases break through at the junction of two sections due to a loosening of the connecting clamp.
Loose pipe connections are sometimes indicated by leaks of condensate escaping along with smoke.
While teaching my wife to drive a 7, a friend of mine unsuccessfully chose a site with a low parapet instead of a curb. While backing up, the girl hit the road fence with her muffler. Since the part had already worked for a decent period of time, the impact was enough to pierce the body through.
The tank or pipe touching the bottom of the car occurs due to stretched or torn rubber hangers. Rocking and impacts cause a dull annoying knock, which can be eliminated by replacing the rubber bands.
Stretching or breaking of rubber suspensions causes dull knocks from the muffler
If the engine is absolutely “dead”, it is worth checking the catalyst of the injection “seven” or the tract itself for blockages. A completely blocked section of the pipe will not allow gases to be ejected from the cylinders and a new portion of the combustible mixture to be drawn in.
A clogged or clogged catalyst can be identified by a quiet hiss of air coming from one of the pipe joints. When you repeatedly try to start the engine, the pistons pump air into the clogged exhaust system, which, under pressure, begins to escape through leaks. If you unscrew the “pants” from the manifold and repeat the start, the engine will probably start.
I had a chance to see a completely clogged pipe personally when a friend asked me to start the car using the pushrod (the battery was discharged due to prolonged rotation of the starter). The attempt failed, we moved on to diagnosing the ignition and fuel supply systems. A quiet hiss of air from the manifold was noticed when checking the carburetor. It turned out that the owner added a “good” additive to the fuel, which caused the formation of soot, which completely clogged the exhaust tract.
A housing rupture occurs due to a strong impact or as a result of a shot from the exhaust manifold.
Malfunctions
Any driver experiences an unpleasant feeling when the clutch pedal sinks to the floor. This can happen if the clutch cable breaks; it is also possible that the release fork breaks (this case is discussed in another article). The cable breaks more often on older cars that are used in extreme conditions or all year round.
The cable may become frayed, which affects the smoothness of the pedal and the operation of the clutch. This cable also requires replacement.
If the clutch cable is broken, you can drive your car to the repair site. You need to start the car in first gear and shift while driving. The following situation is possible: the cable broke while the gear was engaged, and the car stalled.
There is a possibility that it will be difficult to engage the neutral position. Then your car won’t even be able to roll off the roadway. The transmission is disengaged by rocking the car forward and backward and disengaging the transmission at the same time. You can jack up one of the wheels and spin it by hand, this will also help.
Even if the cable is not replaced, gear shifting is possible. It is possible to get to the service station, but such driving has a negative impact on the service life of the gearbox.
The cost of the spare part is low, about 300 rubles. The cost of replacing a cable in a car service is 400 rubles.
What muffler can be installed on the “seven”
There are 4 options for replacement:
- Standard VAZ 2101-2107 muffler made of ordinary steel with anti-corrosion coating. The plus is the low price of the product, the minus is the unpredictable duration of work. When purchasing, it is quite difficult to evaluate the quality of the metal and workmanship, unless the welds are made completely carelessly.
- Factory section made of stainless steel. The option is not cheap, but durable. The main thing is not to buy a fake made from cheap Chinese metal.
- The so-called direct-flow sports muffler, manufactured in a factory.
- Weld the outlet element of the desired design yourself.
Standard mufflers are made of ordinary metal with an anti-corrosion coating
If you do not have welding skills, the fourth option is automatically eliminated. All that remains is to choose between stock and sports parts.
A straight-through muffler differs from a standard muffler in the following ways:
- shape - round, outlet of larger diameter;
- design - inside is a straight perforated pipe, lined with fireproof sound-absorbing material;
- the operating sound is low-frequency, louder.
The factory-made direct flow is painted on the outside with heat-resistant paint, the pipe outlet is equipped with a decorative nozzle
The forward flow resistance is significantly less than the factory model of the muffler. The design makes it possible to ventilate the cylinders more efficiently and increase engine power by up to 5 hp. With. A side effect is a higher noise level, which brings pleasure to fans of extreme driving.
The stock design muffles noise due to several internal partitions and additional perforated pipes, causing gases to change direction and be reflected repeatedly from obstacles. Hence the high resistance of the element and a small drop in power.
In a conventional element, sound and gases change the direction of movement several times; in a direct flow, they are dissipated through the perforation of the pipe
Tuning enthusiasts install forward flow in combination with other means - zero-resistance filters, turbines, and so on. Replacing a standard muffler with a direct-flow muffler without performing other measures will give one result - a loud rumble, you will not feel an increase in engine power.
It is not difficult for a car enthusiast who owns a welding machine to make a forward flow independently:
- Make a round tank from sheet metal (you will need rollers) or select a ready-made can from another car brand, for example, Tavria.
- Place a perforated pipe inside, having previously drilled many holes with a diameter of 5-6 mm.
It's easier to make slits in a pipe, but it's better to spend more time making the holes - Fill the cavity between the straight channel and the walls tightly with non-flammable basalt fiber.
- Weld the end walls and supply pipes. A curved element from an old muffler is perfect as an inlet pipe.
If desired, the direct flow can be made double - then the noise level will decrease - At the required points, attach 3 fasteners corresponding to the standard hangers.
You can refine the outlet pipe using a nickel-plated decorative nozzle. The choice of products in size and shape is extremely wide, the prices are quite affordable.
Video: making a direct flow with your own hands
Reasons for a loud sound or diagnostics of the exhaust system of a VAZ 2104
What problems can occur in the exhaust system and when does the muffler need to be replaced? Let's look at it in order:
- The first thing that can cause a loud exhaust is a malfunction of the muffler, or rather its burnout or rotting. This can be determined by external examination. Look for traces of rust - they often hide holes that are hardly noticeable.
- Let's go further - the middle resonator. Again, it could have rotted, or while driving you could have gotten caught in it and punched it. Also carefully inspected for cracks, holes and rust.
- The exhaust pipe or simply pants can also be a cause. They, as a rule, do not burn out. The same thing happens to them as to the resonator. After hitting the bottom of the pants, a dent appears, which then rots and a hole appears.
- If the entire exhaust system, after visual inspection and testing with your own hands, turns out to be safe and sound, then there is only one conclusion - the reason for the loud operation is definitely the gasket between the pants and the exhaust manifold.
Note! When inspecting areas with rust, be sure to test the strength of the surrounding metal. It is possible to repair the muffler.
What is important to know about the resonator
Structurally, the pre-muffler is identical to the forward flow described above - a straight perforated pipe passes through the cylindrical body. The only difference is the partition that divides the tank space into 2 chambers.
Resonator tasks:
- dampen primary sound vibrations of large amplitude;
- facilitate the work of the main muffler and extend its life;
- remove some of the heat from the flue gases.
The resonator bank resembles a forward flow, only the part size is smaller
The principle of operation of the element is based on the physical phenomenon of resonance - repeatedly reflecting from the partition and the inner walls of the can, sound waves cancel each other out.
The VAZ 2107 car is equipped with 3 types of resonators:
- The classic option for carburetor engines, used in the first models with an injector, is a long pipe with one or two banks (depending on engine size).
- On injection models that comply with Euro 2 exhaust standards, a shortened resonator section with a flange was installed at the front end of the pipe. The catalytic converter was bolted to it.
The latest VAZ 2107 models were equipped with a neutralizer that took away part of the length of the resonator pipe - After the introduction of Euro 3 standards, the length of the catalyst increased and the length of the resonator decreased. The section for the injection version of the “seven”, which meets these requirements, is equipped with a front flange with 3 bolts.
Euro 2 and Euro 3 resonators differ in the shape of the mounting flange and the length
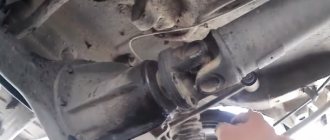
When operating resonators, the malfunctions described above occur - burnouts, rust and mechanical damage. Troubleshooting methods are similar to repairing a muffler - welding or temporary sealing with a bandage. Removing the resonator section is not difficult - you need to unscrew the fastening to the gearbox, then disconnect the muffler and “pants” pipes. On a VAZ 2107 with an injector, the flange is disconnected instead of the front clamp.
Find out how you can control fuel consumption: https://bumper.guru/klassicheskie-modeli-vaz/toplivnaya-sistema/rashod-topliva-vaz-2107.html
Removal process
In the process of removing an element of the exhaust system from a VAZ 2107 (injector) for its subsequent replacement. The following tools will be useful to you:
To figure out how to remove the muffler from your VAZ correctly and replace it. Please read the following instructions carefully:
After this, the product can be freely removed to be replaced with a new one, which is installed in the reverse order.
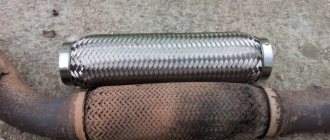
Please note that the connection between the muffler pipe and the resonator pipe is located in front of the rear axle. The ends of the pipe with slots and female-male fasteners are tightened using a coupling. Removal of the product can be complicated by corrosion, which develops under the influence of temperatures and lubrication.
For this reason, moisten corroded parts with an anti-corrosive agent in advance (motor oil or brake fluid will also work). If you are planning to install a new muffler, it would be a good idea to purchase new suspension rubber bands (1 for the rear and 2 for the center location).
Instructions for replacing the fuel filter
Visually inspect the filter. If you find any foreign parts inside or external defects, you should definitely replace it. If you don’t know where the fuel filter is located, ask a specialist or entrust the repair to a specialized salon.
Prepare all the necessary tools and parts: a new fuel filter, as well as keys 10, 17, and 19.
Next, we will begin the preparatory work. Disconnect the ground of your car. Despite the fact that among all the operations with the fuel system, replacing the filter is not that difficult, while you are in the hole, anything can happen.
Use keys 19 and 17. If you don’t have the first one, you can hold the filter with your hands and unscrew the fitting with a key 10. Make sure that the gasoline remaining in the fuel tank does not get into your eyes. Prepare a container in advance to drain gasoline into. Similarly, unscrew the fitting located at the opposite end of the fuel pump filter.
Use a ten key to loosen the clamp to the point where it can be removed.
An important point in installing a new part is to maintain the polarity of the filter
Pay attention, first of all, to the arrow that is drawn on the body. The direction of movement of gasoline must strictly coincide with the direction of the arrow on the filter housing
The last stage involves completing finishing work
Thus, after replacing the problematic element with a new one, you should reassemble the entire previously disassembled structure in reverse order. Most often, when carrying out this operation, car owners also replace the clamp that secures the location of the fuel filter. However, if this element is still in order and has not lost its operational properties, you can leave the old one and replace it at the next inspection if any malfunctions or external damage are detected. After you have learned how to replace the fuel filter on a VAZ 2110, you can go to an auto parts store, purchase a new part and start replacing it.
Precautionary measures:
- You should not smoke while repairing the fuel system; the slightest fire can lead to big troubles.
- Have a fire extinguisher nearby.
- Wear safety glasses and a gas mask while working.
- The workplace should be well ventilated.
- Be sure to wash your skin with soap and water if fuel comes into contact with it.
When replacing the fuel filter, it is also quite convenient to check the lambda probe.
Sources
- https://mashintop.ru/articles.php?id=2368
- https://vaz-russia.ru/remont/zamena-toplivnogo-filtra.html
- https://autoremka.ru/raznoe/zamena-toplivnogo-filtra-vaz-2110-podrobnaya-instrukciya.html