Welcome! Valve clearance - it should be there, but it should be minimal, otherwise if there is no clearance, then the valves will simply not close completely, in this case depressurization will appear in the cylinders and the power will noticeably drop, and the exhaust valves will also burn out, in addition there is the second side is when the valve clearance is increased, in this case, when the engine is running, the valves will not simply open completely, thereby the power will again drop because the engine cannot simply feed the fuel-air mixture into itself since the valves do not open completely and more the valves will rattle when the valve clearance is large, after adjusting them, when you start the engine, you will immediately feel how quieter it will run and in the future you will understand when it is time to adjust the valves on the car.
Note! To make the adjustment, the following tools will be needed: Tweezers, as well as a screwdriver, a set of all kinds of wrenches (spanners, sockets, etc.), in addition, a set of feeler gauges for adjusting the valves is needed (Purchase it at a car store) and a micrometer!
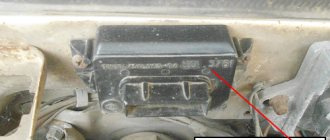
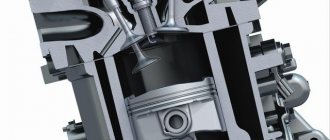
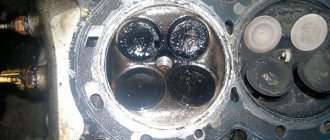
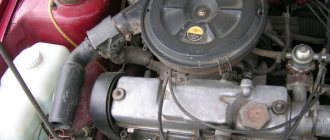
Where are the valves located? You won’t be able to see them that easily, you’ll have to remove the cylinder head from the car (we’ll tell you how to do this later), after removal you will see the camshaft and its cams, in addition, there will be eight valves under the camshaft cams ( Or rather, they are adjusting washers, and under the adjusting washers there are pushers and it is precisely under these pushers that the valves themselves are located) which you need to adjust (The shaft cams and valve adjusting washers, due to which the clearance is adjusted, are indicated by arrows, in addition, under each arrow there is a number , which indicates the valve number; you will use these numbers to adjust the valves, so don’t forget about this photo as you read the article).
When should valves be adjusted? Their gap increases as you drive the car, for example, if you drive hard, then after 30 thousand you will have to adjust the valves; if you drive quietly, after 40 thousand you will need to think about adjustments, in addition, it must be done after purchasing a used one car (It’s just that few people adjust the valves before selling) and when the engine is running loudly (Valves are knocking), in general the easiest way to understand whether the valves need to be adjusted or not is to check their clearance, you don’t need to do much for this, just remove the cylinder head cover from the car engine and then, using a set of feeler gauges, check the clearance of all valves on the car.
Symptoms of a problem
If the valves have not been adjusted properly, a characteristic clattering sound appears when the engine starts. This rather loud noise comes from under the block cover. You can hear it especially well when the speed increases.
If the valve clearance is significantly larger than specified, the loud clatter becomes more distinct, and noise appears even at low engine speeds.
Adjustment
To adjust the gap, you must use the appropriate shims. They are installed on top of the valve tappets.
If you choose the right shim using trial and error, you can return the clearance to optimal values, thereby restoring normal engine operation.
There are certain standards regarding clearance sizes depending on the valve.
Valve type
Normal clearance
Tolerance
Adjustment process
Adjusting the gaps yourself is not difficult. Just follow the instructions provided, as well as video tips and visual demonstrations of the process.
- Remove the unit cover and clean the surfaces with a clean rag. You need to remove traces of engine oil.
- Place a device for recessing the valve tappets on the cover fastener studs. This is the most common lever with a handle.
- Set the piston of the first cylinder to the TDC position - top dead center. To do this, remove the camshaft drive belt cover and rotate the crankshaft as it rotates. The marks on the camshaft drive gear and the rear gear cover must match. If you remove a couple of spark plugs, it will be easier to turn the crankshaft.
- After aligning the marks, the crankshaft rotates about another 50 degrees, no more. This will allow you to unscrew the camshaft cam from the valve lifters.
- Using a feeler gauge, check the condition of the gaps on valves 1-3 and 5. If the gap differs from the required one, return the required parameters by replacing the adjusting washers.
- To adjust the clearances, the pushrods are recessed a little so that you can release the shims. The pushers are recessed by pressing the lever. Do not let go and lock it in the desired position. Be sure to place the clamp so that it is between the edge of the pusher and the camshaft.
Fixing the pusher
- Pry the adjusting washer off the pusher by prying it with a flat-head screwdriver. On the back of the washers there is usually a mark with the size. If not, you will have to measure it manually. Write down somewhere how thick the washer you are using is, and using the dimensions as a guide, select a new washer.
- New shims must be installed with the numbers down. By recessing the device for compressing the valve pusher, the retainer can be removed.
- Check the gap. If necessary, perform the operation again, taking a washer larger or smaller than the previous one.
- Having completed the adjustment, the crankshaft rotates 360 degrees, which provides access to valves 4, 6, 7 and 8. They are adjusted in the same way.
Valve adjustment technique
After you have completed the preparatory work, you can begin to regulate.
If you have already done repair work on a car, then the adjustment procedure will not seem difficult to you. The adjustment must be carried out in the order of the cylinders. It should be remembered that valves 2, 3, 6, 7 are intake valves, and the remaining numbers are exhaust.
To make work easier, you can mark the camshaft pulley with special marks in a circle with a distance of 90 degrees. When the camshaft is rotated 90 degrees, the crankshaft will rotate 180 degrees.
Align the marks on the pulley and on the belt housing panel, then turn clockwise another 2 teeth. This scheme will allow you to move the cams.
Measure the gap using a feeler gauge. If it moves between the pushrods and cams with little effort, everything is correct.
In the event that the gaps do not coincide with the nominal ones, the following must be done:
- install a tool to adjust the gap on the bearing studs;
- turn the pusher so that the hole is facing you. Using the lever, move the pusher until it stops, and then lock it;
- remove the washer using tweezers, you will find a thickness mark on it.
To make it easier to select a new washer, you will need a special formula that can be used to calculate the thickness: H = A + (B – C).
Decryption table:
- thickness of the new washer – N;
- thickness of the old one – A;
- present gap – B;
- the required gap is C.
When you calculate the required thickness of the washer and install it, you need to measure the gap again. Repeat this step until you get the size you want. For the remaining cylinders, carry out adjustments in the same order.
Problematic seals
In addition to adjusting the valves, it is extremely important to check the current condition of the seals.
Valve seals are designed to prevent excess engine oil from leaking through. In ideal operating condition, they seal tightly against the valve and allow only the amount of oil to flow through to provide effective lubrication.
Valve seals
They sometimes have to be changed, since the rubber used to make oil seals ages over time and loses its elasticity. As a result, the oil seal leaks more oil than required. Engine oil consumption increases, problems arise in the lubrication system and more.
Therefore, we offer you instructions on how to replace them.
- The work begins with the obligatory removal of the negative terminal from the battery.
- Disconnect the contacts from the ignition coil and move them aside. It is better not to unscrew the spark plugs, otherwise you risk providing the cylinders with an impressive amount of dirt during the repair process.
- Disconnect a pair of rubber tubes from the valve cover. Loosen the valve cover mounting screws and unscrew them. Subsequently, put all small parts, nuts, bolts in a separate jar so as not to lose anything.
- Remove the valve cover and a pair of gaskets. It is best to replace these gaskets immediately.
- In order not to remove the cylinder head side cover, which covers the camshaft chain and sprockets, you can move the sprockets into the cover as far as it will go and remove the shafts from them.
- Remove the spark plugs. First, insert the oil dipstick into the spark plug hole until the end touches the piston. After this, carefully rotate the pulley until the dipstick stops before lowering.
- Using a marker or paint, make marks on the sprockets and chain, fixing the required position of the teeth in the chain. This way, when reassembling, you will be able to correctly return the chain to the teeth on which it was located before dismantling.
- Unscrew the sprockets using an open-end or socket wrench. To prevent the cylinders from turning, secure the large pulley below the wheel with a key.
- Remove the shaft mounting yokes. The one next to the stars is removed first. Next, all the others are removed, adhering to the order of weakening. Place all the elements on a rag in the order in which you removed them. This way you won't get confused when reassembling.
Replacement procedure
- Remove the stars from their nests. The first one is easily removed in the area of the cylinder head side cover, if you remove the shaft position sensor first. It is held on by one bolt, so there should be no problems here.
- Having freed the shafts from the yokes, lift them a little using a flat-head screwdriver, and then remove them from the sprockets.
- After removing the shafts, remove the near sprocket and secure the chain with a slight tension.
- Next, the valve cups are dismantled. They are shiny, so it is difficult to confuse them. Although no cup holders are used, removing them can be a problem. They stick from the inside. Try using a powerful magnet.
- Remove the springs. To do this, you will need to loosen the valves on cylinders 1 and 4. This is due to the fact that on them the piston is at TDC. Secure the outer bracket with a bolt using a suitable hole in the block head. Using the second bracket, jerk the washer until it stops. The crackers should come free, after which you carefully remove them from their seats with a magnetized screwdriver.
- Remove the springs along with the washer. Place them on the table in the order in which you removed them. That's it, we finally got to our oil seals.
- Use pliers to remove the old seals. This can take quite a long time.
- Put on new oil seals, treating them with engine oil first.
- Press into place using a washer or tube of the required diameter.
- Put the springs back in place and dry them. Here you need to be as careful and attentive as possible. We recommend covering the engine with a rag. Having dried the valves of cylinders 1 and 4, move the pistons of cylinders 2 and 3 to TDC, then repeat the operation.
- Having dried the last valve, proceed to reassemble the unit. Here, strictly follow the reverse sequence.
Adjusting washer
I installed a tachograph with CIPF But in vain 1214, January 26, 2022 Print version
Then remove the steel bushing and adjusting washer, after which the trigger sector is carefully removed from the stop.
The outer end of the latter is clamped in the pocket of the adjusting washer 7, mounted on the fixed cover o. Concentric slots in the places where washer 7 is attached allow it to be rotated when adjusting the device. The reohord is included in the measuring circuit of an electronic bridge of the EMD type.
When installing the kingpin support bearing and adjusting washers, it is necessary to ensure an interference of 0 1 mm in the M 20 and Moskvich-400 cars, in the GAZ-5 car - with a gap of no more than 0 15 mm, in the ZIL-ISO car - 0 10 mm.
| Starter connection circuit for checking. |
The required amount of axial clearance is ensured by installing adjusting washers on the armature shaft journal on the drive side.
This gap should be equal to the thickness of the adjusting washer 2 plus the working stroke of the punch equal to 0 45 - 0 5 mm.
The axial clearance of the sector shaft is regulated by selecting an adjusting washer of a certain thickness.
Low pressure injection burners, which have an air adjusting washer, ignite with low gas pressure and a closed washer. During the ignition period, combustion occurs due to the secondary air available in the furnace of the unit. When torches appear at all burner fire holes, the gas pressure rises slightly and the air washer slowly opens. If the gas combustion is stable, the operator, observing the flame, alternately increases the gas pressure and opens the air washer until a mode is established that corresponds to the operating instructions.
Medium pressure injection burners, which have an air adjusting washer and ceramic combustion stabilizers, ignite with reduced gas pressure and a closed washer. Gas during this period also burns due to the air available in the firebox. If there is a stable flame at the burner mouth, the gas pressure rises slightly and the air washer slowly opens so that the stability of the flame is not disturbed. The transition to the design gas pressure mode and the supply of primary air in an amount that ensures complete combustion of the gas is allowed only after the ceramic stabilizer has been heated to a light red heat. With stable combustion stabilization using a ceramic slide or divider, the torch should come off the burner mouth and the gas should burn on the surface of the stabilizer. If a ceramic tunnel serves as a stabilizer, then the gas mainly burns in the tunnel and the flame should not be separated from it.
The air bubble is installed in the center of the scale using adjusting washers. Ball tilt indicators are installed on MKA series cranes. A steel ball is placed in a plastic case with a spherical bottom, hermetically sealed with a plexiglass lid and filled with oil. When the crane operates on an uneven site, the ball moves along the spherical bottom, indicating the slope of the crane. The pointer scale is backlit. Verify the pointer in the zero position of the ball using special screws, having first installed the tap on a strictly horizontal platform.
| Liquid tilt indicator. |
The air bubble is installed in the center of the scale using adjusting washers.
Disassembling the glass, selecting the total thickness of two adjusting washers, assembling the glass and checking the selection of washers are carried out in the same way as on a GAZ-51A car.
During the adjustment process, an additional weight in the form of an adjusting washer is placed under the balance screws for final balancing of the balance.
Correct tightening of the bearings is achieved by installing steel shims of different thicknesses or by grinding.
Replacement of VAZ valves.
Good afternoon dear readers. Having searched the Internet for information on replacing valves, I found practically nothing concrete. Therefore, I will try to explain in detail the entire valve replacement process.
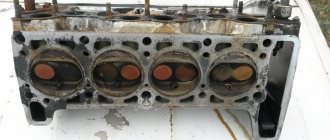
When the engine needs valve replacement. There are times when the timing belt breaks. Or the motor chain jumps (which I highlighted more than once). With such actions, on some engines the valves simply bend and their further operation is impossible. And they look something like this.
Next is wear on the valve stem. You need to measure the size with a micrometer. If the valve stem is smaller than 7.97 mm. This means it needs to be sent for repairs. How valves are repaired, we’ll talk about this a little below. And the last thing that can happen to the valve is a burnout or crack of the plate itself.
So, let's get down to business. First of all, we cannot do without a special tool with which we will remove the valves.
The replacement method is the same on classic VAZ models, on eights and the like.
Now we need to remove the camshaft from the head to gain access to the valves. I recommend that you read the article (Repair of G.B.Ts. VAZ), it contains a detailed and step-by-step explanation of how to do everything correctly, and you will also learn a lot of other useful information. After removing the camshaft, remove the pushers on the eights and the rocker on the classics.
We attach our device to the studs of the gas camshaft and, placing a small stand under the valve plate, remove the fastening crackers.
Be careful, the springs are very powerful and if the device comes off the plate, the springs will throw crackers, God only knows where, and then you will need to look for new crackers.
Once you have removed both crackers, remove the plate with the springs.
There are also thrust plates under the springs, which also need to be removed, but on classic models the plate can be removed immediately, and on models of the eighth generation and beyond only after removing the valve seal. To remove the oil seal, there is a special grip with which we remove it.
The removal process is as follows. Clamp the oil seal with a grip and press it a little. Pressing it, make as many turns to the right and left. At the moment of turning, pull the grip upward. You cannot bend the grip to the right and left with the clamp pressed, otherwise you can damage the seating collar of the oil seal on the guide sleeve.
Now all we have to do is pull out the old valves. If the valves are to be reused, they must be marked.
The marks are applied like this.
Marks are made at the end of the valve plate with a punch, the first cylinder has one mark for each valve, and so on. On the fourth cylinder the valves are not marked, because it’s already clear :).
Next, all we have to do is install new valves and put everything back together. How to properly replace valve seals, see the article on repairing the G.B.Ts. link at the top of the article. It is also worth checking the condition of the valve guides; if replacement is required, the article (Replacing VAZ valve guides) will help you with this. I also recommend that you read the article (Lapping in VAZ valves).
And finally, I almost forgot. Now let's talk about valve repair. Nowadays, I would say that finding high-quality valves is very difficult. I saw how a head, after repair, traveled ten thousand and became unusable to such an extent as if one and a half million kilometers had been driven on it. The wear and tear was simply stunning. Therefore, if anyone has the opportunity (fortunately, this is available nowadays), old valves can be chrome-plated and then ground to the desired size. Old valves are one hundred percent high quality, and it is not advisable to throw them away. I repeat, if you have the opportunity to go around the factories and ask the craftsmen if they can do such work, this will be the best option.
How to adjust valves on VAZ 2108-VAZ 21099?
Note! The adjustment can only be made when the car’s engine is warm (+20 °C and above), so if it’s winter outside or you live in a cold climate, be sure to warm up the engine first and then quickly adjust the car’s valves before it has completely cooled down, but there is one nuance here, for adjustment you will either need to initially stock up on adjusting washers with the help of which the adjustment is carried out, but you don’t know what sizes of washers exactly are needed (The washers just need to be removed first and only then look at their sizes and select according they are new, so take into account the fact that you will need a second car or a taxi in order to get to the car shop for these new washers and buy them) and therefore we do not recommend adjusting the valves in this way, it is better to find a warm place where the car will stand you and as this happens the engine will warm up to room temperature, at which the valves can be adjusted!
1) First, remove this very cylinder head cover from the car engine, but before removing it, stock up on all this with a new cylinder head cover gasket, because the old one always shrinks and deteriorates (cracks, deforms) over time, and in more detail For information on how to remove this cover from the engine, read the article: “Replacing the cylinder head cover gasket on a car.”
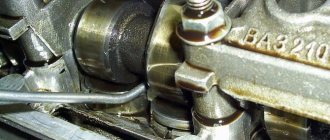
2) Now unscrew the two side bolts and one central one using wrenches or a socket wrench as shown in the photo below, as soon as the bolts are unscrewed as indicated by the arrows, remove the plastic cover and set it aside, after which you will have to align it with each other two marks, namely the camshaft pulley mark (Indicated by a blue arrow) and the mark on the rear cover (Indicated by a green arrow), in order to combine them there are many ways, we recommend that you use this, firstly, hang up any one of the front wheels and turn on the fourth gear, immediately after this turn the wheel forward as the car moves, you need to turn it until these two marks are connected, besides this there is another way and it is as follows, also turn on fourth gear and slowly move the car on your own until the marks are aligned, well, the very last method that many of you will prefer is the following, take a hefty wrench in your hands (a wrench with a large socket head is most convenient) and with its help, turn the bolt clockwise that secures the crankshaft pulley, This bolt is located very low and for clarity in the next photo after the bottom one it is indicated by a yellow arrow.
Note! You can turn the crankshaft to set the two marks only by turning the crankshaft pulley (Indicated by number 3) and the generator pulley (Indicated by number 2), turning the crankshaft by rotating the camshaft pulley (Indicated by number 1) is prohibited, so do not touch its mounting bolt and turn it the crankshaft only by two other pulleys, in addition to making it easier for the crankshaft pulley to rotate (This is when you turn the bolt using a healthy wrench), remove all four spark plugs and it will be much easier for you to turn the crankshaft, for more details on how to turn out the spark plugs, read in the article: “Replacing spark plugs on a car”!
3) Then, with a clean cloth or something similar, wipe the cylinder head, namely the place where the valve pushers are located (Wipe near them, we talked a little earlier about where these pushers are located) to remove all remaining oil from them, this is necessary for more convenient work, as soon as the work is done, turn the crankshaft another 40-50° (This is specifically about the crankshaft, do not confuse it with the camshaft) and thus the camshaft cams and pushers will have the same gap that you need will check you, and in this case you need to check the gap only at the first, second, third and fifth valves (Where these valves are located, see in the second photo, starting from the top), for exhaust valves it should be equal to (0.35+0.05) mm ( Exhaust valves are the first, fourth, fifth and eighth, be sure to remember this), and for the intake valves (0.2+0.05) mm (Intake valves are the second, third, sixth and seventh), as soon as the clearances of the required valves are checked (They are checked using special feeler gauges, which will need to be inserted one at a time of different thicknesses between the camshaft cam, which is indicated by the red arrow, and between the adjusting washer, which is indicated by the blue arrow), rotate the crankshaft exactly 360° (This is one full turn) and check and, if necessary, adjust the clearances of the fourth, sixth, seventh and eighth valves in exactly the same way.
Note! The valve clearances are adjusted, as we said earlier, using adjusting washers; for clarity, the photo below shows one such washer; if you look closely at the place indicated by the arrow, there is an inscription that says what thickness this washer has (3.82 per it’s written on it), but yours may have a completely different thickness, which won’t even be close to these numbers, so no one knows which washers need to be inserted when adjusting the valves, and therefore the old ones have to be removed and new ones selected using the calculation method, we’ll explain in more detail , this washer is removed (read about how to do this in point 4 below), but this is done only if the gap at the valve and camshaft cam exceeds the permissible standards, so as soon as you checked all the valves using special feeler gauges and found there are several that have a gap that is too large, take out these washers and the first thing you do is measure their thickness with a micrometer (it’s just that the values are not always written correctly on the washers or it can even be erased), after which you have a value for example 3.90, remember what the gap is has a valve from which you took out this washer 0.50 for example and add these two values and you get a number (4.4), from this number you need to subtract the gap that is needed for this particular valve (The permissible gap for all cars, as we indicated earlier, equals “0.2+0.05” mm for the intake valve, and “0.35+0.05” mm for the exhaust valve), so we take and calculate from the resulting value 4.4 (For example, we have an exhaust valve) the value 0.2 and we get 4.2 mm , thus you have found the value that your new shim should have!
4) To remove the washer you don’t need a lot of work, it’s easy to do, the main thing is to know how, in general you will have to press the valve pusher with something and thereby push it down a little, in this case a gap will appear through which you can remove the adjusting washer, by the way to make it easier, take it out with a screwdriver or, even better, with tweezers, you will need to pick it up in those places where there are grooves on the pusher (Indicated by arrows in the small photo) and then pull it out of the pusher and replace it with a new one, also drowning it this pusher and inserting a new washer there, but only insert the washer down with the value (There is a value on the washer, we talked about it a little higher, this value indicates how thick the adjusting washer is), otherwise it will be erased and you will not understand later without a micrometer what thickness is your washer, but we generally recommend only measuring them with a micrometer, since sometimes the values they write are not even correct.
Note! By the way, the pusher rotates, so to make these grooves fit more conveniently for you, turn it until the grooves are looking at you, as soon as you turn it, press the pusher itself and remove the adjusting washer after that!
One more thing, be sure to check after the work done whether the valves were adjusted correctly or not, using the same adjustment probes and, if necessary, adjust them again!
Additional video clip: To learn more about the process of adjusting the valves and generally understand how these washers are removed, how they are selected, etc., watch all this information in the interesting video just below:
Note! In general, it is better to approach any work with the phrase, the more I know, the better the job I will do, so watch another video from Zhenya Travnikov, in which he also explains how to adjust the valves and also talks about how to understand if there is a gap between the valves and cams of the camshaft were not set correctly for a long time, in general, watch the video and delve into it, but start watching from the 17th minute, because at the beginning it is explained how to change the timing belt on a car, and you hardly need this!
The main problem in which valves have to be changed on VAZ 2114-2115 cars is their burnout. These cases are quite rare, but still occur. This happens for various reasons:
- low-quality fuel regularly poured into the car
- operation of the vehicle on PROPANE without appropriate changes to the controller firmware
- Incorrect spark plug heat rating
- constant engine detonation, or more precisely, its causes
- regular driving at high speeds (maximum permissible)
Of course, not all factors that can affect valve burnout were listed above, but the main points are still presented. There is one more time when it will be necessary to change the valves - if they are bent when they meet the pistons. But here - ATTENTION! On standard VAZ 2114 engines with 8-valve cylinder heads, this cannot happen in principle.
But if you have a 16-valve engine installed, which happens even on late factory models, then a broken timing belt can lead to dire consequences. Below we will briefly discuss the replacement procedure, with photo reports on repairs based on personal experience.
Symptoms of a problem
If the valves have not been adjusted properly, a characteristic clattering sound appears when the engine starts. This rather loud noise comes from under the block cover. You can hear it especially well when the speed increases.
If the valve clearance is significantly larger than specified, the loud clatter becomes more distinct, and noise appears even at low engine speeds.
Adjustment
To adjust the gap, you must use the appropriate shims. They are installed on top of the valve tappets.
If you choose the right shim using trial and error, you can return the clearance to optimal values, thereby restoring normal engine operation.
There are certain standards regarding clearance sizes depending on the valve.
Valve type
Normal clearance
Tolerance
Adjustment process
Adjusting the gaps yourself is not difficult. Just follow the instructions provided, as well as video tips and visual demonstrations of the process.
- Remove the unit cover and clean the surfaces with a clean rag. You need to remove traces of engine oil.
- Place a device for recessing the valve tappets on the cover fastener studs. This is the most common lever with a handle.
- Set the piston of the first cylinder to the TDC position - top dead center. To do this, remove the camshaft drive belt cover and rotate the crankshaft as it rotates. The marks on the camshaft drive gear and the rear gear cover must match. If you remove a couple of spark plugs, it will be easier to turn the crankshaft.
- After aligning the marks, the crankshaft rotates about another 50 degrees, no more. This will allow you to unscrew the camshaft cam from the valve lifters.
- Using a feeler gauge, check the condition of the gaps on valves 1-3 and 5. If the gap differs from the required one, return the required parameters by replacing the adjusting washers.
- To adjust the clearances, the pushrods are recessed a little so that you can release the shims. The pushers are recessed by pressing the lever. Do not let go and lock it in the desired position. Be sure to place the clamp so that it is between the edge of the pusher and the camshaft.
Checking the quality of work
After completing the repair, it is necessary to check the operation of the engine. First, we install all the dismantled elements in place and screw in the spark plugs. After starting the engine, there should be no knocking of valves or other extraneous noise. We recommend carrying out checks for 15-20 minutes - this will ensure that the cylinders are operating normally even after heating.
It is not difficult to adjust the valves on the VAZ-2109 model yourself. You can do this work yourself, the main thing is to have a special kit and a couple of hours of free time. Using step-by-step instructions and an adjustment diagram, you will do the job efficiently and save on a trip to the car service center.
Problematic seals
In addition to adjusting the valves, it is extremely important to check the current condition of the seals.
Valve seals are designed to prevent excess engine oil from leaking through. In ideal operating condition, they seal tightly against the valve and allow only the amount of oil to flow through to provide effective lubrication.
Valve seals
They sometimes have to be changed, since the rubber used to make oil seals ages over time and loses its elasticity. As a result, the oil seal leaks more oil than required. Engine oil consumption increases, problems arise in the lubrication system and more.
Therefore, we offer you instructions on how to replace them.
- The work begins with the obligatory removal of the negative terminal from the battery.
- Disconnect the contacts from the ignition coil and move them aside. It is better not to unscrew the spark plugs, otherwise you risk providing the cylinders with an impressive amount of dirt during the repair process.
- Disconnect a pair of rubber tubes from the valve cover. Loosen the valve cover mounting screws and unscrew them. Subsequently, put all small parts, nuts, bolts in a separate jar so as not to lose anything.
- Remove the valve cover and a pair of gaskets. It is best to replace these gaskets immediately.
- In order not to remove the cylinder head side cover, which covers the camshaft chain and sprockets, you can move the sprockets into the cover as far as it will go and remove the shafts from them.
- Remove the spark plugs. First, insert the oil dipstick into the spark plug hole until the end touches the piston. After this, carefully rotate the pulley until the dipstick stops before lowering.
- Using a marker or paint, make marks on the sprockets and chain, fixing the required position of the teeth in the chain. This way, when reassembling, you will be able to correctly return the chain to the teeth on which it was located before dismantling.
- Unscrew the sprockets using an open-end or socket wrench. To prevent the cylinders from turning, secure the large pulley below the wheel with a key.
- Remove the shaft mounting yokes. The one next to the stars is removed first. Next, all the others are removed, adhering to the order of weakening. Place all the elements on a rag in the order in which you removed them. This way you won't get confused when reassembling.
Replacement procedure
- Remove the stars from their nests. The first one is easily removed in the area of the cylinder head side cover, if you remove the shaft position sensor first. It is held on by one bolt, so there should be no problems here.
- Having freed the shafts from the yokes, lift them a little using a flat-head screwdriver, and then remove them from the sprockets.
- After removing the shafts, remove the near sprocket and secure the chain with a slight tension.
- Next, the valve cups are dismantled. They are shiny, so it is difficult to confuse them. Although no cup holders are used, removing them can be a problem. They stick from the inside. Try using a powerful magnet.
- Remove the springs. To do this, you will need to loosen the valves on cylinders 1 and 4. This is due to the fact that on them the piston is at TDC. Secure the outer bracket with a bolt using a suitable hole in the block head. Using the second bracket, jerk the washer until it stops. The crackers should come free, after which you carefully remove them from their seats with a magnetized screwdriver.
- Remove the springs along with the washer. Place them on the table in the order in which you removed them. That's it, we finally got to our oil seals.
- Use pliers to remove the old seals. This can take quite a long time.
- Put on new oil seals, treating them with engine oil first.
- Press into place using a washer or tube of the required diameter.
- Put the springs back in place and dry them. Here you need to be as careful and attentive as possible. We recommend covering the engine with a rag. Having dried the valves of cylinders 1 and 4, move the pistons of cylinders 2 and 3 to TDC, then repeat the operation.
- Having dried the last valve, proceed to reassemble the unit. Here, strictly follow the reverse sequence.
Reassembly often causes problems for those who do not take into account useful tips during disassembly of the unit - marking, arranging dismantled parts in sequence, storing fasteners in separate containers, etc.
Adjusting the valves and changing the seals on them is not the easiest task, but it can be done with your own hands. Be patient and follow the instructions.
Step-by-step adjustment
Checking and adjusting valves is a simple job that everyone without exception can handle if they follow the instructions exactly:
- First of all, you need to remove the cover from the cylinder head.
- Remove the protective front cover from the timing belt.
- The candles are unscrewed. For more convenient unscrewing of spark plugs, it is recommended to use an open-end wrench of the appropriate size.
- Excess automobile oil is carefully removed from the top of the head.
- The integrity of the cams is carefully inspected. If during inspection any defects are found on these elements, they must be eliminated.
- A special device is installed on the studs to which the head is fixed to help recess the pushers.
- Next, you need to turn the crankshaft strictly clockwise until the mark on the rear cover of the timing belt and the pulley coincide. After the mark matches, you need to rotate the crankshaft 50 degrees.
- Using a set of feeler gauges, the clearance of the 1st exhaust valve and the 3rd intake valve is checked, the count should be taken from the pulley.
- If the gap dimensions correspond to the indicators that were previously given, then the following is done:
the pushers are recessed and fixed at the lowest point; the washer for adjusting the gap is removed and its thickness is measured using a micrometer; Having decided on the desired thickness of the washer, you need to take a suitable element from the kit and install it in the pusher
In this case, it is important to ensure that the washer enters the pusher with the side on which its thickness is indicated; The gap dimensions are re-checked.
- The remaining valves are adjusted according to the same scheme, each time you need to turn the crankshaft half a turn, and the adjustment sequence should occur in this order:
- 2nd inlet and 5th outlet;
- 6th inlet and 8th outlet;
- 7th inlet and 4th outlet.
Step-by-step steps for replacing valve stem seals on a VAZ 2109
Replacing valve stem seals (valve seals) for VAZ 2108–2109 vehicles is carried out in the same way. The need for such an operation arises due to natural wear and tear or poor quality of parts. Valve seals are exposed to aggressive environments and varied temperature conditions. If necessary, not just one individual cap is replaced, but the entire group.
Reasons for adjusting valves on VAZ 2109 cars
The operation of any internal combustion engine is associated with high temperatures. Thermal expansion increases or decreases valve clearances relative to factory settings. This disrupts the normal operation of the timing system.
Modern engines are usually equipped with hydraulic compensators, which “automatically” set the valve clearance optimal for the current engine temperature. 8-valve engines produced by the Tolyatti Automobile Plant do not have such a device, so problems are possible.
1. If there is excessive clearance, the valve collides with the camshaft cam while moving the rod. A mechanical impact occurs, due to which the wear rate of parts increases many times over.
2. Insufficient clearance leads to the appearance of a gap. This situation is especially dangerous, since the penetration of hot crankcase gases into the cylinder head can cause burnout of valves, depressurization of seals and other problems that can only be corrected by a major engine overhaul.
Functional purpose, causes and signs of wear
Oil seals are an important part that ensures productive engine operation. Valve seals serve to lubricate the gas distribution mechanism. They prevent oil from leaking and entering the combustion chamber. The caps remove oil from the moving valve.
Valve seals separate two working areas of the engine: the cylinder head and the combustion chamber. The upper part of the cap is constantly in the area of intense movement of lubricant of the VAZ 2109 engine. The lower part is in contact with the combustible fuel mixture and gas waste. Therefore, the caps are subject to intense loads.
The rubber elements of the seals lose their elasticity and delaminate. As a result, oil flows through the valve into the combustion chamber and onto the spark plugs. The wear of oil seals accelerates when they are made of low-quality materials.
It is impossible to visually verify the working condition of the VAZ 2109 oil seals. These parts are hidden and are not easy to get to. Indirect signs indicate that there are problems with the seals:
- excess oil consumption; thick bluish-blue smoke from the exhaust pipe; oily coating on candles.
Valve location
In the VAZ-2109 model, the designers changed the previously familiar system with a camshaft chain drive. Despite the simplicity of the old design, it was noisy and required additional adjustments after a short period of time. In the nines, the shape of the upper part of the piston was changed, and special recesses were added for the valves. An important adjustment task is also to align the camshaft and crankshaft on the same axis so that they rotate together.
The intake and exhaust valves are located in a certain order, this should be taken into account when adjusting
How to make a replacement
Replacing oil seals in a VAZ 2109 engine is a relatively labor-intensive procedure that requires special skills and certain tools. It is advisable to carry it out in a garage or workshop. Allow enough time for work so as not to rush. Replacing oil seals in a VAZ 2109 engine requires care, precision, and attentiveness.
Prepare everything you need
Successful replacement of valve stem seals can be done with your own hands. But this will require more than just a simple set of keys. You will have to take care of preparing special devices. Before starting work, you must equip:
- tin (or soft metal) rod with a diameter of no more than 8 mm;
- desiccant;
- tweezers;
- hammer;
- set of keys, socket heads;
- pliers;
- collet (puller) for removing oil seals;
- flat screwdrivers;
- press-fit frame.
Step by Step Actions
You can change the valve seals by removing the cylinder head (cylinder head). Some experts claim that this is the only and most reliable way. However, in practice, most car enthusiasts ignore this belief and change oil seals without dismantling the cylinder head.
First, preparatory work is carried out:
- disconnect the negative terminal;
- remove the gear from the camshaft by carefully pulling out the key;
- by unscrewing the bolts located around the perimeter, dismantle the cylinder head cover (front);
- remove the back part of the cover (ignition distributor plug);
- remove the camshaft with oil seal.
- turn the crankshaft so that the piston under the cap being replaced reaches top dead center; having unscrewed the spark plug, insert a tin rod into the hole to prevent the valve from falling out;
- using a desiccant, the springs are removed from the valve;
- remove the crackers using tweezers;
- take out the upper spring plate, inner and outer valve springs;
- put the collet on the cap, dismantling it; craftsmen carry out this operation with pliers or screwdrivers;
- before installing a new cap, remove the spring from it;
- the prepared cap is dipped in engine oil and inserted into the mandrel;
- carefully press the cap until it rests on the bottom plate;
- return the spring from the cap to its place;
- the remaining valve seals are changed in the same way;
- replacement ends with the assembly of components and parts in the reverse order of removal;
- the rod is removed from the spark plug hole;
- after installing the crackers, substituting a metal rod, hit the valve ends with a hammer - the crackers are seated in place;
- when installing the camshaft, monitor the direction of the cams of the 1st cylinder - they should “look” in the direction opposite to the valve tappets;
- When reinstalling, all rubbing parts are lubricated with engine oil.
For better clarity, you can watch a video showing the replacement of valve seals in a VAZ engine. The demo video will present all the steps, after going through which you can change these important details yourself.
Adjusting valves 2109, replacing them and adjusting clearances
Lada Vesta Logbook 5. Installed 17th wheels
Adjusting the valves of the VAZ 2109, its technology and features, is of interest, naturally, only to the owners of this VAZ model. However, the principle of operation is universal and familiarization with it will not hurt anyone.
How to adjust valves 2109?
Video tips for adjusting valves on a VAZ 2109
In internal combustion engines, which are installed in cars and other cars, a fairly large number of parts are made in such a way that the thermal expansion of the metal in no way affects their performance. First of all, this concerns the thermal gaps between the timing valve stems and the elements exerting pressure on them. Which experienced car enthusiast does not know the procedure for setting valve thermal clearances?
Adjusting the valves is also inevitable, because thanks to this procedure you can achieve fuel economy, get maximum power from the engine and simply have a comfortable ride. Everyone knows that when the gap is increased, a characteristic annoying ringing comes from the motor.
Adjustment of valves 2109 is necessary to ensure that there is a thermal gap between the end of the valve and the cam - 0.2 mm for the intake valve and 0.35 mm for the exhaust valve. The error during regulation should not be more than 0.05 mm. If the gap is too large, the valve does not open completely, as a result of which not all of the fuel mixture enters the cylinder, and the exhaust gases are poorly removed. There is no gap, which means the valve does not close the window.
What do you need to know if you need to adjust the VAZ 2109 valves?
Valve adjustment - video
The design of the gas distribution mechanism in cars of the ninth series is significantly simplified in comparison with “classic” Zhiguli engines. The camshaft lobes apply pressure directly to the end of the valve through the adjusting plate. There are no rocker arms or other transmission elements here. Sets of washers of various thicknesses are available for sale. Regulating the thermal gap comes down to choosing a washer of the required thickness.
The gap size is determined using special calibrated probes, which are also commercially available. In addition, you will have to purchase a special device for recessing the valve pushers, because without it it is impossible to remove or install the washer. Such an acquisition will not be superfluous, because regulation is carried out after the VAZ 2109 valves have been replaced and after a mileage of 25 - 30 thousand km.
At the stage of preparation for adjustment, it is also necessary to perform several operations:
- Prepare a set of keys and a jack;
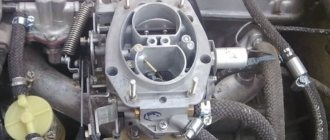
- remove the cover and the carburetor air filter;
- install a device for recessing the pushers on the head.
Features of the technological adjustment process
First, you need to determine which of the valves are inlet and which are exhaust, because their gap sizes are different. That is, we need to know elementary . Counting from the camshaft drive, the exhaust valves are located in the order: 1-4-5-8, and the intake valves: 2-3-6-7.
The clearance can only be adjusted when the camshaft cam is at the top and the valve is completely closed. This can be achieved by turning the camshaft.
First you need to align the marks on the sprocket and the drive cover. The piston in the first cylinder will be at top dead center, from which it will be necessary to rotate the shaft 45 degrees (+2-3 teeth). It is better to write down the adjustment procedure on a sheet of paper in advance.
The adjustment itself occurs as follows. A feeler gauge of the appropriate size is inserted between the washer and the camshaft (the feeler gauge should enter with little resistance). If it fits in without difficulty or, conversely, does not fit into the gap, the washer must be replaced. We recess the pusher and insert the lock so that it does not interfere with the removal of the washer. The washer is removed from the pusher and another one (thicker or thinner) is installed in its place. The thickness of the washer is written on one side.
Experienced drivers can figure out which washer needs to be installed the first time, but this skill only comes with practice. All other car enthusiasts are doomed to insert and remove washers of different sizes until the required gap is set.
When do you need to change seals?
The fact that they have fallen into disrepair is evidenced by:
- high oil consumption, with no signs of leakage;
- increased fuel consumption;
- traces of grease on the spark plug contacts.
Moreover, the last point is the most reliable evidence of oil seal failure for the simple reason that there is simply nowhere else for the oil to appear.
Regardless of whether you have an injector or a carburetor in your car, the seals are changed in the same way. The only thing that owners of the latter should know is that before starting work you will need to first dismantle:
- gasoline pump;
- Air filter;
- generator drive housing;
- distributor.
Valve clearance adjuster
A more effective and efficient way to adjust the valve mechanisms of the power unit is to adjust them using a device, which is a special rail with an indicator attached to it. This adjustment is much more accurate manually, since when using the device, it detects and takes into account all defects on the surface of the adjustable parts.
For mechanical adjustment, in addition to dismantling the cylinder head cover, you will additionally have to remove the accelerator drive, the protective shield on the ignition distributor, the exhaust hose from the crankcase, and for carburetor cars, the carburetor “pan”.
Using a special wrench, you need to rotate the crankshaft until the marks on the camshaft sprocket align (this is described above). To make this process easier, you can use a bright marker to mark the camshaft sprocket every 90 degrees. After that, we install the device rail on the valve being tested and fix it in a stationary state. We put an indicator on it and place its foot on the edge of the adjustable valve. To correctly perform this procedure, you will need a special grip, with which you need to clamp the cam and pull it up (a simple wrench will do). As a result, the indicator readings should deviate by 52 divisions. If they are slightly too low or too high, the valve needs to be adjusted. And then everything is extremely simple:
- using a 17mm wrench, loosen the locknut on the adjusting screw;
- the gap is adjusted with a key of 13, and all readings are clearly reflected on the indicator scale;
- the adjustment is checked and the locknut is tightened;
- At the end of the stage, it is again necessary to check the correct settings of the valve mechanism.
As you can see, this adjustment is much more accurate and simpler. But we should not forget that a highly qualified specialist will perform it at a high level and using a standard set of probes. In conclusion, it is worth emphasizing that most sets of feeler gauges contain an adjustment diagram that contains data on the angles of rotation of the camshaft and crankshaft, indicating the numbers of cylinders and valves.
Lada 2114 1.6 8V washer Logbook Adjusting the valves of the VAZ 2114
I’ll say one thing right away, guys, I advise you to adjust the valves yourself, if you change the oil in the internal combustion engine yourself, then you can handle it too. Personally, I went to the service center for adjustment twice, in one, as soon as I arrived, they started to remove the cap and adjust, in the other, without bothering in what position the shaft cams were adjusted. and besides, the money they charge is not trivial, sometimes 500 rubles, sometimes 1200 rubles. I'm tired of it, and from now on I always do it myself. This is the second time, with my own hands)))
A few more words, patience, we’ll soon get to practice))) I’ll say right away, I allocated 2 days for this matter. One day, when I arrived from work, I took off the valve cover and left the engine to cool overnight. In the morning of the second day, I started adjusting.
and so, what do we need from material and tools: 1) a device for adjusting valves (rod, flag, handle for recessing the pusher) 215 rubles. 2) feeler gauges for checking clearances 75 rubles. 3) syringe (for pumping oil out of the valve groove) 4) pliers (medical or manicure ones will do) 5) adjusting washers (buy after calculating the gaps) 6) valve gasket. covers. 120р7) pen, piece of paper8) wrench 10 and 89) screwdriver
a few more words about the gasket, probably everyone who has taken off the valve cover is familiar with the situation of oil snot coming out from under it, well, I had the same thing, I bought ordinary black gaskets, but then I came across information that there is a miracle gasket from the Balakovo company (BRT, RTI) red, silicone, I found it, bought it and it’s true, I’ve been driving it for two days now and there’s not a hint of smudges. I advise you, here is a photo of her.
1) remove the valve cover. 2) bring together the marks of the camshaft pulley and the rear timing cover 3) the sequence of checking the gaps is as follows, I will write the valve number as the first digit, the second is the number of teeth that will need to be moved relative to the marks of the camshaft and rear cover clockwise (photo example checking the clearance of valves 1 and 3):