Despite the fact that the VAZ 2107 has long been out of production, however, due to its ease of maintenance and unpretentiousness in repairs, it remains one of the popular cars among the population in its class. The fact that most cars are not new requires increased attention to their technical condition. When carrying out maintenance, it is also worth assessing the condition of the driveshaft.
In accordance with the instructions, lubrication of the splines of the driveshaft connection of the elastic coupling should be done every 10 thousand km.
The cardan shaft or cardan is one of the main parts of the VAZ 2107 car transmission, the main task of which is to transmit torque from the gearbox to the rear axle gearbox. Technically, the VAZ 2107 driveshaft consists of two components: a front driveshaft and an intermediate driveshaft, interconnected by a cross that allows them to rotate at a varying angle relative to each other.
Features of the mechanism
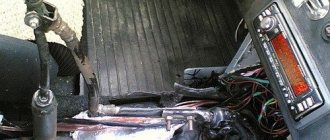
The driveshaft transmits the torque generated by the car's engine to the rear axle, causing the wheels to rotate. It is located under the bottom of the VAZ-2107 car, which is why you can find a raised floor in the cabin.
The cardan on the VAZ 2107 consists of two main parts, which are connected to each other using a cross. This design of the device is necessary because the rear suspension constantly “plays” when driving due to shock absorption. The device is a hollow tube, which is the “arm” connecting the engine to the wheels. Despite the simplicity of the product, the shaft, like other car parts, fails and requires repair or replacement.
Main cardan malfunctions
The main malfunction of the driveshaft is that elements such as the spider and the outboard bearing fail. It is these parts that are the most loaded. The crosspiece and bearing fail for a simple reason - lack of lubrication. Over time, it is necessary to periodically diagnose these elements with the obligatory addition of lubricants. In rare cases, a cardan malfunction may be associated with a defective crosspiece, which requires its replacement.
https://youtube.com/watch?v=yViVuF1_nt4
The malfunctions of the mechanism in question are as follows:
- failure of crosspieces;
- destruction of the outboard bearing;
- violation of the configuration (imbalance) of the shaft;
- breakage of flanges, splines and couplings, which happens under heavy loads;
- excess moisture and dirt inside the crosspieces.
At the slightest sign of malfunction, it is necessary to diagnose the mechanism and eliminate all resulting damage. The malfunction can be identified by the following signs:
- the appearance of a knocking sound when the clutch is engaged, which may indicate wear of the splines or damage to the elastic coupling;
- the occurrence of a grinding noise when the car is moving indicates a lack of lubrication;
- the appearance of vibration when the car is moving, which indicates a violation of the alignment of the product;
- knocking noise during sudden acceleration or braking, which indicates wear of the crosspieces.
We will discuss how to replace the VAZ 2107 driveshaft in the next paragraph.
The process of removing and replacing the cardan
The mechanism is removed for the purpose of carrying out repair work or replacing it with a new product.
Often the driveshaft itself is an unpretentious device, but it is important to periodically check the condition of the bearing, splines and crosses. These are the weak points that need to be periodically looked at and monitored for their condition.
Work on dismantling the cardan is carried out in the following order:
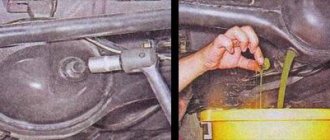
First, you need to secure the car by placing stops under the front wheels, and place the gearshift lever in the “neutral” position. Next, jack up the rear of the car, while suspending one of the drive wheels. We proceed to disconnect the device from the mount to the differential. To do this, you need to unscrew the 4 fastening nuts and then remove the bolts. After unscrewing the fastener, you can separate the product from the differential flange.
It remains to unscrew the two nuts securing the cross member on which the suspension bearing is mounted. After unscrewing, you can dismantle the cardan from the VAZ 2107. Using a wooden hammer, you need to knock out (if necessary) the shaft from the engagement of the splines with the elastic coupling. After the shaft is repaired or replaced, you can install it in place. The installation process is inversely proportional to removal
When installing the product, it is important to ensure that the shaft is positioned correctly.
What faults occur in this connection?
Of course, most often the most loaded elements fail: the universal joint and bearings. There are reasons for this: lack of necessary lubrication in the bearings and defects in the production of crosspieces. In the USSR, there was a terrible shortage of crosspieces: there is no crosspiece - the transmission is faulty - the car is stuck. Repairing the cardan shaft often cost a week's family budget, and replacing the crosspiece (or rather, the need for it) led many to despondency.
More rare transmission malfunctions of the VAZ 2107:
- Damage and misconfiguration (hitting rocks when driving in the mountains);
- Abundant amounts of dirt in parts and bearings;
- Failure of flanges, splines and couplings under load.
For lubrication, maintenance, if a part needs to be replaced, first of all, you need to properly remove it from the car and put it back. Repair of the driveshaft is also possible only after removal.
Which suspension bearing and crosspiece should I install on the VAZ Classic?
The original number of the outboard bearing is 2101-2202080, the average price is 330 rubles.
Analogues:
- SEVI 3103 — 426 rub.
- Trialli RM0133 — 471 rub.
- Master-sport 2101-2202080-ST-PCS-MS — 506 rub.
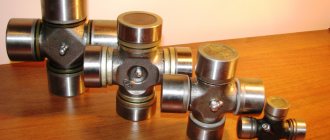
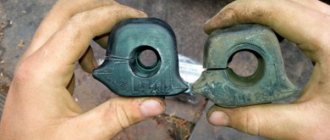
The original number of the cross is 2101-2202025, the average price is 260 rubles.
Analogues:
- Trialli CC506 — 212 rub.
- Toyo TU-51L — 350 rub.
- Zommer 21012202025 — 210 rub.
1
The parts needed for replacement are the bearing, spider and snap rings.
2
The set of tools is as follows: open-end wrenches for 12 and 13, socket wrenches for 13 and 27, pliers for removing retaining rings, a puller and an elastic coupling flange for replacing the outboard bearing, as well as a hammer and an adapter made of aluminum or copper.
3
Let's move on to removing the driveshaft from the car. Unscrew the nuts securing the propeller shaft to the rear axle shank.
4
First, using a 13mm wrench, unscrew the two bolts securing the suspension bearing to the transverse support.
5
After the cardan has been removed, not all of its parts need to be marked, so that in the future it can be assembled according to the applied marks in order to avoid its beating and vibration.
6
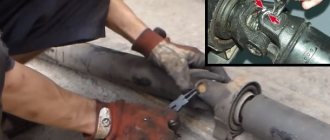
We change the cross. Using pliers, remove all retaining rings.
7
The cardan shaft must be installed in such a way that the crosspiece is suspended. Using a hammer and a mandrel, knock out the cup of the cross. A puller for cardan shaft crosspieces will allow you to do this faster and safer.
8
We unfold the cardan and take out the cup.
9
We repeat the same with the remaining cups of the cross, after which the eyes of the propeller shaft are cleaned of dirt and rust, as are the grooves for the retaining rings.
10
Remove two cups from opposite sides of the crosspiece and tuck the crosspiece into the eyes. Carefully, so as not to scatter the needles from the cup, move it to one side and put the cup on.
11
Using a soft metal adapter, we seat the cup until a groove for the retaining ring appears. Having installed the retaining ring, turn the cardan over. Carefully move the cross to meet the cup and put it on, in the same way we seat it until a groove appears. We install the retaining ring. The second part will be a little more difficult to assemble. The crosspiece has been replaced.
12
We are replacing the driveshaft outboard bearing. After removing the crosspiece, insert the splined end of the cardan into the flange of the elastic coupling.
13
From the other end, using a 27mm wrench, unscrew the nut securing the universal joint fork to the front shaft.
14
Use a puller to tighten the hinge fork.
15
after which we remove the outboard bearing from the shaft, for which you can use a puller after cutting off the outer ring of the outboard bearing. Or just try to knock him off the shaft. That's all, assembly is carried out in reverse order.
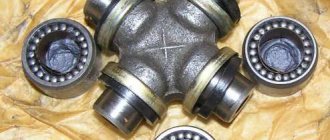
Assembling the VAZ 2107 crosspiece
We begin to install a new spare part; to do this, we remove the needle bearings from the crosspiece on two opposite sides.
Also pay special attention to whether there is grease in the bearings; if not, you can add a little. Lubricant for cardan crosspieces, as a rule, comes with a special one (“Fiol-2U”). If you purchased a crosspiece with a grease fitting or, as it is also called, a grease nipple, then you can lubricate it after installation using a special syringe.
If you purchased a crosspiece with a grease fitting or, as it is also called, a grease nipple, you can lubricate it after installation using a special syringe.
Attention! When assembling the driveshaft parts, do not forget about the marks you made, they must match.
We insert the crosspiece itself into the eyes of the propeller shaft, after which we carefully insert the bearing cups so that the bearing needles do not fall out.
Having inserted the bearing, you need to put it in its place so that you can insert the retaining ring. We do the same thing from different sides.
After the assembly of the VAZ 2107 crosspiece is completed, we proceed to install the driveshaft on the car and thoroughly tighten the bolts, at this point the replacement of the VAZ 2107 crosspiece is completed, and even more precisely, the entire repair can be considered complete.
After you have checked the technical condition of the driveshaft on a VAZ 2105 car and identified certain faults, you can begin to remove it for the purpose of subsequent repairs. To carry out repair work, prepare a standard set of tools and perform the following sequence of actions:
Place the car on a viewing hole, overpass or lifts. Then move the gear shift lever to the neutral position. Next, hang up the rear wheel.
- On a car with an injection engine, you must first remove the heat shield located above the catalytic converter. To do this, unscrew the nuts securing it to the body studs and remove it, carefully removing it from the space above the exhaust pipe.
- Next, using a core punch, make a mark on the flange of the drive gear of the rear axle gearbox relative to the driveline fork. So that during subsequent assembly the cardan can be installed in an identical position.
- Then clean the surface of the cardan fork mounting nuts from dirt and treat them with penetrating lubricant so that they can be unscrewed better.
- Secure the shaft from turning with a large flat screwdriver, while inserting the screwdriver in the place so that its rod also presses the head of the bolt, thereby securing it from turning.
- Using a thirteen-size open-end wrench, unscrew all the nuts securing the bolts and remove them.
- Tie the driveshaft with a wire to the body so that it does not sag when the supports are subsequently dismantled.
- Next, in the front part of the spline connection with the elastic coupling, use a flat screwdriver to straighten the tendrils of the oil seal cage.
- Now slide the race along the shaft.
- Unscrew the nuts securing the intermediate cardan support to the car body.
- Now you can remove the cardan towards the rear axle, disengaging it from the elastic coupling and first untying the retaining garter.
At this point, the repair work on removing the driveshaft on the VAZ 2105 has been completed. Make the necessary repairs, then install in reverse order.
Sources
- https://vaz-russia.ru/remont/remont-kardannogo-vala-na-vaz-2101-vaz-2107.html
- https://remontavtovaz.ru/vaz-2107/zamena-krestoviny-kardannogo-vala-vaz-2107.html
- https://remont-vaz2106.ru/vaz-2105-kak-snyat-kardannyj-val
Diagnostics
If you heard the characteristic sounds of a driveshaft malfunction, or sensed something was wrong based on the car’s behavior, you need to quickly understand the situation and determine the reasons. It is not necessary to go to a service station, since diagnosing and replacing the crosspiece on a VAZ 2107 can be done with your own hands.
To diagnose the problem you need to do the following:
- Drive the car into the pit and go down yourself.
- Pressing the flange leading to the gearbox with one hand, grab the shaft with the other;
- Make turns in different directions and listen to the sounds that appear. If you notice play in the connection, it means that the surfaces are seriously worn.
- Perform the work of replacing the crosspiece.
- In some cases, the play may go unnoticed. This happens if one bearing fails.
- Under such circumstances, trust your eyes by visually examining the mechanism.
- Arm yourself with a 13mm wrench and unscrew the driveshaft from the flange. Look at the condition of the entire unit.
- Do not forget to apply the installation marks during disassembly, which will allow you to reassemble the system in the correct sequence and according to the placed marks without any problems.
Replacing the suspension bearing for VAZ 2107, 2106.
1. Remove the crosspiece and remove the rear cardan.
2. Using a 27 socket, unscrew, but not completely, the nut of the front cardan fork.
3. Place the puller on the fork, resting it against the nut, and tighten the puller bolt to create a preload. If the fork does not move, we help it with light blows of a hammer. In this way, we gradually press the fork from the splines of the front cardan.
4. Using a 13mm wrench, unscrew the two bolts securing the outboard bearing to the plate.
5. We rest the pendant on the corners and knock it off the shaft through a spacer made of soft metal.
6. The cardan assembly is carried out in the reverse order.
7. Install the cardan in the reverse order, lubricate the splines with Fiol-1 or Fiol-2U or CV joint grease and align the marks made earlier.
8. After installing the splined part of the cardan into the flange of the elastic coupling, we assemble the seal ring. We move the clip forward and use a screwdriver to bend the locking tabs one by one.
Signs of malfunction of VAZ 2107 crosspieces
Malfunctions of crosspieces are usually associated with wear of the sealing collars and dirt getting inside the bearings, which, having abrasive properties, begins to destroy the metal. This manifests itself as follows.
- at a speed of about 90 km/h, characteristic impacts from below are felt;
- when the reverse gear is engaged, vibration appears;
- When the driveshaft swings from side to side, play is detected.
It is much easier to identify a faulty crosspiece on a removed cardan. If the bearings are damaged, the hinge will rotate poorly in one of the planes, and sounds resembling crunching or rustling will appear.
Clicking noise when starting
The first sign of a faulty universal joint is a loud clicking sound when turning on first gear at the start of movement. When such sounds, reminiscent of a clinking pan, appear, it is recommended to rotate the parts of the cardan in different directions with your hands, while holding the hinges. If large play is detected, the crosspieces must be replaced. It is noteworthy that sometimes clicks can appear only during a sharp start from a standstill, and when the movement begins smoothly, they may not appear.
Vibration
Often, if the crosspieces are faulty, vibration occurs when reversing. Sometimes it does not disappear even after replacing the crosspieces, but begins to appear at average speed. Moreover, the vibration may become even stronger than before replacing the CC. Such situations are a consequence of non-compliance with the alignment of the cardan elements during its assembly.
Sometimes vibration persists even after work has been done correctly. The reason for this is usually the use of low-quality products when replacing CC. Experts advise tapping the cups on all sides with a metal tube before installing new crosses. This will allow the stuck circlips to move and the vibration will go away.
Comments
Question
For some time, vibration appeared, it starts at a speed of 60 km/h and stops after 120. I replaced the outboard, replaced the gearbox. Doesn't stop. I climbed in myself. I removed the cardan and inspected it; the holes on the mounting of the pendant to the body were not fully bored out, because of this, the pendant is attached with tension and therefore with an inclination. Bore the holes. The hanging sat well. The vibration is gone. Traveled 20,000 km. Appeared again. It was not the wheels that sinned. It seems to have been balanced, the vibration has not disappeared. I changed from winter to summer tires, still the same. What you didn’t do doesn’t disappear. There is a slight play in the left rear axle shaft. Maybe because of this? Or maybe the spline joint of the cardan is not lubricated?
Your writing is interesting and lifelike.
Your writing is interesting and lifelike. Still, in order to make a truly interesting blog, you need to not only report something, but also do it in an interesting way.
Source
Choosing a universal joint for a VAZ 2107
I once had an argument with a mechanic. He argued that crosspieces should not have an oil nipple, since it provides an extra hole for dirt to enter. The hinge quickly becomes clogged and fails. I insisted that without a grease can there would be no way to lubricate the crosspiece - it was somewhat offensive, since before that I had found an almost new screw syringe for lubrication in my grandfather’s garage. “Why, if each part has its own resource,” my opponent answered, “if the lubricant runs out, change the part, especially since it is inexpensive
It is better to pay attention to the seals (O-rings). If they dry out, new lubricant will not save"
Indeed, it is so.
When purchasing new crosspieces for the VAZ 2107, you should be guided by the following points.
- CCs should not be too expensive, since they have to be changed quite often.
- Spare retaining rings must be included with the CC. On sale you can find kits without rings, consisting only of the cross itself and a rubber seal.
- For the VAZ 2107, old and new crosspieces are available. It is not recommended to install new reinforced crosspieces on old-style cardan forks - this will reduce the rigidity of the joints. “Sevens” produced after 1990 are equipped with modern driveshaft forks. On such cars you can safely install reinforced joints with additional stiffening ribs on the cups, an increased number of bearing needles (one more than in a conventional joint) and improved characteristics of the seals.
Reinforced crosspieces can be installed on VAZ 2107 produced after 1990
Among the manufacturers of crosspieces, the following companies have proven themselves to be the best:
- GKN (Germany);
- VolgaAvtoProm LLC;
- JSC AVTOVAZ.
Which crosspiece to choose
When choosing a crosspiece, pay attention to the presence of a grease nipple on it. By lubricating, you will extend its service life.
Selecting the cardan shaft cross
It wouldn’t hurt to conduct a small test of the part even in a store. To do this you will need a small piece of glass or a small mirror. We take the part under test out of the packaging and place it on the glass. Holding the opposite ends, try to shake the part, then do the same with the others. Then we turn the cross over and repeat the operation. If a knock is heard during the procedure, then there are serious doubts about the quality of the cross.
For me, the best option for installation is the Tolyati cross.
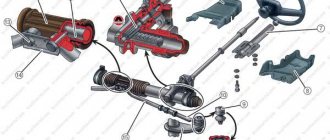
VAZ 2107 driveshaft design
The driveshaft of the VAZ 2107 consists of a pair of main parts connected by means of a cross. An elastic rubber coupling is attached to the front of the cardan, providing connection between the cardan and the gearbox. The rubber of the coupling absorbs shock loads, and the spline connection allows the driveshaft to move back and forth when the angle of inclination of its parts changes or vibrations of the engine and gearbox when driving over bumps and holes.
- Bolt securing the flexible coupling to the flange
- Transmission output shaft flange
- Rubber element of elastic coupling
- Flange centering sleeve
- Flexible coupling insert
- Flexible coupling bolt
- Front propeller shaft flange
- Oil seal cage
- Stuffing box
- Gearbox secondary shaft
- Mud deflector
- Flange nut
- Centering ring seal
- Front driveshaft
- Centering ring
- Retaining ring
- Intermediate support
- Cork
- Rubber bushing
- Spacer
- Rear driveshaft
- Flange universal joint yoke
- Elastic coupling
- Safety bracket
- Balance plate
- Intermediate support cross member
- Retaining ring
- Front propeller shaft fork
- Retaining ring
- Needle bearing
- Stuffing box
- Oil seal cage
- Universal joint fork
- Cross
- Fork fastening nut
- Intermediate support bracket
- Elastic cushion
- Bearing shell
- Bearing
- Dirt remover
The main parts of the cardan are made of hollow pipe, which minimizes its weight. Less mass (which means inertia) reduces the load on the engine and transmission parts of the car.
To avoid vibration when the cardan rotates, its parts are balanced at the factory using special equipment. To ensure balancing, weights of the required weight are attached to the outer surface of the cardan.
Balancing the driveshaft
Scheme of dynamic balancing of cardan transmission
If parts of the cardan transmission were replaced during repairs, then balancing is required.
Dynamic balancing of assembled cardan shafts is carried out on a special stand.
At a rotation speed of 91 s–1 (5500 min–1), the maximum permissible imbalance on supports A, B, C should not exceed 1.62 N mm (175 gf mm), and when checking balancing - 2.15 N mm (220 gf mm).
Balancing is achieved by welding metal plates.
Recommendations for independently replacing the VAZ 2107 suspension bearing
1. When operating a car, prevent the following causes of failure of the PP: – Excessive contamination, moisture ingress into the unit; – Lack of or dry lubricant; – Cardan imbalance; – Expiration of service life; – Loose fastenings and damage to the unit. – Replacement of factory parts with Chinese or defective analogues. 2. When replacing the ball bearing separately, look for the following manufacturers: VBF (Vologda), GPZ (Vologda), SPZ, Harp. 3. It is best to purchase replacement auto parts from trusted stores, service centers or directly from dealers. 4. When assembling the driveshaft, lubricate the threads with graphite grease. 5. After replacing the PP, it is advisable to measure the radial runout of the cardan
Didn't find the information you are looking for? on our forum.
We recommend reading:
Gasoline consumption VAZ 2112, city, highway, combined cycle
How to check current leakage on a VAZ 2110 car with a multimeter
VAZ 2107 speedometer drive gear, what drives are there, replacement
How to check injectors on a VAZ 2110
Replacing the CV joint on VAZ cars with your own hands
How to eliminate the smell of gasoline in the interior of a VAZ 2114 injector
How to remove the fuel rail on a VAZ 2112 16 valves
How to remove the intake manifold on a VAZ 2112 16 valves
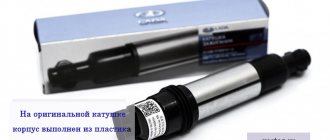
Elastic coupling for driveshaft VAZ 2107
The driveshaft of the VAZ 2107 consists of two parts (front and rear), connected to each other by a articulated coupling (cross). This design allows you to avoid loads on the shaft while driving, when the body and chassis of the car begin to “play.”
The VAZ 2107 cardan consists of front and rear shafts connected by a cross
The end of the rear shaft is connected to the axle gearbox, and the end of the front shaft is connected to the gearbox shaft. The connection to the gearbox is made through an elastic coupling, which is a kind of buffer for leveling shock and dynamic loads on the driveshaft and gearbox shaft.
The elastic coupling acts as a buffer, smoothing out dynamic loads
Flexible coupling location
The elastic coupling is located in the lower front part of the car on the rear side of the gearbox. You can see it if you remove the engine protection and climb under the car. The coupling is easily recognizable due to its hexagonal shape.
The clutch is located on the rear side of the gearbox in the lower front part of the car
Coupling design
The basis of the coupling is a cushion made of especially durable rubber. Along its circumference there are six steel bushings fused into rubber, through which the bolts connecting the cardan flanges and the gearbox secondary shaft pass. The coupling kit also includes a special tightening clamp, which is put on it during installation or dismantling.
The elastic coupling consists of a rubber base and six steel bushings located around the circumference
Diagnostics of elastic coupling faults
The coupling may fail as a result of:
- wear of metal bushings;
- body wear;
- rupture of the body.
In each of these cases, the malfunction will manifest itself in the form of body vibration and extraneous sounds coming from the gearbox.
The condition of the coupling can only be checked by inspecting it and assessing the size of the play between the flanges of the gearbox and cardan shafts. This is done as follows.
- The car is driven onto an overpass or inspection hole;
- The engine protection is removed;
- The coupling body is inspected and the condition of the bolted connection is assessed.
- By loosening the cardan, the presence or absence of play is determined.
If signs of wear or mechanical damage are found on the coupling body (the body is partially or completely torn), the part must be replaced. A slight play (provided the body is intact) is eliminated by tightening the nuts of the connecting bolts. If the play is large, the elastic coupling will have to be replaced with a new one.
Criteria for choosing a new coupling
Driveshaft couplings for the VAZ 2107 in Russia are produced under catalog numbers 2101–2202120 and 2101–2202120Р. The retail price of the part, depending on the manufacturer, ranges from 400 to 600 rubles.
Table: technical characteristics of the elastic coupling of the VAZ 2107 driveshaft
| Characteristics | Indicators |
| Length, mm | 140 |
| Width, mm | 140 |
| Height | 35 |
| Weight, g | 780 |
| Bending rigidity, Nm/deg | 3,14 |
| Torsional rigidity, Nm/deg | 22,5 |
| Rigidity during axial displacement, N/mm | 98 |
| Breaking load (not less), N | 4116 |
| Cyclic durability, cycles | not less than 700000 |
How to diagnose wear on crosspieces
Replacing the crosspiece in a VAZ 2106 is carried out after diagnostics:
When, during rapid acceleration or braking of a car, when changing gears, a knocking sound from the cardan transmission or vibration of the axle is heard, all this indicates wear of the crosspiece and its bearings
There is an urgent need to replace the VAZ 2106 crosspiece, which has become unusable.
If you don’t pay attention to these signs in time, then the result will be destruction of the bearing and the cardan falling out directly onto the road. The axle gearbox and the underbody of your car can also be damaged.
Buy a “VAZ” crosspiece, do not forget to purchase spare retaining rings (if they are not included in the kit), because old rings, as a rule, become deformed or break.
Tool required for replacement
Replacing the driveshaft crosspiece of a VAZ 2106 requires the following tools:
- Two open-end wrenches 13 and 12
- Socket wrenches 27 and 13
- Copper or aluminum extension
- Hammer
- Compression pliers with thin jaws to remove circlips
- Two mandrels for pressing out the cardan cross bearings.
- Universal puller
- Ticks
- Chisel
- Large screwdriver
We remove the cardan
Replacing the VAZ 2106 crosspiece with your own hands is not possible without removing the cardan from the car. So:
- We remove the cardan on a lift or inspection hole. Unhook the handbrake cable spring.
- Using a chisel, we apply marks at the junction of the cardan and the gearbox flange. Using a 13mm wrench, unscrew the nuts (there are four of them). Use a large screwdriver to secure the cardan shaft from rotating.
- Remove the rear end of the cardan.
Use a chisel to mark the position of the cardan and flange of the rubber coupling
- Then we bend the locking tendrils of the seal ring near the rubber coupling
- We move the cage with the seal together towards the propeller shaft
- Using a 13mm socket, unscrew the nuts and take out the safety bar
- Supporting the cardan, unscrew the nuts using a 13mm wrench and remove the plate securing the outboard bearing from the studs. It is attached to the body using rubber washers.
We pull the cardan out of the slots inside the rubber coupling flange and take it out
It is first recommended to watch how to replace the crosspiece of a VAZ 2106 video.
How to replace the cardan on a VAZ 2101-VAZ 2107?
Removal: 1) First, hang one of any rear wheels from the car. 2) Next, move the gearshift lever to the neutral position, and then lift the handbrake up until it stops.
3) Then unscrew the left and right nuts securing the bracket, and then remove it from the car body.
4) Next, unscrew the three nuts that secure the cardan coupling to the box flange.
5) Now, turning the cardan along its axis, remove all the bolts from the flange and coupling one by one.
Note! To make it easier to remove bolts from the flange and coupling, use a punch and a hammer!
6) Next, disconnect the cardan coupling from the box flange.
7) Then remove the four nuts that secure the rear driveshaft flange to the gearbox flange.
and then disconnect the flange of the rear part of the cardan from the gearbox flange.
Note! When unscrewing the nuts, for convenience, use a thick screwdriver to hold the cardan from turning!
9) Next, unscrew both nuts securing the cross member, and then remove the cross member from the body.
10) Now remove the cardan from the car body.
Installation: 1) Installation occurs in the reverse order of removal.
Note! When installing the cardan, make sure that all the coupling liners “2” fit into the grooves of the box flange “1” and “3”!
Important! 1) After you hang up one rear wheel, check with your hand whether the cardan rotates or not, if not, then lift the second rear wheel as well!
Removing the VAZ 2107 cardan
It is better to remove the cardan on a lift or inspection hole. In the latter case, it is necessary to secure the car wheel with boots and secure it with the handbrake so that the car does not roll away. Only after this can you begin dismantling.
The work is performed in the following sequence:
- unscrew the bolts connecting the cardan to the gearbox flange;
- unscrew the nuts securing the outboard bearing to the bottom of the car;
- Carefully, using a wooden hammer, knock the cardan out of the splines of the elastic coupling.
Tip: Before removing the universal joint, you must note its position relative to the rear axle flange and flexible coupling. It is also necessary to mark the relative positions of the cardan halves. This will simplify assembly and keep the assembly balanced. Otherwise, vibration may occur when the machine moves.
You need to knock on the cardan parts with a wooden hammer or use a regular hammer and a wooden spacer. Otherwise, the cardan pipes may be deformed.
Cardan malfunctions
The driveshaft of the VAZ 2107 wears out during operation under the influence of constant loads. The crosspiece is subject to the most wear. As a result, the cardan loses its original characteristics, vibration, knocking, etc. appear.
Vibration
Sometimes while driving a VAZ 2107, the body begins to vibrate. The reason for this usually lies in the driveline. This may be due to the installation of an initially poor quality shaft or incorrect assembly of the unit. Vibration can also appear due to mechanical impacts on the cardan when hitting obstacles or during an accident. This problem can also be a consequence of improper hardening of the metal.
There are many reasons leading to an imbalance in the cardan drive. Vibration may occur under heavy loads. In addition, the VAZ 2107 cardan can become deformed even if the vehicle is used infrequently. This will also lead to vibration. In such situations, balancing or replacing the unit is required, and the problem must be corrected immediately. Otherwise, vibration of the cardan can lead to destruction of the crosspieces and rear axle gearbox, and the cost of repairs will increase many times over.