Automotive injectors used in the engine fuel supply system are classified as very important and necessary elements. During their active use, gradual clogging occurs and signs of natural wear are observed.
The formation of a blockage does not mean that the injectors have completely failed, and these fuel nozzles must be replaced. Considering the quality of the fuel poured into the tank, as well as other provoking factors, the accumulation of contaminants that interfere with the normal operation of the injector is a completely natural and common phenomenon.
The car owner’s task is to monitor the condition of the injection system, identify signs of clogging in time, and clean it if necessary. If you ignore these recommendations, the situation may get out of control. This will lead to repairs or complete replacement of injectors, which implies a completely different level of financial costs.
Cleaning the fuel system - getting ready for winter
As a rule, experienced motorists begin to prepare their iron horse for winter in advance. Everyone has their own plan of preparatory measures; it all depends on the general condition of the car and the result that the car owner is aiming for. Some inspect the suspension and purchase new winter tires, while others prioritize the condition of the engine, preparing it for operation in sub-zero temperatures. In the second case, one of the most important procedures is cleaning the fuel system, since it will determine how stable and confident the car will operate and start in the winter.
Causes and signs of injector contamination
Most of the automobile engines produced today are equipped with a fuel injection system, one of the most important elements of which are injectors. Over a long period of operation, hundreds and tons of liters of fuel pass through them, which contains a huge amount of impurities - from solid particles to heavy hydrocarbon fractions and resinous substances. Naturally, all this leads to clogging and repair of injectors and changes in the parameters of its functionality. The first signs of contamination The very first symptoms that the injectors are clogged appear in the nature of the engine and the operation of the car. Among them, the most obvious signs are:
Main causes of pollution When operating a car in the Western European zone, the above symptoms will not necessarily indicate clogged injectors. Foreign manufacturers recommend not cleaning them, but simply changing them after the car has driven at least 120 thousand km. However, this rule does not work in the CIS countries. There is only one reason - low quality fuel. Therefore, domestic motorists have to clean their injectors every 15 thousand kilometers.
It is not possible for an individual car user to verify the reliability of fuel quality directly at the gas station. For this reason, you cannot insure your car against getting a bad fuel mixture into it. At the same time, the fuel itself can become contaminated before entering the gas tank for a number of reasons:
Changes in the fuel system when the injectors are clogged When the injectors are clogged, there is always a significant deterioration in the process of formation of the fuel-air mixture and the nature of its supply, expressed in the following manifestations:
Educational program
When talking about the fuel system, we meant the injection system itself, that is, the injector, since most cars are equipped with it.
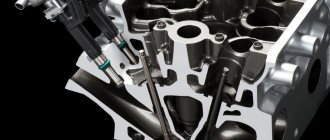
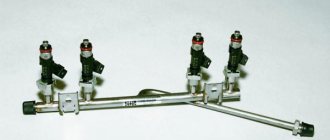
So, what is it: a fuel pump, a fuel line, a filter and a rail with injectors. We will talk about injectors, since these are the mechanisms that are responsible for injecting fuel into the combustion chamber. Fuel is supplied to the injector under a certain pressure (depending on the engine operating mode). Electrical impulses supplied to the injector solenoid from the control unit actuate the needle valve, which opens and closes the injector channel. The amount of fuel sprayed is proportional to the pulse duration specified by the control unit. The shape and direction of the spray torch play a significant role in the process of mixture formation and are determined by the number and location of the spray holes.
Causes and signs of injector contamination
Most modern cars are equipped with injection engines; the days of carburetor engines are gone forever.
Injection power plants are more economical, environmentally friendly and productive, but at the same time they have a more complex design and injection system, consisting of a pressure regulator, injectors equipped with an electromagnetic valve, a fuel line, a fuel rail, intake valves and a number of other parts. During operation, various fine particles and heavy fractions (sulfur, olefin, benzene and a number of others) are deposited on the designated parts, which come along with the fuel and can accumulate in the form of varnish and resinous deposits. In turn, this leads to contamination of the injectors, a change in the direction and shape of the spray pattern, and in some cases a complete cessation of fuel supply, even when using fuel filters that are capable of filtering out particles larger than 10-20 microns.
As a result, the formation of the air-fuel mixture is significantly deteriorated, the tightness of the pressure regulator valve is also compromised, and engine performance is reduced.
The deposition of these substances can interfere with the normal functioning of the working elements inside the nozzle, namely, it can disrupt the tightness of the valve, which is opened by an electromagnet controlled by the BC. In this case, when closed, they will allow gasoline to pass through due to constant pressure in the fuel system.
How to determine
The condition of the injectors significantly affects engine performance. The main signs of their malfunction are: jerks and dips when the load on the engine increases, insufficient power developed by the engine, unstable operation at low speeds, increased toxicity of exhaust gases.
If the injectors are clogged, a cold engine may not start on the first try, especially in winter. During the first few seconds after starting, you can hear misfires in one or two cylinders - the engine is shaking. If you press the gas pedal sharply, a “dip” appears before picking up speed, and the engine may even stall. After warming up, at idle speed the engine operation becomes normal, but while driving, especially when accelerating, a deterioration in the engine’s “throttle response” appears.
The most common malfunction of injectors is their contamination. They are located in an area exposed to high temperatures. The consequence of this is coking of the resins contained in the fuel, especially low-quality fuel, and the formation of solid deposits on the injector, blocking the spray holes and violating the tightness of the needle valve.
Signs of a blockage
The injector nozzle is designed in such a way that the injector does not need to be cleaned at all if the car consumes fuel of European standards. Car manufacturers recommend changing devices every 120-140 thousand km. mileage, regardless of the technical condition of the device. But the fuel used in the post-Soviet space clogs the nozzles so much that it is better to clean them after 20-30 thousand km.
It is usually not immediately clear that the devices are clogged. It is easier to find out about clogged devices in the cold season, when the volatility of gasoline decreases. Engine malfunctions appear:
With and without removal
Today, there are several ways to clean injectors; all these methods can be divided into two main methods: cleaning without removing the injectors from the engine and cleaning with removing the injectors from the engine.
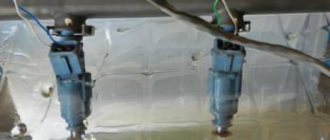
Washing injectors using a special installation without dismantling them involves running the engine on a special flushing fuel - solvent. To do this, the car’s standard fuel pump and the fuel drain line into the tank – “return” – are turned off, and the fuel injection system line is connected to a stand that has a reservoir with a solvent, which is supplied under pressure to the injectors.
The process is divided into several stages. First, the engine runs for 15-20 minutes at idle speed. Then it is stopped for 15-20 minutes to soften particularly stubborn deposits. Then the engine starts again and runs for 15-20 minutes in the mode of periodically increasing the speed to its maximum number. The effectiveness of flushing can be indirectly determined by the duration of opening and closing of the needle valve using a multitester, by the smoothness of the increase in the speed and concentration of CH in the exhaust gases.
It is recommended to clean injectors after 40-60 thousand kilometers. The higher the vehicle's total mileage, the shorter the recommended interval between cleanings.
The final stage of flushing is to restore the connections of the standard fuel lines and run the engine on gasoline for 30 minutes. It is recommended to carry out such washing every 15-20 thousand kilometers.
As for stripping cleaning, one of the main advantages of the method is that the operator is able to accurately measure the performance - the throughput of each nozzle before and after cleaning. Therefore, the injectors are installed back on the engine only after their performance has been fully restored.
Restoring injector performance can be achieved using various methods. Many stands provide a mechanical principle for cleaning injectors due to a built-in ultrasonic bath. The bath emitter generates ultrasonic vibrations in the liquid with which the bath is filled. As a result of the influence of complex physical processes, sediments are “fragmented” into very small fragments.
Cleaning injectors using an ultrasonic bath provides a significantly better result, which lasts much longer compared to chemical cleaning. But still, the ultrasonic bath does not provide complete cleaning of the injectors, since it mainly affects solid deposits.
Current methods of combating pollution
Having encountered a similar problem for the first time, car enthusiasts are interested in what is the best way to wash their injector nozzles, and which methods to give preference to.
In fact, all techniques can be divided into 2 main categories.
- Ultrasonic method. This method is based on the phenomenon of cavitation. With it, ultrasound affects the liquid, which provokes the formation of microexplosions. The purpose of cleaning is to place the sprayers in a special bath with a cleaning agent in the form of a liquid, and apply ultrasound. This type of injector cleaning is very effective, but you won’t be able to do it yourself. Special expensive equipment is required, available only in car service centers. Moreover, not all service stations offer such services, and their price seems too high for some car owners.
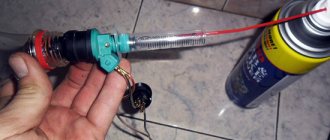
- Liquid method. Another option is how you can wash the injectors. But the advantage of the method is that special equipment is not required. Although car service centers use liquid cleaning stands. Whether you perform liquid flushing with your own hands or at a service station, the meaning remains the same. Contaminants are removed using a flushing agent supplied under pressure.
First of all - diagnosis
Sergey Kamenev , Jetronic auto repair shop specialist:
— Try to avoid refueling at questionable gas stations. Using high-quality gasoline will extend the life of the injector. Follow the recommended fuel filter replacement intervals. When carrying out repair work, do not allow the fuel system to become clogged. It often happens that motorists see the procedure for cleaning injectors as a panacea for uneven engine operation. This is not true at all. Before carrying out this procedure, you need to make sure that your car really needs it. It is quite easy to determine this by first diagnosing the car. As a rule, the problem that appears is not the one that the car owner is at fault for.
Signs of injector contamination.
When the injectors of an injection engine of any vehicle become dirty, characteristic signs of malfunction arise, which necessitates the need to clean the engine injectors. Among these signs we note:
It should be noted that even if all the problems listed above are present during the operation of your machine, this does not mean that the cause is clogged injectors. These problems can arise for a large number of reasons - from the failure of any sensor (air meter, throttle sensor, lambda probe, IAC) or a drop in pressure in the fuel system (RDT, fuel filter, fuel pump), to spark plugs.
The best cleaning products
- Wynns - Perfectly restores injector atomization, also cleans combustion chambers, decarbonizes spark plugs, reduces exhaust toxicity, Wynns is absolutely safe for spark plugs and oxygen sensors;
- LAVR - One of the leaders in the Russian market, Lavra's assortment includes various chemicals, liquid for cleaning injectors ML101, ML102 perfectly performs its functions and cleans the injector no worse than foreign analogues;
- Liqui moly – Liqui moly’s assortment includes both preventative agents and highly effective injector cleaners that have a cleansing and decarbonizing effect;
- Carbcleaner - A fairly popular product produced by many manufacturers, it is quite cheap and can be used not only for cleaning injectors, but also for cleaning the engine compartment;
- BG - One of the best injector cleaners, safe for spark plugs, catalyst and oxygen sensors, has a decarbonizing effect. Real tests and user reviews prove the effectiveness of this flush;
- Hi-Gear is a fairly popular manufacturer of auto chemicals. Hi Gear’s assortment includes many different cleaners, additives, additives, stabilizers, the products of this company are of good quality, there are both fuel additives for cleaning the entire system and liquids for washing injectors;
- RVS - Repair and restoration compounds, the range includes only an additive for adding to fuel, which is more of a preventative measure; as practice shows, it is ineffective in case of significant contamination.
Diagnostics of the operation of injectors on the ramp
To carry out this type of check of the injectors, it will be necessary to dismantle them along with the fuel rail. This is not difficult to do, but it requires some skill. It is best to do such a check together with a partner who, during your diagnostics and measurements, will manipulate the ignition and cranking of the engine.
- after dismantling and fixing the ramp with the nozzles in a stationary state, prepare measuring containers;
- next you need to connect the contacts of the ramp and injectors, and also return the negative terminal of the battery;
- it is very important to place the ramp so that the measuring container can easily fit under each nozzle;
- Gasoline/diesel supply pipes will need to be connected to the ramp;
before ignition, make sure all fasteners are secure to ensure data accuracy and prevent leaks;
- then ignite and crank the engine a little using the starter;
- At this time, evaluate the operation of the injectors: the containers should be filled equally under each of them.
If there is a discrepancy between any of the containers and the others, the injector must be cleaned. In addition, it is possible that fuel continues to flow even after the ignition ends. This indicates that the injector has lost its seal and needs to be replaced.
How to check injectors without removing them from the engine?
Checking the winding resistance level on the injectors
1. You can carry out an inspection by turning off the ignition and removing the negative terminal from the battery.
2. Using a thin screwdriver or an awl, you need to unclip the spring clip on the block.
3. Disconnect the connector from the injector.
4. Attach an ohmmeter to the injector terminals and measure the winding resistance.
5. If the resistance between the side and central pins of the connector is within 11–15 Ohms, then the injector is working properly. If the device shows more or less than required, it should be changed.
Checking the functionality of all injectors
1. Initially, you need to remove the fuel rail on which the injectors are installed.
2. Then you should connect the wire block to the ramp harness. If the “-” terminal was removed from the battery, then put it back on.
3. Connect the fuel pipes to each other and, using a wrench, tightly tighten the fittings securing them.
4. Place a measuring cup or any other container with markings under each nozzle.
5. Using the starter, crank the engine and monitor the operation of all injectors. Fuel should come out evenly from each.
6. Turn off the ignition and check the fuel level in the measuring cups, it should be the same. If the amount of fuel in the containers does not match, replace or clean the nozzle that has come out of alignment.
INJECTORS
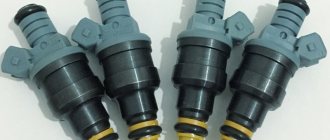
The injectors on the VAZ 2114 are an electromagnetic device in which, when there is a pulse in the electrical component, the valve opens and atomized fuel is injected under pressure into the internal combustion engine cylinder. Depending on the magnitude of the pulse, the valve opens to a greater or lesser extent, thereby dosing the flow.
Model 2114 can be equipped with fuel injectors from different manufacturers, and accordingly, the cost of the injectors may also differ. Manufacturers and cost (price range in the Russian Federation):
Article on the topic: The stove on the VAZ 2114 does not heat well: we find out the reasons and fix the problem
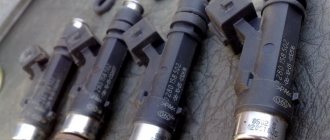
The VAZ 2114 (2115) is equipped with engines of 1.5 and 1.6 liters (8 and 16 valves), therefore the performance of the injectors must be selected depending on the type of engine. If you make the wrong choice, fuel consumption may increase or the internal combustion engine may lose power. Which injectors are better to install on a VAZ 2114? Here you should focus on the part markings. For example, BOSCH 0 280 158 502 is only suitable for a 1.5 l 8-valve engine. It’s hard to say anything about the manufacturer; the quality of all products is approximately the same.
SIGNS OF PROBLEM
There are certain signs of clogged injector nozzles:
And, if the injectors are leaking, the internal combustion engine may not start at all. To improve engine operation, you should clean the injectors on the VAZ 2114.
REMOVAL
Let's look at how to remove injectors on a VAZ 2114 (of course, everything is done with the engine not running, and it won’t hurt to disconnect the battery terminals). To do this we need a set of combination wrenches, a hexagon, screwdrivers and pliers:
We move the latch and take out the nozzle. The injector is removed from the ramp very simply - you need to move the locking washer to the side and pull out the nozzle using a little force.
REPLACEMENT
Replacing injectors with the fuel rail removed is done simply - remove the old part, install the new one and secure it with a springy split washer. Then we install the fuel rail in place. Changing the nozzle is very simple.
EXAMINATION
Before cleaning, it won’t hurt to check the injectors on the VAZ 2114; it’s a good idea to first make sure they are not working. The check is carried out on a removed fuel rail; there is a special stand for this; many modern car repair shops are equipped with such stands.
Article on the topic: Hand (parking) brake system on the VAZ 2110
You can check each individually removed injector by applying power to it and connecting a fuel tank to the inlet. When voltage is applied, the valve should operate and gasoline should spray out of the nozzle. But the test here is conditional; performance is almost impossible to determine.
Even more dubious is the idea with measuring cups, which is often described on resources on the Internet. Let's say all glasses are filled with the same amount of gasoline. How then did you determine the performance when simply cranking with the starter? After all, the engine operates at different speeds, and a faulty injector usually overflows gasoline depending on the voltage supplied to it. What if the electrical part is faulty?
Cleaning methods
Currently, there are two main cleaning methods:
It should be noted that this method will not get rid of dirty injectors 100%. After this, flushing fluid remains in the oil system and injector. Therefore, experts recommend driving 10-15 km in forced engine operation, and then changing the oil filter and changing the oil. This method requires a significant investment of time and will cost a lot.
However, both methods are most suitable when the car’s mileage is low, and dismantling the injectors is quite difficult due to their location.