Fuel injectors play an important role in the fuel system; stable engine operation, fuel consumption and much more depend on their serviceability and performance. Today I won’t talk for a long time about the reasons why the injectors become clogged, it seems to me that everyone already knows about this, instead I propose to go directly to the work of cleaning the fuel injectors of the VAZ 2115.
For those who are not aware or are simply interested in what a nozzle is and how it works, I recommend reading this article.
Before cleaning the injectors, you need to prepare the following set of “tools”:
- Five-cc medical syringe;
- Special liquid for cleaning (flushing) the carburetor;
- Two copper wires length (~1 meter);
- Light bulb (small one from a headlight);
- Hex key at “5” and key at “24”;
- O-rings for injectors (if the old ones are finished).
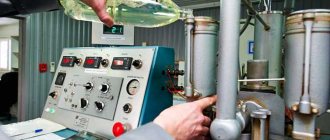
From all these seemingly unrelated parts, you need to build a device for washing the injectors with your own hands. And this is done as follows, see the diagram:
Take the injector, connect the wires to it (+ and -, respectively), and set the button (breaker) to minus. It is necessary to connect the previously prepared syringe to the back side of the nozzle (input), and install the tube of the cleaner can into the thin hole of the syringe. All this must be connected to the battery. Read the operating principle of this mechanism below.
Alternatively you can do this:
Injectors - what are they?
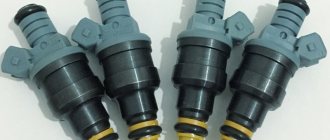
Let's figure out what injectors are and what they are needed for. Injectors are an electromagnetic mechanism designed to spray fuel into the cylinder. Their number depends on the number of cylinders in the car. The VAZ car has 4 cylinders, therefore there are also 4 injectors.
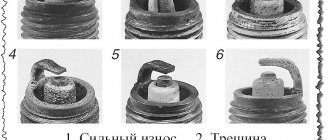
A serviceable and clean injector sprays fuel evenly without any delays or jerks.
Operation of a serviceable and clean injector
A clogged injector may not spray fuel at all or, on the contrary, pour it in drops. As a result, the engine cannot operate normally and correctly.
Dirty nozzle
Fuel pressure regulator VAZ-2114: signs of malfunction, repair. Fuel system VAZ-2114
All engines with an electronic fuel injection system are equipped with devices that maintain the required fuel pressure in the fuel line. In the VAZ-2114 power unit, this function is performed by a special regulator. It is thanks to this that gasoline is supplied under pressure to the injectors in the required quantity, depending on the operating mode of the engine.
In this article we will talk about what the VAZ-2114 fuel pressure regulator is, how it works and where it is located. In addition, we will consider its possible malfunctions and methods for eliminating them.
Symptoms of clogged injectors
Loss of dynamics is one of the main signs of clogged injectors. If they are contaminated, the car simply will not accelerate properly.
- Unstable idling, the engine at idle will operate unstably and intermittently.
- Starting difficulties can occur when there is contamination or when the injectors stop holding pressure. Fuel begins to drip into the cylinder, which can cause popping sounds in the exhaust pipe.
- Ringing fingers are inevitable when the spray nozzle is clogged; this is due to the fact that the fuel entering the cylinder is mixed with air and the concentration of fuel in this mixture is quite small, so the engine experiences detonation.
Driving with dirty injectors will not provide any driving pleasure. And driving with such a problem is highly not recommended.
How to clean injectors on a VAZ 2115 at home?
Fuel injectors play an important role in the fuel system; stable engine operation, fuel consumption and much more depend on their serviceability and performance. Today I won’t talk for a long time about the reasons why the injectors become clogged, it seems to me that everyone already knows about this, instead I propose to go directly to the work of cleaning the fuel injectors of the VAZ 2115.
When to clean injectors
Cleaning of injectors on Lada cars is carried out according to the condition of the car. If there are no problems with your car, then there is no need to clean them. Also, to find out for sure whether the injectors need to be cleaned, you first need to diagnose the fuel system. You can learn more about how to diagnose the fuel system in our article.
The manufacturer recommends cleaning the injectors every 50,000 km. Since the fuel at our gas stations leaves much to be desired, just before this mileage they begin to become clogged and flushing them will be useful. You can wash it at a service station, or you can do it yourself. Next, we will look in detail at how to wash the injectors on a VAZ car at home.
Cleaning the injector: how to do it
If there are noticeable malfunctions in the operation of the injector, you need to know how to clean the VAZ 2114 injectors. This cleaning can be done in two ways:
- cleaning of injectors with removal;
- cleaning the injector without removing it;
The most correct method is to wash the injectors on a special stand. The stand allows you to evaluate the performance of the nozzle, effectively remove contaminants and then check the quality of the spray. If the result is unsatisfactory, problems with spraying and opening/closing are eliminated using the ultrasonic cleaning method of nozzles.
As for the second method, cleaning the injectors on a machine without removing it is considered more of a preventive measure and does not remove stubborn dirt. For such cleaning, it is necessary to pour a special cleaner into the gas tank or supply a similar cleaner directly to the injectors, bypassing the fuel supply system (this is done using a special installation).
Do-it-yourself injector cleaning
During operation of the VAZ 2114, the injectors must be periodically washed. This can be done either with special equipment or independently. After removing the injectors from the car, you can begin cleaning them yourself.
To do this you will need:
- remove the sealing rings from the injectors;
- soak the injectors in acetone or gasoline;
- remove the injectors and carefully clean the nozzles with a thin needle;
- wash the inside of the nozzles by supplying cleaner;
As part of cleaning, the nozzle is connected to the battery through a button with wiring. You need to draw liquid into the syringe and connect it through a tube to the nozzle. Then the pressure is created by the syringe and the button is pressed, the liquid is sprayed. The procedure is repeated several times.
Methods for cleaning injectors
Injector flushing additives
Additives that are poured into the tank
There are a huge number of different additives for flushing the injector. Such additives are poured into the car tank and mixed with fuel. The mixture of fuel and additives enters the main elements of the fuel system and flushes them, including the injectors. But, as a rule, such washings do not bring much results, since all the dirt that was washed away to the injectors gets and settles on them, which can only aggravate the situation. Using this method is not recommended.
Ultrasonic cleaning
Ultrasonic cleaning of injectors
This washing is considered as effective as washing the injectors during dismantling. We will not dwell on this method, since this method of washing can only be carried out at a service station. And the price of this method is not small, from 2000 rubles to 5000 rubles.
Clean in place without removal
This flushing method is carried out using special additives, but differs from the first method in that this flushing is used only on the injectors without going all the way along the fuel line. We will dwell on this method in more detail.
Washing with dismantling
This method is very reliable and probably the most popular among garage car enthusiasts who like to repair their car themselves. After reading this article, you can easily wash the injectors on a Lada car with your own hands without any special knowledge.
Recommendations and tips
An indicator of normal operation of the nozzle is a high-quality spray of liquid. Also, after washing the injectors, it is recommended to replace the fuel filters; if necessary, the fuel pump mesh filter is additionally cleaned. This is necessary to prevent dirt from the fuel system from re-clogging the injectors.
We also recommend reading the article on how to clean injectors with ultrasound. From this article you will learn about the advantages and disadvantages of this method, as well as the features of such cleaning.
Please note that the cleaning method by washing only removes surface deposits. If the injectors on a 2114 or VAZ 2115 have persistent and heavy contamination, it is necessary to perform deep cleaning of the injectors with ultrasound or washing on a bench. In difficult cases, ultrasonic cleaning of injectors is combined with washing to obtain better results.
Washing without removal
What you will need:
- Set of wrenches;
- Screwdrivers “+” and “-“;
- Flushing fluid;
- Fuel hose;
- Fitting for tubeless wheel – 2 pcs;
- Bottle;
- Clamps;
- Drill 10 mm;
- Compressor with pressure gauge (can be used for a car);
Making a device for washing injectors without removing them from the car
- In a 1.5 liter bottle, drill a hole in the bottom with a diameter of 10 mm.
- Insert the wheel fitting into the drilled hole.
- Similarly, drill a 10 mm hole in the bottle cap.
- Insert the wheel fitting into the bottle cap and screw it on.
- Unscrew the spool valve from the fitting in the bottle cap.
- We attach a fuel hose to the fitting installed on the cover and secure it with a clamp.
This is what should happen
Nozzle cleaning device
Relieving pressure in the fuel rail
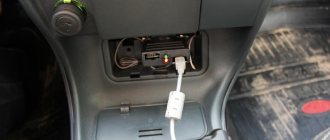
- In order to relieve pressure in the fuel rail, you need to remove fuse F3 (15A) it is located under the central panel where the foot air ducts are.
- After that, you need to start the car at the residual pressure and let it run until the car engine stops.
- After which you can start working
Connecting the device to the fuel line
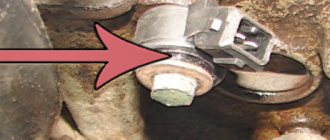
- Under the hood we find a fuel line pipe (if the engine has a return line, there will be two pipes, one of them goes to the fuel rail, so you need to connect to it).
Connect to the “straight” hose
- We take two Keys on “17” and unscrew the fitting connection, carefully without damaging the tube.
- You need to unscrew it like this: position the keys like scissors and squeeze them; you must follow the correct direction so that the fitting and nut are unscrewed and not tightened.
- After the fitting connection is unscrewed on the tube, you will see a rubber ring; it must be removed; if it is in poor condition, it is better to replace it.
- Next, we connect the hose from our device to the tube and tighten it with a clamp.
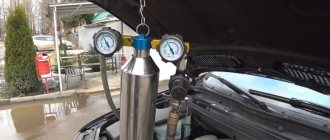
- Pour washing liquid into the bottle and tighten the cap.
- We pump a pressure of 3 atm into the bottle with a compressor.
- We hang the bottle with the cork down and start the car.
Washing process
- We start the car on the flushing fluid and let it use up half of the flushing fluid.
- Next, we stop the car engine and let it sit for 20 minutes. This is necessary so that all the dirt in the injectors becomes sour and dissolves.
- We start the engine again and press the accelerator pedal and keep the speed around 3000 rpm. This must be done until the flushing liquid runs out.
- Next, remove the flushing device and screw the fuel line hose into place.
Attention
Don't forget to install the rubber O-ring when connecting the tube and the fuel line fitting.
Main features
So, signs of clogged injector nozzles:
- misfires at idle,
- the engine is unstable,
- fuel consumption increased sharply,
- slow acceleration of the car when the gas pedal is fully pressed.
Why is it important to identify this malfunction? The injector supplies fuel to the system and is its main element, therefore, extending its service life is of great importance for the operation of the entire engine.
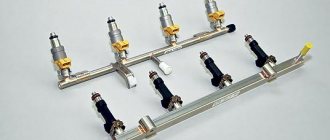
Washing with removal of injectors
What you need:
- Set of wrenches;
- O-rings for injectors 16 pcs;
- Carburetor cleaner;
- Syringe;
- Injector plug 1 pc. or mother chips 2 pcs;
- Two-core wire up to 1 m long;
- Intake receiver O-rings;
Injector removal process
- First, we relieve the pressure in the fuel rail; how to do this is written above.
- In order to dismantle the fuel rail, it is necessary to remove the intake manifold.
- We remove the intake manifold corrugation by unscrewing the clamp from the DZ and unscrewing the clamp from the low crankcase ventilation, and remove the chip from the mass air flow sensor.
- Unscrew the dipstick with a screwdriver and pull it up.
- Unscrew the breather clamp, remove the hose and bend it down.
- We remove individual ignition coils except for the 4th cylinder (it does not interfere).
- Unscrew the two nuts securing the intake manifold from above.
- Unscrew the 2 bolts and 3 nuts securing the intake manifold.
- We move the intake manifold towards the radiator and lift it to the top.
- Under the hood we find a fuel line pipe (if the engine has a return line, there will be two pipes, one of them goes to the fuel rail, so you need to connect to it).
- We take two Keys on “17” and unscrew the fitting connection, carefully without damaging the tube.
- You need to unscrew it like this: position the keys like scissors and squeeze them; you must follow the correct direction so that the fitting and nut are unscrewed and not tightened.
- After the fitting connection is unscrewed on the tube, you will see a rubber ring; it must be removed; if it is in poor condition, it is better to replace it.
- Disconnect the injector wiring harness.
- Using a screwdriver, unscrew the bolt securing the fuel rail tube to the cylinder head.
- Unscrew the two hex bolts to “6”.
- Pull the fuel rail towards you; with a little force, the ramp should come off.
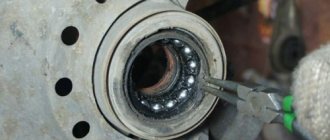
Removing injectors from the fuel rail
- We remove the chip from each injector and dismantle the wiring harness.
- Remove the retaining rings from the injectors
- Pull out the nozzles in a circular motion
Preparing to wash the injectors
In order to wash the removed injectors, it is necessary to prepare a washing device. The injectors are flushed under pressure. To do this, we assemble the injector power supply circuit. The injector receives power from 9 to 12 V. The power source for opening the injector can be a crown battery or a car battery. We will use a rechargeable battery.
So, let's start assembling a device for washing injectors on a Lada car
For convenience, it is better to carry out the procedure together.
- You need to prepare a syringe. Pull the piston out of it; the syringe cylinder should fit tightly onto the nozzle with the ring. You can also use a hose of a suitable diameter instead of a syringe and tighten it with a clamp. We will use a hose.
flushing with a syringe
flushing through a hose
- Next, we twist the wires with the injector plug or with the “mother” terminals.
- We connect the nozzle to the power source, observing the polarity. "+" and "-"
- The injector should click, which means the injector is opening.
- We hold the nozzle and spray carburetor cleaner into the hose and hold it, creating pressure in the hose between the nozzle and the cleaner bottle.
- Then you need to open the injector by connecting the wires to the battery
- The injector will spray carburetor cleaner and clear itself.
- You can complete the procedure as soon as a uniform spray of fuel begins to emerge from the injector.
- Next, you should do the same procedure with all the injectors.
- Assembly should be carried out in the reverse order of disassembly.
Advice
For easier installation of the fuel rail with injectors into the cylinder head, it is recommended to lubricate the O-rings with engine oil.
Now you know in what ways and how you can wash the injectors. We hope our article helped you and you chose a method of washing injectors that is convenient for you.