A friend of mine has been using the Lada Granta for more than six months.
Occasionally the check engine light would come on, but I told her not to bother, especially in the off-season. Moreover, the swearing itself goes out after a while.
The other day, after refueling (Lukoil, AI-95), not only did the icon light up, but the car began to noticeably kick and shake. Taking into account the automatic transmission, it’s completely unpleasant.
The diagnosis was made: bad fuel, injectors need to be replaced. Moreover, the case is not guaranteed, pay half your salary to the cashier and then sue Lukoil, fortunately you have the check in your hands.
My friend was smart enough to refuse.
Then two options were proposed: ultrasonic cleaning or special washing. The second is cheaper and faster - so she chose flushing. We also changed the spark plugs.
Result: the check went out, the car drove well, my wallet was lighter by 3,000 rubles.
Now the question that has been tormenting me for three days: isn’t this a scam?
A full tank of fuel (allegedly the culprit) - no one drained it or even offered it.
I looked at the removed spark plugs - they are normal, well, maybe you can use a brush a little.
I myself was a bit of a mess back in the last century, so my knowledge is of little use.
Do you think the servicemen mocked the blonde, or does washing the injectors (without draining the fuel) on Grant make sense?
Checking and replacing injectors on a Lada Granta car
Tools (for 8 valve engines):
- Tester
- Medium Phillips screwdriver
- Medium flat screwdriver
- 5 mm hex key
- Open-end wrench 17 mm – 2 pcs.
Tools (for 16 valve engines):
- Tester
- Medium Phillips screwdriver
- Medium flat screwdriver
- Open-end wrench 10 mm
- Open-end wrench 17 mm – 2 pcs.
- Ratchet wrench
- Extension
- 13 mm head
- 5 mm hex key
Parts and consumables:
- Injectors
- Injector O-rings
If the injectors on a car fail, the following signs of injector malfunction are possible: – difficulty starting the engine; – unstable engine operation; – the engine stalls at idle; – increased crankshaft rotation speed at idle; – the engine does not develop full power, insufficient engine response; – jerks and dips in engine operation when the vehicle is moving; – increased fuel consumption; – increased content of CO and CH in the exhaust gases; – glow ignition due to leaking injectors.
In points where there are two photos, the first shows the process on an 8-valve engine, and the second on a 16-valve engine.
1. Disconnect the injector wire and engine harness connectors as described here (for 8-valve engines) or here (for 16-valve engines.
2. Perform an initial check of the injector windings. To do this, connect the tester to the connector contacts one by one.
Basic methods of washing injectors without removing them
There are two methods to clean the injectors without removing them from the engine:
- Pouring a special cleaning agent into the fuel tank;
- By connecting a homemade device with a cleaning mixture to the fuel system of the power unit.
The first method is the simplest and takes very little time from the driver. It is used to clean injectors after a short mileage (less than 15 thousand kilometers) and only for prevention. In case of pronounced deviations in engine operation, this method is ineffective.
The second method is a little more complicated and requires more time from the car enthusiast. However, the effect of washing injectors with this method will be more noticeable, since its efficiency is an order of magnitude higher. It is used in more advanced cases, in case of obvious problems with the injector or after 15-20 thousand kilometers. Below we will analyze each of these injector flushing methods in more detail.
Flushing the injector through the fuel tank
To flush with this method, a special product, additives, are used that are designed to clean the entire gasoline supply system. As the name suggests, it is poured directly into the fuel tank. You can buy it in almost any store that specializes in selling components and consumables for cars.
The procedure for cleaning the injector system occurs in several stages:
- First of all, you need to replace the fuel filter.
- After this, one bottle of cleaning agent is poured into the fuel tank.
- Next you need to drive 250-300 kilometers.
- Then the fuel filter is replaced again.
The calculation of the proportion of gasoline and cleaner specified by the manufacturer should be strictly observed. Otherwise the motor may be seriously damaged.
It is necessary to focus your attention in more detail on the importance of the first stage - replacing the fuel filter. The fact is that dirt separated from other parts of the power system enters the filter and remains there.
If you do not change it, then heavy soot particles will reach the injectors, and the injector flushing procedure will completely lose its meaning. Therefore, before you start washing the injectors in this way, you should definitely replace the fuel filter. Since without this it will not be possible to effectively clean the injectors.
Engine on Grant: features
So, the Grant 21116 1.6-liter 8-valve gasoline engine is a modernized 1.6-liter VAZ 2114 engine. The idea to modernize the VAZ 2114 engine arose in connection with the release of the Grant car and the transition of the entire model range to Euro-4. Initially, ICE 21116 was installed on the Lada Priora and then on the Lada Granta and Lada Kalina cars. List of main technical characteristics:
- injection power system;
- in-line 4-cylinder engine with a power of 87 hp;
- engine capacity 1596 cm3;
- the presence of two valves per cylinder;
- the maximum torque is 140 Nm;
- the presence of an intake manifold with extended channels and a flange for an electronic damper (increased torque);
- new H-module.
The 87 hp Grant engine, especially in comparison with its predecessor VAZ 21114, has a lightweight connecting rod and piston group. This feature of the 21116 engine has its advantages and disadvantages.
By lightening the parts and elements of the internal combustion engine, the service life of the valve-piston group decreases, but at the same time the dynamics and other indicators improve. For example, an increase in power to 87 hp, which is 6 hp. more than that of ICE 21114.
Main characteristics of the Lada Grand car with a VAZ 21116 engine installed on it:
- The maximum speed of the car is 167 km/h;
- Fuel consumption 8.5 l. per 100 km (when driving in the urban cycle);
- Fuel consumption 5.7 l. per 100 km (when driving on the highway);
Let's move on. If we consider the Granta 8-valve engine and its design, the Granta 8-valve engine has several design features that distinguish it from other modifications.
Firstly, the plate honing method is used to finalize the surfaces of the cylinders. Secondly, the presence of oil nozzles allows for more intensive lubrication and cooling of the pistons.
The dimensions of the internal combustion engine parts have also been reduced: the height of the cylinder block is about 197.1 mm; the crank radius is about 37.8 mm; piston ring height 1.2/1.5/2 mm, etc.
Another thing worth noting is the electromechanical throttle module installed at the receiver input. This design solution allows the ECU to fully control both the fuel supply and the air supply to the cylinders.
Let us add that the main design feature of the Grant 21116 internal combustion engine was the lightweight ShPG connecting rod and piston group. In the previous model, exhaust gas flows collided and created back pressure.
For this reason, in the case of the VAZ 21116, the designers decided to lengthen the collector pipes by changing the shape of the cylindrical block and the inlet pattern. As a result, such actions helped reduce losses and resistance.
We'll tell you and teach you
There are many reasons for unstable injector operation, the most common of which is contamination of the injectors. How to recognize a “dirty” injector and what to do in this case?
Operating principle of the injector
The fuel injection system of modern cars is implemented on the basis of injectors connected to the fuel rail. An electric fuel pump supplies gasoline under pressure through the fuel lines from the tank to the fuel line of the injector.
The electronic control unit, based on data received from a variety of sensors (mass air flow, throttle position, coolant temperature, crankshaft position, detonation, etc.), sends a signal to the solenoid valve, which opens, resulting in the injection of gasoline from the fuel rail into the intake tract of a cylinder or into the combustion chamber of an engine.
Signs of a “dirty” injector
If the injector nozzles are dirty, not only does the amount of fuel injected through them significantly decrease, but the shape of the cloud of atomized air-fuel mixture also changes.
As a result, engine operation becomes unstable. What does this mean? It is not always possible to start the engine right away, especially in the cold season. During the first seconds of operation, the engine “troubles” - you can hear misfires in one or two cylinders.
The idle speed becomes unstable, the crankshaft speed either increases or decreases.
After the engine warms up, its idle operation returns to normal, but when you press the accelerator pedal sharply, there are delays (“dips”) and jerking before picking up speed, and in particularly advanced cases, the engine may even stall.
The engine's power drops, its throttle response decreases, but its "appetite" increases - fuel consumption can increase by one and a half times. Accordingly, the content of carbon monoxide and hydrocarbons in vehicle exhaust gases increases.
Remember that the engine may experience similar symptoms if there is a vacuum in the fuel tank, a clogged fuel filter, pinched fuel lines or a faulty fuel pressure regulator.
Causes of clogged injectors
As a rule, the injector becomes clogged with gasoline itself.
The main reason for a “dirty” injector is heavy paraffins, which are invariably included in any fuel, even the highest quality. After turning off the engine, a small amount of gasoline always remains in the injector. Its light components evaporate over time, and heavy paraffins settle on the surface of injection system parts in the form of deposits.
Over time, such deposits lead to a noticeable decrease in the throughput of the injector.
During the production of gasoline, it is impossible to completely get rid of heavy paraffins, so when processing fuel, special substances are introduced into its composition - detergents that dissolve paraffin deposits. The most effective of them is polyetheramine.
All this applies to European oil refineries. Domestic oil refiners, at best, add ineffective, cheap cleaning additives to gasoline, and at worst, add nothing, despite the fact that adding a high-quality detergent increases the cost of 1 liter of gasoline by only 1 cent.
Given the above, car owners need to periodically inspect and clean their injectors.
How often? This depends on the operating characteristics of the machine. When driving short distances within the city, cleaning the fuel injection system is necessary after 20 thousand km. For those who drive longer and further - every 40 thousand mileage.
Methods for cleaning the injector
The simplest and most affordable way to clean injectors is to use a high-quality cleaner, which is poured into the car’s fuel tank and the vehicle is continued to be used until engine performance stabilizes.
This method will only help at the initial stage of injector clogging. A more effective procedure is when the car’s fuel system is disconnected from the gas tank and connected to a special stand.
Flushing the system with a special cleaning liquid, depending on the contamination, lasts from 20 minutes to 2 hours.
In particularly difficult cases, it is necessary to dismantle the injector and then wash it with detergent in forward and reverse directions.
The injector is also cleaned using ultrasound, placing it in a so-called ultrasonic bath.
All cleaning methods, except the first, are available only at specialized service stations.
If you have any complaints about the operation of the injector, and washing it by adding detergent to the gas tank did not bring results, give the car into the caring hands of specialists from a car service center.
The article was written by me personally. You have the right to copy it without restrictions.
To begin with, let’s understand that
an injector
is not only a set of control units and sensor equipment, but it is also a very
high-tech fuel supply system
.
If we imagine fuel injection in a carburetor and an injector
, we
will see
some differences.
The carburetor does not have such injection
— fuel is supplied by gravity through the nozzle and it mixes with air on
its way into the engine
and enters the combustion chamber, where it burns safely.
The injector injects fuel
through a
high-pressure
to an open or closed intake
valve
. This is a classic injector and will not be confused with a direct injection injector, where the nozzle is not located on the intake manifold near the valve, but directly looks into the combustion chamber.
That's all the inherent differences between the fuel injector and the carburetor.
In 15.000 - 20.000
thousand kilometers (depending on the engine, driving style and technical fluids) from direct
contact of fuel
with the valve (after all, injection occurs on an open or closed valve),
coke
and deposits in the form of a sponge form.
Because of this, the mixing of the mixture deteriorates. Fuel simply falls
on this “sponge” and is absorbed and flows off the valve in drops.
And this has a very detrimental effect,
first of all,
on starting
a cold engine and on
smooth idling
.
Also, coke and deposits form inside the combustion chamber, increasing the compression ratio
, which leads to
detonation
and
loss of power
, as well as sticking of the piston rings.
Lada Granta 21116 engine life, maintenance, pros and cons
The Lada Granta 21116 engine model under consideration differs from its predecessors in sufficient reliability and efficiency. If you take into account compliance with the operating and maintenance conditions (time frames for maintenance), you can significantly extend the service life of the unit.
Features of servicing the VAZ 21116 engine:
- The engine oil and oil filter are replaced every 15 thousand kilometers (recommended by the manufacturer);
- mandatory adjustment of valve clearances and replacement of the valve cover gasket;
- replacing spark plugs, air and fuel filters after 30 thousand kilometers;
- after a run of 90 thousand kilometers, they change the coolant, drive belts, high-voltage wires, etc.
If you study the reviews of VAZ 21116 owners, then the internal combustion engine of the Lada Granta 21116 with an engine capacity of 1.6 and a power of 87 horsepower pulls well at the bottom, as well as when driving at full power.
Fuel consumption per 100 km, even when driving in city traffic (traffic jams, traffic lights), usually does not exceed 10 liters. By the way, the use of AI-95 fuel recommended by the manufacturer can reduce fuel consumption even further.
We also recommend reading the article about how to do tuning the Lada Vesta engine. From this article you will learn about the available methods for tuning the Lada Vesta engine, how to increase power and boost the specified internal combustion engine.
You can also note the normal start of the engine in cold weather, even after the car has been idle for a long time. Also a plus is a reduction in noise (minimal vibration) and an increase in the torque of the internal combustion engine.
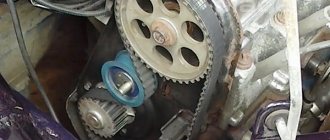
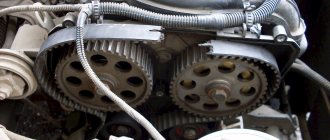
The only drawback is a broken engine timing belt, which leads to bending of the valves (as a result, expensive repairs). Also, in some cases, the fragility of the pistons is noted (when they collide with the valves, they sometimes break and require replacement much earlier than their allotted time);
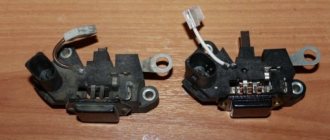
Repair of injectors VAZ 2110–2112
Repairing injectors means cleaning the product and replacing the O-rings. Simple measures to restore the functionality of the injectors can significantly increase the car’s power and make cold starts easier. Injector repair is possible in the following cases:
- there are no visible deformations on the body;
- the nozzle has not yet exhausted its service life;
- the car owner wants to optimize the operation of the power unit.
In all other cases (cracks and deformations, long service life), it is recommended to replace the nozzles with new ones.
How to blow out and clean oil molds
On cars of the tenth family, injector cleaning may be necessary after 40–50 thousand kilometers. In this case, it is best to carry out the procedure yourself, since you can always observe for yourself the true condition of the motor and its elements, and also save a significant amount on service station services.
Many drivers prefer to use the simplest method of cleaning injectors - fuel additives. Special liquids, along with gasoline, are poured into the tank and pass through all elements of the fuel system, cleaning them. This measure is justified for new cars in which the degree of pollution is at a minimum level. But additives will not be able to properly clean injectors and other elements of the system.
Video: a simple way to clean injectors using a repair kit
Removing the fuel rail and injectors of VAZ 11183, VAZ 21116 and VAZ 11186 Lada Granta engines
- Medium Phillips screwdriver
- Medium flat screwdriver
- 5 mm hex key
- Open-end wrench 17 mm – 2 pcs.
Parts and consumables:
- Injector O-rings
- Fuel injectors (if required)
- Engine oil
Remove the fuel rail to check the injectors and replace them, as well as when removing the intake pipe.
1. Relieve pressure in the engine supply system as described here.
2. Remove the air supply hose with the throttle assembly as described here and here.
3. Using a flat-head screwdriver, press the retainer of the engine management system wiring harness block and disconnect it from the injector wiring harness block.
4. Using a 17 mm wrench, unscrew the fitting of the fuel rail tube, holding the tip of the fuel supply hose to the rail with a wrench of the same size, and remove the tip of the fuel supply hose from the ramp tube.
The connection is sealed with a rubber ring.
5. Using a 5 mm hex key, unscrew one screw each securing the ramp to the inlet pipe on the left and right sides.
6. By pulling the ramp along the axes of the injectors and overcoming the resistance of the rubber sealing rings of the injectors, remove all four injectors from the holes in the intake pipe. Place the fuel rail assembly with injectors to the left side of the car and remove it from the engine compartment.
7. Squeezing the spring clamp of the wiring harness block, disconnect the block from the injector connector.
Do-it-yourself injector cleaning VAZ
Read more: VAZ 2114 stove is noisy
The first thing to do is remove the injectors from the engine. All 4 injectors are mounted on the fuel rail, which in turn is attached to the engine with two bolts.
To make work easier, you can remove the intake manifold and clean the throttle valve at the same time. The intake manifold is mounted on 5 studs.
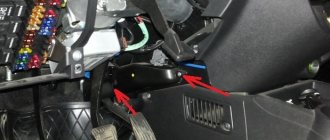
Before removing the fuel rail, it is necessary to relieve the pressure. For this purpose, there is a special spool on the left side of the ramp.
Remove the chips from each injector, having first disconnected the terminal from the battery. Unscrew the fuel supply hose from the ramp (key 17). Unscrew the 2 bolts securing the ramp to the engine block (hexagon). Now you can remove the injectors from the engine and take the entire structure out.
Remove each injector from the rail. It is secured with one small clip. Now you can start cleaning.
To clean the injectors yourself, you need to assemble the following structure:
Remove the two o-rings from the removed injector. We connect the wires to the 2nd terminals (if +/- are not marked, then + should be on the left). From the side where the injector is attached to the fuel rail, we tighten the syringe (it fits quite tightly). To the syringe, instead of a needle, we attach a bottle of liquid for cleaning the carburetor. Now this entire structure is ready for use.
We put a little liquid into the syringe and briefly supply power to the injector terminals by connecting the wires to the battery terminals (try not to supply power for more than 1-2 seconds, this may damage the injector).
Follow the steps described in the previous paragraph until the nozzle begins to spray liquid normally (there should be no separate jets, dripping, etc.).
After you have cleaned all the injectors with your own hands, you can put everything back in place. When you start the engine, you will be pleasantly surprised, and the dirtier the injectors were, the greater the surprise.
Technical characteristics of the VAZ-21126-77 engine
| VAZ-21126-77 | |
| Installed on cars: | Lada Granta Sport and Lada Kalina Sport |
| Years of production, year | since 2013 |
| Cylinder block material | cast iron |
| Supply system | injector |
| Type | in-line |
| Number of cylinders | 4 |
| Valves per cylinder | 4 |
| Compression ratio | 11 |
| Engine volume, l | 1,6 |
| Power | 120hp/5900rpm |
| Torque | 154Nm/4740rpm |
| Fuel consumption (city/highway/mix), l | -/-/7.8 per 100 km |
| Oil consumption | 50g/1000km |
| Engine oil quantity | 3.5l |
| Engine life (according to the passport/actually) | 200/200 thousand km. |
Let us remind you that in another article we determine the best VAZ engine for a modern Lada car.
Keywords: Lada Granta engine | Lada Kalina engine
Found an error? Select it and press Ctrl+Enter..
- (AEB) Car sales statistics in the Russian Federation for April 2022 (-72.4%) - the largest drop
- How to remove the throttle assembly on LADA cars
- How to automatically open the trunk on a Lada Priora sedan
- If the reverse gear on the Lada Vesta does not engage (AvtoVAZ instructions)
Cleaning VAZ injectors (2109, 2110, Kalina, Granta)
Now we will talk about self-cleaning of injectors on VAZ cars (2109, 2110, 2115, Kalina, Granta with 8-valve engines). How often should this be done? There is no clear answer to this question. It all depends on the quality of the fuel. But on average, it is recommended to clean injectors every 20-25 thousand kilometers.
But mileage is not the main indicator on which you should rely. The main thing here is to notice in time the incorrect behavior of the engine - floating speed, increased fuel consumption, dips in dynamics, etc. All of these factors may indicate clogged injectors.
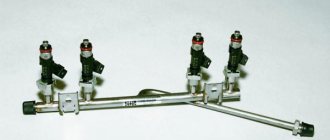
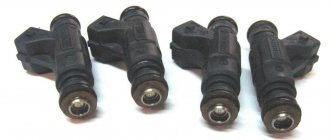
FUEL INJECTORS standardly installed on LADA KALINA GRANTA PRIORA
BOSCH injectors with catalog numbers 0 280 158 502 and 0 280 158 022 are also installed.
Bosch 0 280 158 022
Bosch 0 280 158 502
Bosch 0 280 158 017
These injectors have so far been encountered only once on the Kalina car.
“Thin” Siemens differ in the location of the nozzles, in 20734 all 4 nozzles are located in the same plane in a cone-shaped recess, and in 20735 they are spaced apart in pairs in two different planes (see photo). Such injectors are called “double-flare”, each torch pours fuel onto “its own” inlet valve, and not onto the partition between them.
“Thick” Siemens Deka nozzles are available in two types: 6393 (beige) and 20734 (yellow). It is unclear what caused the use of the same code (20734) for structurally different injectors. I don’t want to think that there weren’t enough numbers or imagination :). There is an assumption that the “thin” nozzles for some reason did not suit Siemens-Deka and they were replaced with ordinary ones.