The VAZ 2110 was equipped not only with an injection engine, but also with a carburetor. Great popularity and the rest of the years of production, the tenth Lada model was produced with an injection engine. The injector helped the “ten” improve its technical characteristics, increased the reliability and stability of the internal combustion engine. As you know, injection engines are equipped with a large number of different electronics and sensors aimed at maintaining the operation of the entire car. With the advent of the injector, the VAZ 2110 began to work much better, softer, and the dynamics began to please. Fuel was injected into the combustion chamber under pressure using fuel injectors; the fuel was atomized under pressure, which was pumped by a fuel pump.
Quite often, fuel injectors become dirty due to poor fuel quality, which makes their flow rate slightly lower and leads to a lack of fuel and loss of vehicle power.
In this article we will talk about fuel injectors on the Lada 110, namely their purpose, design, location, signs of malfunction, methods of washing and replacement.
Purpose
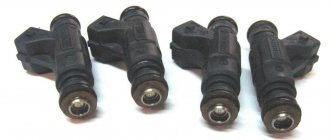
Fuel injectors are designed to spray fuel, which is mixed with air to form a fuel mixture and then enters the combustion chamber. The injectors replaced the old carburetor injection, which produced mono injection on all 4-cylinders, and the injectors allowed individual injection for each cylinder. Based on this, we can define the purpose of fuel injectors - this is the supply of fuel under pressure into the combustion chamber of a certain cylinder. There are a total of four fuel injectors on the VAZ 2110, which are connected into one system, to the fuel rail.
Device
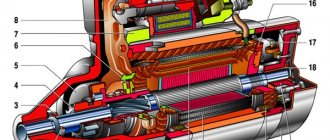
A fuel injector is an electromechanical part that, under the influence of an electric current, opens a channel and passes the compressed fuel through the nozzle into the combustion chamber. The injector is an electromagnetic valve, the armature of which has a locking bar; when voltage appears on the injector winding, the armature is retracted, thereby opening the channel for the passage of fuel.
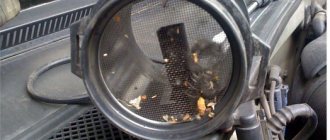
The injector consists of many parts, but most often the mesh filter is at risk of contamination, which becomes clogged due to fuel combustion products and low-quality fuel.
The nozzle consists of:
- O-ring;
- Strainer;
- Electrical connector;
- Windings;
- Return spring;
- Anchors;
- Housings;
- Needles;
- Pin;
Location
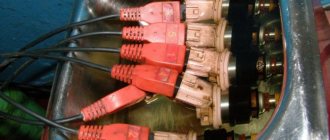
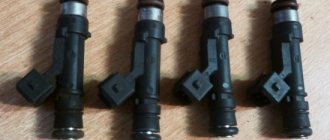
The injectors are located opposite each cylinder and are inserted into special milled holes in the cylinder head on one side, and on the other hand they are assembled into a single system through the fuel rail. All 4 injectors are connected in parallel and spray the same amount of fuel into the cylinders.
The location of the injectors depends on the engine type. For example, in an 8-valve engine, the fuel rail with injectors is located at the rear of the cylinder head, above the exhaust manifold.
In a 16-valve engine, the fuel rail is located on the front of the cylinder head, under the intake receiver.
Symptoms of a problem
Quite often, injectors fail due to winding burnout or contamination, which seriously affects engine performance. If in the first case the injector fails completely and it is difficult not to notice, then in the second case, if it is dirty, it is quite difficult to determine whether the injector is faulty, but still it will show signs by which you can find out whether the injector is working or not.
Signs of a broken injector:
- The engine is tripping;
- Loss of power;
- The car's dynamics disappeared;
- The internal combustion engine starts poorly;
All these symptoms are indirect and can be observed with other problems in the car; in order to more accurately determine faults in the injectors, it is necessary to diagnose them.
Cleaning methods
There are three main ways that will allow you to clean your injectors. Decide for yourself which one to use.
Peculiarities
Quite effective, but financially expensive. Plus, working with chemicals is risky because it is very dangerous to your health. Cleaning is carried out only in full compliance with safety regulations
Car services will now do everything for your money. But you'll have to pay a lot. Don’t forget that finding a really good, responsible and inexpensive service station is something out of the realm of fantasy. Therefore, either questionable quality of work, or impressive money for effective cleaning
The most economically profitable way to save money and complete the task efficiently. You should choose this option only if you have an idea about the design of the motor, the location and functions of the injectors
Do not carry out cleaning yourself if you have never climbed into the engine compartment yourself to replace or repair engine components. Trust trusted specialists, do not take risks.
Examination
The injectors can be checked by measuring the fuel pressure, but the injectors can be checked in more detail only after they have been removed.
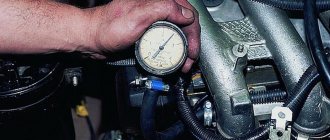
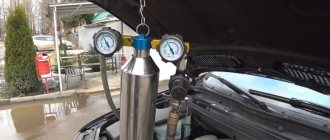
Checking fuel pressure
This test is quite primitive and will not determine the failure of the injector with 100% effect, but this test consists of determining whether the injector is leaking. Fuel injectors must maintain gasoline pressure and not leak it; it often happens that they begin to leak fuel, which then flows into the cylinders.
By measuring the fuel pressure, you can determine whether there is a leak or not, but it should be noted that this procedure without removal will not give an accurate result, since the pressure may drop for other reasons.
Check after removal
It is necessary to apply pressure directly to the injector and see if it allows fuel to pass through when the valve is closed.
The second step is to check the clarity of the fuel atomization, that is, for contamination of the injector. To do this, you need to connect the injector to the stand, or assemble your own circuit for washing the injectors.
Stories from our readers
“Fucking basin. "
Hi all! My name is Mikhail, now I’ll tell you a story about how I managed to exchange my two-wheeler for a 2010 Camry. It all started with the fact that I began to be wildly irritated by the breakdowns of the two-wheeler, it seemed like nothing serious was broken, but damn it, there were so many little things that really started to irritate me. This is where the idea arose that it was time to change the car to a foreign car. The choice fell on the melting Camry of the tenth years.
Yes, I had matured morally, but financially I just couldn’t handle it. I’ll say right away that I am against loans and taking a car, especially not a new one, on credit is unreasonable. My salary is 24k a month, so collecting 600-700 thousand is almost impossible for me. I started looking for different ways to make money on the Internet. You can’t imagine how many scams there are, what I haven’t tried: sports betting, network marketing, and even the volcano casino, where I successfully lost about 10 thousand ((The only direction in which it seemed to me that I could make money was currency trading on the stock exchange, they call it Forex. But when I started delving into it, I realized that it was very difficult for me. I continued to dig further and came across binary options. The essence is the same as in Forex, but it’s much easier to understand. I started reading forums, studying trading strategies. I tried it on a demo account, then opened a real account. To be honest, I didn’t manage to start earning money right away, until I understood all the mechanics of options, I lost about 3,000 rubles, but as it turned out, it was a precious experience. Now I earn 5-7 thousand rubles a day. I managed to get the car buy after half a year, but in my opinion this is a good result, and it’s not about the car, my life has changed, I naturally quit my job, I have more free time for myself and my family. You’ll laugh, but I work directly on the phone)) If If you want to change your life like me, then here’s what I advise you to do right now: 1. Register on the site 2. Practice on a Demo account (it’s free). 3. As soon as you get something on the Demo account, top up your REAL ACCOUNT and go to REAL MONEY! I also advise you to download the application to your phone, it’s much more convenient to work from your phone. Download here.
Cleaning VAZ 2110 injectors
You can wash the injectors in three ways: using a special wash, at a service station (service station) and with your own hands. The first method does not give the desired effect and often even worsens the situation, and washing at a service station costs a pretty penny, which not every car enthusiast wants to spend on such an easy procedure. Therefore, it would be best to do the washing yourself.
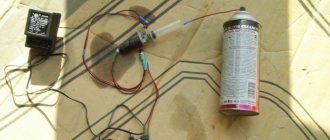
For self-washing, it is necessary to make a power supply circuit for the nozzle; for this we need:
- Carburetor cleaner;
- Wires 2 m;
- ON/OFF button;
- 12V lamp;
- Injector connector;
- Syringe;
Electrical circuit assembly
To flush the nozzle, it is necessary to supply power to it; for this you will need to assemble an electrical circuit according to the diagram presented below. It is not difficult to assemble such an assembly; you just need to look carefully at the drawing and everything will become clear.
Washing video
Injector repair kit
If the injectors cannot be washed and they are already in a deplorable condition, you can use a repair kit for fuel injectors for the VAZ 2110, it is sold in regular auto parts stores for domestic cars. The cost of this kit is small and amounts to approximately 200-300 rubles.
The repair kit includes:
- O-rings;
- Nets;
- Fasteners;
- Filters, etc.
Replacing injector consumables will help correct contamination.
Cleaning
Useful cleaning agent
The procedure is not complicated, but try to do everything carefully and step by step.
- Visually examine the condition of the item. If there are traces or signs of leakage, it is better to immediately replace the elements, since cleaning will definitely not have a long-term effect.
- If the injector can be saved by stripping, remove the O-rings located on the body and nozzle.
- Place them in acetone for a while. As an analogue, you can use regular gasoline. But do not forget that these are highly flammable mixtures, so there should not be any sources of even the slightest spark nearby.
- Be sure to keep a fire extinguisher near you. Let you be the most careful and consistent person, accidents have never been canceled.
- Keeping the injectors in acetone or gasoline will allow you to better clean all accumulated contaminants.
- While the units are soaking, pay attention to the valve cover and ramp. It is advisable to clean them, as they act as sources of contamination.
- The ramp is blown out with a conventional vacuum cleaner.
- Now we take out the nozzles and start working directly with them.
- Coke often forms on the nozzles, resembling resin in appearance and consistency. Be sure to get rid of these deposits.
- The surface around the nozzle is cleaned with gentle movements of a pin or needle.
- At this point, external cleaning can be considered complete.
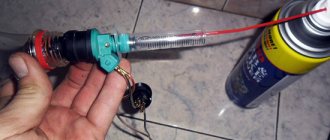
- Now the most difficult process is the internal “cleaning” of the elements. For this procedure, arm yourself with a tube, a syringe and a can of a substance intended for cleaning carburetors. It doesn’t matter that you have an injection car produced by our glorious automobile company AvtoVAZ. It is not difficult to purchase such a product, and it is cheap.
- The product must be applied under pressure using a tube, simulating an injection. For each injector, perform several such manipulations. This will allow them to cleanse themselves and break through from within. As a result, the devices will be able to spray fuel liquid more evenly than before cleaning.
- Be sure to give them some time to dry.
- You should also replace the old O-rings with new ones. It is strongly not recommended to use the old ones, even if you clean them. Replace the seals every time you clean the injectors.
- To delay the next cleaning as much as possible, and also to ensure long-term and efficient operation of the cleaned injectors, it is recommended to replace the mesh on the fuel pump, as well as the fuel filter.
VAZ 2114 drivers motivate the use of cheap gas stations by the need to save money . But if this is not stopped, clogged injectors will be only a small part of the problems your car will face due to poor fuel. And all the money saved on gasoline, plus the same amount, will be spent on repairs. Here is the price of cheap gas stations.
Source
Removing the injectors
In order to remove the injectors, you will need a special tool necessary for this work. It should be noted that the process of removing injectors on a VAZ 2110 depends on the type of engine; in an 8-valve engine, dismantling them is quite simple, but in a 16-valve internal combustion engine you will have to tinker. Let's look at each of the engines in detailed instructions.
Tool you will need:
- Flat and Phillips screwdrivers;
- Set of open-end wrenches;
- Set of hexagons;
After preparing the instrument, you can begin removal.
Dismantling the injectors of an 8-valve internal combustion engine
- We relieve the fuel pressure by disconnecting the fuel pump connector, which is located under the rear seat of the car.
- We start the engine and let it run until it stalls, after which we proceed to remove the injectors.
- We unscrew the fuel supply and return pipes (if there is one) with two 17 mm wrenches.
- Unscrew the tubes from the fuel rail.
- We unscrew the ramp from the cylinder head using a hexagon (2 bolts).
- Pull the ramp away from the cylinder head and remove it.
- Then remove the injector clamps and pull it out of the ramp.
Dismantling the injectors of a 16-valve internal combustion engine
- We relieve the fuel pressure by disconnecting the fuel pump connector, which is located under the rear seat of the car.
- We start the engine and let it run until it stalls, after which we proceed to remove the injectors.
- We unscrew the fuel supply and return pipes (if there is one) with two 17 mm wrenches.
- Unscrew the tubes from the fuel rail.
- Unscrew the two nuts securing the receiver.
- We unscrew the clamps from the cuffs connecting the receiver and the intake manifold.
- Disconnect the receiver from the intake manifold.
- We unscrew the ramp from the cylinder head using a hexagon (2 bolts).
- Pull the ramp away from the cylinder head and remove it.
- Then remove the injector clamps and pull it out of the ramp.
Video
Preparation for dismantling
Replacing injectors may not be necessary for much longer if you purchase special additives added to the fuel. Thanks to them, the injector stays clean longer. But you shouldn’t shift all the responsibility onto them, because with prolonged use, dirt and deposits formed create a kind of blockage for the passage of fuel, and this, in turn, causes irreparable damage to the engine.
To replace, you must purchase the goods that will be required for the job. First of all, this is a special product for cleaning the injector; it is sold in special aerosol cans. It is advisable to replace the rings on the injectors themselves. It would be useful to purchase any button, a light bulb whose power will not exceed 21 W, and a chip used to connect the wires to the injectors.
It is also necessary to pay attention to some features of dismantling. Before removing the injectors, be sure to ensure that the engine has cooled down. Then it is necessary to completely de-energize the fuel pump.
To do this, all wires responsible for power will need to be disconnected. Next, you need to reduce the pressure in the motor as much as possible. They simply start the engine and wait for the engine to stall. Repeat several times until the engine stops starting.
Then it is necessary to completely de-energize the fuel pump. To do this, all wires responsible for power will need to be disconnected. Next, you need to reduce the pressure in the motor as much as possible. They simply start the engine and wait for the engine to stall. Repeat several times until the engine stops starting.