A car's fuel system loses its functionality over time. The occurrence of contamination leads to a change in the operating mode of the engine. Loss of power and exhaust smoke are only a small part of the problems that arise. To correct this situation, you will need to replace the injectors or service them. The use of special additives can help prevent contamination, but is not a panacea. Figuring out how to change a clogged injector is quite simple; you only need to partially disassemble the fuel system.
Symptoms of a problem
Injectors can be faulty not only on a gasoline injection engine, but also on diesel units. The main symptoms of failure of these parts are identical, therefore, regardless of the type of fuel on which the engine runs, the following signs may indicate a malfunction of this part:
- Increased fuel consumption;
- Unstable engine operation in idle mode;
- Difficulty starting, reminiscent of “overflow” of a carburetor engine;
- Jerks during uniform movement, and dips during sudden acceleration.
These are the main signs of a malfunction, but the injectors should be checked only after other possible causes of such manifestations have been completely excluded. The engine may operate unstably if the fuel pump malfunctions, when the hoses are leaking, or when the lumen of the pipe becomes clogged with various deposits. A clogged fuel filter can also negatively affect engine performance. Jerking on a gasoline engine can also be caused by a faulty ignition system. All of the above options for engine breakdowns must be completely excluded before proceeding with a full diagnosis of engine injectors.
What else could cause an injector malfunction?
Unstable operation of the injector can also be associated with other mechanisms of the fuel system:
- IAC or idle air control - this type of sensor opens the air channel;
- Spark plugs are the elements responsible for spark formation.
Faulty sensors and spark plugs must be replaced promptly. Well, the injectors need to be cleaned and repaired/replaced regularly. They usually last at least 200-250 thousand kilometers on foreign cars.
You learned how to wash the injectors without removing them from the engine . If you properly clean the injector, the car will start to drive faster and pull well at speeds of 2000-3000 per minute. Fuel consumption will also be reduced.
What is an injector sprayer
An injector is a necessary element of the Common Rail fuel system; it serves for:
- creating fuel injection (ensuring the required dose and angle of fuel supply);
- sealing the injection system from the internal combustion chamber;
- fuel efficiency.
The nozzle nozzle is the part that is directly involved in the injection process. In this case, the part located at the front end of the nozzle is constantly in contact with the combustion chamber, and therefore is subjected to thermal and mechanical treatment. Thanks to the fuel that flows through the nozzle, the atomizer is cooled. However, during long-term operation such cooling is not enough, so the nozzle tip body is always made of heat-resistant materials.
In a fuel system with high pressure Common Rail injection (injectors can operate under pressure from 250 to 1000 atmospheres), the atomizer is a built-in element of the injector assembly. This is the only way to achieve its long service life.
What types of injector nozzles are there?
All parts, regardless of the prestige of the manufacturer and cost, must comply with the minimum list of job requirements:
- Supply a strictly defined amount of fuel.
- Ensure calculated injection time.
- Ensure the injection cycle specified by the manufacturer.
- Form fuel droplets of the required size.
- Maintain a certain torch shape.
Pin atomizer allows you to create one spray
Thus, on diesel engines equipped with a Common Rail fuel system, injectors with two types of nozzles are used . Pin ones are considered standard equipment, since they form only one fuel torch. Multi-jet engines are designed to create two or more torches, due to which the engine power is significantly increased.
A more complex nozzle model is equipped with a new generation atomizer, which forms several torches at once
Spray device
The design of the nozzles of all types of nozzles is similar. So, this part of the nozzle always consists of a body and a needle. The body is made in a cylindrical shape, along the axis of which the needle is inserted (in Common Rail nozzles the needle is inserted inside the channel). The system part has ultra-precise processing: the gap between the needle and the channel does not exceed 1–2 microns.
The most important unit of the entire structure is considered to be the point of contact between the needle cone and the body cone. In a new and working one, the needle cone is always in close contact with the body, and as it wears out, a gap begins to form between them.
These two parts perform the main function of the injector - metered fuel supply
Principle of operation
The operation of the nozzle (and with it the sprayer) on diesel engines is divided into four cycles:
- The injector is completely closed, that is, the valve is at rest. In this case, the injection pump presses on its wall, but the sprayer chamber counteracts this pressure, so the valve is closed.
- The beginning of fuel injection - the nozzle valve begins to open, as the external pressure becomes stronger than the internal resistance of the atomizer.
- The injector is fully open - depending on the fuel consumption, the nozzle needle will rise at different speeds. At maximum torque the needle rises quickly, at low speeds it rises more slowly. After it is completely raised, a dose of fuel is injected into the internal combustion chamber.
- Closing the valve means lowering the spray needle. The electronic control unit commands the injector to complete the cycle. As soon as the needle drops into its channel, fuel injection stops completely.
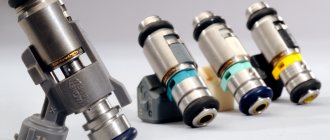
Removing injectors from the engine for diagnostics
On modern injection systems, the element is an electromagnetic device that opens upon command from the ECU to allow some of the fuel to pass through. On most cars, the injectors are installed on the fuel rail (rail). The removal process may differ slightly depending on the type and design of the internal combustion engine, and different tools may also be needed. Often, to remove fuel injectors, you need to prepare:
- Screwdriver Set;
- several keys;
- pliers or pliers;
- carburetor cleaner;
- rags or suitable rags;
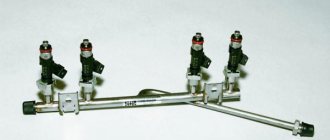
Now let's take a closer look at the process and answer the question of how to remove injectors on a VAZ or any other fuel-injected car. First you need to reduce the pressure in the fuel system. Many car models have a pressure regulator on the fuel rail. This regulator is a valve that needs to be pressed. As a result, fuel will flow out of the ramp and the pressure will drop.
Next, you need to remove the fuel rail on which the injectors are attached. To dismantle it is necessary to disconnect the connectors with wires that are secured using a special clamp. The specified latch is a spring clip that must be pressed. Then you will need to use a screwdriver to move the clamp along the ramp. The injectors can now be removed.
How to check an injector
Injector malfunctions are not numerous, but any of the breakdowns can lead to unstable operation of the cylinder in which this part is installed. After removing the injector, it is necessary to carefully check and, if necessary, clean or replace the part that does not meet the conditions for uninterrupted delivery of fuel to the cylinders. Correction of injection engine injectors consists, first of all, in eliminating tarry deposits in the area of fuel spray. Diagnostics and repair of parts installed on a diesel engine are carried out in a similar way. The diesel engine cylinder injector has a design that allows only the nozzle to be replaced. If the injector is not dirty, but there is no fuel combustion in a given cylinder, then the injector winding may have burned out. A broken injector is a fairly rare malfunction, but if there is no other damage, it is necessary to measure the resistance between the contacts of this part using a multimeter. If resistance is completely absent, then the faulty part must be replaced.
Removed injectors can be checked directly on the fuel rail. To do this, connect the control unit by connecting the wires in the sequence in which they were connected to the running vehicle. The fuel rail must be secured in such a way that containers of the same volume can be placed directly below them.
Plastic cups that are placed under the spray nozzle of each nozzle are ideal for this purpose.
Then you need to turn on the ignition and run the engine starter for 7 - 10 seconds. When performing diagnostics, you should pay attention to the quality of atomization of the fuel flowing from the injector. If fuel flows from the nozzle in a straight stream, then this nozzle needs to be replaced or cleaned of carbon deposits formed on its nozzle. You should also pay attention to the amount of fuel in the containers that were placed under the injectors. If, when performing diagnostics, there is a complete absence of fuel in any container, then there may be no power to the injectors. This problem can be caused by a lack of contact between the cable and the terminal, as well as a simple break in the wiring. If the wiring is intact and there is good contact between the wire and the injector winding terminal, then the control unit of the vehicle's power system may be faulty. If the electronic control unit is faulty, then in order to continue diagnostic measures, it must be replaced with a known good part.
Checking the injectors yourself using this method allows you to fairly accurately determine the faulty parts of the car’s power system. When performing such diagnostics, you should remember the heavy load on the battery when the starter is turned on, as well as the dangers of rotating the crankshaft without sufficient oil flow into the engine line, so it is advisable to carry out the diagnostics in one step. When the problematic injector is identified, you can begin to repair it.
Diagnostics and replacement of the injector
Injectors have a huge service life, and in some cases, cleaning is enough. When replacing them with non-original ones, registration of the injectors will be required; such information is entered into the electronic control unit and is necessary for engine operation. It is also important to maintain the tightening torque of the injectors, which ranges from 40–90 Nm and depends on the specific model.
The operation of the injector, although it seems complicated, upon closer examination becomes clear to every car enthusiast. A modern injector ramp has its own maintenance features that cannot interfere with disassembly and replacement of parts.
If you have any questions, leave them in the comments below the article. We or our visitors will be happy to answer them
Basic injector malfunctions
Almost all malfunctions that occur in both diesel and gasoline injectors are associated with their clogging. And the question comes down to how exactly the blockage occurred in the sprayer.
Knock
The so-called knocking sound is a malfunction that occurs due to coking of the nozzle holes. The fact is that this part is regularly exposed to high temperatures. If the driver constantly uses low-quality fuel, tar deposits accumulate on the nozzles.
Common Rail injector nozzle failed due to poor quality fuel
Gradually, the surface of these deposits becomes covered with hard soot, and interruptions in the fuel supply begin. It is at this moment that the mechanism begins to “knock.” Here are the signs of his knocking:
- engine power is significantly reduced;
- an increase in engine speed leads to jerks and dips;
- at low speeds the engine is unstable and often stalls;
- The toxicity of exhaust gases increases two and sometimes three times.
To eliminate this, the device must be washed. Here are the main cleaning methods:
- flushing with special fuel additives;
- washing on the stand (for this the parts will have to be removed).
Flow
An injector leak usually occurs due to the destruction of the o-ring located under it. Any, even the smallest crack in this part leads to a leak, since the pressure in the fuel line is very high. In addition, due to the collapsed ring, the fuel system loses its tightness and air begins to leak into the engine combustion chamber.
Due to the destruction of the sealing ring, the Common Rail injector may leak
Here are the signs that the injector is leaking:
- When inspecting the engine, characteristic oily streaks are visible around the part;
- the engine is very difficult to start;
- a running engine operates intermittently and with characteristic popping noises.
Flushing
After removing the nozzle, you can start washing it, but to do this, first remove the sealing rings installed on its nozzle and body.
This must be done carefully so as not to cause damage.
Washing is done like this:
- Place the free end of the prepared hose onto the nozzle and secure it with a clamp. We connect a bottle of cleaning agent to the plastic tube;
- We connect the wires to the injector terminals; it is important not to reverse the polarity. Therefore, it is better to ask in advance where the exit is. When connecting wires, you should also take care of the insulation. Then we connect the wiring to the battery;
- We create pressure in the hose by pressing the spray can a couple of times;
- Use a toggle switch or button to turn on the nozzle, after which it will begin to spray the cleaning agent;
- We carry out cleaning until its spraying becomes uniform. In this case, it is necessary to constantly maintain pressure in the hose by pumping it from the can. It is important to prevent the injector from running idle;
- After washing, new sealing rings are put on the nozzle, and it is installed in the ramp.
Disassembling the nozzle
In most cases, injector repair can be done by replacing the filter, which is installed at the top of the injector where it connects to the fuel hose. To remove the filter, the main tool is to use a self-tapping screw, which is screwed 2-3 turns into the mesh filter and removed from the nozzle body.
Then, in place of the removed filter, a new mesh filter and o-ring are installed. In this way, it will be possible to ensure stable filling of the injector with clean fuel, which will have a positive effect on the operation of the injection engine.
Adjusting nozzles at home is a completely doable task if you have minimal experience in handling tools. For home craftsmen who have at least once disassembled the carburetor and eliminated engine overflow, it will not be difficult to clean the injectors.
Restored injectors can last for a long time, and if all cleaning and repair actions were carried out according to the rules, then the vehicle will be operated without serious deviations in the fuel supply system.
Checking diesel injectors for overflow (drain to return)
As diesel injectors wear out over time, a problem arises due to the fact that the fuel from them gets back into the system, due to which the pump cannot generate the required operating pressure. The consequence of this may be problems with starting and operating the diesel engine.
Before the test, you will need to buy a 20 ml medical syringe and an IV system (to connect the syringe you will need a 45 cm long tube). To find an injector that throws more fuel into the return line than it should, you need to use the following algorithm:
- remove the plunger from the syringe;
- with the engine running, use the system to connect the syringe to the “return” of the injector (insert the tube into the neck of the syringe);
- hold the syringe for two minutes so that fuel is drawn into it (provided that it will be filled);
- repeat the procedure one by one for all nozzles or build a system for all of them at once.
Based on information about the amount of fuel in the syringe, the following conclusions can be drawn:
Checking the return flow
- if the syringe is empty, it means the nozzle is fully operational;
- the amount of fuel in a syringe with a volume of 2 to 4 ml is also within normal limits;
- if the volume of fuel in the syringe exceeds 10.15 ml, this means that the injector is partially or completely out of order and needs to be replaced/repaired (if it pours 20 ml, then it is useless to repair, since this indicates wear of the injector valve seat ), since it does not maintain fuel pressure.
However, such a simple check without a hydraulic stand and plan test does not give a complete picture. Indeed, in fact, when the engine is running, the amount of fuel discharged depends on many factors; it can be clogged and needs to be cleaned, or it freezes and needs to be repaired or replaced. Therefore, this method of checking diesel injectors at home allows you to only judge their throughput capabilities. Ideally, the amount of fuel volume they pass through should be the same and range up to 4 ml in 2 minutes.
You can find the exact amount of fuel that can be supplied to the return line in the manual of your car or engine.
To ensure that the injectors last as long as possible, refuel with high-quality diesel fuel. After all, it directly depends on the operation of the entire system. In addition, install original fuel filters and do not forget to change them on time.
Replacing the injector nozzle
During the operation of a diesel car, situations may arise when fuel consumption increases noticeably and engine power decreases until it stops completely. This is often caused by faulty nozzles. In these cases, it is advisable to carry out repair work as quickly as possible.
The cause of decreased engine power and increased fuel consumption is often a faulty injector nozzle.
Symptoms of a faulty injector nozzle
The need to replace the sprayer can be determined by the following signs.
- Fuel is supplied in excess volume. It continues to flow into the engine even after the end of the operating cycle. Smudges appear.
- The engine is unstable, starts poorly after a long stay and the idle speed fluctuates. The reason for this is a lack of fuel in the system.
- Due to incomplete combustion of fuel, the exhaust becomes black and denser.
As a result, engine power is reduced. In this case, replacement of the nozzles is required.
Required Tools
Typically, injectors are installed in the cylinder head on a thread. To dismantle them, you should not use open-end wrenches. Even if you manage to remove the injectors in this way, you will not be able to install them back - it is impossible to tighten them with a wrench with the required force.
The main part of the injector body is a hexagon. To remove them, you can use standard 24 and 27 socket heads and a wrench. They should be elongated. In addition, you will need a container with fuel to flush the injectors.
Video: dismantling and repairing injectors
Procedure for replacing an injector
After removing the injectors, washers and contaminants are removed from the injector channels. The washers are pulled out using self-made hooks. After cleaning the channels, be sure to crank the starter for 10 seconds. This will ensure that the channels are completely clear of debris. In addition, it is recommended to check the functionality of the glow plugs and control system.
After removing the injectors, their performance is checked according to the following criteria:
- when fuel is supplied under a certain pressure, the injector must open;
- before opening the injectors, fuel should not flow out of the nozzle;
- spraying should be uniform;
- When the fuel supply is stopped, the pressure inside the injector must remain unchanged for some time.
When disassembling the nozzle, it is convenient to use a vice, but you should not use excessive force
If the nozzles are faulty, protective caps should be put on the nozzles and the work area should be prepared. The surface must be clean and level. You will need:
- vice;
- container with clean fuel;
- spanners.
Japanese car injectors that have a return through a ramp should not be clamped in a vice, as the part may be damaged. The key is secured in a vice and the nozzle is placed in it.
The injectors of German engines can be clamped in a vice. It is not recommended to use open-end wrenches - only socket wrenches and extended heads.
The procedure for replacing the nozzle is as follows.
- The union nut is loosened and unscrewed. Sometimes it is removed along with the sprayer. In this case, it is knocked out with any suitable attachment, cleaned of dirt and washed.
- The intermediate housing is removed and washed in a container with fuel.
- The remaining fuel is drained from the injector body.
- Remove the new atomizer from the packaging and wash it.
- The intermediate body is removed from the container in such a way that contaminant particles are removed along with the fuel.
- The nozzle is assembled, the nut is tightened.
- The performance of the injector is checked at the stand.
- Before installing the nozzle, the seat is lubricated with graphite lubricant. Tightening is carried out with a force of 6–7 kg-m. Screw the nozzle into the channel by hand - it should go easily.
The assembly process does not present any difficulties if the tubes and fittings were marked during disassembly. Before installation, high-pressure pipes are washed with fuel both outside and inside. After connection, clamps are installed on the tubes to prevent vibration and premature failure. Air is then removed from the system and the engine is started.
Video: DIY injector replacement
Checking diesel injectors for overflow (drain to return)
As diesel injectors wear out over time, a problem arises due to the fact that the fuel from them gets back into the system, due to which the pump cannot generate the required operating pressure. The consequence of this may be problems with starting and operating the diesel engine.
Before the test, you will need to buy a 20 ml medical syringe and an IV system (to connect the syringe you will need a 45 cm long tube). To find an injector that throws more fuel into the return line than it should, you need to use the following algorithm:
- remove the plunger from the syringe;
- with the engine running, use the system to connect the syringe to the “return” of the injector (insert the tube into the neck of the syringe);
- hold the syringe for two minutes so that fuel is drawn into it (provided that it will be filled);
- repeat the procedure one by one for all nozzles or build a system for all of them at once.
Based on information about the amount of fuel in the syringe, the following conclusions can be drawn:
Checking the return flow
- if the syringe is empty, it means the nozzle is fully operational;
- the amount of fuel in a syringe with a volume of 2 to 4 ml is also within normal limits;
- if the volume of fuel in the syringe exceeds 10.15 ml, this means that the injector is partially or completely out of order and needs to be replaced/repaired (if it pours 20 ml, then it is useless to repair, since this indicates wear of the injector valve seat ), since it does not maintain fuel pressure.
However, such a simple check without a hydraulic stand and plan test does not give a complete picture. Indeed, in fact, when the engine is running, the amount of fuel discharged depends on many factors; it can be clogged and needs to be cleaned, or it freezes and needs to be repaired or replaced. Therefore, this method of checking diesel injectors at home allows you to only judge their throughput capabilities. Ideally, the amount of fuel volume they pass through should be the same and range up to 4 ml in 2 minutes.
You can find the exact amount of fuel that can be supplied to the return line in the manual of your car or engine.
To ensure that the injectors last as long as possible, refuel with high-quality diesel fuel. After all, it directly depends on the operation of the entire system. In addition, install original fuel filters and do not forget to change them on time.
How to diagnose and repair injectors
In the event that the owner suspects the unstable operation of the internal combustion engine is a failure of the fuel equipment, in particular, faulty injectors, he will have to go for computer diagnostics . When it shows errors in the operation of the injectors, they will all be removed from the engine as a set and sent for diagnostics on a special stand. Bench diagnostics will show whether the injectors are bleeding fuel back into the drain line, and if this happens, at what pressure.
The next stage will be testing the operation of injectors on equipment that simulates operation on an engine, with the participation of injection pumps and fuel pipes. Electronic sensors will one by one measure all the operating parameters of each injector, and this will provide direction for diagnosing the causes of the problem. After inspection, the injectors are sent to an ultrasonic bath and cleaned of carbon deposits and other deposits.
After diagnostics, the stage of inspecting each injector on the stand begins. The master carefully disassembles all the smallest elements of the nozzle (can only be done with electromagnetic injectors) and examines them under a microscope. The advantages of such a meticulous approach are that most manufacturers produce all the necessary “spare parts” for repairing and restoring the injector. Having identified a problem, for example, with a non-working injector nozzle, you can replace it with a new one, thereby returning the element to operability using a budget method.
- True, for injectors from those manufacturers whose components cannot be found on sale, there are only two strategies left - replacing an expensive element with a new assembled one, or looking for a budget analogue of the required part, but from a different manufacturer.
After all the injector elements that need replacement have been replaced, the technician assembles the element together . The most important step is adjusting the assembled nozzle, and this is a difficult task: each assembled part is measured with an indicator; if the size does not correspond to the required range, the part is again disassembled and adjusted with a washer or a locking ring. And so on with each element until the injector is completely assembled.
It is also important to tighten the upper and lower parts of the injector with a maximum regulated tightening torque using a torque wrench.
After collection, the repaired injector is again sent to the diagnostic stand , where it is checked in all operating modes.
Flushing valves and combustion chamber
At the end of the above procedures, it is recommended, to improve the cleaning result, to pour inside the fuel tank a liquid intended for cleaning valves, which will destroy carbon deposits on the intake valves and combustion chamber over the course of six engine operating hours, although you need to be careful, who knows what you have built up in the engine (and if you drove constantly under tension and only at low speeds, then carbon deposits, for example, on the bottom of the piston can reach several millimeters) and how it will begin to fly off when using a cleaner.
Now you can relax... until the next engine cleaning. We strongly advise you to read this article again after ten or twenty thousand kilometers. And then you will forget about engine problems!
vote
Article rating
Adjustment after self-repair
It should be noted that in some cases the part will not immediately function correctly - calibration is necessary. This is done by changing the adjusting washers; it is advisable to stock up on washers of different thicknesses in advance. For example, if the response pressure is lower, we install a thicker washer and vice versa. You can take it as a rule that to increase the pressure by 10 kgcm, take a washer 0.1 mm thinner. The diameter should be the same as those previously installed.
It is also worth noting that at the stage of disassembling the nozzle, you need to carefully inspect the pressure spring and, if it has exhausted its service life, replace it. Otherwise, fuel leakage can be expected. Also, all O-rings must be changed. Without this work, calibration will not make sense. After adjustment, the product can be put back on the engine.
What do the experts advise?
It's easy to change. To find out how to do this on a diesel engine and you will be pleased with the result, use the advice of experts.
Warm up the engine before removing.
If the mounting bolts do not come off, fill them with WD-40 and leave for 30 minutes. Again they do not give in, contact a service station, as it may burst. To get it you need special tools.
Important! Unscrew along the axis. You cannot hit it or twist it against the axis.
To prevent the part from wearing out prematurely, follow these recommendations:
✦ Don't wait for a breakdown. For preventive purposes, wash periodically.
✦ Try cleaning it the old way. Accelerate the car to 120 km/h and drive about 10 kilometers. High voltage will trigger self-cleaning.
✦ Choose high-quality diesel fuel. Poor quality will cause the sprayer to break and the installation to become unusable.
✦ Fill the tank completely. Don't let the red light come on. If there is no diesel fuel in the tank, the pump will begin to capture sediment and debris, and its operating function will be lost.
✦ Keep the container clean. Remove and wash twice a year. Clean the sediment filter.
✦ Do not use the cleaner for more than ten thousand km. When it becomes clogged, water and debris enter the device. This will cause it to wear out.
✦ To retain microparticles, install another fine filter. When you reinstall, look at what condition it is in. It should be filled no more than 60%. This will prevent damage.
✦ Install a bandage to heat diesel fuel in winter. It will warm up and the paraffin flakes will not harm the spare part.
Some tips
Particular attention should be paid to the quality of the sealing rings - not only the tightness of the unit depends on them, but also possible overheating. They act as a barrier that prevents excess heat from the cylinder head from affecting the injector. The rings must be changed after each dismantling. The fact is that after tightening the element, the rings are compressed, they are deformed, etc. Please note other points:
- When asked whether it is possible to repair a Common Rail diesel injector on your own, the question will be - yes, it is possible. But only with the use of special equipment, which costs a lot of money. It's easier to go to a workshop.
- Check in advance whether you need to re-register a new injector into the unit’s memory. Sometimes this can be a problem.
- O-rings from different manufacturers and for different models may be indistinguishable by eye. In this case, even the slightest deviation will cause a seal failure. Only use rings that match your car brand.
- Buy spare parts not on the market, but in specialized stores. Otherwise, there is a high risk of running into a low-quality part.
- Special fuel additives will significantly extend the service life of not only injectors, but also other components of the car. However, this is more of a preventative measure and not a panacea.
When is cleaning required?
Despite all the advantages, the injector quickly becomes clogged when using low-quality fuel for a long time, which reduces engine efficiency. This is the main drawback of this element of the fuel system. Then the question of flushing the injector arises.
Note! Experts recommend cleaning every 20,000 km. But the frequency may vary depending on the quality of the fuel used and the design features of the injection system.
Flushing the injector without removing it
There are a number of signs that indicate the need to flush the fuel system elements. The most common ones include:
- dirty spark plugs;
- difficult engine starting;
- uneven operation of the motor;
- the appearance of smoky air from the muffler;
- power reduction;
- increase in fuel consumption (as a rule, consumption increases sharply).
Signs of faulty injectors
These are not all the reasons, as there are many of them. Therefore, if you have the slightest doubt, you need to seek help from specialists to conduct a full diagnosis of your vehicle. The cost of this service may vary depending on the city in which the procedure will be performed.
Methods for washing without removal
There are two ways to clean injectors - pour a special product through the fuel tank or make a homemade device and fill it with injector cleaning fluid (the device is connected to the fuel system of the car engine). The first method is considered the easiest to implement, so it will not take much of your time.
How often to change the fuel filter
A special cleaning agent is added every 15,000 km for preventive purposes. If the engine begins to operate abnormally, then this method is considered ineffective. In such cases, the second method is used.
It is more difficult to implement, but using a homemade device is much more beneficial. They resort to the second method in advanced cases, when the injector is working with obvious problems or after 20,000 mileage or more.
Now let's look at each method separately.
Through the tank of a car
You can buy the product used in this method at almost any auto store. The main purpose of such an additive is to clean the entire fuel system of the car. Based on the name of the method, it is easy to guess that the additive is poured through the neck into the fuel tank.
Flushing the injector through the tank
The procedure consists of several stages, the sequence of which must be followed:
- replacing the fuel filter;
- adding a cleaning agent to the fuel tank (one bottle should be enough);
- operation of a vehicle (must travel at least 200 km);
- repeated replacement of the filter element.
On a note! The calculation of the proportion of cleaning agent and gasoline must be observed accurately so as not to harm the engine. Detailed information can be found in the manufacturer's instructions.
Injector cleaning products
On the market you can find cleaners from different manufacturers and at different prices, but not all of them can fully clean the injectors. Below are the best manufacturers whose products are truly effective.
Table. Review of the best purifier brands.
Brand name, photo description
| "Liqui Moly" | A well-known German manufacturer that specializes in additives and lubricants. Injector cleaning products are very popular in the former CIS countries. |
| "STP Injector Cleaner" | The composition of this product is specially selected in such a way as to completely eliminate deposits in the fuel injection system. Positive changes will be noticeable almost immediately (after about 60 km). |
| "Kerry" | A domestic manufacturer of auto chemicals and auto cosmetics, which in its relatively short career has managed to conquer the modern automotive market. The product is the perfect combination of good quality and low price. |
| Hi Gear | Another manufacturer of injector cleaning products used in Russia. This product is produced in the USA, which is why its price is an order of magnitude higher than that of cheaper analogues. |
| "LAVR" | An effective cleaning agent designed for in-place flushing of the fuel system. It has been used relatively recently in the Russian Federation, but during this time many motorists have appreciated the high quality, as evidenced by numerous positive reviews. |
If you find it difficult to choose a manufacturer, you should not focus on the cost of the product alone. It is better to seek help from a sales consultant who will tell you in detail about the product you are interested in and recommend the best option.
Using a special device
To make a washing device, you need to prepare some tools and materials, namely:
- electric compressor;
- drill with a diameter of 13 mm;
- two-liter plastic bottle;
- small hose with a diameter of 12 mm;
- nipples and clamps – 2 pcs.;
- fuel filter;
- cleaning agent – 1 bottle.
Injector flushing device
Having prepared everything you need, you can start working. Below are step-by-step instructions, which, if followed correctly, will simplify the procedure for cleaning injectors.
Step 1. Carefully drill holes in both sides of the bottle (as shown in the photo).
Make small holes on the bottle
Step 2. Connect the bottom of the plastic bottle with a full nipple. Make sure everything is sealed.
Place the nipple on the bottom of the bottle
Step 3. Install the same nipple into the bottle cap, but the valve must be unscrewed to ensure smooth supply of liquid to the nozzles.
Attach the nipple to the cap
Step 4. Connect one end of the hose to the nipple on the bottle cap and secure it with a clamp. Connect the fuel filter to the lower hole and tighten it with a clamp.
Connect the hose to the nipple
Step 5: Start the engine and warm it up to operating temperature. Now you can connect the manufactured equipment. First, disconnect the special connector on the fuel line.
Disconnect the special chip
Step 6. After removing the fuel supply hose, place this chip on the fuel filter. The action should continue until a characteristic click appears.
Connect the structure to the fuel system
Step 7: Fill the bottle with wash liquid and close it tightly.
Pour the washing liquid into the bottle
Step 8: Hang the filled bottle somewhere on the open hood so it is higher than the engine.
Secure the bottle over the engine
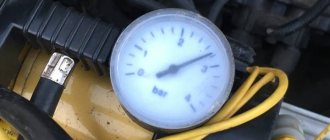
Then connect the compressor pump to the nipple at the bottom of the bottle to create optimal pressure inside the car's fuel system. Turn on the device and inflate the bottle to the 3 atm mark. During the process, the pressure in the bottle will drop, so it needs to be controlled by turning on the pump in a timely manner.
Connection diagram for a device for washing injector nozzles
Once the desired pressure is achieved, start the engine and let it run for 10-15 minutes. Stop the engine for a while, and then start it again until the fluid is completely used up. As soon as the engine stops on its own, reduce the pressure in the bottle by unscrewing the cap.
This is what self-flushing the injector looks like
Connect the fuel hose back to the car, connect the chip and start the engine for a few minutes so that it can run on pure gasoline. At this point, the injector cleaning procedure can be considered complete.
Additional recommendations
Having understood the washing technology, you can make sure that it is not so complicated if we are talking only about the technical component.
Selecting the necessary materials, preparing tools and creating a special device for the job is quite simple.
To do this, you only need to have desire, free time and the skills to use conventional tools that are present in the driver's kit.
Cleaning injectors without removal
But with the choice of a high-quality cleaning agent, things are much more difficult, because this is a responsible task. An incorrectly selected product can damage the injectors and make them unsuitable for further use. Such an error will entail not only temporary, but also additional financial costs. Therefore, it is important not to make mistakes when choosing.