Overheating of the engine leads to serious problems: the pistons may jam, the cylinder block gasket may break, which leads to the need to overhaul the engine. To protect the power unit from overheating, it is important to maintain stable operation of the cooling fan. In this article we will discuss the operating principle of the device, its connection diagram, independent diagnostics and repair, as well as modernization of the control circuit. The instructions are fully suitable for VAZ 2115 and VAZ 2113 cars.
OPERATING PRINCIPLE
A fan is a device that allows you to increase the efficiency of a cooling radiator. The radiator takes heat from the engine and releases it into the air. This process is accelerated by blowing through the blades of an electric fan.
The coolant flows through a closed, sealed system. Its task is to remove excess heat from overheated engine parts. Hot antifreeze flows into the radiator, is cooled here and returns back. While in the radiator, the coolant passes through a system of thin tubes. The incoming air flow while the car is moving helps to quickly remove excess heat from the engine compartment.
But when the car is stuck in traffic or idling, the air flow stops cooling it. In this case, the cooling system may not cope with its task. An electric radiator fan is designed to create air flow artificially. The temperature for turning on the fan on a VAZ 2114 is 85 degrees Celsius.
Having received a signal that the permissible temperature value has been exceeded, the sensor starts the device’s operating mechanism. An artificial air flow is created that removes heat from the radiator. The mechanism operates until the temperature level drops to an optimal state.
The thermal switch then receives a signal that the normal temperature has been reached and turns off the fan.
The device consists of four plastic blades that are mounted on the EDF shaft. A special controller regulates the automatic operating mode. The thermostat is equipped with a solid filler that is sensitive to temperature changes.
There are main and additional valves. When the temperature reaches 85 degrees Celsius, the main valve opens.
VAZ 2110 engine operating temperature
Normal operating temperature of internal combustion engine: +90. +95, if above +97 then the internal combustion engine will be slightly dulled, but this t is also considered normal, up to +110 is also normal, but the radiator fan should already turn on. If t is below +90, this is not overheating. We look at the thermoelement for grinding into the thermostat cover (so that when closed it does not etch into a large circle) and the serviceability of the thermoelement itself by boiling it in the thermostat cover. If the lower pipe is cold, this is not a fact that it does not poison the large circle.
I purchased a 6-hole thermostat assembled, sealed, with an Quality Control Department stamp, t 85, PRAMO, for 505 rubles. I also had a thermocouple from a viburnum, also at t 85, lying around for a long time. ___________________________________________
Kalinovsky thermoelement: ___________________________________________________
Thermostat with thermocouple: ___________________________________________________
I boiled both thermoelements in this one housing of the new thermostat, the result:
1. Thermoelement from viburnum: opened slightly at +92 (began to let water through at atmospheric pressure) at 96 opened slightly by 5 mm +100 opened by 8-9 mm diluted the water to +83 - almost instantaneous slamming.
2. Stock thermocouple Pramo: opened slightly at exactly +85 and went at atm. pressure +86 hole mm 2-3 +88 hole approximately mm 5 diluted the water to +83 - it slows down for about a minute.
Now do you understand why your operating temperature in winter is +88 and below?
There was a thermoelement left from the new PRAMO thermostat, which turned out to be a little longer (rod) and did not fit tightly into the cover of the Priora thermostat. The cover of the Priorov thermostat was drilled out a little and the thermoelement sat tightly, now it is not blown through. (before these actions I thought about it, I didn’t sit down by two mm)
via FTP video 5:52, 24.4 MB _______________________________________________________________
And now the sea trials of the Kalina thermoelement with the Pramo cover:
In weather -15, VideoAdded t coolant on the move, t air in the driver's compartment, t air flow at the carrier's feet (16.6 MB)
Via FTP, 16.6 MB ________________________________________________________________
Warming up from a cold start, with on. stove, -16 on the street, -15 coolant, -15 in the cabin, at XX, 24 minutes: here is the video, 63.4 MB:
Warming up from a cold start, with off. stove, -19 on the street, -18 coolant, -17 in the cabin, at XX, 23 minutes: here is the video, 30.4 MB:
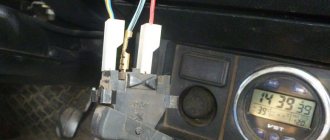
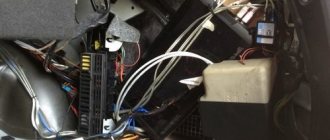
WHERE IS THE FAN RELAY LOCATED?
It is located in an additional block.
4 – electric fan relay;
5 – electric fuel pump;
6 – ignition relay.
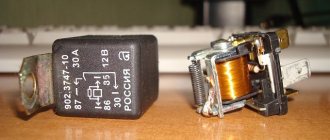
Relays and fuses may have a different order. Therefore, you need to focus on the color of the wires. The main relay is always located at the bottom. Find the relay that has a thin pink wire with a black stripe coming from it. It comes from the main relay through pin 85. Be careful! Do not confuse this with the red thin wire, which also has a black stripe and extends from the controller. And find a thick white wire with a black stripe (pin 87). This is where the cooling fan relay is located. There is always a fuse next to it. It is an element of the chain.
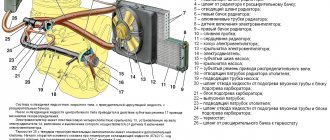
Connection diagram
Knowing the electrical diagram for turning on the radiator fan, it will be easier to find problems in its electrical circuit.
The cooling fan has 2 inputs: the first input leads to the generator through fuse F5 and the connection busbars in the mounting block (2). The harness block (3), nicknamed the chip by drivers, connects the electric fan via a relay to the injection controller connected to the ignition relay. From the wire coming from the controller, a branch leads to an auxiliary relay with a fuse.
COOLING FAN DIAGNOSTICS
If signals appear on the dashboard indicating that the permissible temperature level in the cooling system has been exceeded, this may indicate that the fan on the VAZ 2114 is not working. The main symptom of the malfunction is that the mechanism does not start even with a significant increase in temperature. It is urgent to turn off the engine to prevent its elements from overheating.
The engine should not be operated with a faulty electric cooling fan. This may damage the cylinder head.
If the cooling fan on a VAZ 2114 does not work, the following malfunctions may be the cause of the breakdown:
- The fan switch sensor on a VAZ 2114 has failed.
- Lack of contact at the sensor connector.
- The wiring has broken.
- Electric fan relay faulty.
- The fuse has blown.
- Damage to the device's electric motor drive.
Unplug the device. Connect it to the battery terminal. Maintaining polarity. If a direct connection to an energy source starts the electric motor, then the drive is working. There may be problems with the wiring, the fuse, or the temperature sensor.
Now it’s time to diagnose the fuse. You don't even have to open the plastic box to do this. If the relay malfunctions, the horn stops working at the same time as the fan. Therefore, if you notice the loss of the sound signal, it means that the fuse has definitely blown. You can find it in the engine compartment in a small plastic box. We release the cover, pressed by two latches, take out the burnt fuse with tweezers and replace it with a new one.
But diagnosing a relay is quite difficult. Especially for those who are exclusively “you” with auto electrics. To check functionality, the easiest way is to find a working relay and temporarily install it. If, after installing a new device, the fan begins to work properly, then it is time to replace the old one.
To diagnose the temperature sensor that supplies a signal to the radiator, you need to disconnect the connector from the sensor and start the ignition. The emergency mode will start, in which the electric fan will start blowing. If the fan starts late when the connector is disconnected, the sensor is most likely faulty. Replacing it will take no more than five minutes. You just need to unscrew two bolts using a Phillips screwdriver and install a new device in its place.
Even if a malfunction has occurred in the VAZ 2114 fan itself, this does not mean that it is time to change it. Sometimes you can simply replace a damaged bearing or brushes. But if the electric motor is faulty, it is much easier to purchase a new mechanism.
Fan connection diagram in carburetor and injection engines
The control of forced radiator airflow in carburetor and injection engines of the VAZ-2110 is significantly different. Firstly, the fan switch located on the radiator housing is responsible for everything. It is set to a certain coolant temperature. Usually it is 105-107 oC. When the coolant heats up to this temperature, the sensor is triggered, sending a signal to the fan relay. It closes the electrical circuit, driving the electric motor.
Turning on the cooling fan of a VAZ-2110 with an injection engine occurs somewhat differently. In engines equipped with an electronic control unit, there is no sensor on the radiator. Its place was taken by a temperature sensor located on the thermostat pipe. When the coolant heats up to a temperature of 105-107 oC, it sends a signal directly to the controller, which makes the decision to turn on the fan. It transmits an electrical impulse to a relay, which turns on the electric drive.
HOW TO REPLACE
If you are convinced that the cause of the malfunction lies in the fan motor, then the easiest way to carry out repairs is to completely replace the device. In this case, there is no point in spending money on a new casing. It will be cheaper to just buy a new electric motor.
Necessary tool
No special tool is needed. The work is carried out simply using 8 and 10 socket wrenches and a Phillips screwdriver.
Step-by-step algorithm of work
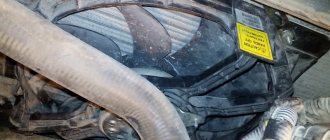
You can replace the cooling fan motor without removing the radiator.
- Disconnect the connector and device wiring harness from the casing.
- Unscrew the mounting bolts using a 10mm wrench.
- Unscrew the lower fastening nut.
- Using a 10 mm socket wrench, unscrew the mounting nut from the radiator.
- Using a size 8 socket wrench, unscrew the two pressure plate nuts.
- Remove the plate.
- Remove the electric fan along with the casing.
- Let's start dismantling the electric motor. Using a 10 mm wrench, unscrew the three mounting nuts and remove the engine along with the blades.
- Using a screwdriver, pry up the lock washer.
- And take it off.
- Remove the impeller.
- Put the impeller on the new motor. Make sure that the shaft pin fits into the impeller groove.
- Reassemble in reverse order.
Quick Repair Methods
If the thermostat has died for a long time on a long journey, then first try knocking on its body. Sometimes, after exposure, the valve opens, but expect it to jam again soon. The best option is to drain the fluid and try to break through the thermostat to turn on the big circle. And if suddenly there is a new one or a working one in the glove compartment, then install it.
It’s more difficult with a pump on the road; it will be easier to add water as needed. But this is only if the leak is not very large. Having reached the place where repairs can be carried out, it needs to be replaced. On sevens this is done quite quickly, you just need to drain the liquid, loosen the fan belt and remove the old pump. And on nines you will have to remove the casing that covers the timing block, loosen the belt, and only then use a 10mm wrench to unscrew the three bolts securing the pump.
But with a fan everything is simpler. If there is a breakdown in the sensor, then the easiest option is to short-circuit its contacts. In this case, the fan will work constantly, so after stopping the engine, be sure to turn it off, as the battery will run out. If the problem is in the wiring, then the best way to get out of this situation is to connect a fan to the battery. But if the electric motor winding burns out, then only a complete replacement will help.
- Description of the VAZ 2107 cooling system
- Typical failures in the cooling system in 2017
The engine cooling system is one of the important parts of the car. It not only cools the engine, but also heats the car interior in winter. And to carry out maintenance and repair, you simply need to know the composition of the system and the general principle of its operation.
The first copies of VAZ 2110 cars were practically a copy of the nines. The only difference is in the body, but the engine and gearbox are similar. But carburetors were replaced by an injection system, and a lot has changed in the car, including the cooling system. Constant modernization makes itself felt, the car becomes more reliable, but more difficult to maintain. Of course, increasing engine power entails a lot of modifications. Changes occur in the braking system, lubrication and cooling systems. But the operating principle remains virtually unchanged.
HOW TO REPLACE THE TEMPERATURE SENSOR
Before starting work, you need to partially drain the coolant from the cylinder block.
- Remove the wire.
- Using a 21 wrench, unscrew the temperature sensor.
- Take it off.
- Install the new one in reverse order.
Problems with the electrical circuit
If checking the reservoir cap does not reveal any faults, then the problem may lie in the circuit.
The search should begin by checking the serviceability of fuse F7. To do this, you need to gain access to the mounting block and check the contacts for the presence of oxidative traces. If nothing of the sort was noted, then proceed to the next step. Otherwise, clean the contact connections or simply replace the fuse with a new element. The part is inexpensive.
The next step is to check the fan switch sensor:
- Initially, warm up the car to 100 degrees.
- Turn off the engine and immediately start the engine.
- Open the hood and disconnect the terminal from the fan sensor.
- If, after disconnecting the contact, the fan starts working, then the unit is operational, but the sensor needs to be replaced.
- When the fan does not turn on after disconnecting the terminal, then the situation is the opposite - the sensor is working, but the fan is not.
Electric motor breakdowns are often the reason why the fan does not turn on. If all the previous measures did not help you find the problem, then you will need to dismantle the electric motor. The following problems can be identified in this node:
- The commutator brushes are worn.
- The brushes are stuck.
- There was a short circuit in the armature winding - the problem is identified by a characteristic smell.
Problems with the relay. Sometimes a situation arises when the cooling system fan start button simply fails. In this case, you will need to carry out the following work:
- Remove the trim on the right side of the dashboard inside the passenger compartment. To do this, you need to unscrew two screws.
- Under this panel there are three relays.
- The required relay is usually located on the side in relation to the front of the car.
- To be sure to act correctly, find the car's operating manual and check the wires that go to the relay we need.
- To solve the problem with the relay, you just need to install a new element. You should not skimp on this component. Cheap models break down very quickly.
WHAT TO DO IF THE ELECTRIC FAN WORKS CONSTANTLY?
Sometimes another problem arises. Many car enthusiasts are interested in why the fan on the VAZ 2114 is constantly running?
There are four possible causes of the malfunction:
- a short circuit has occurred in the electrical circuit;
- the electric fan relay has broken down;
- The temperature sensor needs to be replaced;
- The electronic unit is broken.
Most often, the fan starts to work continuously as a result of a shorted wire. The electrical circuit remains on regardless of the signals from the temperature sensor and relay.
To troubleshoot the problem, you need to ring each wire and find the fusion point. Sometimes it is noticeable even upon visual inspection.
If ringing does not help identify the malfunction, you need to check and replace the fan relay. The cost of the device is low. Therefore, for diagnostics it is easier to buy a new relay and install it in place of the old one.
If this does not help, then you need to check the operation of the temperature sensor. After all, it is he who is responsible for turning on and off the electric motor of the VAZ 2114 fan.
If all other elements of the system are working properly, you need to check the electronic module. It rarely fails. If the problem still occurs there, you will have to perform a complete error reset. Sometimes only a complete flashing helps. Not everyone can do this work on their own. Therefore, it is better to seek help from a car service center.
It would also be useful to install a button to force the fan to start and turn off on the VAZ 2114.
This solution can be very useful if the breakdown occurs somewhere on the highway far from the city. In this case, using the button on the instrument panel, you can force the fan to cool the engine.
Checking at home
Sometimes the electric motor turns on too late, when the antifreeze temperature is already high. This may be caused by a malfunction of the valve in the radiator cap or abnormal parameters of the switch on sensor. You can check the device’s response temperature at home using a multimeter and thermometer.
After disconnecting the electrical connector, the sensor is unscrewed with a key. To avoid burns, remove the device only from a cold engine, after draining the antifreeze. When reinstalling, it is advisable to use a new sealing copper washer and not apply too much force when tightening.
The switching temperature is engraved on the end; it can be from 92 to 95 degrees. To check, you need to connect the multimeter in resistance measurement mode and immerse the threaded part in a container of water.
While heating the water and monitoring the readings of the multimeter, we use a thermometer to record the moment it turns on, and when it cools down, the temperature it turns off. Standardly, these are 92 and 87 degrees; with significant deviations, late operation is especially critical, the device requires replacement.
To improve cooling, it is possible to install a double fan from Niva. There are two modifications for placement: after the radiator or in front of it.
Nivovsky injection radiator 21214-1300024-43 (placed in front of the radiator)
On the VAZ 2110, any of the options can be installed with minimal modifications to the fasteners on site. When electric motors are connected in parallel, the current consumption increases to 40 amperes, which requires replacement of the wiring.
Nivovsky suction radiator (placed after the radiator)
Monitor the engine temperature. If you notice overheating too late, then in addition to boiling of the antifreeze and a forced stop, more serious consequences are possible: deformation of the cylinder head, jamming of the camshaft. If there are defects in the operation of the cooling system fan of the VAZ 2110, the faults can be diagnosed independently by checking the thermostat, electric motor, relay, and switch sensor.
Fuses and relays VAZ 2115
Today, every car, regardless of type, is equipped with special protection for all electrical systems. This protection is called a fuse. They are installed so that in the event of a short circuit or malfunction, the system can turn off via a fuse, thereby protecting itself from breakdown. Fuses are used for every electrical circuit, from a small light bulb to an engine's ignition system. More important engine systems are equipped with special relays, they protect various pumps, electric motors and other powerful sources of electricity consumption.
The fuse is a small structure consisting of a plastic casing with a fusible element inside. If a short circuit occurs, the thin contact melts under the influence of current, which interrupts the electric current. The simplest electrical fuse is a thin copper wire inserted into a circuit. If the upper limit of the supplied current increases, the contact begins to melt and interrupts the flow of electricity. Here there is a description of all fuses and relays for VAZ 2113, 2114, 2115 models of injection and carburetor types, old and new models.
Common faults
Since the fan is spinning, it needs to be forced to stop and turn on only when there is a real need for it.
There are several main reasons why cooling system fans may turn on when the engine is cold. This is related to:
- switch on sensor;
- coolant;
- mass;
- thermostat;
- temperature sensor;
- contacts;
- air conditioning.
Each of the points may be the reason why the fan turns on and starts rotating when the engine is cold.
Power sensor
One of the most common reasons why a fan runs on a cold engine is a short circuit in the controller, that is, the sensor.
Quite often it happens that the fan starts when the ignition is turned on. If this occurs at the same time, the contacts on the controller have probably shorted. As a result, the airflow works constantly.
Although the breakdown is the most common, it is also the most harmless and safe. The worst consequence of this phenomenon is considered to be a complete discharge of the battery. This will happen if you leave the ignition on for a while.
To check whether the short is at fault or not, you will need to use a multimeter to check the resistance by applying probes to the terminals. When the sensor is working, the multimeter shows infinite resistance, that is, it displays the corresponding value on the display.
If you see that the resistance is less, then the contacts are probably closed. The controller will need to be replaced. Such a malfunction is displayed as a separate code during computer diagnostics.
Coolant
Sometimes there is no need to look for all sorts of reasons why the cooling fan suddenly turns on on a cold engine. Experienced motorists advise starting with a simple check of the coolant.
The thing is that quite often the sensor reacts by activating the fan to a lack of coolant in the system. The amount of antifreeze that is available heats up too quickly, which leads to the fan starting when the engine is still cold.
Therefore, it is not so rare that the cause of such a malfunction is the banal inattention of the car owner. Some drivers simply forget that they need to monitor the fluid level and periodically add fresh antifreeze to the expansion tank. It will gradually evaporate, so reserves need to be replenished. When the radiator is half empty, the sensor will indeed begin to react accordingly. To cool the motor, it will use air cooling, implemented using a fan.
Due to a shortage of cooling liquid, it heats up faster than with a completely filled system. And the coolant temperature does not match the engine temperature. As a result, it turns out that the engine has just been started, it has not yet warmed up, and the fan is already rotating its blades at full speed due to the high temperature of the quickly warmed up liquid.
Interpretation of fuses and relays of injection models
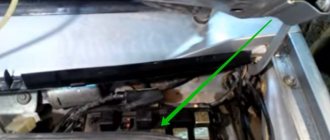
The main electrical fuse module 2114-3722010-60 is located under the front engine compartment. This arrangement allows for quick access to all electrical systems of the car.
Block location
Please note that the location of the electrical fuse module may depend on the type of equipment and year of manufacture of the vehicle. As a rule, this is the upper right part of the engine compartment, under the front windshield. The mounting block is made of plastic in the form of a rectangular box. To protect against accidental opening, the box is equipped with special latches. To open the module, you need to snap off the two protective brackets and lift the top plastic protection. Under the cover are all the main control relays and electrical fuses of the vehicle.
To quickly remove the fuse, special plastic pliers are located on the plastic protection cover. With their help, you can very easily get any element. You need to grab the top edge of the plastic case with pliers and carefully lift the element.
For the convenience of the user, on the top plastic cover there is a complete diagram, made in the form of a schematic image, which shows all the electrical fuses and relays indicating the current strength (A).
Fuse and relay diagram for injection models
Table 1. Explanation of fuses and relays 2114-3722010-60
| № | Current, A | Explanation of fuses |
| F1 | 10 | Rear fog lights, rear fog light indicator lamp |
| F2 | 10 | Turn signals and turn signal breaker relay. Alarm system. Hazard warning lamp |
| F3 | 7,5 | Interior and luggage compartment lighting systems (interior lamp, luggage compartment lamp, ignition key illumination). Brake brake lamp, on-board computer backlight lamp. Engine control lamp |
| F4 | 20 | Rear window heating control. Portable lamp connection socket |
| F5 | 20 | Relay for monitoring and turning on the sound signal. Cooling system engine switch fuse and relay |
| F6 | 30 | Control and relay switching on electric windows |
| F7 | 30 | Electric motor control - heating system, interior heater, windshield washers, headlight cleaners. Interior cigarette lighter, glove box lamp. Turn on the heated rear window. |
| F8 | 7,5 | Turning on the right fog lamp |
| F9 | 7,5 | Turning on the left fog light |
| F10 | 7,5 | Side light for the left side body, indicator light for turning on the side lights (on the display), lamps for illuminating the license plate and engine compartment, illumination lamp for switches, cigarette lighter, heater control levers. Instrument lighting switch. |
| F11 | 7,5 | Right side body marker light |
| F12 | 7,5 | Front right low beam headlight |
| F13 | 7,5 | Front left low beam headlight |
| F14 | 7,5 | Front left high beam headlight. Light indicator lamp. |
| F15 | 7,5 | Front right high beam lamp. |
| F16 | 15 | Body turn signals, relay-breaker for turn signals and hazard warning lights. Control relay and reverse lamps, indicator lamps for the on-board instrument control system, lamps for oil pressure, handbrake activation, brake fluid level, battery charge. On-board computer, engine generator winding. |
| F17-F20 | Spares | |
| № | Relay circuit | |
| K1 | Headlight cleaners | |
| K2 | Turn signals and hazard warning lights | |
| K3 | Windshield wiper | |
| K4 | Monitoring the serviceability of brake light lamps and side lamps | |
| K5 | Window lifters | |
| K6 | Sound signal | |
| K7 | Heated rear window | |
| K8 | High beam headlights | |
| K9 | Low beam headlights | |
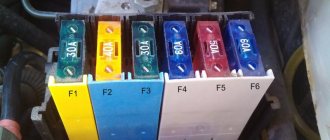
Modern fuses vary in color depending on the number of amps.
- 5A – brown
- 10A – red
- 15A – blue
- 20A – yellow
- 30A – green
The color distinction is made for ease of use and identification of the right fuse with the right resistance. There are also fuses available in black, grey, purple, white, orange and other colors. They all differ in the number of amperes that are registered on each product.
In each block, the manufacturer provides additional electrical fuses. They are designed to allow quick replacement of a burnt-out element. They are located at the bottom of the module and are marked with the names F17, F18, F19, F20. Each replacement element differs in color and number of amps.
If one of the electrical appliances in a vehicle breaks down, it is recommended that you first check the mounting block. To determine the burnt element, you need to completely turn off the engine and remove the key from the ignition. Using special pliers, carefully remove the burnt out module. Hold it up to the light and check for damage to the circuit. It is permissible to use fuses with a higher number of amperes, but only for a short time.
We identify the cause of the breakdown
First, you need to figure out the reason why the stove fan is not working. There may be several of them.
- A faulty fuse is the most common, simple and most common reason that the motor does not turn. On the one hand, replacing a fuse is not a big and difficult problem, which can be easily handled even by a beginner. But on the other hand, it will be necessary to find the reason why the fuse has become unusable. And to do this, you will need to examine the electrical circuit that ensures the normal operation of the heating system for the presence of a short circuit. Since we are talking about fuses, it would be useful to know that the operation of the stove on the VAZ-2110 depends on fuse F7 with a current strength of 30 amperes. Also, the operation of this fuse determines the illumination of the glove compartment, the functioning of the cigarette lighter, the electric motor from the headlight washer and the heated rear window. If a short circuit is not found in the electrical circuit of the heating system, then the cause will need to be looked for throughout the wiring.
- Problems with the contacts that are located inside the mounting block are a common reason for the VAZ heater motor not working. To identify this problem, you can move the block with the attached harnesses while the car is running. If the VAZ-2110 heater fan starts working, then it is necessary to remove the block and clean the contacts.
A problem with the contacts inside the mounting block is a common reason for a non-working fan.
- A flooded relay may also be one of the reasons why the heater fan does not work. Diagnosing this problem is very simple: the fan will turn on only after the car has warmed up well. In this case, you will need to replace the relay, which is hidden behind the dashboard.
- The heater electric motor can only operate when the third speed is activated. This situation is explained by the nature of the current supply to the fan: at speeds 1 and 2 this process is implemented through a resistor, and at speed 3 - directly. Consequently, if the heating does not work at the first two speeds, then the reason lies precisely in the resistor, which must be replaced.
- The malfunction of the switch can be identified as follows: after removing the center console, start the car, take a large 12-volt light bulb with soldered wires, connect the negative wire from it to the body and touch the second wire to contacts 1, 2 and 3 on the additional resistor. When the light comes on, it indicates that the switch is working properly. But if the light bulb does not light up, then you will need to connect the wire from the light bulb to the positive terminal on the switch. If there is no light on the light bulb, you can talk about an open circuit or a faulty fuse.
A broken fan motor could also be the cause.
- A faulty fan motor is the final cause that can result in a fan not working. Here we can consider three main reasons, the elimination of which may require replacing the motor, cleaning the contacts and replacing the brushes.
Decoding fuses and relays of block 2114-3722010-18
VAZ-2114, 2115, 2113 cars of the first models with a carburetor have certain differences in the fuse module.
Old style block fuse and relay diagram
Table 2. Decoding of fuses and relays of block 2114-3722010-18
| № | Current, A | Explanation of fuses |
| F9 | 7,5 | Right rear fog lamp |
| F8 | 7,5 | Left rear fog lamp |
| F1 | 10 | Front headlight cleaners at the moment of switching on, wiper contacts, headlight washer switch valve, headlight wiper switch relay contacts |
| F7 | 30 | Front headlight wipers during operation, winding of the relay for turning on the wipers, fuse for the interior heater, windshield washer, gearbox and timing controller for the rear window wiper, valves for turning on the front and rear washer, relay (winding) for turning on the engine cooling system, relay for turning on the rear window heating, glove box lighting, rear window heating control lamp |
| F16 | 15 | Turn signal indicators and activation of hazard warning lights in turn mode, indicator control lamp, reversing lights, gearbox and relay for activation of windshield washers, generator winding (at startup), control lamps for brake fluid, oil pressure, carburetor flap, hand brake. "STOP" display lamp, voltmeter and coolant temperature indicator |
| F3 | 10 | Interior lighting and rear brake light |
| F6 | 30 | Power windows, power windows on/off relay |
| F10 | 7,5 | License plate lights, engine compartment lamp, warning light on the dashboard (exterior lighting), instrument panel lights, cigarette lighter light, heating lever lights |
| F5 | 20 | Relay for turning on the cooling system fan (electric motor), sound signal. |
| F10 | 7,5 | Left front marker light Left rear marker light |
| F11 | 7,5 | Right front headlight, right rear headlight |
| F2 | 10 | Hazard warning lamp, turn signals and hazard warning relay. |
| F4 | 20 | Rear heated glass, heating on, portable socket, cigarette lighter in the cabin |
| F15 | 7,5 | Front right high beam |
| F14 | 7,5 | Front left high beam Light switch |
| F13 | 7,5 | Left low beam |
| F12 | 7,5 | Right low beam |
| № | Relay circuit | |
| K1 | Headlight washers | |
| K2 | Hazard and turn signals | |
| K3 | Windshield wipers | |
| K4 | Monitoring the health of lamps | |
| K5 | Windows | |
| K6 | Sound signal | |
| K7 | Heated rear window | |
| K8 | High beam headlights | |
| K9 | Low beam headlights | |
Operating principle and triggering requirements
So, the main element of the DVV is the contact group inside the node. When the desired temperature is reached, the sensor contacts begin to expand and at a certain moment close. After this, the signal goes to the ECU, which, in turn, gives a command to the fan.
What should the switch-on temperature be? You must remember that DVVs are available with different temperature limits.
Most often, switching on occurs when 92 degrees Celsius is reached, and switching off occurs at 87. Sensors are also sold with other temperature ratings, but for the VAZ-2110 the 92/87 option is most suitable - so give preference to it.
Starter, ignition, rear fog lamp relay
In order to carry out quick checks and repairs, the ignition system relay is installed under the front dashboard of the car, behind the hood release handle. It is located just below the central dashboard. The module is closed with a plastic plug, which must be opened slightly to test for functionality.
Starter, ignition, rear fog lamp relay
Next to the indicated relay, there is a similar one for the rear fog lights and the starter.
The main task of the relay when igniting is to reduce the applied load to the contacts. When the engine starts, the relay turns off some electrical circuits in the vehicle system. The system is used not only in injection, but also in carburetor engines.
In the event of a malfunction or malfunction in the ignition system, it is necessary to monitor the operation of the relay. For this purpose, open the box and carefully remove the desired element. It is attached using contacts to special grooves. The first thing to do is look at the oxidation of the contacts, if necessary, clean them with a soft cloth or treat them with a special liquid.
To check functionality, you need to use a regular multimeter. We connect to incoming connections and check the numbers. If there is no short circuit when current is applied, it means the element is not working. Replacement is carried out in a similar manner. It is necessary to use a standard element with the number of amperes indicated on the housing.
Possible malfunctions and ways to eliminate them
The following symptoms may inform the car owner about the failure of the DVT:
- The quality of the exhaust gases is too low, which is associated with a violation of the combustible mixture in the cylinders.
- Fuel consumption has increased, and noticeably.
- Problems have arisen in the operation of the power unit. The dynamics of the vehicle may decrease, and the engine power as a whole will also deteriorate.
- Combinations of errors may appear on the dashboard, and the ECU may also send a signal to the dashboard about the need to check the performance of the motor.
- The power unit has become more difficult to start.
When they detect the first signs of problems, many motorists immediately drive their car into a garage or service station to change the controller. In practice, symptoms of DTOZ malfunctions are often associated with damage to the electrical circuit and poor contact of the device with the vehicle’s on-board network. Therefore, if you encounter a similar problem, we first recommend checking the condition of the wiring.
Photo gallery “Diagnostics of DTOZH”
1. DTOZH connected to a multimeter in a container with antifreeze
2. Dependence of temperature (left), resistance (right)
Recommendations for care and maintenance
- Buy original fuses. Domestic or foreign, it doesn’t matter;
- Install strictly in accordance with amperage ratings. Unacceptable with lower or higher current strength. In the first case, this will lead to damage to the module, in the second - to breakdown of the unit, which is attached to the fuse;
- Carefully check the quality of fixation of terminals and limit switches on the board. If loose, tighten and press with pliers. A spark can cause a fire and melting occurs;
- If moisture gets in or condensation forms inside the mounting block, remove the cover, dry it, and if necessary, blow it with a stream of compressed air.
Carry out preventive and diagnostic work in the fuse box with the battery terminals removed in order to prevent a short circuit in the circuit.
The average service life of fuses is 40 – 60 thousand km. The service life of foreign analogues is 10–15% longer. Before replacing, read the instructions and get advice from service station specialists.
Sources
- zapchasti.expert/predoxraniteli/predoxraniteli-vaz-2115.html
- 7vaz.ru/vaz-2114/ne-rabotaet-ventilyator-na-vaz-2114-2115-2113.html
Relay-breaker layout diagram
| Name | What is it responsible for/what does it provide? |
| K 1 | Headlight wiper relay |
| K2 | Turn signals, hazard warning lights |
| K 3 | Windscreen wipers |
| K 4 | Controlling the operation of dashboard lamps |
| K5 | Window lifters |
| K 6 | Sound signal |
| K 7 | Heated rear window |
| K 8 | Long range lighting |
| K9 | Low lighting |