Some car owners ask search engines where the VAZ 2114 starter fuse is located, but do not find an answer, since the VAZ 2114 and earlier models of cars from this manufacturer do not have a starter fuse. On various sites, excellent reviews about the mounting block were written about the location of the fuse, but they did not essentially answer the question posed, because there is no fuse in the mounting block.
The protection function is assigned to the auxiliary relay, a compact device that is located under the steering wheel, next to the hood release handle.
Looking for a starter relay
If any devices on the car fail, then first of all you need to check the relay or fuse in the circuit. Therefore, as soon as after diagnosing them, it will be possible to draw conclusions about the problems as a whole.
As you know, on a VAZ-2112, even when the engine is not running, all devices are powered directly from the battery, and when it is started, the energy comes from the generator. And when the current in the circuit increases or there is a short circuit, the fuse simply blows, and a relay is provided for the most powerful devices.
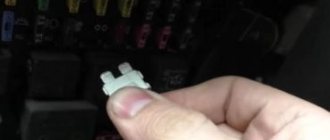
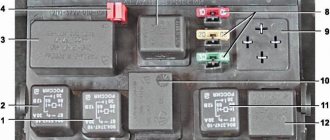
Photo of the starter relay in the fuse box
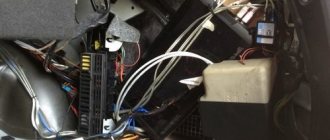
In order to get to the fuse and relay box in which the starter relay is installed, you need to find the cover on the underside of the dashboard. Then, press the locking button and fold it down.
The starter relay is marked with a red arrow
Replacing the old element with a new one must be done in the reverse order of removal.
Please note that in various vehicle configurations, additional relays can be installed on top of the unit, which are intended for certain groups of devices. But the starter relay is always installed second, on the right.
Fuse mounting block 2114-3722010-18
Relay block 2114-3722010-18
| Relay number | Description of relay purpose |
| K1 | Headlight wiper relay |
| K2 | Turn signal relay, hazard warning lights |
| K3 | Windshield washer and wiper relay |
| K4 | Relay for brake lights and side lamps |
| K5 | Power window relay |
| K6 | Horn relay |
| K7 | Heated rear window relay |
| K8 | High beam relay |
| K9 | Low beam relay |
Fuse block 2114-3722010-18
| Fuse number | Rated Current (A) | Description of fuse purpose |
| F9 | 7,5 | Fog lamp (right) |
| F8 | 7,5 | Fog lamp (left) |
| F1 | 7,5 | Headlight cleaner |
| F7 | 30 | Interior heater fan, cigarette lighter, glove box lighting |
| F16 | 15 | Direction indicators, hazard warning lights, taillights, gauges on the dashboard. |
| F3 | 10 | Brake lights, dome light |
| F6 | 30 | Electric windows |
| F10 | 7,5 | Interior panel lighting. License plate light |
| F5 | 20 | Engine cooling fan. Klaxon |
| F10 | 7,5 | Signal lamps on the left side |
| F11 | 7,5 | Signal lamps on the left side |
| F2 | 10 | Enabling and disabling alarms |
| F4 | 20 | Heated rear window |
| F15 | 7,5 | High beam lamp (right headlight) |
| F14 | 7,5 | High beam lamp (left headlight) |
| F13 | 7,5 | Low beam lamp (left headlight) |
| F12 | 7,5 | Low beam lamp (right headlight) |
Lada 2110 PhiX › Logbook › Additional, starter unloading relay VAZ 2110
Hi all! I’ll tell you about a very useful modification that will be useful for owners of elderly VAZ 2110. Many ten-year-olds have encountered a problem when, in hot weather, a hot engine does not respond to the movement of the key. The starter does not turn and you have to go under the hood with a screwdriver and make a direct connection to the contacts. In the case when the starter is working (in my case it is completely new), the culprit for this trouble may be the contact group of the ignition switch. Over time, the contact group in the ignition switch wears out or the current collector contacts burn out. This problem is successfully solved by installing an additional unloading relay. By the way, such a relay is installed on many cars from the factory.
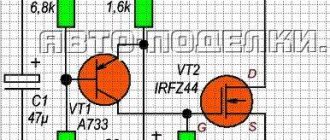
To install this relay we will need: 4-pin relay with a metal ear (30-40A); 80r Wires 1.5 sq. mm; about three meters -80r relay block - 1 piece; 20r Flat male connector - 1 piece; Flat female connector - 1 piece; Ring tips - 2 pcs. Electrical tape, heat shrink, corrugation.
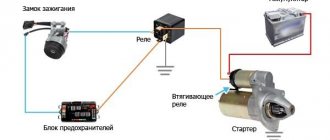
Let's put this whole thing together according to the following scheme.
The relay needs to be protected from moisture, for this I used thick heat shrink, in which I completely covered the relay block.
After assembly, I check the relay by connecting it to the LBP.
Pay attention to the laboratory power supply, the ammeter shows the current that the relay consumes. The current is only 0.12A and it is this current that will flow through the contact group of the ignition switch. For comparison, the pull-in current according to different sources is from 10 to 30A! Most often we are talking about 20-25A, where 20A is the current of the pull-in winding and 5 amperes of the holding winding.
Obviously, such currents will not be to the liking of the ignition switch contact group. The relay solves this problem perfectly.
I carried out another experiment, turned the voltage towards a decrease, the relay operates down to 7V, at 6V it no longer works, but this is quite enough, because the retractor will not work even at 8 volts.
We connect the wiring to the starter.
We pull off the red wire from the flat terminal of the traction relay and tightly insert the “folder” with the wire from the new relay into the connector of this wire. This wire now powers the coil of the new relay. We connect wires with ring lugs to the battery terminals.
We put the wire from contact 30 of the new relay with the “mother” onto the freed contact of the traction relay. Through this wire, the plus goes to the traction relay coil.
Fuse mounting block 2114-3722010-60
Below is a table describing both relays and fuses.
Relay block 2114-3722010-60
| Relay number | Description of relay purpose |
| K1 | Headlight cleaner relay |
| K2 | Turn signal relay, hazard warning lights |
| K3 | Windshield washer and wiper relay |
| K4 | Relay for brake lights and side lamps |
| K5 | Power window relay |
| K6 | Horn relay |
| K7 | Heated rear window relay |
| K8 | High beam relay |
| K9 | Low beam relay |
Fuse block 2114-3722010-60
Fuses F17-F20 are spare.
| Fuse number | Rated Current (A) | Description of fuse purpose |
| F1 | 10 | Fog lamp fuse. Turning on the front and rear fog lights |
| F2 | 10 | Turn signal and hazard warning lights |
| F3 | 7,5 | Interior lighting. Front and center lamp. Luggage compartment lighting. Computer |
| F4 | 20 | Heated rear window. Socket for connecting a portable lamp |
| F5 | 20 | Engine cooling fan electric motor. Klaxon (beep) |
| F6 | 30 | Electric windows |
| F7 | 30 | Interior heater fan, cigarette lighter, glove box lighting |
| F8 | 7,5 | Fog lamp (right) |
| F9 | 7,5 | Fog lamp (left) |
| F10 | 7,5 | Signal lamps on the right side |
| F11 | 7,5 | Signal lamps on the left side |
| F12 | 7,5 | Low beam lamp (right headlight) |
| F13 | 7,5 | Low beam lamp (left headlight) |
| F14 | 7,5 | High beam lamp (right headlight) |
| F15 | 7,5 | High beam lamp (left headlight) |
| F16 | 15 | Dashboard warning lights, generator excitation |
Starter fuse (relay) VAZ 2110
Very often I get a question via email! Which fuse is responsible for the start function on a VAZ 2110 car and where is it located.
I would like to answer it right away - the fuse responsible for the starter on the VAZ dozen does not exist. But there is a starter relay and it is this that very often burns out and fails
Additional mounting block
An additional mounting block is located under the front passenger's footwell air duct cover.
Relay of the additional unit VAZ 2114
| Relay number | Description of relay purpose |
| K4 | Fuel pump relay |
| K5 | Cooling fan relay |
| K6 | Main relay |
Fuses of the additional unit VAZ 2114
| Fuse number | Fuse Rating (A) | Description of fuse purpose |
| F1 | 15 | Main relay circuit |
| F2 | 15 | ECU power supply |
| F3 | 15 | Fuel pump power |
How to replace the central locking fuse on a VAZ 2110 with your own hands
Great, now let's move on to the step-by-step instructions for replacing the starter relay on a VAZ 2110 with your own hands:
- Press the fuse box cover switch and lower it down.
- We take a Phillips screwdriver and unscrew the screw securing the latch and pull it out.
- Now remove the fuse box from the cover and turn it over
- Now we disconnect all the plugs with wires and take out the fuse box.
- Using pins, we remove the failed fuse responsible for the cigarette lighter, recall its designation in the R7 diagram and replace it with a new one.
- We put everything back together in reverse order.
Cigarette lighter fuse: replacement
Using the example of a cigarette lighter, we will look at replacing fuses, since they are changed according to the same scheme. First you need to check the functionality of the cigarette lighter, this is done as follows:
- We start the car.
- The cigarette lighter must be inside its socket. That is, at your workplace.
- We wait 20 seconds.
- We take out the device and check it by touch: if the temperature has not increased, then it is faulty.
So, we are convinced that the device is not working. Now we have to replace the blown cigarette lighter fuse. We already know the location of the black box (to the left of the steering wheel, below the dashboard). Next, you need to press the latches so that the lid opens. Inspect the mounting block carefully: there should be tweezers inside to remove the fuses. Now all that remains is to find the cigarette lighter fuse - it is indicated in the diagram as “F18”. We remove the burnt out element and install a new one - the work is finished. We took the cigarette lighter as an example, since it most often fails. This happens due to the desire of VAZ 2110 owners to place additional electrical appliances inside its socket: pumps, car vacuum cleaners and other equipment that overload the fuse.
If there are no tweezers inside the black box or you have lost them, then you can use pliers as a replacement. You should not try to do this with your fingers, as such an action will weaken the already fragile nest. If the relay is inexpensive to replace, then you will have to spend a lot of money to repair the mounting block. You need to unscrew the element carefully so as not to crush it.
Inspection of cigarette lighter wiring
If after replacement the protective element burns out again, you should look for the cause elsewhere. It lies not in the VAZ cigarette lighter fuse, but in faulty wiring.
If the car is old or due to improper manipulation of the electrical system, the wires may shorten and burn out, or an open circuit may occur in the circuit itself, causing the cigarette lighter fuse to trip. It is advisable to inspect the cables for kinks or abrasions. This failure should be diagnosed using a multitester. The wires coming to the cigarette lighter are tested for resistance. If there is no power, then one of the cables is broken.
To repair the cigarette lighter on a VAZ, you will need a soldering iron with rosin and tin, working cables and insulating tape.
You can install the starter relay on the VAZ 2110 yourself
Those people who have a VAZ 2110 have certainly encountered a situation where the starter did not turn after the key was turned, and some clicks are heard, which indicate that the retractor relay is working. In such a situation, the question immediately arises: where is the VAZ 2110 starter relay located and how to find it faster. This question is also relevant when tuning a VAZ 2111.
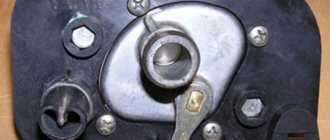
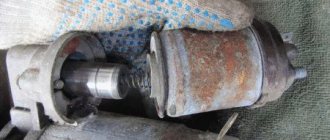
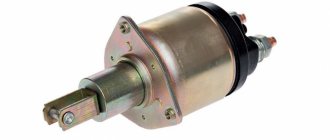
But we have interesting news for you: the VAZ 2110 simply does not have a starter relay. There is a solenoid relay, to which the positive contact is supplied from the ignition switch. The relay is installed on the starter, its size is 2 times smaller than that of the starter, and it is round in shape.
Next, we will highlight some popular malfunctions that usually arise in the VAZ 2110, related to the VAZ 2110 starter relay and the starter; by the way, a lot of things are used in the VAZ 2115, so by tuning this car, many problems can be avoided.
Basic starter malfunctions
The traction relay does not operate after the ignition key has been turned, and the armature does not rotate.
In this situation, it may be due to the following possible problems:
- the battery is broken or discharged, the solution to this problem is to buy a new battery or charge it;
- the positive contacts have oxidized - you just need to clean them;
- it happens that an interturn short circuit occurs on the winding of the traction relay - to correct this situation, you need to install a new relay;
- the circuit that powers the traction relay has broken - you need to check the wires for integrity, and whether they have become disconnected from the circuit?
- contacts “30” and “50” do not close - you just need to change the contact part of the ignition switch;
- The traction relay armature does not work well - you need to remove it and disassemble it, there may be a lubrication problem.
After turning the key, the starter does not start, the armature rotates slowly, and a click is heard in the traction relay.
This situation may arise due to previously similar situations:
- the battery is discharged or disconnected - you need to check and correct the situation;
- the winding of the traction relay is shorted or broken - you also just need to change the relay;
- the ends of the wires have seriously succumbed to oxidation - they need to be checked and cleaned, starting with the battery.
After turning the key, the starter armature spins, but the flywheel does not spin..
This situation arose due to the fact that:
- the freewheel is slipping - you need to diagnose the starter at the stand and replace the clutch if it is faulty;
- The gears on the gearbox are worn out - you just need to replace them.
The starter makes a lot of noise when the armature is spinning.
This problem arose because:
- The liners on the armature or drive shaft bearings have served their service life - you just need to replace the parts that have failed;
- the starter is not secured properly, and the cover could have broken - you just need to secure it or change it;
- the gears on the gearbox, flywheel crown or drive have failed - you just need to change them, or immediately replace the non-functioning parts entirely.
- the gear is constantly engaged with the flywheel; if the clutch on the shaft splines is stuck, it is possible that the armature of the traction relay is stuck - to solve this problem, you need to lubricate the splines with oil. And if the traction relay is stuck, then you need to either change it or use certain methods to get rid of the jam.
Replacing the VAZ 2110 starter relay on your own
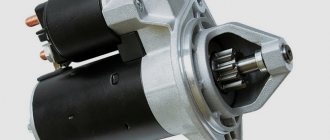
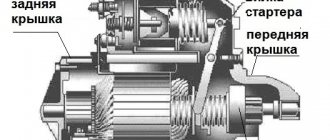
All drivers know that without a starter, the car not only won’t move, it won’t even start. It drives the crankshaft. In this case, the shaft is accelerated to a certain frequency. As soon as the desired frequency is reached, the engine will start. One of the starter components is a two-winding traction relay. Replacing the VAZ 2110 starter relay is a mandatory procedure, because without the correct operation of this mechanism, the vehicle will not move. On a VAZ 2110, replacing the starter relay can be done on your own.
How to check the starter
The starter relay is an important part responsible for turning on the car engine, synchronizing the operation of all parts and distributing electricity. It is not difficult to check its functionality, but it requires following all the instructions.
When starting a car engine, not every driver thinks about where this difficult process begins. The starter relay plays an important role in this chain, and its breakdown often stops the car. The replacement process is not as complicated as it seems at first glance, but for this we will consider the components, the principle of operation and the repair process itself.
What is a relay for?
Replacing the starter relay on a VAZ 2110
The traction relay ensures that the drive gear starts. Starting occurs in clutch with the gear mechanism of the crankshaft flywheel. It also provides power to the starter motor. When the starter is turned on, energy begins to be transferred from the battery. The energy path passes through the ignition switch.
This is interesting: The starter spins for a long time when starting
VAZ 2110 additional starter relay
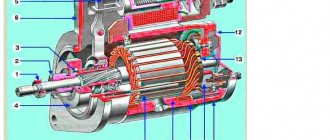
In this way, power is supplied to each winding of the traction relay. Windings have two types:
As soon as the process of closing the relay contacts takes place, the retractor winding is turned off. A working relay has a voltage limit that should not exceed 8 V. The temperature during this process should not exceed 25 degrees Celsius. If the voltage when starting the relay exceeds this indicator, then you should pay attention to the drive and the traction relay itself. They may become damaged or stop working. The traction relay can be visually examined. Perhaps the breakdown can be seen with the naked eye, but the starter will have to be dismantled and disassembled.
VAZ 2110 starter lock relay