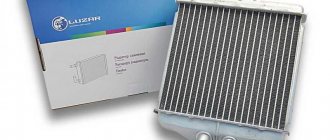
The temperature in the VAZ-2115 cabin is maintained using a built-in stove. The car has an automatic control system that regulates air heating with a small error. The air is heated using a radiator. Once it passes through the deflectors, the heat is distributed inside the machine.
To ensure that the radiator of the VAZ-2115 stove is replaced without various problems, we recommend that you carefully study this article.
Preparatory work
Now we will look at how to replace the part without having to remove the torpedo.
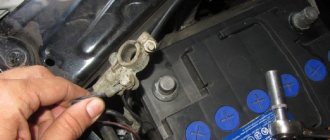
The first step is to disconnect the negative terminal of the battery and drain the coolant.
To merge everything without loss, do the following:
- Unscrew the drain plug on the cylinder block with a 13mm head. The location of the bolt is slightly lower under the ignition unit. There are times when it is better to remove the ignition to gain access to the desired location.
- To collect the coolant, place any container under the car and unscrew the cap.
- Remove the plug from the expansion tank - this is necessary to remove the vacuum, which will prevent antifreeze from leaving the system.
Main causes of malfunction
There can be several reasons for such problems, but the most common are:
- Worn or damaged pipes.
- Incorrect connection of pipes.
- Broken stove tap.
- Radiator failure.
The first of these reasons - wear of pipes - can occur for natural reasons during operation, since the chemicals contained in coolants have a corrosive effect, which is complemented by the influence of high temperature.
In addition, the hoses of the VAZ 2114 stove can be easily damaged by over-tightening the clamps on them. When such damage occurs, fluid leaks from the system.
In total, VAZ 2114 cars have 4 pipes. Two of them are located under the hood and two in the cabin.
Their damage, which led to a coolant leak, can be judged by the following indirect signs:
- there is a constant drop in the liquid level;
- a specific smell appeared in the cabin;
- A puddle of coolant forms under the car or in the passenger compartment while parked.
If at least one of these signs is observed, then urgent diagnostics of the pipes should be carried out and their replacement.
The process of replacing the stove radiator
After the preparatory work has been completed, you can proceed directly to replacing the stove radiator:
- Remove the steering shaft cover and turn off the hazard warning light button.
- The next step is to click under the steering switches. Remove the connectors from them and put them aside.
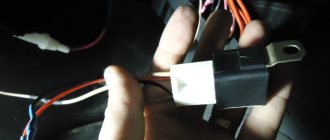
- Locate the black and gray wires and disconnect them from the horn slip ring base. It is important to remember which guide was which. Otherwise, the signal will subsequently be triggered by turning the steering wheel. Don't mix up the wires.
- Remove the screws and remove the side panels of the console.
- Open the diagnostic connector cover by unscrewing the mounting screws. Next you need to remove the connector from the instrument panel.
- The next step is to remove the connector from the ashtray and cigarette lighter lamp.
- On the heater control unit, remove the gear selector lever and the damper control knobs.
- Next, remove the radio, unfasten it and pull out the slide. Disconnect the connectors from the buttons and the BSK block. Remove the instrument panel panel.
- Unscrew the screws securing the central bracket using a size 8 wrench and pull it out. First disconnect the engine control unit connector.
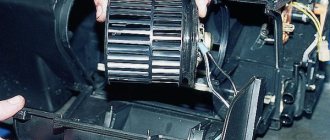
- Unfasten the heater unit and lower it down as far as the control cables will allow.
- Take a marker and mark the position where the steering column is located. This is necessary in order to put everything in its place during assembly.
- Using a chisel, unscrew the two shear bolts counterclockwise. During assembly, install new ones, possibly non-cut type. Unscrew the two nuts with a 13mm wrench and lower the column onto the seat.
- Remove the front strut covers.
- At this step you need to loosen the clamps and remove the tubes from the heater radiator. Place some material that absorbs liquid well. Residual antifreeze may come out of the radiator. Now unscrew the 5 screws securing the dashboard (two in the area of the front pillars, two immediately below them and one to the right of the instrument backlight control).
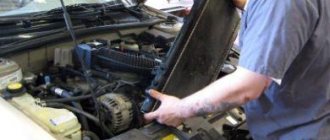
- Now you can change the radiator.
To replace the radiator, you need to move the instrument panel slightly to the side. Unscrew the three screws that hold the radiator to the heater housing. Unscrew the damper control cable. At this stage, you can already pull the radiator out of the heater.
If necessary, clean the insides where the dismantled part was located. Next, install the new radiator and reassemble in reverse order.
Replace without removing the panel
But no matter what method is used, the coolant must first be drained from the system. Therefore, you will need to stock up on antifreeze in the required quantity in advance.
First, let's look at a replacement method without removing the panel. As already mentioned, for this you will have to make cuts here and there.
To complete the work you will need:
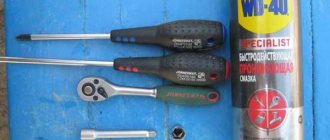
- Set of screwdrivers of different lengths;
- Rags.
- Metal cloth;
- Flat container for draining remaining coolant from the radiator;
Having prepared everything and drained the coolant from the cooling system, you can start working:
- Remove the glove box (glove compartment) from the panel, for which you need to unscrew the 6 screws that secure it;
- Remove the side trims on the center console;
- Using a metal cloth, we make the necessary cuts: the first vertical cut is made on the inner wall of the panel near the center console (behind the metal strip of the glove compartment). And here you need to make two cuts.
The second cut is horizontal, running at the top of the rear wall of the opening under the glove box.The third is also vertical, but not through. Performed on the right on the back wall of the lower shelf of the panel;
- After all the cuts, part of the panel along with the wall can be folded back to gain access to the radiator. We fold this part and fix it;
- We unscrew the nearest bracket for fastening the heating system hatch control cable and move the cable to the side;
- We loosen the clamps of the coolant supply pipes to the radiator. In this case, it is necessary to replace the prepared container under the connection points, since liquid leaks from the heat exchanger. We remove the pipes;
- We unscrew the three screws securing the radiator, remove it and immediately inspect it.
Then we replace the heat exchanger, fix it in the socket, connect the pipes to it and fix it with clamps. To make the tubes easy to insert, lubricate them with soap.
At this stage of operation, the cooling system must be filled with liquid and expelled to remove air pockets.
After this, it remains to make sure that the joints of the pipes with the radiator do not leak, and that the damper and tap are connected without errors.
After this, all that remains is to return the cut out part of the panel to its place and secure it. For this you can use screws and plates.
The main thing is to secure it in several places so that the cut part does not move when moved. Use sealant or silicone.
This method is convenient because when you replace the radiator again (which is quite possible), it will be very easy to do all the work - just remove the storage box and unscrew a few screws.
In addition, all the cuts are made in such places that after assembling the panel and installing the glove compartment, they will not be noticeable.
Reassembly Features
When reassembling the car after replacing the heater core, pay attention to the following nuances:
- Pay attention to the seal in the windshield area - it must be in place.
- The center nozzle body must be in its proper place without deviation.
- Place the wiring in the same openings where it was before disassembly, so as not to do unnecessary work several times.
Once assembly is complete, tighten the drain plug and fill in with new antifreeze. You can use the old one, but it is better to use a new consumable. After completing all this work, start the car until the radiator fan starts working.
After this, check all connections for leaks. Make sure the heater and dampers are working as they should.
The final step is to check for proper operation of the electrical equipment of the dashboard.
Simple and quick replacement of the stove radiator on a VAZ
I think many car owners do not have a garage, and therefore the ability to completely disassemble a certain unit in order to replace or repair it. It is for this reason that we have to come up with non-standard methods of repairing or replacing parts, without performing complete disassembly.
Recently my heater (stove) radiator leaked, and to get to it I had to completely unscrew the dashboard. But without a garage, I don’t want to do this at all. Studying a large amount of information on the Internet, I found an excellent and, most importantly, simple way to change the stove radiator.
Unscrew a few bolts
SCROLL UP THE PHOTO CARousel TO SEE THE LOCATION OF ALL BOLTS THAT NEED TO BE UNLOCKED.
We unscrew the bolts on the passenger side, the first two bolts must be unscrewed with a screwdriver (they hold the dashboard itself directly), and the third bolt with an 8″ wrench or a socket head (this will be much more convenient. And the fourth is located on the driver’s side in the same place, as well as the third bolt. They hold, so to speak, BRAINS).
After the bolts are unscrewed, the dashboard will have free play, which will allow you to move the dashboard and get to the radiator itself.
Drain the ANTIFREEZE / ANTIFREEZE
We unscrew the bolt, but before doing this, do not forget to place a container underneath into which the liquid will be drained. It is worth unscrewing a little at a time, gradually draining the liquid, and when the bulk is drained, you can unscrew the cap of the expansion tank. But you shouldn’t do this right away, as the pressure will be strong and the liquid will spill with a 99% chance.
3. Unscrew the pipes.
After draining the liquid from the system, you need to unscrew the pipes leading to the radiator. Be careful, there may be liquid left in the radiator.
Then we unscrew the three screws that hold the radiator itself and pull it out.
Don't forget to clean the inside of the stove from leaves and other debris. Then we install a new radiator and reassemble in the reverse order.
This method helped me save a lot of time and did not require complete disassembly of the dashboard, which is good news.
How the interior of a VAZ-2115 is heated
In the summer, in order to prevent the interior from overheating, drivers turn off the heater valve by moving its drive lever to the appropriate position, thereby closing the flow of heated coolant into the radiator of the VAZ-2115 heater. In other words, antifreeze or antifreeze circulates in the system, bypassing the heater.
In cold weather, the tap is opened, and the coolant moves through the heating radiator, heating it. To supply heated air into the cabin, a fan is used, which blows on the radiator lamellas and can operate in three different power modes.
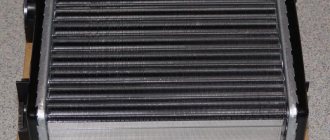
Location and principle of operation of the car heater radiator
The radiator is the main component of the heating system of the car and is located in the heater housing. It is responsible for heating the air in the cabin. This is both a free flow of air and forced from a fan. The radiator, passing coolant, heats up and heats the air passing through it.
Many drivers prefer to use the services of a car service to repair the radiator, although it is quite easy to dismantle it yourself. The fact is that at first glance, its location suggests a complex repair process.
Inconvenient design solutions
VAZ-2114 and 2115 cars are quite modern and quite popular cars in the economy segment.
But these cars, like most new models, have a not very pleasant feature.
By increasing the comfort of the interior and the layout of the front panel, designers significantly complicate the maintenance of the heating system.
The heater radiator in these cars is hidden deep under the panel and is not so easy to get to.
But the heating radiator is a rather vulnerable element of the cooling system. And if the interior heating has deteriorated, in more than half of the cases the problems are related to the heat exchanger.
And all this despite the fact that the element itself is practically not repaired and is often simply replaced.
Classification of radiators
Radiators for the VAZ 2114/15, installed by the manufacturer, are made of aluminum; they are replaced after 3-5 years (at the end of their service life). For Samara cars, two types of radiators are produced:
- 2108-8101060
- 2108-08101060-00
The dimensions and installation method are the same for both models.
You can also install a copper radiator for the interior heating system on a VAZ 2114/15. Its advantages over aluminum: longer service life, higher heat transfer and more suitable for repair. However, the price is almost twice as high.
Repair and replacement of heating radiators
Important! Aluminum radiators should be cleaned only with acidic solutions, while copper radiators should be cleaned with strictly alkaline solutions. Washing is carried out with a special solution both after dismantling and without it.
Leakage is more difficult to deal with. If it is not possible to solder the leak, the radiator will have to be replaced. It is worth remembering that repairs will not extend the life of the radiator, but will only briefly delay the need to replace it.
To reinstall, you will need a standard set of tools: wrenches and socket wrenches, a jack, screwdrivers, as well as polyethylene, rags and a container for drained coolant. Replacement is carried out on an inspection pit or overpass.
You can replace the radiator without dismantling the panel if:
- Drive the car into the pit.
- Disconnect the battery contacts.
- Unscrew the engine protection with the key.
- Unscrew the plug and drain the coolant, tighten the plug.
- Close the heater valve by turning the lever all the way to the left.
- Recline the backrest and move the front passenger seat back.
- Remove the glove compartment.
- Unscrew both covers of the center console.
- Remove the dashboard panel.
- Unscrew and remove the steering column cover.
- Turn off the radio.
- Remove the center console, first unscrewing all the fasteners and turning off the electrical system.
- Unscrew all the screws that secure the panel to the base.
- Remove the control unit.
- Secure the panel with a jack and unscrew the screws of the radiator pipes.
- Disconnect the pipes.
- Unscrew and pull out the radiator.
- Install the new one and assemble everything in reverse order.
The conclusion follows from this: every driver can independently replace the radiator of the heating system.