- Why is the brake light on?
- Possible reasons why the handbrake light is on: opinions of car owners
- How is the replacement performed?
- When to tighten and when to change?
- When to tighten the nut
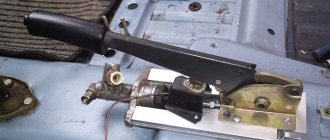
- Components
- The principle of adjusting the handbrake
- Causes of malfunction and their elimination
- Checking the mechanical component
- Recommendations for the braking system
- Handbrake repair for Lada Vesta
Why is the brake light on?
But let's start with the design features of the brake system alarm. Previously, cars used only one sensor - the level of brake fluid in the system, which sent a signal to the warning lamp. Since fluid is the main working element of the system, and its leakage leads to the brakes stopping working, naturally, the designers installed a sensor to monitor the level.
Additionally, the car also has a parking brake, the use of which must be monitored by the driver. On some models, the warning lamps for the working and parking systems are separated. The warning light with an exclamation mark in a circle is responsible for the fluid level, and the indicator marked with the letter “P” signals that the handbrake is engaged, and it turns off after the car is released from the handbrake.
But often a car has only one warning light, to which both the liquid level sensor and the handbrake sensor are “attached”.
Modern cars use circuits that additionally include brake pad wear sensors and brake light lamps. Failure of these elements causes the lamp on the dashboard to light up.
There are other design nuances that cause the indicator to glow. On VAZ models of the 10th family of the first years of production, a starter protection relay was included in the circuit, which forcibly turned it off after starting the engine. In this circuit, the designers connected the power supply circuit for the brake system lamp to this relay.
Why does the brake warning light on the dashboard come on or does not go out after starting the engine? If this happens while moving, it is better to stop moving and carry out diagnostics. If the light does not go out after starting the engine, it is better not to drive until the problem is resolved.
Wiring diagram LADA Largus
All units, including the K4M and K7M engine control circuit, battery charging circuit, low beam headlights and fog lights, turn signals and hazard warning lights, fuel pump and fuel level sensor, horn and sound system speaker connections, windshield cleaners and washers glass and rear door glass, electric front and rear door lifts, central door locking system and interior heating and ventilation system, other modules.
Possible reasons why the handbrake light is on: opinions of car owners
- Changed the hubs. “The light in my car blinked sometimes. At first I decided that the problem was with the pads. But later I remembered - I replaced the pads not so long ago. I checked the brake, everything is fine. And then I thought about why the problem could arise? I didn’t think of anything and stopped worrying. The indicator continued to flash periodically... As a result, the right hub bearing began to make noise, after a while it began to hum so loudly that the sound simply made my head split. I first purchased one hub. Then I thought that it would be better to change both parts at once - or rather, this should be done. I bought a second one, changed it, and the problems all disappeared: no noise, no blinking light.”
- Got a good technician! “The handbrake light would come on from time to time while driving. Quite often this happened after bouncing on the pit. I went and bought a brake fluid. And I found a specialist right at the dealership. He then flooded it. He also climbed under the handbrake and said that perhaps the microphone at the lever was acting up (it seems like this happens sometimes). Take the train and watch. But the problem disappeared after filling the brake fluid. The handbrake no longer lights up. By the way, I met an excellent specialist and looked for the problem for free, with pleasure and without showing off.”
- Depending on the situation, “If the light starts to light up after shocks, for example, on a hole or bump, then, most likely, the brake fluid level is on the verge of the required level or lower. You just need to add it and that's it. If it lights up when braking, the pads are definitely worn out completely. I went through this myself in my VAZ.
How is the replacement performed?
When replacing Renault Logan parking brake cables, our video will show you what to do when doing the repair yourself. It is worth noting that the right and left rear cables are changed in the same way.
To restore the handbrake of Renault Sandero, LADA Largus, the installed cable is removed and replaced as follows:
- The tension of the drive cables is loosened by unscrewing the adjusting drive nut on the handbrake.
- The brake drum is removed.
- The rear brake pad is removed, and the cable tip is disconnected from the lever, which removes the pad itself.
- The cable sheath clamp is compressed.
- The cable is removed from the hole.
- The cable is removed from the holder located on the beam lever.
- It is necessary to pull it a little into the cabin, and then remove it from the equalizer.
- We completely remove it from the hole in the body.
When replacing the handbrake cable on a Logan, you may encounter a situation where it cannot move freely in the sheath. Therefore, it must be lubricated with transmission or engine oil (at your own discretion).
Even before replacing the handbrake cable, it is important to make sure that the new cable is long enough to be installed on the vehicle. Otherwise you will have to buy a new consumable.
As is clear from the instructions, the procedure is quite simple. The parking brake will be repaired only if all operations for independently replacing the cable and checking its operation by placing the car on an incline on the handbrake are followed. The new part is guaranteed to last for several years without any problems.
Operations for removing the tie rod end of Lada Largus
It is more convenient to do the work on a lift. You can also do it on a car mounted on supports. Replacing the tip is shown using the example of the left side rod; the right tip is replaced in the same way. The thread of the left tip is right-handed, and the right tip is left-handed.
1. Lift and support the front of the vehicle on the side of the tip being replaced.2. Remove the wheel. Brake the car with the parking brake and install wheel chocks (“chocks”) under the rear wheels. 3. Loosen the tie rod end locknut.
4. Unscrew the nut securing the hinge pin to the steering knuckle arm, holding the pin from turning.
5. Install the ball joint remover and press the pin out of the swing arm boss.
6. In the absence of a puller, the ball joint pin can be knocked out with sharp blows of a hammer on the end of the swivel lever boss, striking along the axis of the lever.
7. Roll the tie rod end off, counting the number of turns. If necessary, keep the rod from turning the flat with a key.
8. Install the new tip in the reverse order of removal, screwing it onto the steering rod by the number of turns that was calculated during removal (the tip must be screwed to the mark). The tightening torque of the lock nut is 50 Nm, the tie rod end ball nut nut is 37 Nm.9. Check and, if necessary, adjust the wheel alignment angles at a service station.
If there was no mechanical damage to the tip boot, then its service life until complete wear (ruptures, cracks, etc.) is commensurate with the service life of the pins, that is, the tip must be replaced entirely and cannot be repaired
When to tighten and when to change?
During operation of the machine, the steel cable gradually stretches and begins to sag. Then part of the lever stroke is used to remove this slack (the first 2-3 clicks), and only then the force is transferred to the brake pads of the rear wheels. As a result, they are weakly pressed against the surface of the discs or drums and the car does not brake reliably.
The first sign of a malfunction is that the handbrake stops working on the first two clicks of the handle and is raised by hand without any effort. In this case, it is definitely necessary to tighten the hand brake, or rather the cable drive.
But the operation of the mechanism also depends on other factors:
- on the degree of wear of the brake pads;
- from the depth of excavation on the surface of the steel disk or drum.
Abrasion of the linings does not have much effect on the operation of the main system, since the stroke of the hydraulic pistons is quite large. But the effect of the mechanical “handbrake” gradually weakens. To return it to working condition, it is necessary to compensate for the wear of the elements by tensioning the drive.
The cable is replaced in the following situations:
- The element has stretched to such an extent that at maximum tension the pads do not grip the discs and the car rolls away on any slope.
- Due to the constant ingress of water under the cable casing, it rusted and became tightly jammed. This happens when a motorist rarely uses the handbrake.
Cable jamming also occurs in winter, when water trapped under the casing freezes inside. In this situation, do not rush to change it; first warm up the car in the garage, and then drive out the moisture using WD-40 aerosol lubricant.
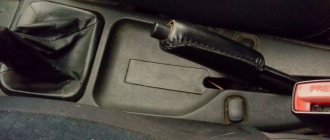
When to tighten the nut
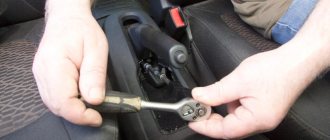
If this does not help you, you will have to use the adjusting nut to adjust the brakes. To do this you need to do the following.
- Open the plastic plug under the handle. It can be easily removed.
- Remove another plug, under which there is an adjusting nut.
- Take a long 10mm socket and tighten the nut.
This completes the adjustment of the hand brake on the Lada Vesta. But I didn’t do this on my car (or rather, not mine, but my wife’s), because I think that automatic adjustment was enough. Therefore, I also advise you to use the automatic function first. If this is not enough, then tighten the nut.
On the Lada Vesta, to adjust the handbrake you no longer need to crawl under the car, as before on the “nines” and “fours”. I hope that the review was useful for someone, and someone probably already knew this trick. Thank you for reading, good luck on the roads everyone!
Components
In such a situation, there are 2 scenarios:
- Carry out modifications in accordance with the factory diagram;
- Purchase components from another manufacturer.
And so, one of the owners of the Lada Vesta in the Exclusive configuration said that he was able to find out from an AvtoVAZ employee exactly what components were needed to replace drum brakes with disc brakes.
According to an employee of the plant, there is no need to replace the beam or reflash the ABS block, and this significantly speeds up and reduces the cost of the work.
In addition, the picture clearly shows that there is a standard spacer between the axle and the beam and it is to this spacer that the boot is fixed. From the factory, the hub and disc come separately, so after installing the rear disc brakes on the Lada Vesta yourself, there is no need to replace the bearings if you need to replace the disc.
All the components necessary to replace the brakes with your own hands are presented in the table along with the article numbers.
| Position | vendor code |
| Right brake hose mounting bracket | 8450031136 |
| Left brake hose mounting bracket | 8450031137 |
| Rear brake flexible hose assembly – 2 pcs. | 8450031129 |
| Rear brake pads (full set) | 11196-3502089-00 |
| Washer 10 | 00001-000516870 |
| Ball joint fixing bolt | 21080-2904194-00 |
| Washer 10 | 00001-000516870 |
| Ball joint fixing bolt | 21080-2904194-00 |
| Rear left brake (assembly) | 8450031163 |
| Rear right brake (assembly) | 8450031162 |
| Retainer fixing screw | 21080610526810 |
| Rear brake disc | 8450031131 |
| Rear wheel hub (assembly) | 8450031130 |
| Hex Head Screw | 00001-003836021 |
| Right rear brake guard | 8450031686 |
| Left rear brake guard | 8450031687 |
| Bolt M10-1.25-40 | 8450031161 |
| Left rear brake mount | 8450031132 |
| Right rear brake mount | 8450031133 |
The estimated cost of the entire kit for self-installation of rear disc brakes on a Lada Vesta is about 30,000 rubles.
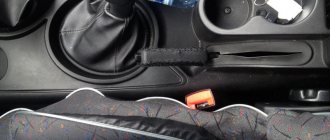
The principle of adjusting the handbrake
- Fully lower the handbrake lever in the cabin.
Lower the handbrake handle
- Place the car on a pit or lift it on a lift. Some car owners manage to adjust the handbrake “from the curb” - but this is inconvenient and dangerous.
- Find the resonator from the bottom of the car and remove it from the rubber brackets.
Remove the muffler from its mounting to the bodyUsing a ratchet, unscrew the 4 bolts securing the protection of the handbrake adjustment mechanism (protective screen).
Remove and set aside the protective screen
Next, you can either remove the protective screen, but it seems to me that it is easier to move it forward behind the muffler, which will free up space that is enough for free work.
The mechanism looks like this
Loosen the first nut with a 13mm wrench.
- By tightening the adjusting nut, tighten the handbrake cable that comes out of the passenger compartment.
- Ask a partner to check the stroke of the lever handle, or check it yourself.
- As soon as the handbrake moves 3-4 clicks, tighten the lock nut.
- Before the final stage of work, it is necessary to check the functionality of the brake mechanism. To do this, hang the rear wheels and watch how they rotate with the hand brake off. They also check how the wheels grip when the handbrake is raised.
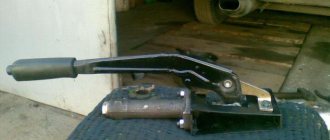
Manual brake lever - removal and installation, adjustment
Removal
Place the vehicle in the work station, apply the parking brake and turn off the ignition.
Remove the floor tunnel lining. (see here)
Cut the floor mat at the rear of the arm and move the mat pieces to the sides.
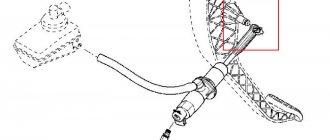
Figure 17-1 — Disconnecting the manual brake lever cables:
1— handbrake lever; 2— equalizer cable for the manual brake lever; 3— adjusting nut of the equalizer cable; 4— manual brake cable equalizer; 5— manual brake cables; X - adjustment dimension for cable tension, X = 16 ± 0.3 mm
Loosen adjusting nut 3, Figure 17-1, of the handbrake lever equalizer cable
... and disconnect both cables 5 from the equalizer 4.
Unscrew the two nuts securing the lever to the floor tunnel studs,
Move the front seats all the way forward, lift the lever and disconnect the wiring harness block from switch 2, Figure 17-2, warning light of the manual brake lever (replaceable head 13, extension and knob).
Figure 17-2 — Removing the manual brake lever:
1— lever attachment points; 2— signal lamp switch
Remove the handbrake lever.
Unscrew the adjusting nut from the end of the front cable and disconnect the short cable from the lever.
Remove the handbrake warning lamp switch by unscrewing the screw securing it.
Installation
Connect the wiring harness block to the warning light switch of the manual brake lever, install the lever on the mounting studs and secure with two nuts. The tightening torque of the nuts is 8 N.m (0.8 kgf.m) (replaceable head 13, extension and wrench, torque wrench).
Install the handbrake cables into the holes in the equalizer.
Tighten the adjusting nut of the manual drive lever so that dimension X, Figure 17-1, from the upper end of the adjusting nut to the end of the threaded part of the equalizer cable is 16 ± 0.3 mm (spanner 10, caliper).
Adjusting the hand (parking) brake drive
Note: The parking brake adjustment is shown here in more detail.
Place the vehicle on a two-post lift, apply the parking brake and turn off the ignition.
Lower the handbrake lever.
Tighten and lower the manual brake lever five times to its original position to bring the drive cables into working condition.
Make sure the rear wheels rotate. If this is not the case, check the following items and repair or replace them if necessary:
— manual brake cables;
— wheel cylinder piston;
— automatic gap adjustment mechanism.
Remove the rear wheels.
Loosen adjusting nut 3, Figure 17-1, cable tension (wrench 10).
Install the manual brake lever on the second cutout of the gear sector.
Tighten the adjusting nut until the brake drum stops rotating by hand.
Tighten and lower the handbrake lever 2-3 times and check the rotation of the brake drum. If the drum does not rotate, gradually loosen the adjusting nut until the drum rotates freely
Install the rear wheels.
Install the floor tunnel lining.
Check the effectiveness of the service brake system.
Causes of malfunction and their elimination
As a rule, the reasons why the handbrake does not work are quite simple and do not require long or expensive repairs:
Checking the mechanical component
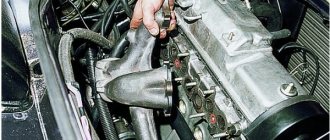
Self-diagnosis is a simple operation. It is divided into two components - mechanical and electrical. The first is very important, since it evaluates the condition of the brake system drive and determines its performance.
Checking the mechanical component is reduced to assessing the level of brake fluid in the reservoir and the condition of the drive lines and system components - the master brake cylinder and operating mechanisms.
The brake reservoir is located in the engine compartment, on the right near the rear panel of the engine compartment. It is not difficult to find it, since there are two wires going to the tank cap.
When checking, disconnect the wires and unscrew the cap to determine the brake fluid level. There are marks on the walls of the tank, by which you can understand how much liquid is left. A level above the middle between the marks is considered normal.
For an additional check, we start the car and press the brake pedal a couple of times, after which we roll the car back and inspect the surface of the ground for traces of leaking fluid, and check the fluid level. If it is detected, the brake line is damaged, and the amount of fluid will decrease.
If there is a brake fluid leak, the car cannot be used because the car does not have brakes. The best option in this case is to call a tow truck to deliver the car to the repair site. But if you have enough driving experience, then we get to the service station or garage on our own. Car brake systems usually have two circuits, and if the line of one of them is broken, the second continues to work.
Sometimes there is a problem with the warning light coming on when you press the brake pedal. The reason for this lies in two factors - low fluid level in the reservoir and worn disc brake pads. When braking, fluid flows into the working cylinders and the amount in the tank drops below a critical level, which is why the lamp lights up. This can be treated by installing new pads and adding fluid to the reservoir.
Wire harness connection diagrams
The following shows in more detail various fragments of the electrical circuits of this car.
1.6 (8V) engine wiring harness connection diagram
1 – generator Lada Largus; 2 – air conditioning compressor; 3 – cooling system fan; 4 – additional resistor; 5 – starter R90; 6 – battery; 7 – absolute air pressure sensor; 8 – vehicle speed sensor; 9 – crankshaft position sensor; 10 – intake air temperature sensor; 11 – adsorber purge valve; 12 – control oxygen concentration sensor; 13 – connection block with the wiring harness of the control oxygen concentration sensor; 14 – diagnostic oxygen concentration sensor; 15 – connection block with the wiring harness of the diagnostic oxygen concentration sensor; 16 – ignition coil; 17 – spark plugs; 18 – nozzles;
19 – throttle position sensor; 20 – idle speed regulator; 21 – coolant temperature sensor; 22 – knock sensor; 23 – refrigerant pressure sensor; 24 – pressure sensor in the power steering system; 25 – low oil pressure indicator sensor; 26 – reverse light switch; 27 – electronic engine control unit; 28 – fuse and relay block in the engine compartment; 29 – high speed cooling fan relay; 30 – low speed cooling fan relay; 31 – air conditioning compressor relay; 32 – fuel pump and ignition coil relay; 33 – main relay Lada Largus; 34, 35 – fuses in the relay and fuse box in the engine compartment; 37 – connection block with the front body wiring harness.
1.6 (16V) engine wiring harness connection diagram
1 – generator; 2 – air conditioning compressor; 3 – cooling system fan; 4 – additional resistor; 5 – starter; 6 – battery; 7 – absolute air pressure sensor; 8 – vehicle speed sensor; 9 – coolant temperature sensor; 10 – crankshaft position sensor; 11 – intake air temperature sensor; 12 – adsorber purge valve; 13 – control oxygen concentration sensor; 14 – connection block with the wiring harness of the control oxygen concentration sensor; 15 – diagnostic oxygen concentration sensor; 16 – connection block with the wiring harness of the diagnostic oxygen concentration sensor; 17 – ignition coils; 18 – spark plugs; 19 – R90 injectors;
20 – throttle position sensor; 21 – idle speed regulator; 22 – knock sensor; 23 – refrigerant pressure sensor; 24 – pressure sensor in the power steering system; 25 – low oil pressure indicator sensor; 26 – reverse light switch; 28 – electronic engine control unit; 29 – fuse and relay box in the engine compartment; 30 – high speed cooling fan relay; 31 – low speed cooling fan relay; 32 – air conditioning compressor relay; 33 – fuel pump and ignition coil relay; 34 – main relay; 35, 36 – fuses in the relay and fuse box in the engine compartment; 37 – connection block with the front body wiring harness.
Recommendations for the braking system
- We recommend that you replace the brake fluid at least once every 1.5-2 years. During operation, brake fluid inevitably absorbs moisture, and its boiling point decreases. During intense braking, it can boil in the working cylinders, and an air plug appears in them, which will not allow creating the required pressure, and the efficiency of the braking system will sharply deteriorate. Check the brake fluid level periodically. If it begins to decrease quickly, it means there is a leak - contact service immediately. If the level decreases, but slowly (smoothly over a run of about 10-20 thousand kilometers) and reaches a minimum, check the condition of the brake pads.
It is advisable to change brake pads/discs if the wear percentage reaches 70% or more, because it is impossible to monitor their condition frequently, and besides, the inner pad wears out more. Maintaining the brake system in good condition is the key to the safety of you and your loved ones on the road.
Use only original and high-quality spare parts in the car’s brake system. Brake pads of questionable quality may not withstand the heat during emergency braking and will not stop the car. They may have a shorter service life, squeak when braking, or wear out the brake rotors quickly.
Selection of front brake pads for Lada Largus
Lada Largus can be equipped with two types of front brake pads: with and without ABS function.
They have different catalog numbers, so they need to be considered separately.
With ABS
The first ones have the ABS function. There are quite a lot of pads, from low quality to high quality. But we will only consider those that are recommended to be installed on a car.
Analog manufacturers provide a fairly wide selection of analogue brake pads for Largus, but Brembo, Fenox, FIT and Bosch deserve special attention in terms of quality.
Without ABS
The second version of the pads is produced for cars that do not have ABS function. 410608481R is the original catalog number of this product. The average market price in the Russian Federation is 3,000 rubles.
Let's consider what analogues can be installed instead of the original.
As in the first case, analog manufacturers produce a fairly large assortment of brake pads for Largus.
Recommendations and improvements
Some car enthusiasts, in order to improve the use of brake pads, replace calipers and discs with a tuning version. They are more efficient than factory ones. Some modifications may require replacing the hub, since the bolt pattern of the parts may vary.
Since the front brake pads last for a maximum of 20,000 km, some owners are not happy with this.
Instead of standard pads, you can install a sports kit from Brembo, which costs 1.5 times more, but also has a service life of about 40 thousand km, depending on driving style.