AutoNews / Reviews / Tests
How to Remove the Exhaust Manifold of a VAZ 2109 Injector
The exhaust manifold is a component of the exhaust system of accounting programs that carries out the process of removing exhaust gases from the cylinders of the unit into the exhaust pipe.
If the collector malfunctions, the culprit is both the element itself and its gasket. Changing the exhaust manifold (exhaust manifold) gasket is a common event when repairing a VAZ 2109.
In order to change the manifold or its gasket, in any case you will have to dismantle the VK. But to get to the element you are looking for, you will first need to go through some preliminary stages. Specifically, tighten the fasteners, and then remove the air filter and carburetor if step 1 does not help.
Your deeds
Often, loose fastenings of the collectors became a prerequisite for the ingress of contaminants, which disrupted the performance of the exhaust system. In that case, the tightening did not give any result, then the gasket was definitely burned out or the collector itself was damaged, which is the least possible
Removing the air filter
- If the engine is injection, to remove the air filter you will need to unscrew the four mounting screws of the filter housing cover. The filter itself is located under the cover. If difficulties arise when lifting the cover, disconnect the mass air flow sensor and remove the filter device.
- If you have a carburetor under the hood, then the filter and housing will be held in place by 3 latches. There is a screw in the center of the iron cover, which is often unscrewed by hand. Once you remove it, you can lift the lid without any problems. Underneath there is a filter, which should be removed carefully. Examine its condition carefully. If the filter has been working for quite a long time, it is recommended to change it during the return assembly.
The carburetor is dismantled in the following order:
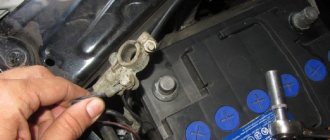
- Disconnect the antifreeze supply hose from the fitting to the engine starting device. For this purpose, you unscrew the clamps;
- Be sure to drain the coolant into a prepared container;
- Disconnect the exhaust pipe that comes from the exhaust manifold and the BC bracket;
- Disconnect the throttle cable bracket. To do this, you need to remove one end of the spring from the damper control rod, and then remove the entire spring. Now loosen the nut on the bracket, which will allow you to remove the cable from the engagement;
- Disconnect the EPH sensor from the power plug;
- Disconnect the vacuum tube and a pair of hoses from the carburetor heater unit;
- Remove the crankcase ventilation hose;
- Remove the four mounting nuts holding the carburetor and intake manifold;
- Remove the carburetor carefully without tugging. It must be evenly removed from the studs.
Now it’s time to remove the intake and exhaust manifolds. Having dismantled them, you can easily understand how you can get by by changing the gasket, or whether you will need a complete change of the collectors themselves.
The gasket is a consumable item, the purchase of which will cost you almost 50-250 rubles, depending on the manufacturer and region. Services for replacing gaskets for 100 cost more than 1,500 rubles. Add to this the price of a high-quality gasket and you get quite a lot of money. You will avoid such costs if our client can do it on his own.
By removing the air filter and carburetor, you gain access to the intake manifold.
To dismantle it you will need a certain set of tools:
- Ratchet with 10mm head;
- Collar;
- Ratchet;
- Deepest head at 13;
- Row head for 13;
- Open-end wrench 13.
When our client is ready, we get to work.
- Unscrew a couple of mounting nuts to bend back the platform located under the carburetor.
- Disconnect the hoses that are connected to the intake manifold.
- Remove the 6 mounting nuts that are located on the intake manifold.
- Remove the manifold itself from the studs. To do this, simply swing the knot to the sides. Often it sticks to the gasket, which causes problems with removal.
- Inspect the condition of the unit. If there is damage, the collector is replaced.
- If the problem lies solely in the gasket, put the intake manifold aside for now and start removing the outlet.
To remove a graduate, you will need:
- Ratchet;
- Open-end wrench 13;
- Socket wrench 13;
- The deepest head is 13.
Is our client still ready? Then let's get started.
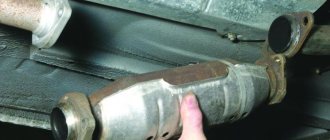
- Unscrew the four exhaust pipe mounting nuts from our exhaust manifold.
- Pull the so-called trousers off their heels and take them to the side. Now you can unscrew three more fastening nuts securing the VK.
- Carefully, without sudden movements or jerks, pull the graduate off the stiletto heels.
- Often, during the dismantling of this unit, the manifold or its mounting nuts become stuck to the seats. To prevent this, treat the assembly with WD40 in advance, let it react, after which there will be no problems with dismantling work.
- If the studs break off during removal, you will need to drill out the old element, make a new thread and install a fresh stud.
Preparation stages
To replace the manifold or its gasket, in any case you will have to dismantle the VK. But before you get to the element you are looking for, you will first need to go through some preparatory steps. Namely, tighten the fasteners, and then remove the air filter and carburetor if the first stage does not help.
Stage of work
Your actions
Often, loose manifold fastenings caused the entry of contaminants, which disrupted the performance of the exhaust system. If the tightening did not give any result, then the gasket is definitely burned out or the collector itself is damaged, which is less likely
Removing the air filter
Removing the carburetor is carried out in the following sequence:
- Disconnect the coolant supply hose to the engine starting device from the fitting. To do this, unscrew the clamps;
- Be sure to drain the coolant into a prepared container;
- Disconnect the exhaust pipe that comes from the exhaust manifold and the BC bracket;
- Disconnect the throttle cable bracket. To do this, you need to remove one end of the spring from the damper control rod, and then remove the entire spring. Now loosen the nut on the bracket, which will allow you to remove the cable from the engagement;
- Disconnect the EPH sensor from the power plug;
- Disconnect the vacuum tube and a pair of hoses from the carburetor heating unit;
- Remove the engine crankcase ventilation hose;
- Remove the four mounting nuts holding the carburetor and intake manifold;
- Remove the carburetor carefully without yanking. It must be gradually removed from the studs.
Dismantling the unit
Symptoms of a problem
Without proper care, such as lubricating bearings and checking play, the steering rack can quickly fail. Signs of malfunction that indicate that the mechanism should already be changed:
- A noticeable knock when driving over bumps, which is transmitted to the steering wheel. If a knocking noise is heard when turning the steering wheel, it is unsafe to drive such a car; it is necessary to urgently diagnose the mechanism.
- Strong play in the steering wheel indicates loose fasteners or wear of the rack-and-pinion joint.
- The effort when turning the wheels has increased.
- You can hear noise from the hydraulic booster (if equipped).
- The cause of the knocking noise may be an insufficiently lubricated bearing or wear of the gear-rack pair. If, when rocking the steering shaft, there is noticeable play at the junction with the rack, repair is necessary. If not, just check and tighten the joints between the bushing and the steering shaft gear.
A powerful vice is used to fasten the rail
Video: How to tighten a loose mechanism
Dismantling of collectors
Now comes the turn to remove the intake and exhaust manifolds. Having dismantled them, you can understand whether it is possible to get by with replacing the gasket, or whether the collectors themselves will need to be completely replaced.
The gasket is a consumable item, the purchase of which will literally cost you 50-250 rubles, depending on the manufacturer and region. Services for replacing the gasket at a service station cost more than 1,500 rubles. Add to this the cost of a high-quality gasket and you will get quite a lot of money. Such costs can be avoided if you do everything yourself.
Dismantled unit
Installation of tow bar on LADA Vesta SW
The Lada Vesta SV tow bar is an irreplaceable thing in any car that can help out in difficult times. But this is only if you use the trailer at least periodically. If the trunk is enough for you to transport things, then there is no point in spending extra money and bothering with its installation. The towbar can be installed on any car. Manufacturers develop special designs that are adapted to specific models. Today, including for LADA Vesta SW, you can easily purchase this design and install it on your car within a short time.
Preliminary work
Replacing the VAZ 2109 intake manifold gasket with your own hands is not very difficult and does not require specific knowledge or expensive tools - the required set of keys is usually present in the trunk of every car enthusiast.
But before replacing, you should try to tighten the fastening of the intake unit - if the gasket is not burned out, it is the loose fastening that may cause exhaust gases to get under the hood. If tightening the fastening does not help, it means that the gasket is completely burned out and needs to be replaced. Replacing the VAZ 2109 manifold gasket will require preliminary work to dismantle the air filter, remove the carburetor and the manifold itself. All of the above work is carried out exclusively on a cold engine.
Removing the air filter with housing
On the injection engine of a VAZ 2109 car, to remove the air filter, it is enough to unscrew the four self-tapping screws securing the cover of the filter element housing - for this, use a 10mm wrench or a ratchet. There will be a filter element under the cover. If the cover is difficult to lift, you can disconnect the mass air flow sensor from the plug.
Possible reasons for withdrawal
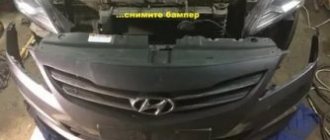
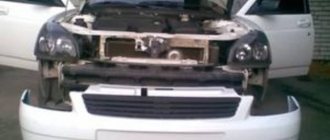
There are not so many reasons for removing the front bumper on Largus, but they all contribute to learning how to dismantle such parts with your own hands. Let's consider what pushes the owner to perform this simple operation:
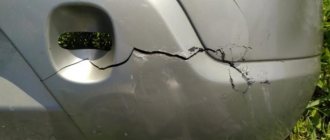
- Part damage . This can happen due to an accident or deformation when driving backwards.
- Another reason may be that the bumper itself was not damaged when damaged, but the rear panel was either deformed and requires restoration .
- Body painting , when carried out comprehensively, also requires removing the buffer.
- Tuning or upgrading the rear bumper will also require dismantling the part.
- Installation of accessories such as parking sensors will force the owner to remove the buffer.
- Partial removal to install bumper cover.
Installing the rear bumper trim
- Other reasons.
There are not many reasons for removing the bumper; this is usually done after road accidents that caused damage to the part.
Replacing the gasket
After the preparatory work is completed - the air filter, carburetor and intake and exhaust manifold are dismantled, you can begin the main work, for which all previous steps were done - directly replacing the gasket itself.
The work order will look like this:
- We remove the old gasket - this can be difficult, since, most likely, it is tightly burned to the cylinder head - in this case, you need to use a thin screwdriver or knife. To make the work easier, you can use special aerosol solvents in cans, sold in auto parts stores. It is also necessary to carefully remove carbon deposits from the mating surface of the block - you can use sandpaper for this.
- The new product is installed on the exhaust manifold, then all work is done in the reverse order. Replacing the intake manifold gasket on a VAZ 2109 is carried out in a similar way.
Replacement of the exhaust manifold gasket on the VAZ 2109 has been completed. The exhaust pipe of the muffler is secured with brass nuts, preferably new ones. And don't forget to fill in the coolant that was drained when dismantling the carburetor!
Design and arrangement of the rack on the VAZ 2110
The operating principle of the steering rack is as follows. A gear is installed at the end of the steering shaft. It meshes with a rack (hence the name). When you turn the steering wheel, the gear moves the rack left and right, turning the wheels. To do this, the steering arms are connected to the rack by steering rods.
This is what the dismantled mechanism looks like
Rack designers need to strike a compromise between lightness and steering feel. It all depends on the rack-and-pinion ratio.
- If the steering wheel is made light, the control will become blurry, and you will have to make too many turns of the steering wheel to turn. This is unsafe when driving on the highway, where quick reaction is important.
- Sharp steering is more predictable and safer, but also requires the driver to exert considerable effort when maneuvering, especially in parking lots.
- A variable ratio rack partially solves this problem. In the near-zero zone, the steering is sharp, which gives confidence on the highway. It is easier to steer closer to the edges, but you also have to turn the steering wheel more. This is convenient, for example, in a parking lot at low speeds.
To maintain a balance between sharpness and ease of control, amplifiers are installed on the steering mechanism. According to the principle of operation, they are hydraulic (GUR) and electric (EUR).
Three types of steering racks are installed on the VAZ 2110: without power steering (with variable gear ratio), with power steering and electric power steering, and you can install the power steering yourself.
Basic criteria for selecting a part
When choosing a device for Vesta SW, you need to take into account the types of coupling devices and some other nuances:
- connectors (round or rectangular), trailer socket;
- maximum load on the structure and fasteners, permissible trailer weight;
- load class - must be 1 or 2, which can withstand a load of 900-1500 kg .
Related link:
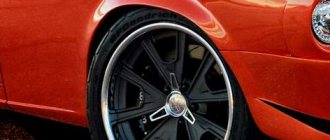
Blizzak winter tires.
It is also worth paying attention to the condition of the paintwork. There should be no scratches, chips, gaps or any defects. Otherwise, moisture will enter the metal, which will lead to corrosion.
Install
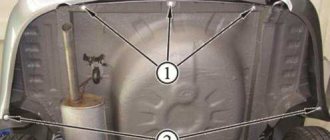
Each sunshade is equipped with 4 magnets. To install frame mesh curtains for a car, you only need to perform a few manipulations:
- We install the selected products on the door panel at some distance from the glass (1-2 cm). It is better to lower the windows first, it will be much more convenient to work.
- The corner mountings that come with the kit need to be installed on magnets. At the same time, the fasteners differ slightly in angle of inclination, so you need to choose the optimal ones. The main thing is that they fit tightly to the surface. I first installed the first ones I came across and at high speed the curtains began to dangle, but after replacing the corners with the correct ones, the nets fit like a glove and were firmly fixed.
- We remove the protective film from the fasteners (I highly recommend wiping the surface with which they will be joined with alcohol first).
- Glue the lower parts of the rods. In this case, the fasteners need to be placed slightly under the rubber band, which is located between the glass and the surface.
- We repeat the same with the remaining 3 magnets.
- Press the fasteners firmly.
After this, the fasteners remain in place, and the tinting screens themselves can be removed at any time. To do this, just pull the tab with the Trokota logo (therefore, I don’t recommend cutting it off for those in a hurry).
However, the mesh may tighten a little and gaps may appear between the sheet and the surface; personally, this is exactly what happened to me. However, due to the fact that this is a new generation of tinting, it is elastic, so such “jambs” can be easily removed. The main frame on which the mesh material is stretched is a wire that can be bent a little (the main thing is not to overdo it).
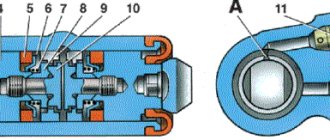
Push coupling
The second important element, without which the clutch cannot work properly, is the push clutch. Its outer part is bolted to the flywheel, continuously transmitting torque to the gearbox and then to the wheels. A so-called diaphragm spring is attached to the coupling ( 2.50 of the video). With its help, the two clutch discs are routed and the engine and gearbox are disconnected.
How to check if everything is done correctly
For installation and connection of the structure, only technological holes are used. If they are not available, you can make them in the bottom yourself using special equipment. All elements are mounted and adjusted to the holes, everything is carefully checked, since minimal misalignment can lead to rapid wear of both the towbar itself and its wiring.
The fasteners must be tightened well to avoid possible displacement. Before using a coupling structure, it is tested to determine whether the coupling device can withstand the permissible load. Before installation, it is recommended that all holes and joints be treated with a grease-type lubricant; a plate-type compound for processing the coupling ball is best suited. Before installing the ball itself, it must be covered with a cap.
Related link:
Vesta SW – is it worth paying extra for the Cross console?