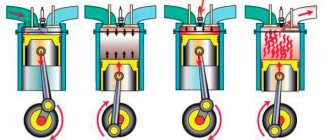
Installation
Remove the standard side mirrors (pry off the mirror triangle with a screwdriver and remove the three mounting screws). Install the new mirror in the reverse order.
We stretch the turn signal wires to the mirrors:
- Remove the door trim.
- Remove the turn signal from the fender and disconnect the block. We install plugs instead.
- Pull the wires out of the fender and into the interior. To do this, unscrew the sill trims in the cabin, peel back the carpet and felt and pull the black wire in the engine panel. We determine which of the two +12 V wires using a multimeter or a test lamp. We insulate the second wire.
- Route the wire from the passenger compartment to the car door through the corrugation.
Step-by-step instructions for installing and attaching an illuminated mirror
Unpacking the mirror
Place the mirror on a flat surface. Use a utility knife to cut slits around the perimeter of the shipping tape. Open the package and remove the protective foam from all sides of the mirror. If necessary, remove the protective film from the mirror surface. Check the package. Along with the mirror, the box must contain a product passport/warranty card and installation instructions.
Preparation for installation
At this stage, it is very important to correctly determine the height at which the mirror will be located. The recommended height for mounting the mirror is 30 cm from the floor. In this case, the top point of the mirror should be located 10-20 cm above the height of the tallest family member. However, this figure may vary depending on the height of family members, for your convenience.
Measure the width of the mirror with a tape measure and place notches on the wall between which the product will be located. Please note that there should be at least 2-3 cm between the level of the mirror and the level of the suspension. Take a building level and a pencil and transfer the drilling points to the wall.
Using a level, draw a horizontal line above the top edge of the mirror - with its help you will hang the mirror perfectly level.
Drilling holes
Drill holes according to the markings. Please note that this is a rather dusty job, so it is better to cover all objects in the room with a protective film in advance.
The diameter and depth of the hole will depend on the dowel used. For a plasterboard wall, we recommend using a butterfly dowel, for other cases - an 8*60 dowel for concrete. For ceramic tiles, we recommend starting with a ceramic drill bit and then also using a concrete drill bit.
Designer tip: mirror mounts are best done at the seams between ceramic tiles.
Insert the screw-crutches with the dowel into the resulting holes, screw in the brackets. Mount the mirror on the hooks.
Instructions for attaching the mirror to hanging brackets:
Instructions for installing a mirror on through dowels:
Connecting the backlight
If the mirror is plugged into an outlet: Carefully turn the mirror over so that it is facing down. In the center of the decorative plastic box you will see the power cord: carefully remove it. Check the functionality of the mirror by connecting the power cord to the network.
Do not forget! The socket must be located at a sufficient distance from the mirror, otherwise you will have to use a splitter.
All bathroom mirrors with LED lighting have a waterproof rating of IP44. Thanks to this, they are completely safe for use in rooms with high humidity levels. Make sure that the outlet also has a high degree of moisture protection. One way to do this is with a plastic protective housing.
Watch this video to clearly see the process of installing a backlit mirror that is plugged into an outlet:
If the mirror is connected to the electrical network: you will find a connection diagram included with the mirror. All that remains to be done is simply follow the instructions. If you do everything carefully and strictly according to the manufacturer’s recommendations, the result will definitely please you.
On the back of the product you will see a control unit. Your task is to connect the lead cable from the wall to the mirror using terminals. The connection diagram shows the insulation markings. It will help you not to confuse anything when connecting wires. Thanks to Wago's special terminals, you won't need to use electrical tape or twist ties to insulate connections.
It is necessary to make the connection through a transformer so that the LED strip can withstand voltage surges and serve you longer.
From this video you will learn how to connect power to the LED backlight via the mains:
And watch this video instruction if in your case it was not foreseen in advance where the power supply wire would be connected:
Idea: in the bathroom you can combine the wiring of the mirror with the wiring of the ceiling lamp. Then the mirror will turn on and off simultaneously with the ceiling light.
Mirror installation
There is very little left: carefully lift the mirror - it is better to do this together with a partner - and hang it on the prepared hooks. Adjust the top line of the mirror to the horizontal markings you made with the level. Pull the connection wire through the hole in advance so that you can then connect it to the power cable without removing the mirror.
In this video we also invite you to see how, if necessary, you can replace the touch button and power supply on the mirror:
Additional functions
If your mirror has a clock and temperature sensor, now is the time to set it up. You will find detailed instructions on how to do this in the box with the received product.
Congratulations! The mirror is installed and ready to go!
Connection
Old style mirrors (without direction indicators) have two connectors (3 and 2 wires):
The mirrors of the new SE model have 1 block of 6 wires:
We cut off the wires from the SE mirror block and solder it according to the diagram:
The process of installing and connecting mirrors of the new SE model is also shown in the video:
Mirrors on the Priora SE and the old model, what is the difference?
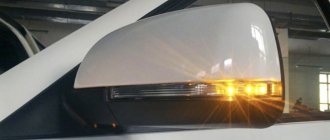
1) The presence of turn signals on the mirrors. SE has them, old ones don't.
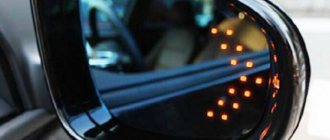
2) Visibility, it is greater on the SE mirrors.
3) Mirror mounting triangle. On the SE mirrors it fits better without any gaps.
4) Protection from rain. SE mirror housings provide less protection from rain and snow.
5) The external differences of the mirrors can be seen in the following photos:
At the moment, the price of SE mirrors on Lada Priora is about 3,300 rubles.
Professional installation of illuminated mirrors
If the process described in this article seemed easy to you, try installing a backlit mirror yourself. If you have any questions, write to us or leave your message in the feedback form. We will definitely advise you! But if you are still not confident in your abilities, it is better to entrust the connection of the illuminated mirror to a professional. You can order the installation service by checking the appropriate box when ordering the product.
In the Rosestar catalog you will find both inexpensive basic mirrors with linear lighting and premium models of unusual shapes, sizes and designs. Our workshop produces all possible options for illuminated mirrors: rectangular, round, oval and irregular shapes; with frames and without frames; for the bathroom, nursery or dressing room and many, many others.
Write to us right now! The sooner you place your order, the faster your custom mirror will be delivered to you. You will fall in love with stylish mirrors from Rosestar from the first second, and time will only confirm their reliability and impeccable quality!
Authors of the article: team of the site and mirror workshop rosestar.ru
Automatic heated mirrors
We invite you to watch the video: automatic mirror heating with auto-start function and heating blocking when the charge is low.
Real life case:
It happens…
A new owner of a used foreign car approached the service station with the question “How to install heated mirrors?” The station workers calculated the amount for him, approved it and sent the owner home. During disassembly, they were extremely surprised, since the heating was already in place, and the factory one at that. So, the new owner, without reading the passport and instructions and without understanding where the heated mirrors are turned on, found himself in a stupid situation and almost lost money.
Replacing elements in the side mirrors of VAZ 2110, 2111, 2112
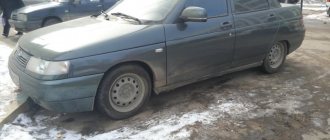
One winter morning, while trying to clean the mirrors, the left mirror element burst. So my wife and I drove around with such a mirror, fortunately the crack did not interfere much. With the onset of warmer weather, it was decided to replace this mirror element, and since... They are not that expensive (the mirrors are standard with lever adjustment), so it was decided to replace both, and even have them heated. (A very useful thing - I have it on the six, it wouldn’t hurt here either). In addition, the adjustment lever of the broken mirror broke
Broken adjustment lever
After a short search I found these mirror elements (not advertising)
Then everything is simple, because... Since the old elements were no longer really needed, they were dismantled without much concern. And new ones were installed in their place.
Left mirror - aspherical
I haven’t turned on the heating yet, I’m waiting for the right moment.
It is very unusual to look into an aspherical mirror. You can see much more in it than in the standard one. But there are slight distortions, although this is a matter of habit.
In general, standard mirrors, or rather the adjustment mechanism, with its huge gaps, are some kind of G. We will save up for normal mirrors. If not electric ones, then definitely cable ones.
Basic faults
Additions to the conventional mirror element make driving even more comfortable. Just in case, the repeater makes it clear to inattentive traffic participants where the driver is going to go. Heating will promptly evaporate moisture - raindrops, and will not leave stains that distort the image. The following malfunctions may occur during operation of the machine:
The fasteners have become loose. Each part is held in place by several fasteners at different points. They may become so loose that tightening them will be useless. Everything will depend on the severity of the damage. In some cases, replacing the fasteners will be sufficient. The heating does not work. Check the connection of the wire blocks. Perhaps it is enough to strengthen the wire connections so that they no longer come loose. The electric drive does not work. Adjusting the position of mirror devices while sitting in your seat is much more convenient than doing it manually. Check the wiring. Turn signal repeater. If the repeater does not work, it means the signal is not reaching it. The problem, again, is the wiring. Broken mirror element. It will be enough to replace it with a new part, but during replacement you should be extremely careful
It is important to prevent splinters from getting under the cover.
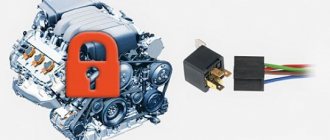
How to connect
Usually only two wires come out of the heater element; they can be connected without observing polarity; the connection will always be parallel and polarity does not matter. Since you can and should turn on the heated mirrors together with the rear window heater, you can connect directly to this system. That is, when you turn on the heated rear window, the heated mirrors will also turn on, the relay and button for heated mirrors are not needed in this case.
If you plan to connect separately from the heated rear window, then you need to stock up on a power button, a relay and a 10 A remote fuse (if you use a 10-amp power button, you can do without a relay, since you can connect heated mirrors directly, due to low power consumption).
If you still need to make heated mirrors from scrap materials, then, as mentioned above, the easiest way to do this is from a car light bulb. This method is universal and suitable for absolutely all cars.
First of all, the mirror body itself requires a little modification; it needs to create a heat shield. This can be done using foil by simply gluing the inside of the case. Then place and secure there the socket with the car light bulb, making sure that the lamp does not touch the mirror itself or the body (the lamp heats up quite strongly, and if touched, it can damage the mirror element or melt the mirror body).
You can also make a heated mirror on a car, with two operating modes, a powerful mode aimed at quickly defrosting the mirror and a weak one to protect against fogging. This can be organized by installing, for example, a two-contact lamp (21\5). Into the mirror housing, and connecting it accordingly. In this case, 21 Watt will work for rapid defrosting, and 5 Watt will be enough to protect against fogging.