Published:
10.03.2017
During long-term operation, the parking brake cable of a VAZ-2112 car inevitably stretches, and the brake pads are subject to gradual wear. As a result, the handbrake does not cope effectively with the task assigned to it or stops functioning altogether. If, after stopping the car, you pull the lever, but the brake pads do not hold the wheels in a stationary position, then it is time for repairs. And we are not necessarily talking about replacement, since it is quite likely that the problem can be solved by simply tightening the cable. To do this, you don’t even need to contact a service station - you just need to know how to tighten or replace the handbrake on a VAZ-2112, and do everything yourself.
During operation, the handbrake cable of a VAZ-2112 car inevitably stretches
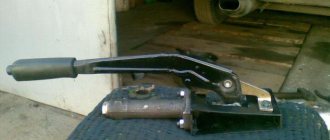
How does a car's handbrake work? This is perhaps one of the simplest systems, and it consists of such elements as:
- parking brake lever;
- lever lock button;
- handbrake cable with equalizer;
- manual brake system traction;
- adjusting nut and locknut.
There is also a protective cover in the design, and the cable itself passes under the bottom of the machine and is placed in a protective sheath. These are, in fact, all the main parts that make up the parking brake system, if you do not take into account its final element - the brake pads.
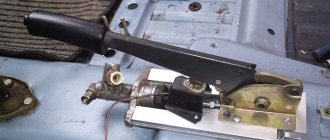
Handbrake VAZ disassembled
Replacing the handbrake cable on a VAZ-2110, 2111, 2112
The handbrake, or scientifically the hand or parking brake, is an irreplaceable part of the car, the benefits of which many people underestimate.
The handbrake is a lever that, in an unexpected situation, will help to perform emergency braking of the car, and in a difficult situation, to move away on a hill, without damaging the cars behind. Yet the main task of the handbrake is to keep the car from accidentally moving. The handbrake makes life much easier for motorists, and sometimes even helps out. Therefore, so that a force majeure situation does not occur and the handbrake does not fail at the necessary moment, you need to monitor the condition of the cable and its serviceability.
How to identify problems with the handbrake? We list the main problems and reasons for the handbrake malfunction.
Basic malfunctions of the hand brake:
- It is difficult or completely impossible to put the car on the handbrake; the cable is difficult to move.
Reason: the threads burst in the middle and fluffed up;
- The car rolls, even with the handbrake raised.
Reason: the cable is loose;
- When I try to put the handbrake on, the car squats to one side.
Reason: one cable broke;
- The handbrake lifts too easily and the car rolls.
Reason: the cable was worn out, the threads began to break.
If a malfunction is detected, the cable should be replaced. If there is no car service nearby, arm yourself with two “13” wrenches, one “10” wrench, a wheelbrace and pliers. Go!
Hydraulics or mechanics
It is worth noting that at the moment not all rear brakes are cable or mechanical; now there are quite a large number of handbrake brakes that operate hydraulically, this is especially true for rear disc brakes rather than drum brakes. Hydraulics duplicate the operation of the main braking system.
That is, when you lift the handle, a special piston creates pressure on the rear discs and they are blocked. If the handbrake does not work in such a system, then the reasons are significantly different from its mechanical counterpart.
Replacing the handbrake cable
1. Make sure that the car is not on the handbrake. If so, lower it. To ensure your safety and prevent the car from rolling away, put it at speed and place anti-roll bars under the front wheels.
2. Next, we tear off the wheel bolts with a wheel wrench counterclockwise, “jack up” the car and remove any of the rear wheels.
3. We unscrew the two drum bolts and, by screwing them into special holes in the drum, remove it.
4. Using pliers, remove the upper and lower springs, thereby loosening the pads, gaining access to the internal springs, by moving them aside, we can easily remove the pads.
5. Pull the cable out of the brake shield.
6. Loosen the cable holder on the beam and pull the cable out of it.
7. Move the resonator (muffler) to the side by hand; if that doesn’t work, remove the muffler.
8. Loosen the handbrake tensioner nuts (1.8). Remove from the mount (4) and lever (3).
9. Pull the cable jacket out of the equalizer and pull the cable out of the rod.
We do the same with the other wheel.
We assemble in reverse order.
Replacement results
After assembly, you should check that the cable has been replaced correctly.
- Raise the rear of the car using a jack, or drive it into a viewing hole;
- Lower the lever all the way down;
- Loosen the lock nut and tighten the adjusting nut until the cable is tensioned;
- Check the clicks, the norm is from 2 to 5;
- For reliability, tighten the lock nut, holding the adjusting nut from turning.
We check the operation of the handbrake: put the car on the handbrake and rotate the wheels. The rotation should be uniform and without friction.
To be more confident, choose a steep hill (with an approximate slope of at least 25%) and put the car on the handbrake. Costs? This means the replacement was done correctly.
Source
Aspects indicating the need to adjust the handbrake
There are several ways that will help any car owner, without exception, to help with the question of whether it is advisable to adjust the handbrake. It is worth noting that there is no need to check the handbrake every day; it is important to pay attention to this detail every 30 thousand kilometers.
To find out whether the handbrake needs to be adjusted, you need to park your car on a slight slope, then leave the car on the handbrake and put the gear in neutral. If the vehicle slowly but surely begins to move down an incline, then the vehicle's parking brake may not be working properly.
Replacing the handbrake cable on a VAZ 2110, VAZ 2111, VAZ 2112
Welcome! The handbrake cable - over time it stretches and becomes unusable, and sometimes it even happens that it breaks (In fact, everything depends on its quality, some cables sometimes don’t even stretch at all), all these problems associated with the cable cause a lot of inconvenience , it all starts with the fact that the car simply cannot be put on the handbrake, or it will hold the car, but very, very weakly, so to avoid such inconveniences, the cable must be replaced from time to time with a new one, this is not difficult to do and you can do it yourself You don’t even need to go to services.
Note! To carry out work on replacing the cable, we recommend that it be convenient to work: Firstly, drive the car into the inspection hole and secondly, stock up on a wrench and sockets for it, if you do not have such an opportunity, then stock up on ordinary keys, such as sockets and wrenches !
Summary:
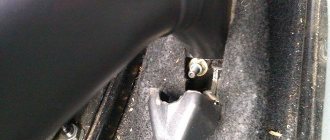
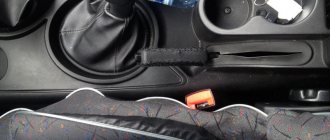
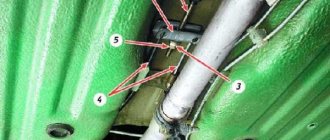
Where is the handbrake cable located? It passes under the bottom of the car, in order to understand its location in more detail, first you will need to look at the handbrake (Indicated by a red arrow in the large photo), next to it there is a bracket, it is also indicated by a blue arrow, and so under the bottom the cable is located in exactly the same place , in general there are only three cables and the last two must be replaced as an assembly (in a pair), the first cable is the one that comes from the handbrake (Small cable, see small photo), the second two are those that are connected to the bracket, the bracket is also shown in the small photo and indicated by a blue arrow.
When do you need to change the handbrake cable? It can rust from old age, or if you don’t use it, exactly the same situation will happen, in connection with this, it will begin to move into the shell with great difficulty, will jam and may even not really hold the car, except for this problem, the cable needs to be changed when it gets loose (You can understand this by looking at it) or it has become very stretched (If the cable cannot be adjusted even by adjustment, then it has become very stretched; how to adjust the cable, read in the same article below).
Why won't the handbrake hold?
The handbrake or handbrake is just a scourge on our VAZs. Very often it turns out that you lift the handle of this brake, but nothing happens - that is, the car rolls.
When undergoing a technical inspection, there is a golden rule:
If the car stops after three clicks, it means the handbrake is working and you can issue the coveted ticket. But if it doesn’t hold well with 4 or more clicks, then the performance is at a low level, or it doesn’t exist at all!
Faulty cars are sent to be repaired or the handbrake tightened, without it there is no way.
How to replace the handbrake cable on a VAZ 2110-VAZ 2112?
Note! Immediately before starting work, remove both rear brake drums from the car, because the ends of the cable are attached to the brake pads, and without removing the drum you will not get to the pads (For information on how to remove it, read the article: “Replacing brake pads at ten")!
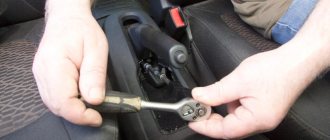
Removal: 1) First, crawl under the car and, using two keys, in the place indicated by the red arrow, loosen the lock nut (There are two nuts in that place, both of them are locked, the first nut, which is closer to the bracket, is an adjusting one, the second the same is the lock nut, thanks to them, by the way, you can adjust the cable, this is done here’s how: the lock nut is loosened and the adjusting one rotates in the desired direction, thereby the bracket begins to move and the cable is adjusted, finally the lock nut locks the adjusting nut again and thereby the cable is adjusted) and after which you can unscrew both of them, when the nuts are in your hands, move the bracket back and the main cable (It is also called a rod) will come out of the bracket (see small photo).
Note! After the operation has been completed, remove both ends of the cable from the bracket, one is shown with an arrow for clarity, and as soon as they are removed, put the bracket aside so that it does not interfere with further work on replacing the cable!
2) Now, using two screwdrivers or you can just stock up on one, remove the ends of the cable from the hooks of the levers, for more details in the photo below, see all the information, in a nutshell, the ends (One of the ends is indicated by a blue arrow) are connected to the hooks and these are needed and remove (one end for each wheel) to release the cable ends in some other places.
How to replace the handbrake cable on a VAZ 2110-VAZ 2112?
Note! Immediately before starting work, remove both rear brake drums from the car, because the ends of the cable are attached to the brake pads, and without removing the drum you will not get to the pads (For information on how to remove it, read the article: “Replacing brake pads at ten")!
Removal: 1) First, crawl under the car and, using two keys, in the place indicated by the red arrow, loosen the lock nut (There are two nuts in that place, both of them are locked, the first nut, which is closer to the bracket, is an adjusting one, the second the same is the lock nut, thanks to them, by the way, you can adjust the cable, this is done here’s how: the lock nut is loosened and the adjusting one rotates in the desired direction, thereby the bracket begins to move and the cable is adjusted, finally the lock nut locks the adjusting nut again and thereby the cable is adjusted) and after which you can unscrew both of them, when the nuts are in your hands, move the bracket back and the main cable (It is also called a rod) will come out of the bracket (see small photo).
Note! After the operation has been completed, remove both ends of the cable from the bracket, one is shown with an arrow for clarity, and as soon as they are removed, put the bracket aside so that it does not interfere with further work on replacing the cable!
2) Now, using two screwdrivers or you can just stock up on one, remove the ends of the cable from the hooks of the levers, for more details in the photo below, see all the information, in a nutshell, the ends (One of the ends is indicated by a blue arrow) are connected to the hooks and these are needed and remove (one end for each wheel) to release the cable ends in some other places.
3) Well, finally, remove the shells of both cables from the second bracket, and also unscrew two nuts (One for each bracket), remove the additional brackets from the levers (see small photo below) and then completely remove both cables from car, but just keep in mind that they go criss-cross, so when reinstalling, don’t forget this and be sure to take it into account.
Installation: Installation of both cables is carried out in the reverse order; be sure to connect all removed brackets in their places so that the cables do not dangle or touch anything unnecessary.
Additional video: You can see the process of replacing the cable in more detail in the video located just below; in addition, it also explains the procedure for replacing the handle itself, you may need this too.
Replacing the cable
Replacement should be carried out in the following cases:
- Two or more cable strands are broken.
- There is wear on the tips.
- The cable is difficult to move in the casing.
Tool
The following tools will be required:
- The key is "10".
- Powerful screwdriver.
- The key is "13".
- Mount.
Work algorithm
Replacement work is carried out as follows:
- Release the lever all the way down.
- Remove the muffler.
- Unscrew the equalizer nuts on the adjusting unit.
Unscrew the nuts and remove the distributor.
We remove the drums, unhook the cable from the lever and remove it from the brake shield.
To make it easier to carry out such work, it is recommended to do it together. One will pull back and the other will unscrew the nuts.
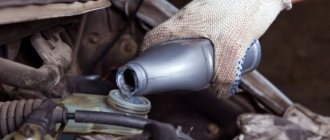
- After dismantling the cable, all attachment points to the body and threaded connections will need to be lubricated and cleaned of rust . It is also important to clean the passages of the casing in the mounts on the body. You can use vinegar for this, which eats away rust. All work must be carried out wearing protective equipment to avoid injury.
- After this, you need to purchase a new set of spacers in the brake drums from the store . If necessary, the pads should also be replaced. Installing the cable is carried out in the reverse order.
Causes of malfunction
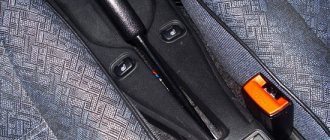
Handbrake lever VAZ 2110 in a leather case
Let's consider the principle of operation of the parking brake (handbrake) on a VAZ 2110 car.
It's pretty simple. One of its main elements is a special cable. When the driver pulls the parking brake handle, this cable is tensioned, which evenly distributes its effect on the brake pads of each wheel of the car. During operation, the rear brake pad linings wear out, the cable stretches, and as a result, there is a need to adjust or repair the handbrake. Also, very often drivers, especially beginners, drive with the handbrake raised, which leads to premature wear of the handbrake cable. If the driver does not carry out preventive maintenance or repair of this mechanism in a timely manner, the car may independently start moving from a standstill or will slow down, even stopping, on an uphill slope.
External view of the parking brake cable on a VAZ 2110 car
You can adjust the handbrake not only in a car service center, but also with your own hands at home. But first you need to familiarize yourself with the manual parking brake diagram in order to know its main elements for setting up this system.
Handbrake diagram for VAZ 2110
In this diagram the following elements are indicated by numbers:
1 - button that fixes the handbrake lever; 2 — hand brake lever; 3 — protective cover; 4 — handbrake rod; 5 — cable equalizer; 6 — adjusting nut; 7 - lock nut; 8 - cable; 9 — protective sheath of the cable
Main causes of failure
The main reason why such an important device may break and need to be replaced is mechanical wear of the handbrake. As you know, the basis of the system is a small cable that transmits forces from the lever to the mechanism
It actually turns on this node.
The operating conditions of the cable are quite complex - the constant load from the force that the driver transmits through the handbrake lever to the system, sooner or later, can damage the device.
However, the cable breaks extremely rarely - most often, the cables simply jump off. Or the tips fixed in the drum are ground with very long wheel bolts. Needs renovation. Also, the parking brake may not work due to wear on the rear drum brakes (as well as abrasion of the pads, depending on the design).
As a result, the unit ceases to perform the functions assigned to it - the handbrake simply does not hold. The parking brake needs to be replaced and subsequently adjusted. But not everything is so simple - in some cases, the device can be damaged during emergency braking of the car - as a result, it will require repair or replacement.
Often the metal is not completely ground, but the steel fibers are stretched and moving in the shell is very difficult
But it doesn’t matter what the reason for the parking brake failure is, why it doesn’t hold. The purpose of our article is to figure out how to solve the problem
Replacement
There is one important condition - you will need an assistant. His task will be to pull the cable tightly, which will allow the equalizer to be installed correctly.
The sequence of work to replace the cable is as follows:
- Lower the handbrake lever as far as possible;
- Remove the brake disc from the wheel where the element is being replaced;
- Remove the muffler from the suspension cushions and the resonator from the rear suspension;
- Lower the exhaust system down;
- Remove the adjusting nut and locknut;
- Remove the equalizer;
- Now remove the cable ends from the equalizer;
- Remove the tip of the equalizer shell from the bracket, which is located on the car body;
- Bend back the brackets that secure the cable;
- Remove the rear brake pad and remove the cable end from the lever;
- Slightly loosen the nut that secures the cable holder to the rear axle;
- Remove the cable from the holder, then from the bracket, and then pull it out through the brake spike;
- Place a new cable in its new location and perform the assembly procedure, following the reverse order of the indicated processes;
- Make sure that the cables in the bracket are positioned crosswise;
- After completing the installation of the new element, adjust the handbrake.
First adjustment steps
To begin adjusting the handbrake, you need to make sure that one of three elements is present and accessible: a lift, an inspection hole or an overpass.
An overpass is a type of engineering structure that is intended to lay a road or communications above the ground.
Homemade overpass for adjusting the handbrake on a VAZ 2110
At home, most often only the inspection hole is accessible. If you cannot take advantage of any of the above conditions, then you can make do with a kind of support trestles, which are a rigid structure installed under the rear part of the body after it has been lifted with a jack. In addition, you need to prepare two wrenches size “13”, as well as pliers.
- lower the parking brake lever to its lowest position;
One of the adjustment stages is to lower the handbrake lever
- using one key set to “13” you need to loosen the lock nut, while holding the adjusting nut with the second key;
Loosen the locknut and loosen the adjusting nut
That's not all, as there are a few steps left to complete the complete handbrake setup.
Adjustment
Replacing the hand brake cable on a VAZ 2110
The parking brake must be adjusted according to the instructions for the vehicle. The handbrake lever travel is within:
- when adjusting 2-4 clicks;
- in working condition from 2 to 8 clicks.
You need to put the already assembled car on jacks, spin the rear wheels one by one, they should rotate freely.
Note: check the operation of the rear brake system while driving. Drive a short distance, applying the brakes several times. Stop and try the rear drum with your hand. The temperature of the drum must be consistent with the environment. If the drums get hotter, then release the cable tension. After an hour we check again.
You can check the operation of the parking brake yourself by selecting a slope of 1:4 (1 m height, 4 m length). Turn off the engine, set the parking brake, turn off the speed or depress the clutch. The car must remain in a calm state. If necessary, tighten the cable. The handbrake cable can be replaced at a car service center. Specialists will carry out such repairs in a short time, within 4-5 hours. Since many car enthusiasts do not always have free time to carry out this category of activities. But the price of such repairs will not be too cheap. Qualified specialists, using special tools and equipment, will quickly and efficiently complete such work, but you can also do it yourself. It is enough to follow the instructions, watch the corresponding video and photo materials, and also prepare the necessary tool.
How much does it cost to tighten the handbrake and can you do it yourself?
Actually the question is rhetorical, as you understand in different regions, the cost can range from 200 to 1000 rubles. For example, in the capital, the price is often 500 – 1000, but in the regions you can raise it for 250 rubles.
And to be honest, the work itself only takes a few minutes, the main thing is to find a hole or a lift, a key of 10 and off you go. You need to tighten the middle bolt, the one that is in the middle, it is the handbrake, tighten the nut and thereby tighten the cables.
Of course, if they are rusty or torn, then everything is much more complicated; it is better to trust the master, because replacing the cables from the rear drums is not at all an easy task.
That's all, read our AUTOBLOG, I think it clarified the situation.
Didn't find the information you are looking for? on our forum.
If you find an error, please select a piece of text and press Ctrl+Enter.
We recommend reading:
Exhaust for VAZ 2110 8 valvesVAZ 2109 consumption per 100 kmThe bridge of the VAZ 2107 is buzzing how to fix itFuel system of the VAZ 21083 injectorVAZ 2104 fuel consumption per 100 km, injectorWhere is the starter relay on the VAZ 2107Error 0340 VAZ 2114 8 valvesHow much oil is in the VAZ 2110
Similar articles
What kind of oil to pour into the VAZ 2115 engine? Choosing oil for the VAZ 2110 VAZ color chart, codes, names, descriptions VAZ error codes - table with a list of all errors
If the handbrake on a VAZ-2112 becomes difficult to hold, then you should not change it immediately, since the cable can be adjusted. If the mileage on the car is high, the rear pads on the car may wear out. This may reduce the effectiveness of the handbrake and the entire braking system. In this case, the handbrake cable will need to be tightened.
Final Setup Steps
- continue rotating the adjusting nut until we are sure that the brake lever has a full stroke of approximately 3 clicks (this operation is convenient to perform with two people - one person rotates the nut, and the second checks the handbrake);
- after checking the working stroke, you need to tighten the locknut while holding the adjusting nut with a wrench;
- now you need to check whether the handbrake cable is not too tight: the parking brake lever goes down, the rear wheels are jacked up and turned by hand - they should rotate evenly, without delays;
- if the lever travel is still large, then we continue to tighten the adjusting nut (or unscrew it if the cable is too tight) and regularly check the handbrake travel until it reaches 3 clicks and the brake pads do not interfere with the rotation of the wheels.
After adjusting the system, you should check its operation. To do this, the driver needs to place his car on a section of the road with a slope of 23% and raise the parking brake lever. If the car is securely fixed on the road and does not move, this means that the work was carried out correctly.
Modernization
Many modern owners modernize their cars and install so-called hydraulic handbrake here. As a lyrical digression, we note that in this case it is necessary to replace the rear brakes with disc brakes without fail.
Very serious design changes are required - such as installing a hydraulic system in the parking brake. No cables are used here - the parking brake lever is connected to the master cylinder.
After the driver lifts the lever, the brake fluid in the system presses on the cylinders. Most often, hydraulic systems can be found on sports cars - after all, such a brake holds much better.
The main advantages that the hydro system gives:
- Full confidence that the hydraulic handbrake will work;
- There is no need to tighten the cable.
There are some disadvantages:
Sources
- https://masteravaza.ru/tormoza/ruchnoj-tormoz/vaz-2110-zamena-trosa-ruchnika-597
- https://masteravaza.ru/tormoza/ruchnoj-tormoz/vaz-2110-regulirovka-ruchnika-600
- https://vazweb.ru/desyatka/tormoza/zamena-trosa-ruchnika.html
How to remove and adjust the VAZ-2110 parking brake components
We install the car on an inspection ditch or a lift. Removing the parking brake cable is shown using the example of the right cable.
Lower the parking brake lever to its lowest position.
We remove the manual brake pad drive lever from the cable end (see Replacing rear brake pads).
1. Using a 10mm wrench, unscrew the nut of the bracket securing the cable sheath to the rear suspension beam.
2. Remove the cable fastening bracket.
3. Remove the cable sheath from the holder.
4. Use a screwdriver to bend the three brackets securing the cable sheath to the body.
We remove the cable from the brake mechanism shield.
5. Using a wrench and a high 13mm socket, unscrew the locknut and the rod adjusting nut.
6. Remove the cable tip from the equalizer slot.
7. Remove the end of the cable sheath from the bracket.
Similarly, remove the left parking brake cable. Its dismantling (unlike the right cable) is hindered by the exhaust system.
If the handbrake cable breaks
There are cases when adjusting the parking brake alone is not enough. This happens quite rarely and mainly on older cars - the handbrake cable breaks. The cable wears out over time and is no longer able to withstand the load of the car, and at some point breaks. Sometimes a break occurs on new cars that are subjected to too intense use, for which their braking system is not designed. Most often, the cables simply jump off or the cable ends secured in the drums are chafed by the wheel bolts; this also happens simply due to wear of the rear drum brakes.
The cable should be changed not only as a last resort when it breaks, but also as a preventive measure for its subsequent breakage in the following cases:
- the handbrake cable moves with difficulty in the sheath even after it is lubricated;
- the cable ends are loose (you have to regularly tighten the cable);
- the cable threads began to stretch, which will ultimately lead to its breakage.
What to do if there is no result
Sometimes motorists are faced with situations in which tightening the cable does not improve the quality of the handbrake. In this case, it is necessary to deal directly with the brakes. The main culprit is the brake pads. They can:
- wear out;
- “get stiff” and not respond to handbrake commands.
Installing new brake pads will help achieve normal results. Experts recommend dismantling the brake drums and checking the movement of the brake pads. If they don't move, it means they're stiff. If there is still movement, the problem must be looked for in other nodes. The primary culprit may be a stretched handbrake cable. If all else fails, it is best to turn to professionals.
If the adjustment does not help
There are not many cases when adjusting the parking brake did not have any effect. However, this is no reason to despair.
Device diagram
There are several situations in which it is necessary to replace the parking brake cable:
- The cable broke;
- The tips gave way;
- The cable threads have stretches, which over time can turn into a full-fledged rupture;
- The cable is difficult to move inside the sheath even after abundant lubrication.
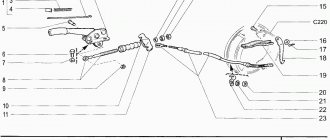
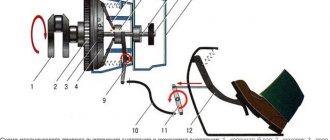
Handbrake diagram for VAZ-2112
1 - button that fixes the handbrake lever; 2 — hand brake lever; 3 — protective cover; 4 — handbrake rod; 5 — cable equalizer; 6 — adjusting nut; 7 - lock nut; 8 - cable; 9 — protective sheath of the cable.
In this circuit we need element number 6 . It is he, and only him!
What is required for adjustment?
In order to adjust the handbrake you need a platform or lift. If there are no such devices, then you can simply hang the rear wheels on the “goats”. They can be installed under the car using a jack. It’s also worth taking two “13” keys and pliers.
- The car is installed on an overpass or “goats”.
- The lever position is set to the lowest possible position.
- Use a wrench to loosen the locknut.
- The second wrench holds the adjusting nut.
- The adjusting nut should be tightened until the cable is tensioned. It must be remembered that the rod should be held with pliers when tensioning the cable.
- After this, you should make sure that the full stroke of the handbrake lever is no more than 4 and no less than 2 clicks.
- When the stroke check is completed, the locknut is tightened. The adjustment is held with another key.
- If necessary, change the mechanism to a new one.
- After releasing the adjusted lever down, you should spin the rear wheels. When the lever is in its lowest position, the wheels should spin freely.
If you cannot tighten the cable, then it should be replaced with a new one.
Adjusting the handbrake after tensioning
After adjusting the brakes, you need to check them again. To do this, the car should be placed on a road with a slope of at least 23% . The car should be in neutral gear in this area and with the handbrake pulled up. If the handbrake brakes hold the car in this area, then the handbrake is adjusted correctly.
What to do when adjustment does not work
There are also cases when the above actions are not enough to adjust the handbrake. This can happen, for example, when the handbrake cable is broken. This happens on the VAZ-2112, although rarely. In such situations, the cable must be replaced. The cable also needs to be replaced when:
- The tips are loose.
- The cable itself begins to stretch, which will lead to its breakage during operation.
- Physical wear (scuffs and cracks) of the handbrake cables.
- It is quite difficult for the cable to move in the casing even after lubrication.
This replacement procedure does not require contacting a service station. Although this will require some time and skills from the driver, such work can be done independently.
It should also be remembered that when replacing the cable, certain conditions must be observed. To do this, the driver will need an assistant who will pull the cable.
Why do you tighten the handbrake?
The cable acts here as a drive. If the driver pulls the handbrake lever, then at the same time he uses the cable, which spreads the pads in the rear wheel.
If the handbrake is faulty, you just need to tighten the cable or replace it with a new one. On a VAZ-2112 it’s quite easy to do this with your own hands.
Need for adjustment
You can determine that the parking brake needs adjustment when checking. It is recommended to do it every 30,000 kilometers. This procedure should be done even if the handbrake seems to be working well.
The device must also be checked in cases where it does not work. For example, a car moves when the brake lever is applied.
Pulling up the handbrake
It is likely that you just need to tighten the parking brake on the VAZ 2110 to fix the problem.
- Drive to the inspection hole, from where it is most convenient to make adjustments. Another option is a lift. You'll find something here. This way you can easily get to the necessary nodes.
- Make sure the brake lever is in its lowest position.
- Take two keys. You will loosen the lock nut first and tighten the adjusting nut second.
- Tighten the adjustment nut until the cable is properly tensioned.
- It is strongly recommended to hold the rod when tightening the adjustment nut with pliers.
- Now make sure that the lever makes full travel in 2-4 clicks, no more.
- If after checking everything turned out to be good and the working stroke is correct, tighten the equalizer locknut while holding the adjustment nut with a second wrench.
- Release the handbrake lever down and turn the rear wheels by hand. Rotation should occur evenly without any jamming.
- But if the adjustment did not allow the cable to be tensioned, then the element must be replaced.
Checking the effectiveness of the parking brake adjustment is also simple. You drive onto an area with a slope, put the car on the handbrake and watch the car’s reaction. If the car does not move in neutral, it means you have done a good job.